Game > Gamebase > Console Guide > App
Go to the NHN Cloud Cloud Console and click Game > Gamebase > App.
- App: Manage app information
- Client: Manage client version and status information
- Install URL: Manage installation URL of each app store
App
When the Gamebase service is activated, the app is automatically created and only the registered information can be edited from the menu. Since only one Gamebase app can be managed per NHN Cloud project, you cannot register additional apps or delete exiting apps. When the Gamebase service is deactivated, the information registered in the app is deleted. For more detailed information on each item, see the details below:
Basic information
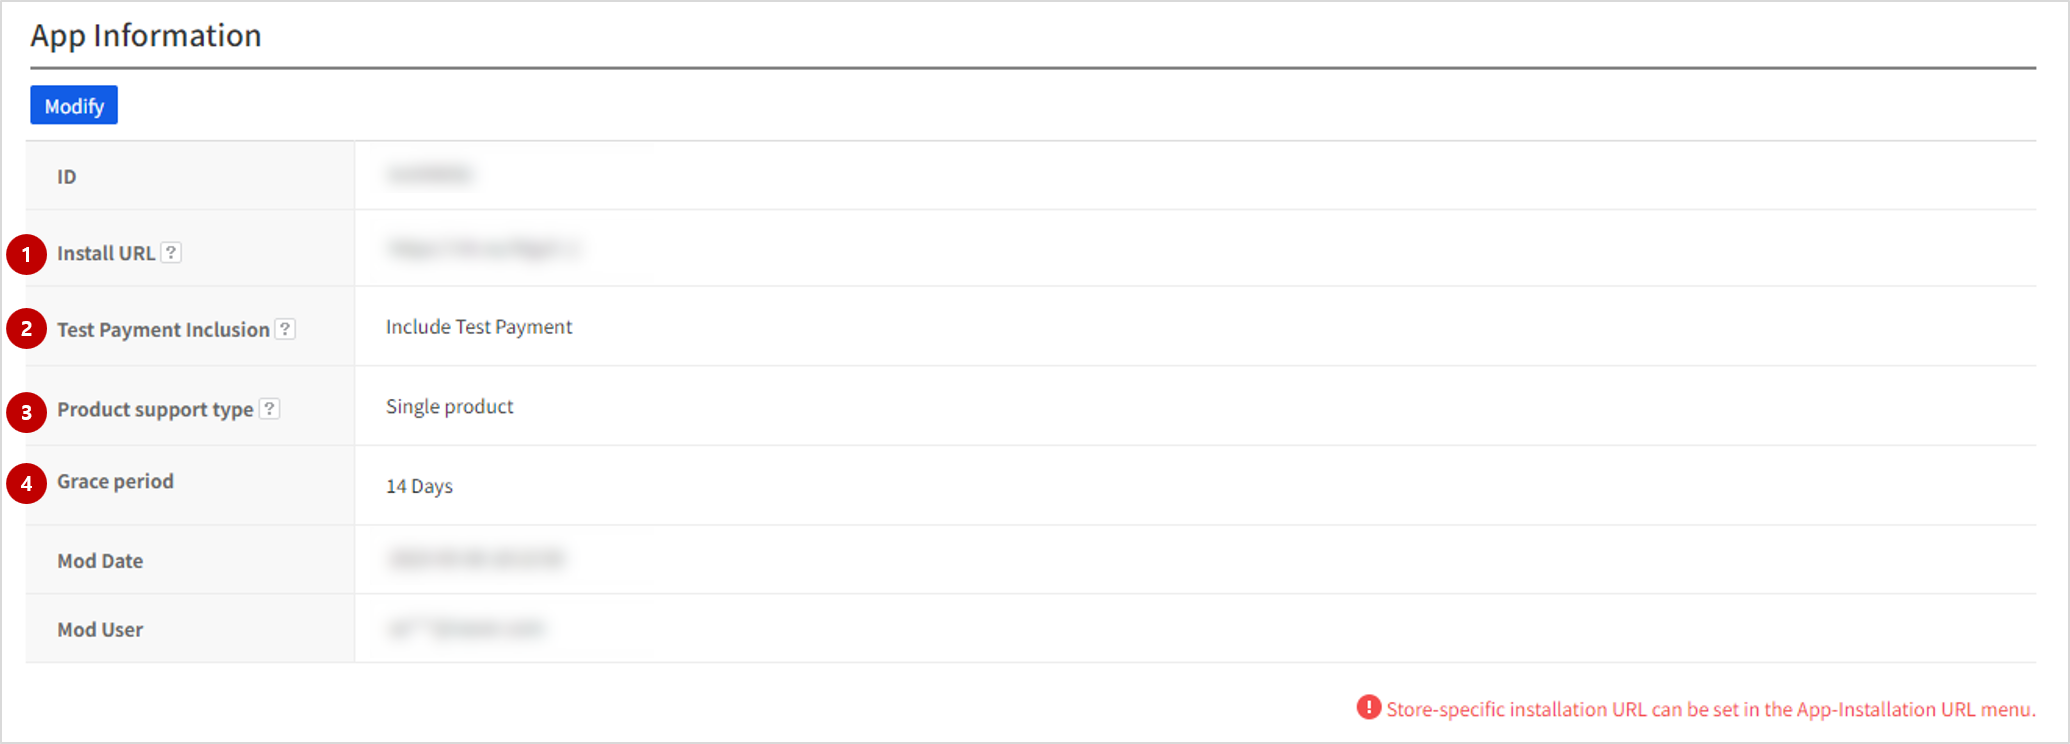
(1) Installation URL
Shortened URL information that can be used to install and promote the app. Even if there are multiple stores to which the app is deployed, you can manage them with a single URL. See the following link for more information on the operation and maintenance of this app. Manage installation URL
[Note] When Gamebase is activated, it is automatically created and cannot be changed.
(2) Whether to include test payments
Decides whether or not to include test payments in the app's indexes. "Include Test Payments" is the default option and if you set it to "Exclude Test Payments", the test payments are all excluded from the Analytics revenue indexes.
[Notes 1] Since the data always accumulate test payments and actual payments regardless of the index inclusion settings, the data collection result won't be affected whether or not test payments are displayed.
[Notes 2] For the payments that occur after setting Exclude Test Payments, the test payments are excluded from the Analytics revenue indexes.
[Note3] Test data is supported only by Google and AppStore. Other stores do not support test data. The test index standard for each store is as follows: * Google: The history of payments made by the test accounts registered with Google * AppStore: The history of payments made in the sandbox environment
(3) Period of Pending Withdrawal
Set the grace period if you want to enable the Pending Withdrawal feature. The default is 7 days and it can be anywhere between 1 and 30 days.
[Note] The services are available as usual during the grace period.
Server address
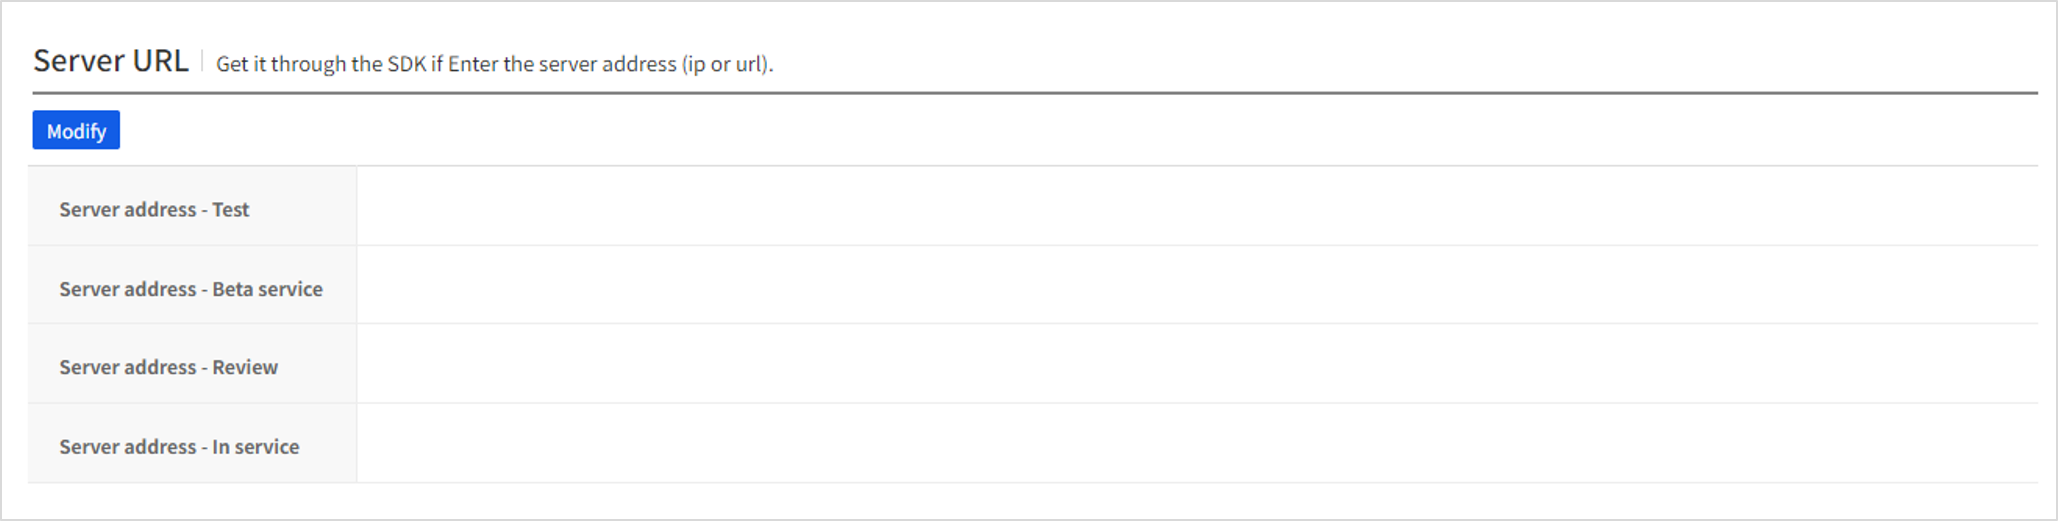
- Used when the game needs to receive the server address (e.g. IP, URL) in real time.
- If you configure the server address, you can see the entered information in Launching Information after the client is initialized.
- Server address can be configured according to the client's status and the server address can be checked in Launching Information.
- Enter information only if required by the game; otherwise, leave it empty.
Language settings
 - You can specify the default language to display in advance in the multi-language setting in each menu.
- The selected languages are displayed when displaying multiple languages and the default language is set as selected.
- If you do not want to use it, leave it empty.
- You can specify the default language to display in advance in the multi-language setting in each menu.
- The selected languages are displayed when displaying multiple languages and the default language is set as selected.
- If you do not want to use it, leave it empty.
Authentication information
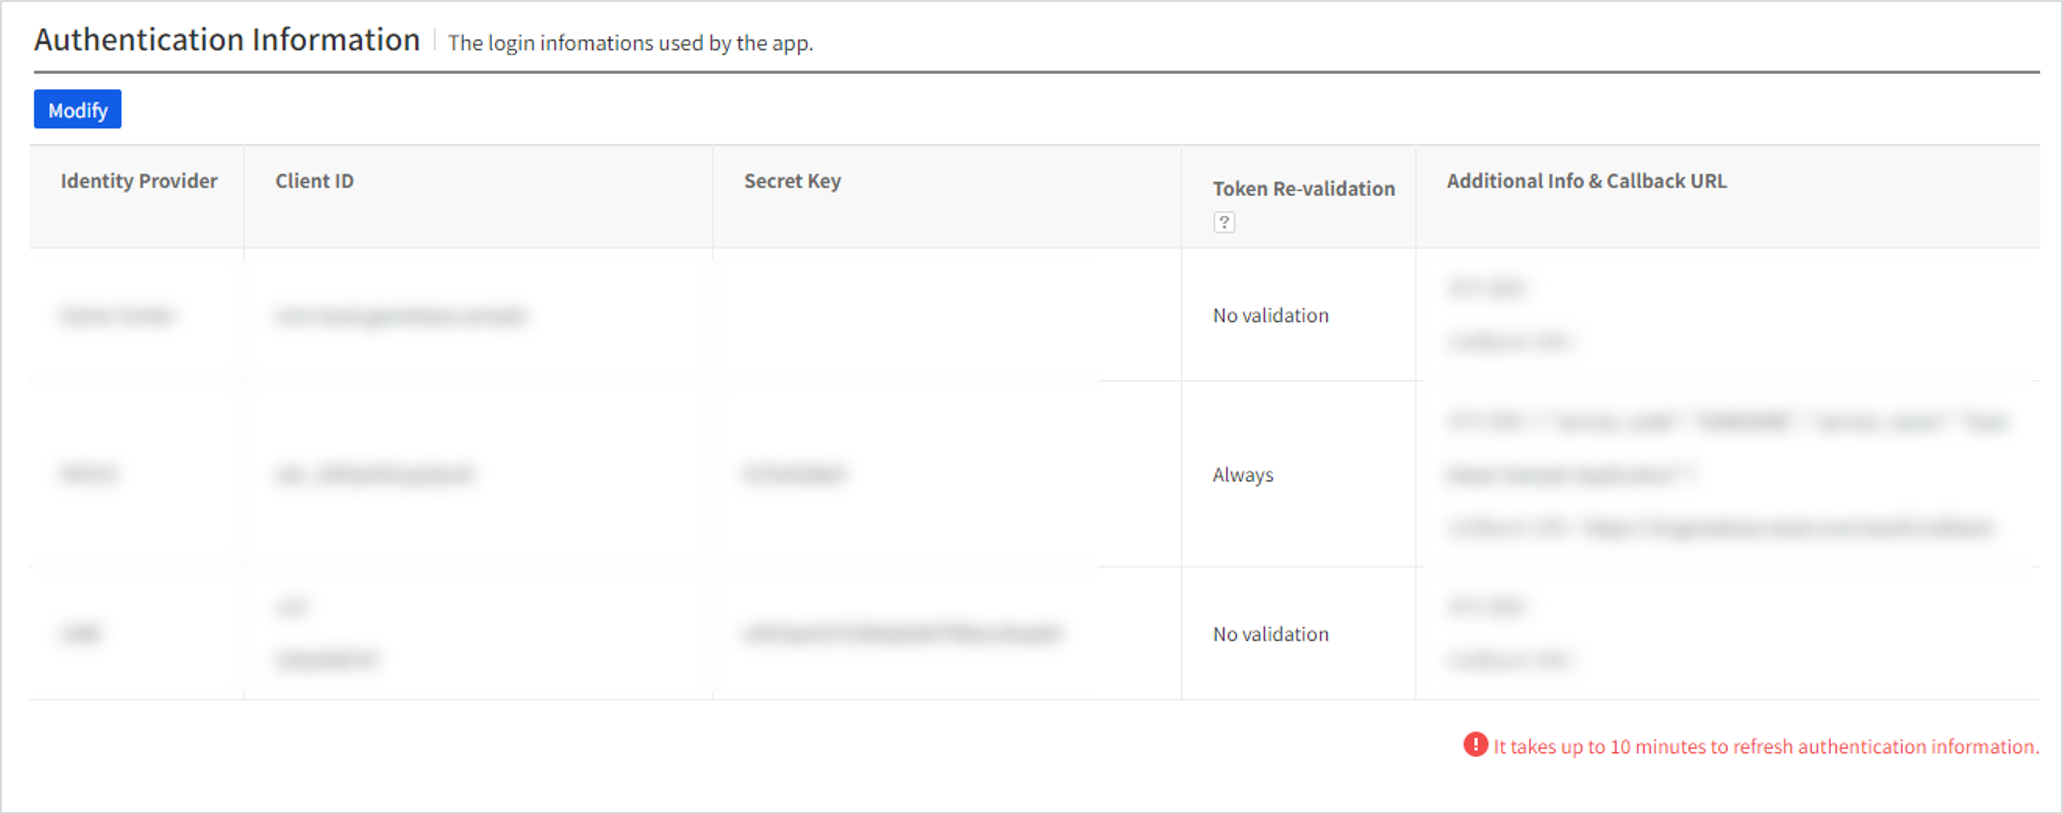
The authentication information of the IdP to be used when logging in to the app can be registered, edited, and deleted.
Not only the client ID and secret key of external authentication but also the callback URL and additional information can be configured. Click the + button next to the authentication information to add information; click the - button to delete the information. See Authentication Information for more information on configuration per IdP.
[Note] What is Token Revalidation? Sets whether the token of an external IdP needs to be revalidated when calling Latest Login API from the client. If Do Not Verify is selected, only internal tokens are validated without revalidating the token of the external IdP. If Always Verify is selected, not only the internal tokens issued by Gamebase but also external IdP tokens are validated every time.
In-app URL
 You can edit URLs frequently used in the app in real time via Console without having to redeploy the client.
- Terms and Conditions
- Consent to Collection of Personal Information
- User Ban Rules
Enter information only if required by the game; otherwise, leave it empty. The configured information can be viewed in Launching Information after the client is initialized.
Customer Center
You can perform the customer center settings. As of now, Gamebase provides 3 types of customer center formats, and the items you can configure vary depending on the type you selected. The following are the settings for each customer center type:
1. Developer's Own Customer Center
 Set this when the developer uses its own customer center.
The options to be set are as follows:
* Customer Center URL: Enter developer's own customer center address which is currently being provided or used.
* Contact: Enter the Customer Center contact information. This information will be delivered via the Gamebase SDK.
Set this when the developer uses its own customer center.
The options to be set are as follows:
* Customer Center URL: Enter developer's own customer center address which is currently being provided or used.
* Contact: Enter the Customer Center contact information. This information will be delivered via the Gamebase SDK.
2. Customer Center Provided by Gamebase
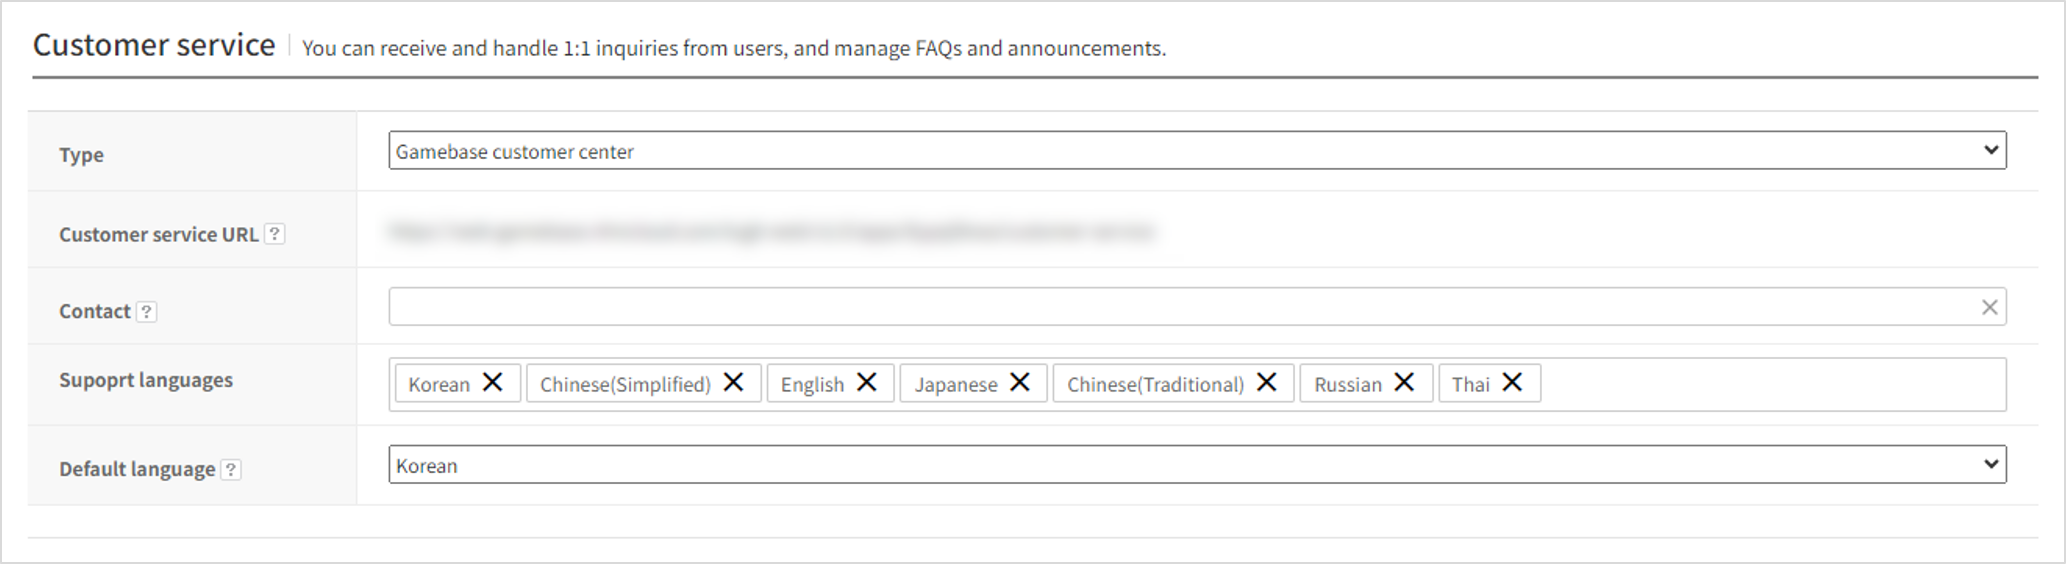 Set this when you want to use the customer center feature provided by Gamebase.
The options to be set are as follows:
* Customer Center URL: Provides the page info where you can receive customer inquiries. This URL is automatically created when selecting the Customer Center Provided by Gamebase, and you can receive the customer inquiry through a separate web page by using this URL.
* Contact: Enter the Customer Center contact information. This information will be delivered via the Gamebase SDK.
* Supported language: Select the language supported for the customer center users. It is set separately from the project language setting, and supports Korean, English, Japanese, Chinese (Simplified), Chinese (Traditional), and Russian. If the supported language you want is not available, please contact customer center.
* Default language: From the list of the selected support languages, select the default one.
Set this when you want to use the customer center feature provided by Gamebase.
The options to be set are as follows:
* Customer Center URL: Provides the page info where you can receive customer inquiries. This URL is automatically created when selecting the Customer Center Provided by Gamebase, and you can receive the customer inquiry through a separate web page by using this URL.
* Contact: Enter the Customer Center contact information. This information will be delivered via the Gamebase SDK.
* Supported language: Select the language supported for the customer center users. It is set separately from the project language setting, and supports Korean, English, Japanese, Chinese (Simplified), Chinese (Traditional), and Russian. If the supported language you want is not available, please contact customer center.
* Default language: From the list of the selected support languages, select the default one.
3. NHN Cloud organization product (Online Contact)
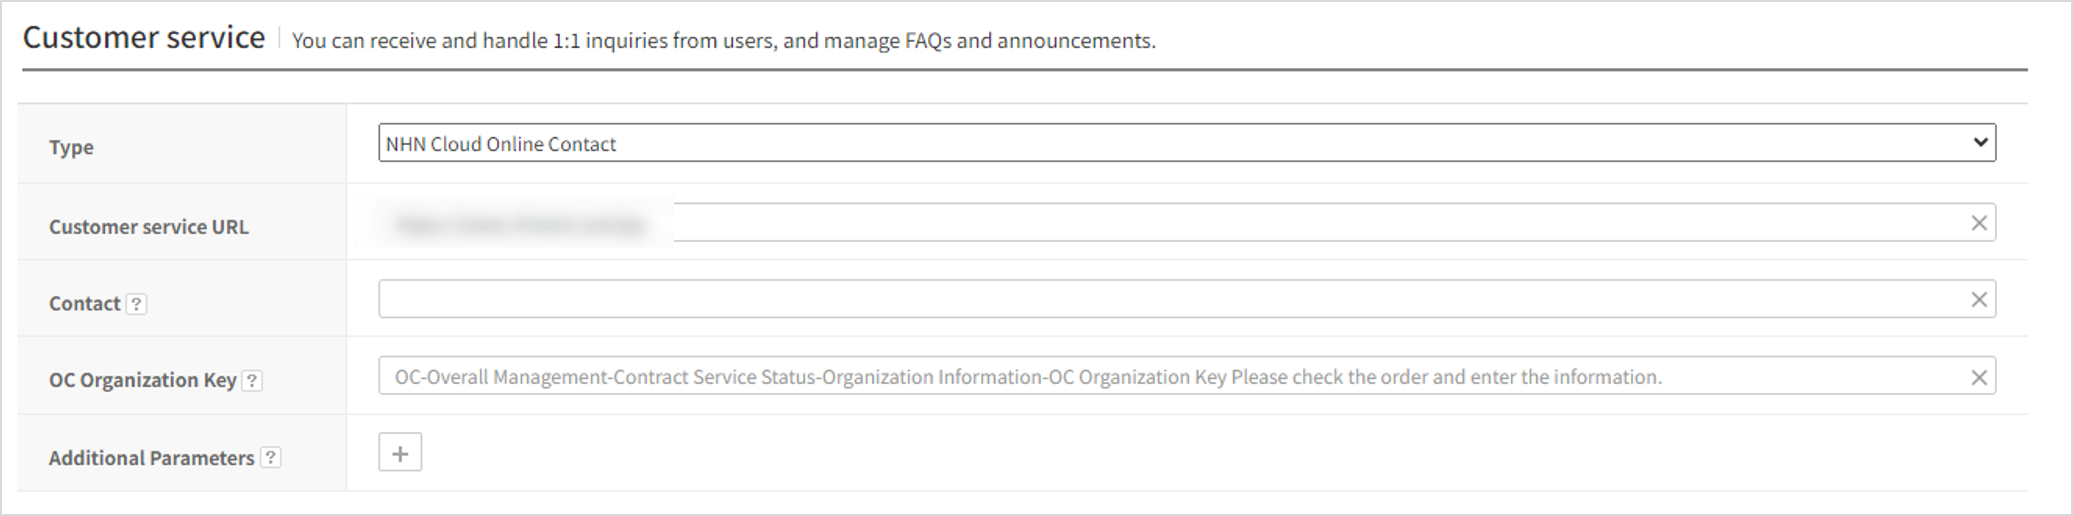 Set this to use online contact products provided by each organization within NHN Cloud.
The options to be set are as follows:
* Customer Center URL: Enter the address provided by NHN Cloud Online Contact. You can see this info by accessing the NHN Cloud Online Contact
* Contact: Enter the customer center contact information. Additional information can be received through the Gamebase SDK.
* OC organization Key: Enter the key for checking the NHN Cloud Online Contact Customer Center inquiries. If you do not enter this info, you cannot find the inquiries received within the customer center page. To find out how to link it, see the following section:
Set this to use online contact products provided by each organization within NHN Cloud.
The options to be set are as follows:
* Customer Center URL: Enter the address provided by NHN Cloud Online Contact. You can see this info by accessing the NHN Cloud Online Contact
* Contact: Enter the customer center contact information. Additional information can be received through the Gamebase SDK.
* OC organization Key: Enter the key for checking the NHN Cloud Online Contact Customer Center inquiries. If you do not enter this info, you cannot find the inquiries received within the customer center page. To find out how to link it, see the following section:
[Note] Linking NHN Cloud Online Contact to Gamebase For linking NHN Cloud Online Contact within Gamebase, you must follow the following procedure to acquire the SSO login API Key and set it within the Gamebase in order to use the customer center service properly. For the customer center to provide stable service, please follow the below steps in the correct order:
1) Set the method of linking members to the NHN Cloud Online Contact Service Management -> Help Center -> Link Member
Enable member linking: Enable Login type: GET method Token validation URL: https://web-gamebase.nhncloud.com/tcgb-web/v1.0/apps/{appId}/online-contact/login-status For the {appId} field, check the project ID of Gamebase and enter it in the field.
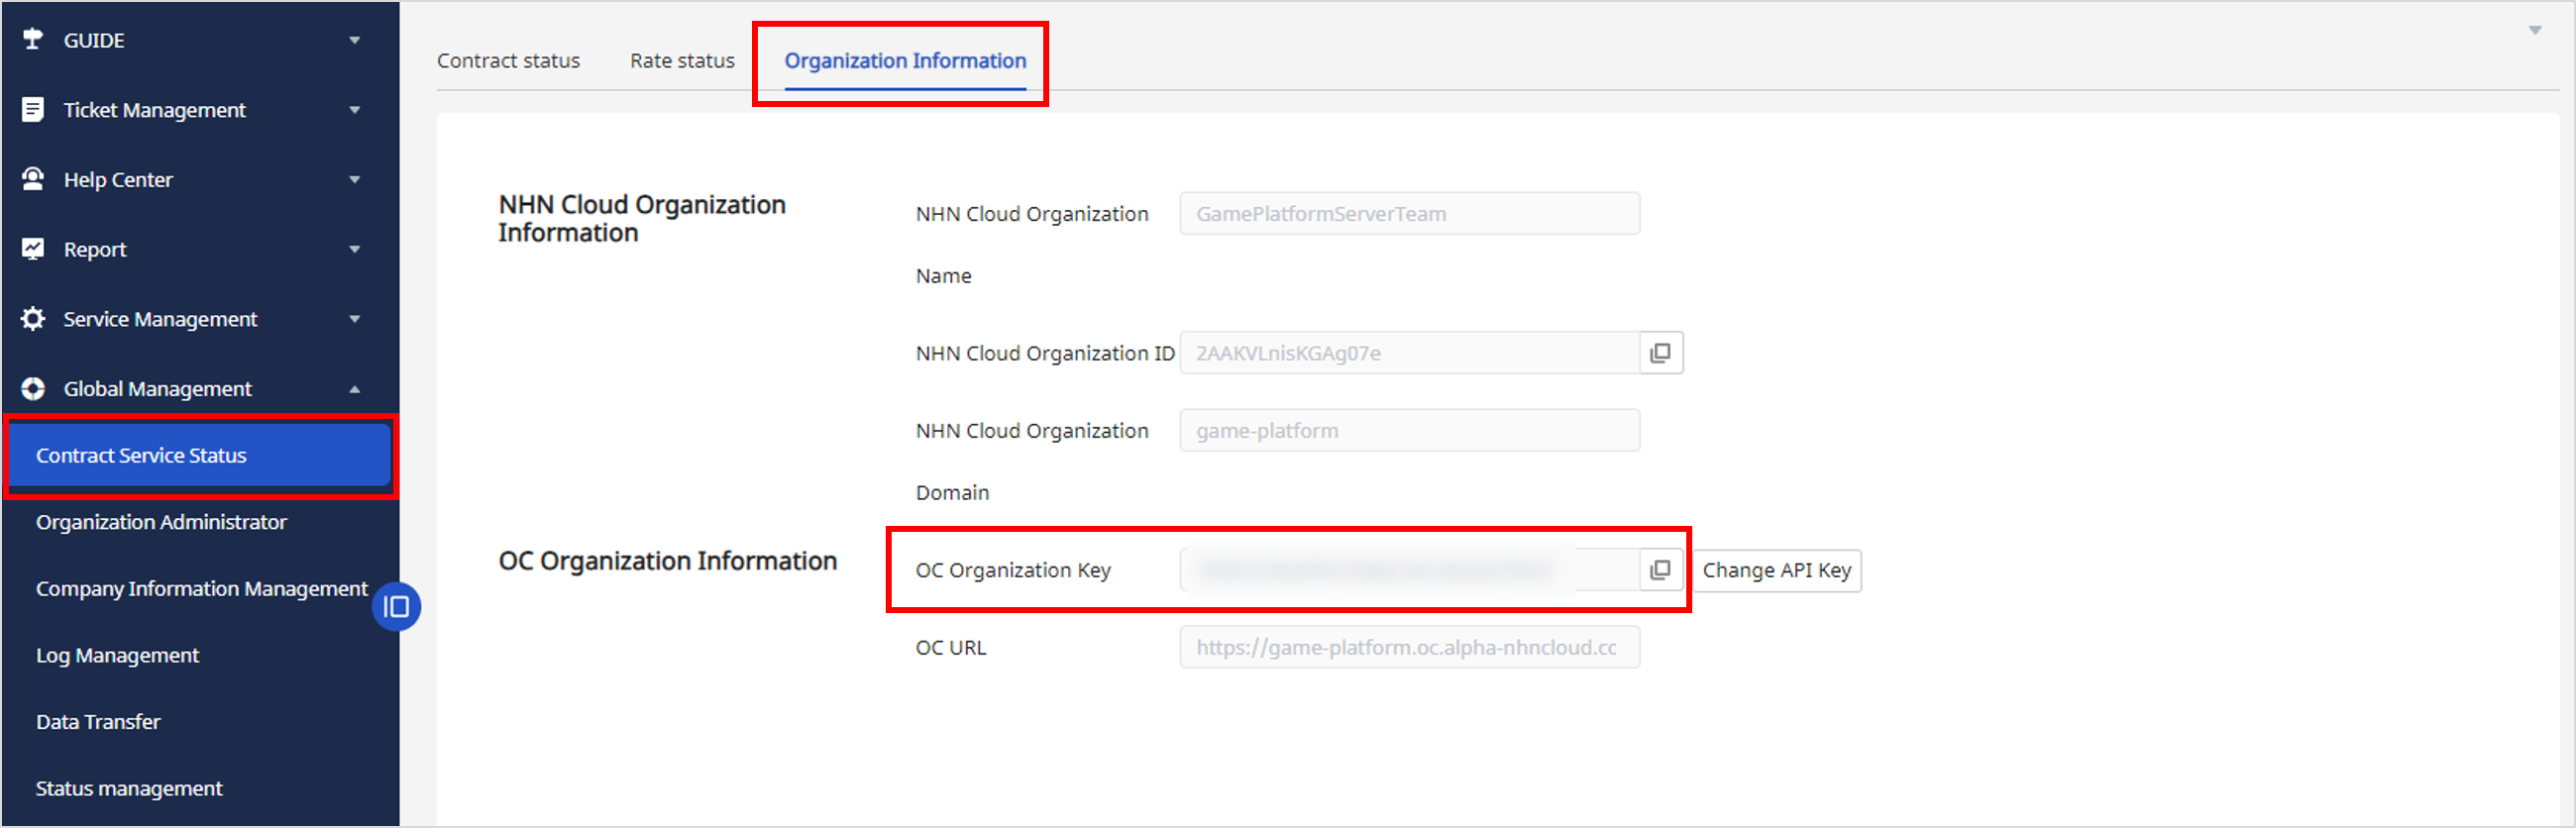
2) Acquire the OC organization Key and enter it in the OC organization Key field. Full Administration -> Contract service status -> Go to the organization info, copy the OC organization key of the OC organization info, and then enter it in the Gamebase OC organization Key field
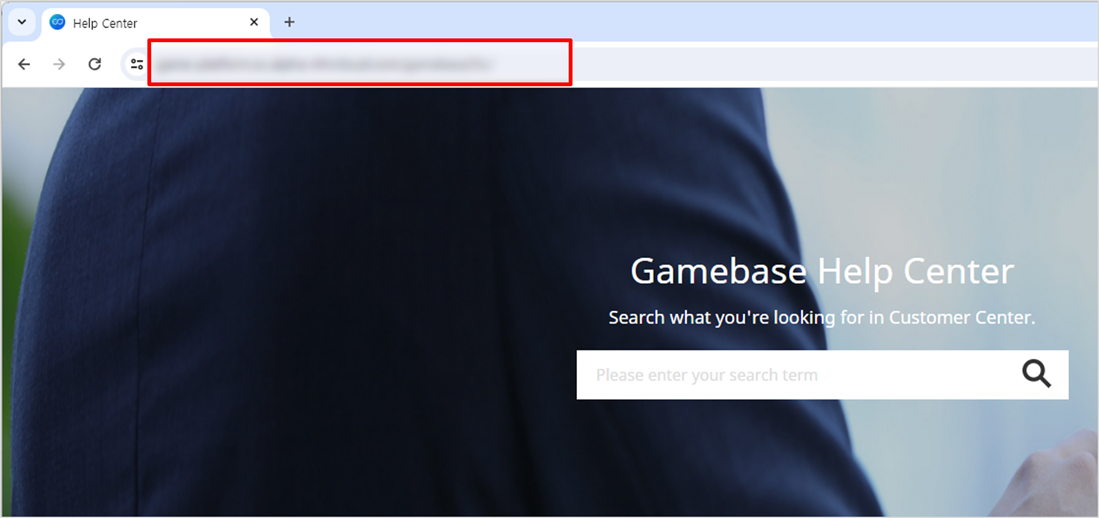
3) Acquire the NHN Cloud Online Contact Customer Center site address, and enter it in the Customer Center URL field Help Center -> Select the submenu -> Click the shortcut for help center at the top right
Enter the address shown at the top of the browser in the Gamebase Customer Center URL field
Test Device
 If it is registered as a test device, it can access the game as usual even when the app running Gamebase is under maintenance.
You need to register Device Key or IP information to register a test device. You can register it by directly entering the information or retrieving Game User ID.
Test devices can be managed by allowing them to be able to access the game even when it is under maintenance or configuring whether to display the debug log on each device.
You can also delete test devices that you don't use anymore.
Click the Access History button to check Connected Time and Detailed Connection Log during Maintenance via the device.
If it is registered as a test device, it can access the game as usual even when the app running Gamebase is under maintenance.
You need to register Device Key or IP information to register a test device. You can register it by directly entering the information or retrieving Game User ID.
Test devices can be managed by allowing them to be able to access the game even when it is under maintenance or configuring whether to display the debug log on each device.
You can also delete test devices that you don't use anymore.
Click the Access History button to check Connected Time and Detailed Connection Log during Maintenance via the device.
[Note] Up to 100 test devices can be registered.
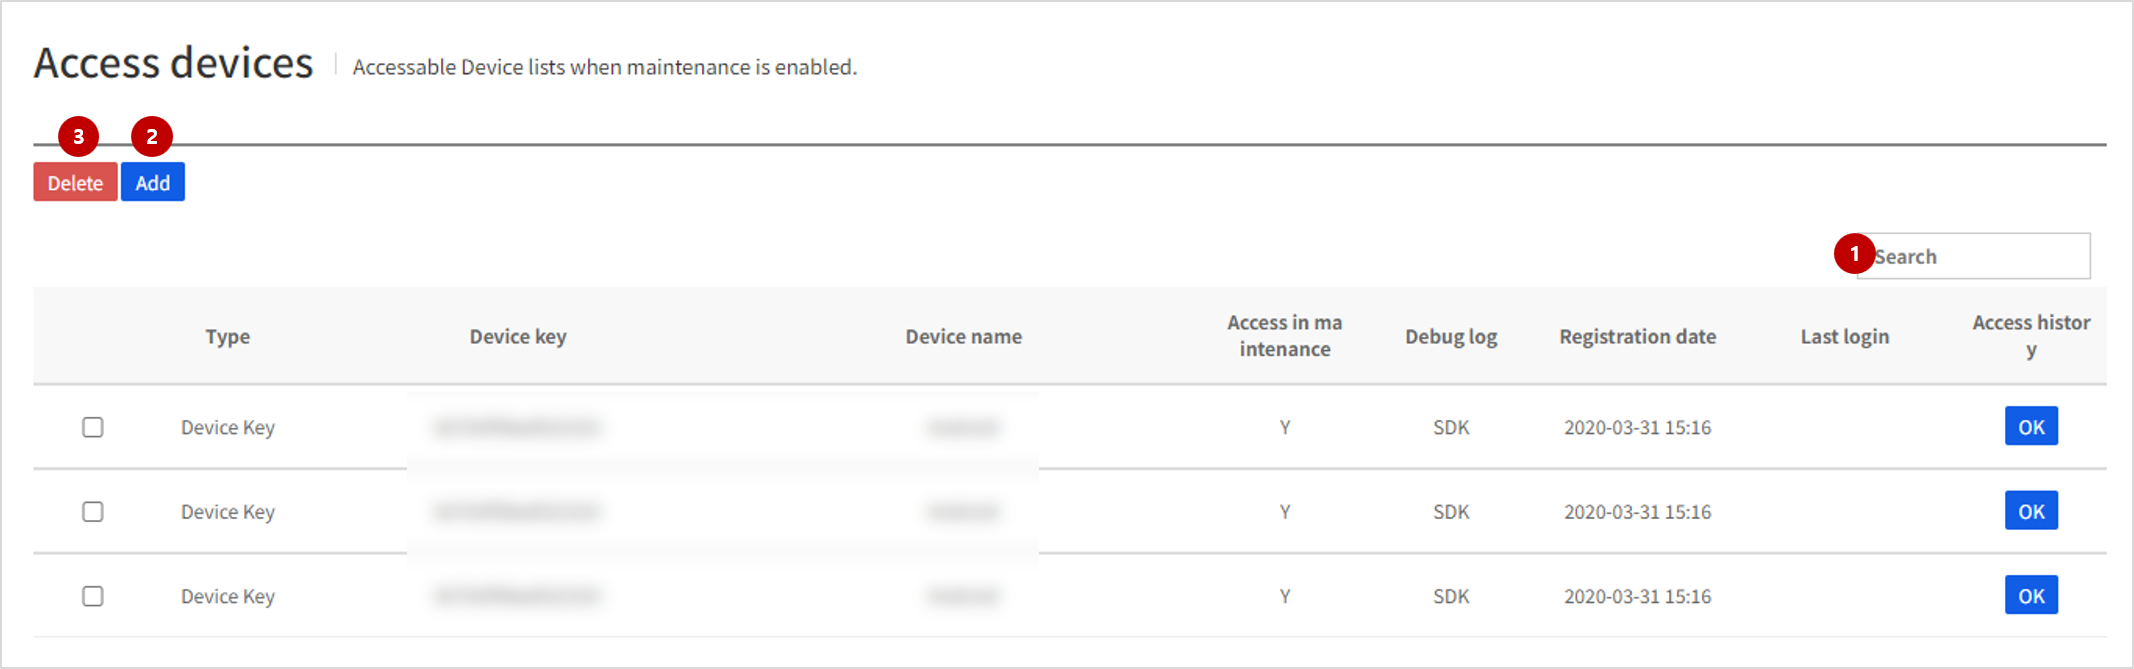
(1) Search
Can check all test devices registered with the app. Enter a keyword in the Search field to easily find test devices that match the keyword.
(2) Register
Click the Register button on the Search screen to access the screen where test devices can be registered. Manually enter Device Key or search for Game User ID and register a test device.
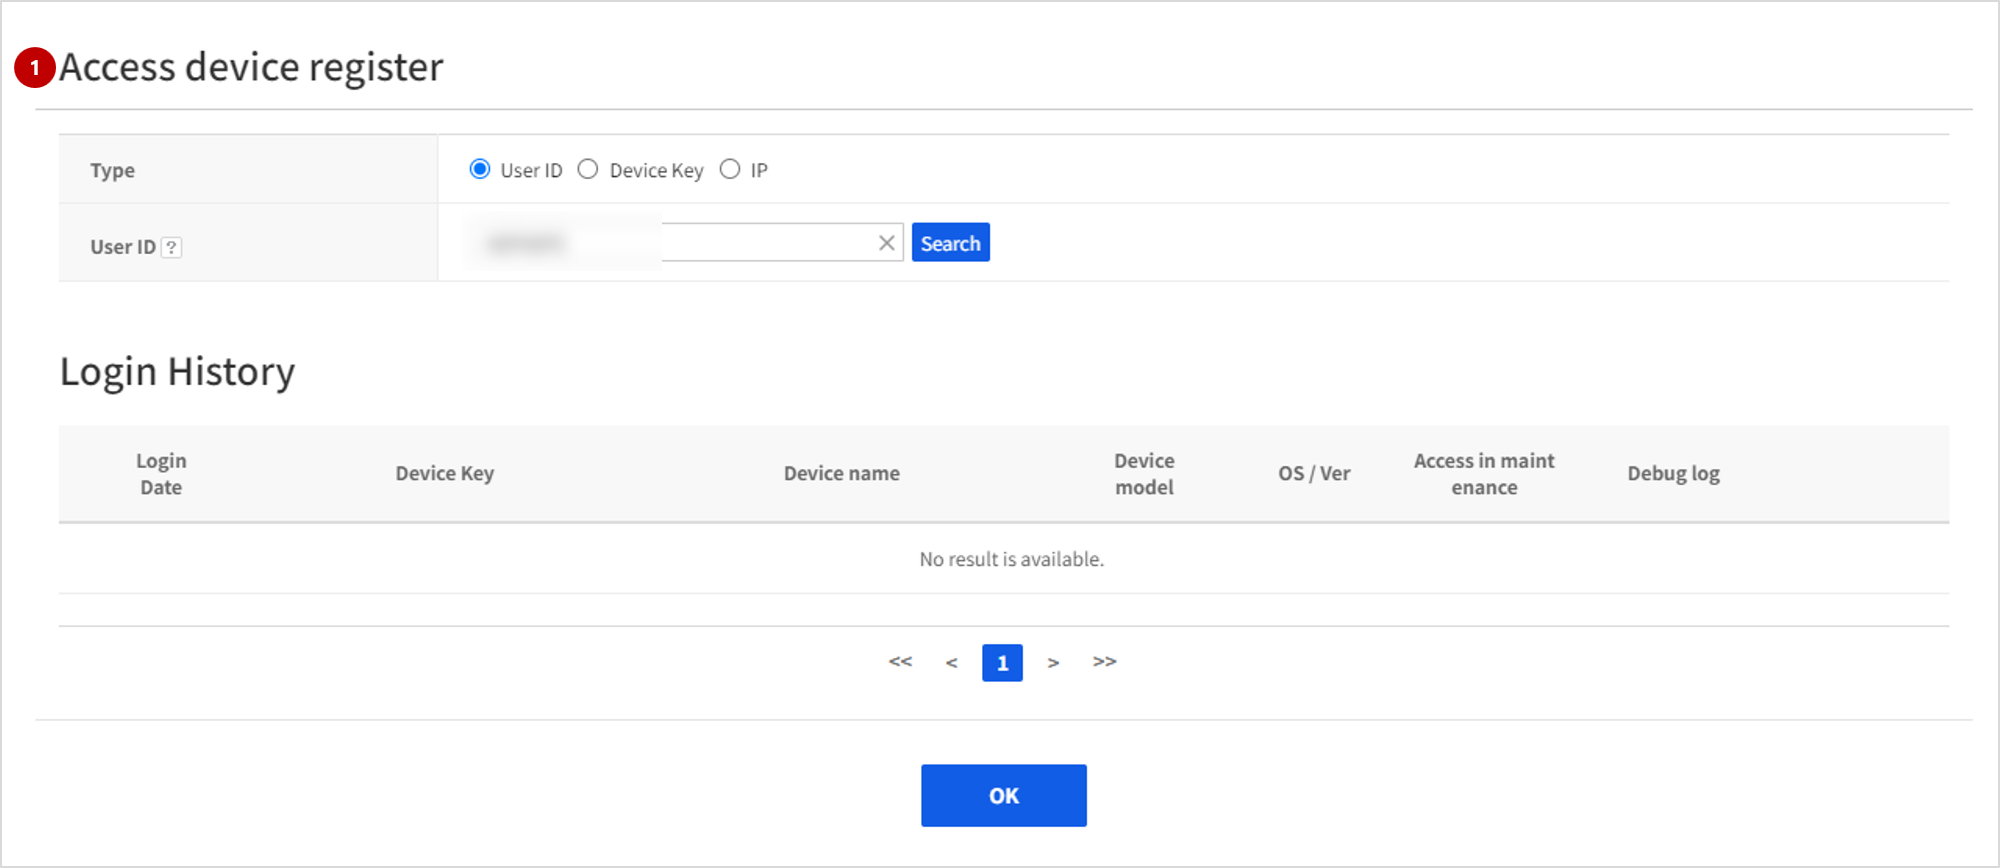
(1) Register using Game User ID
Select User ID for Type, enter a game user ID, and click the Search button and the log history of the user will be displayed at the bottom of the screen. Select the Device key of a device to register as a test device among the searched history, enter Additional Information, and click the Register button to register the Device key as the test device information.
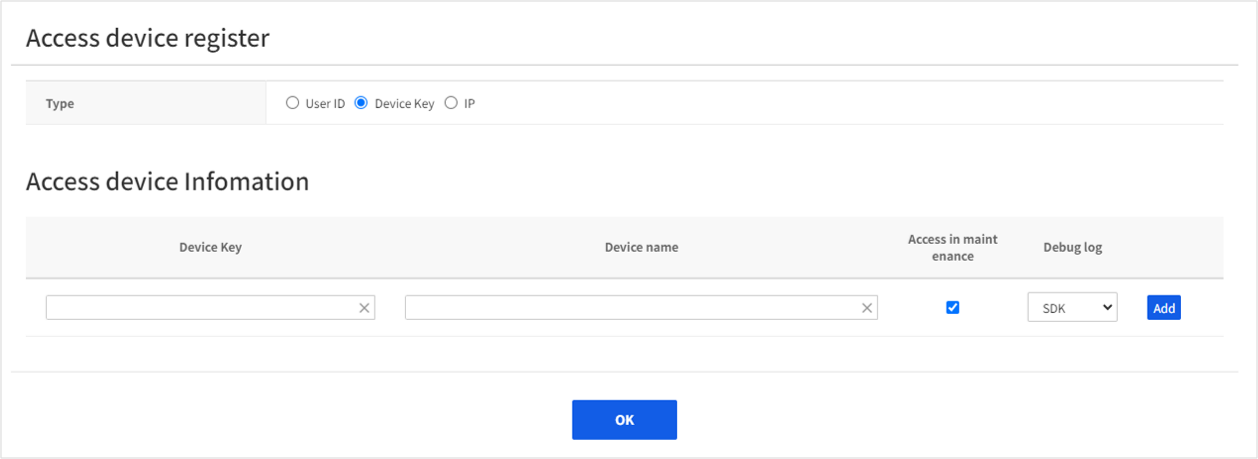
(2) Register Using Device Key or IP
If you know the Device key or IP of the device you want to register, you can directly register it as a test device by selecting the type you want as your desired input method. Enter Device Name, debug log, and whether to ignore maintenance of the device that you want to register, and click the Register button to register it as a test device.
[Note] Enter an easily recognizable nickname as the name of the device (e.g. iPhone 6 Test, TOAST's iPad)
(3) Delete
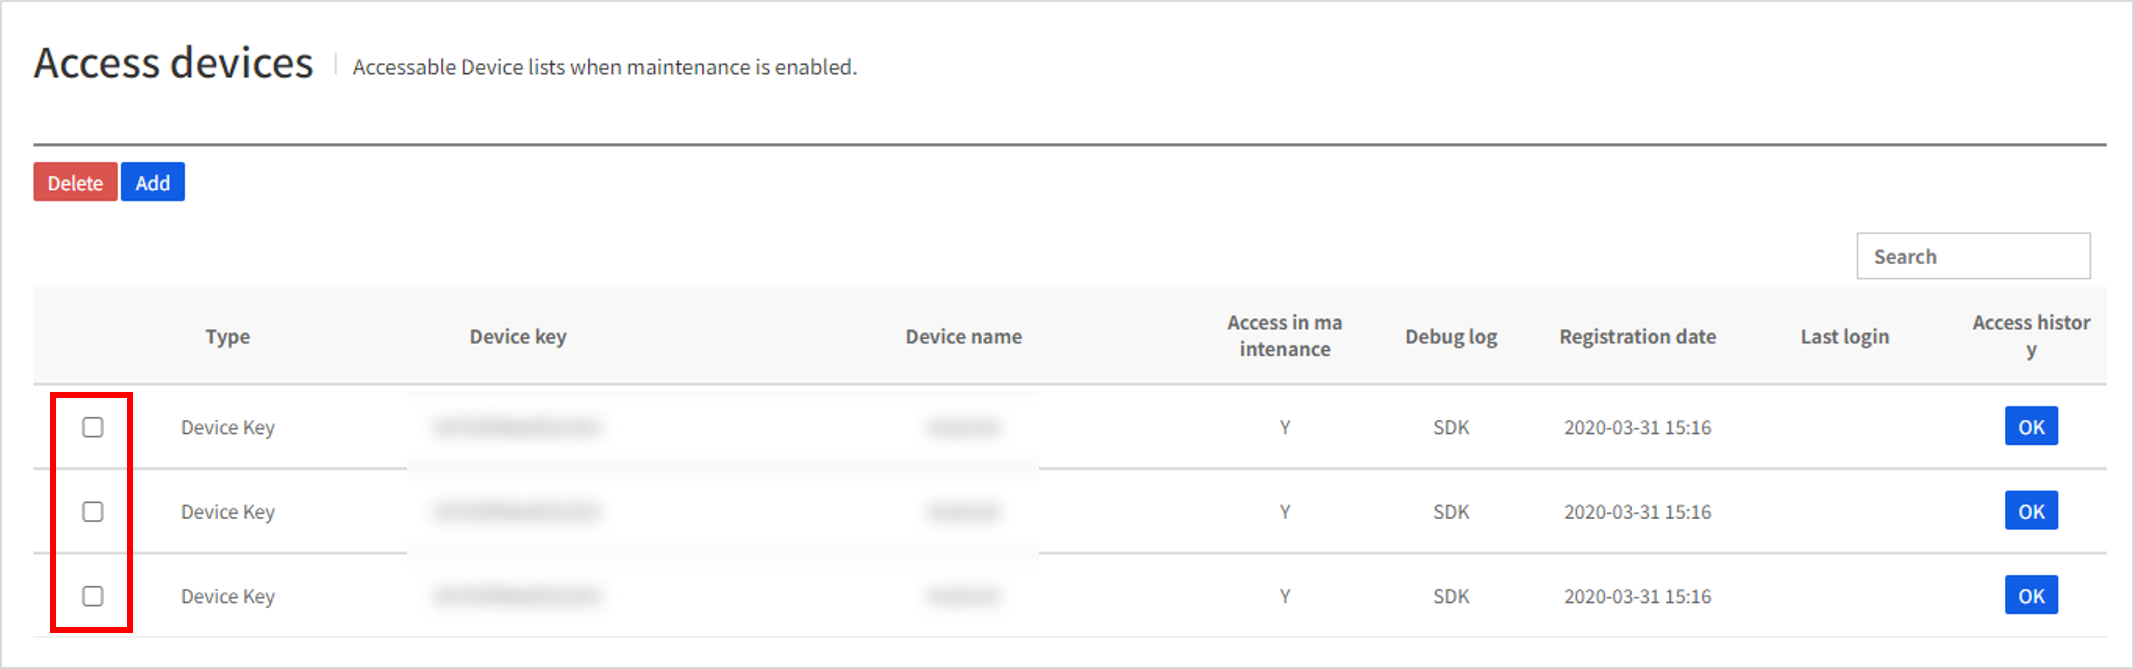
Select the test device to delete on the Search Test Device screen and click the Delete button located at the top left of the screen to delete the test device information. Once deleted, the information cannot be recovered, so please make sure that it needs to be deleted before clicking the button.
Authentication Information
1. Facebook
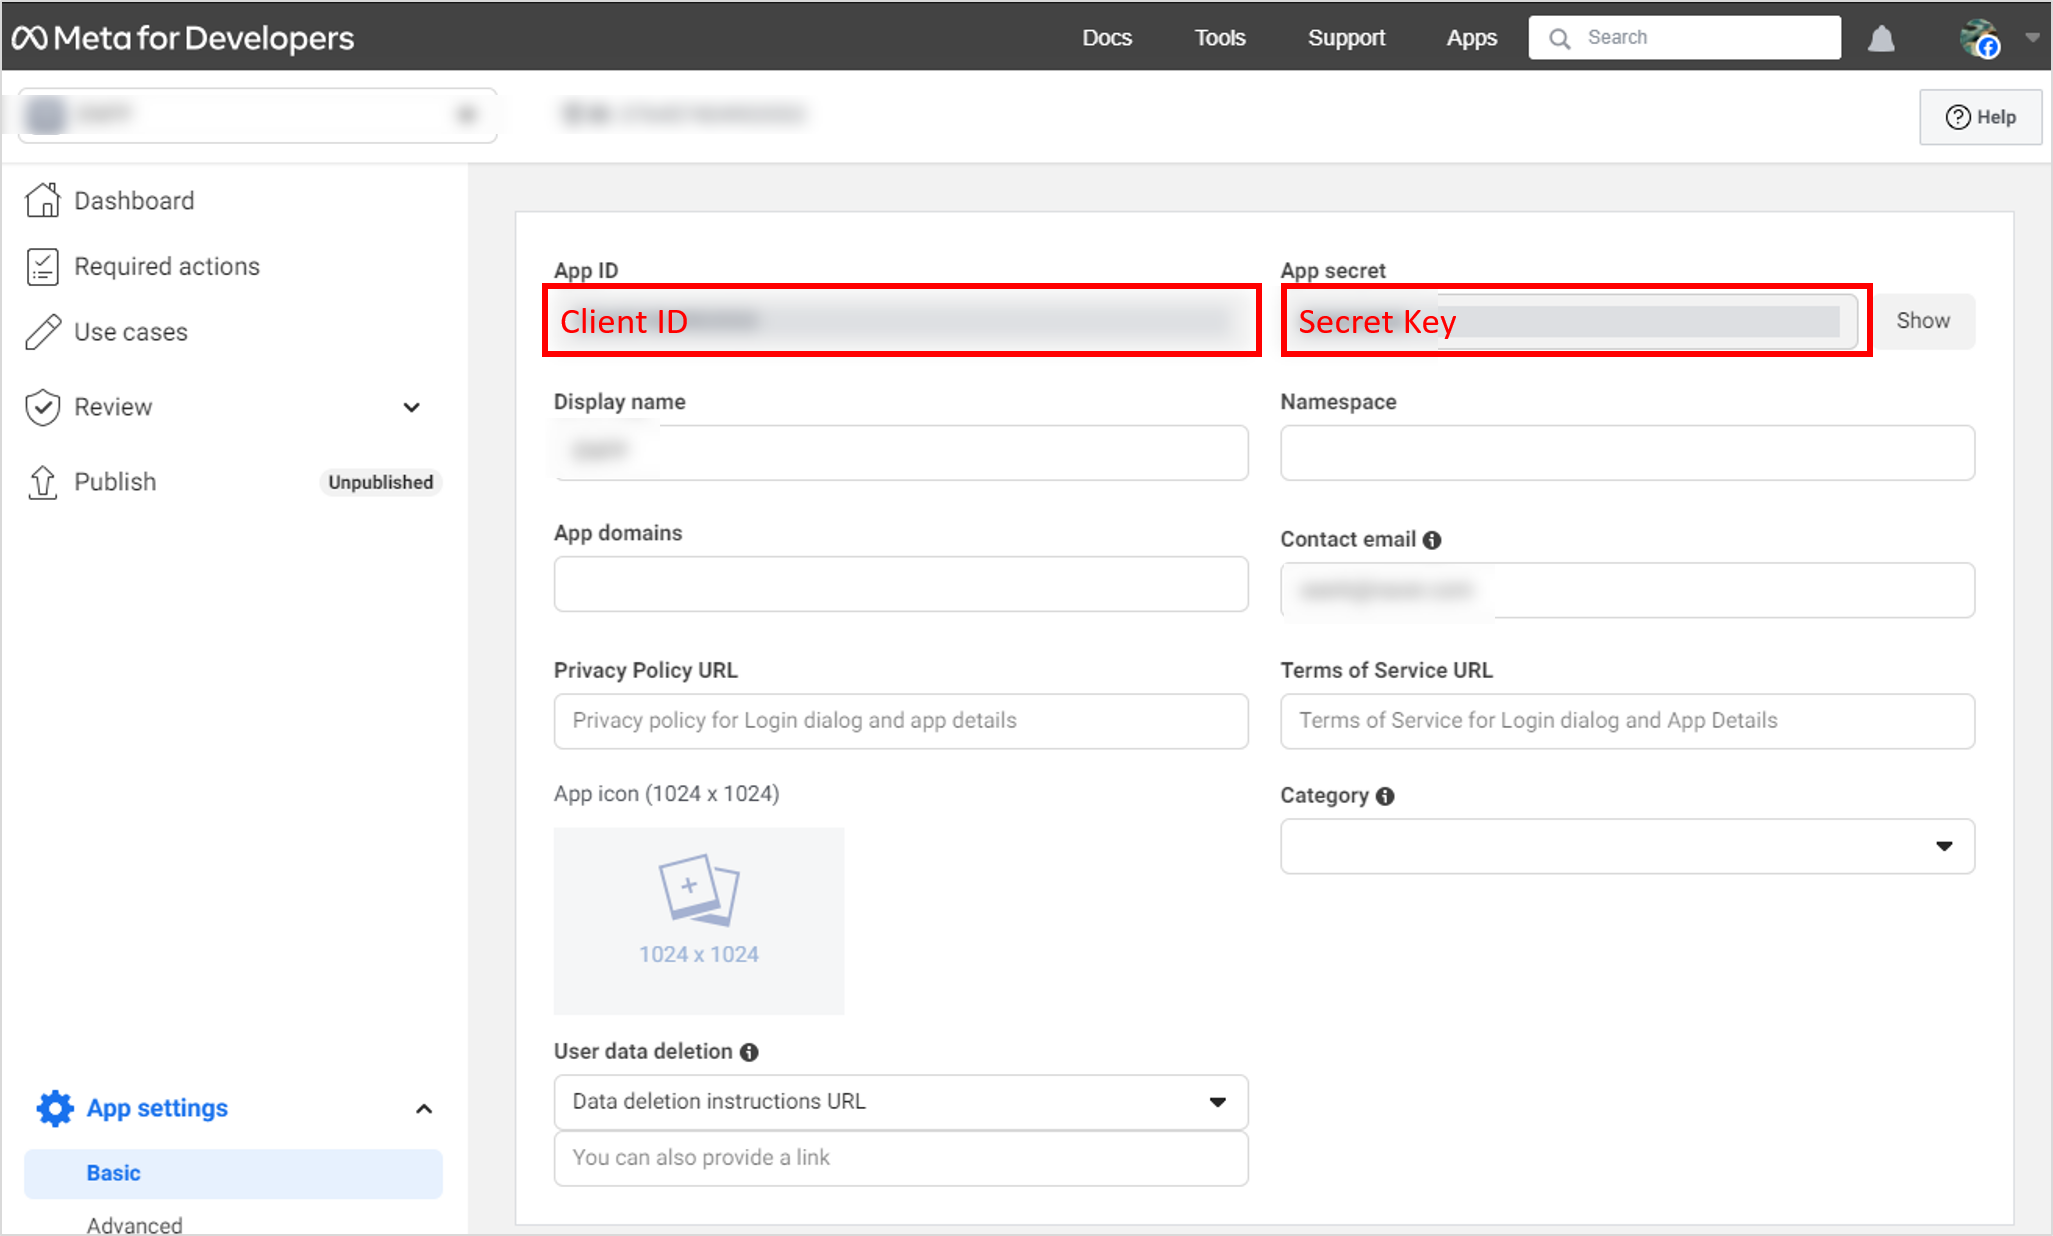
Enter {App ID} and {App Secret Code} of an app registered in the Facebook developer's site in the TOAST Cloud Gamebase Console.
Entry Fields
- Client ID: {AppID}
- Secret Key: {App Secret Code}
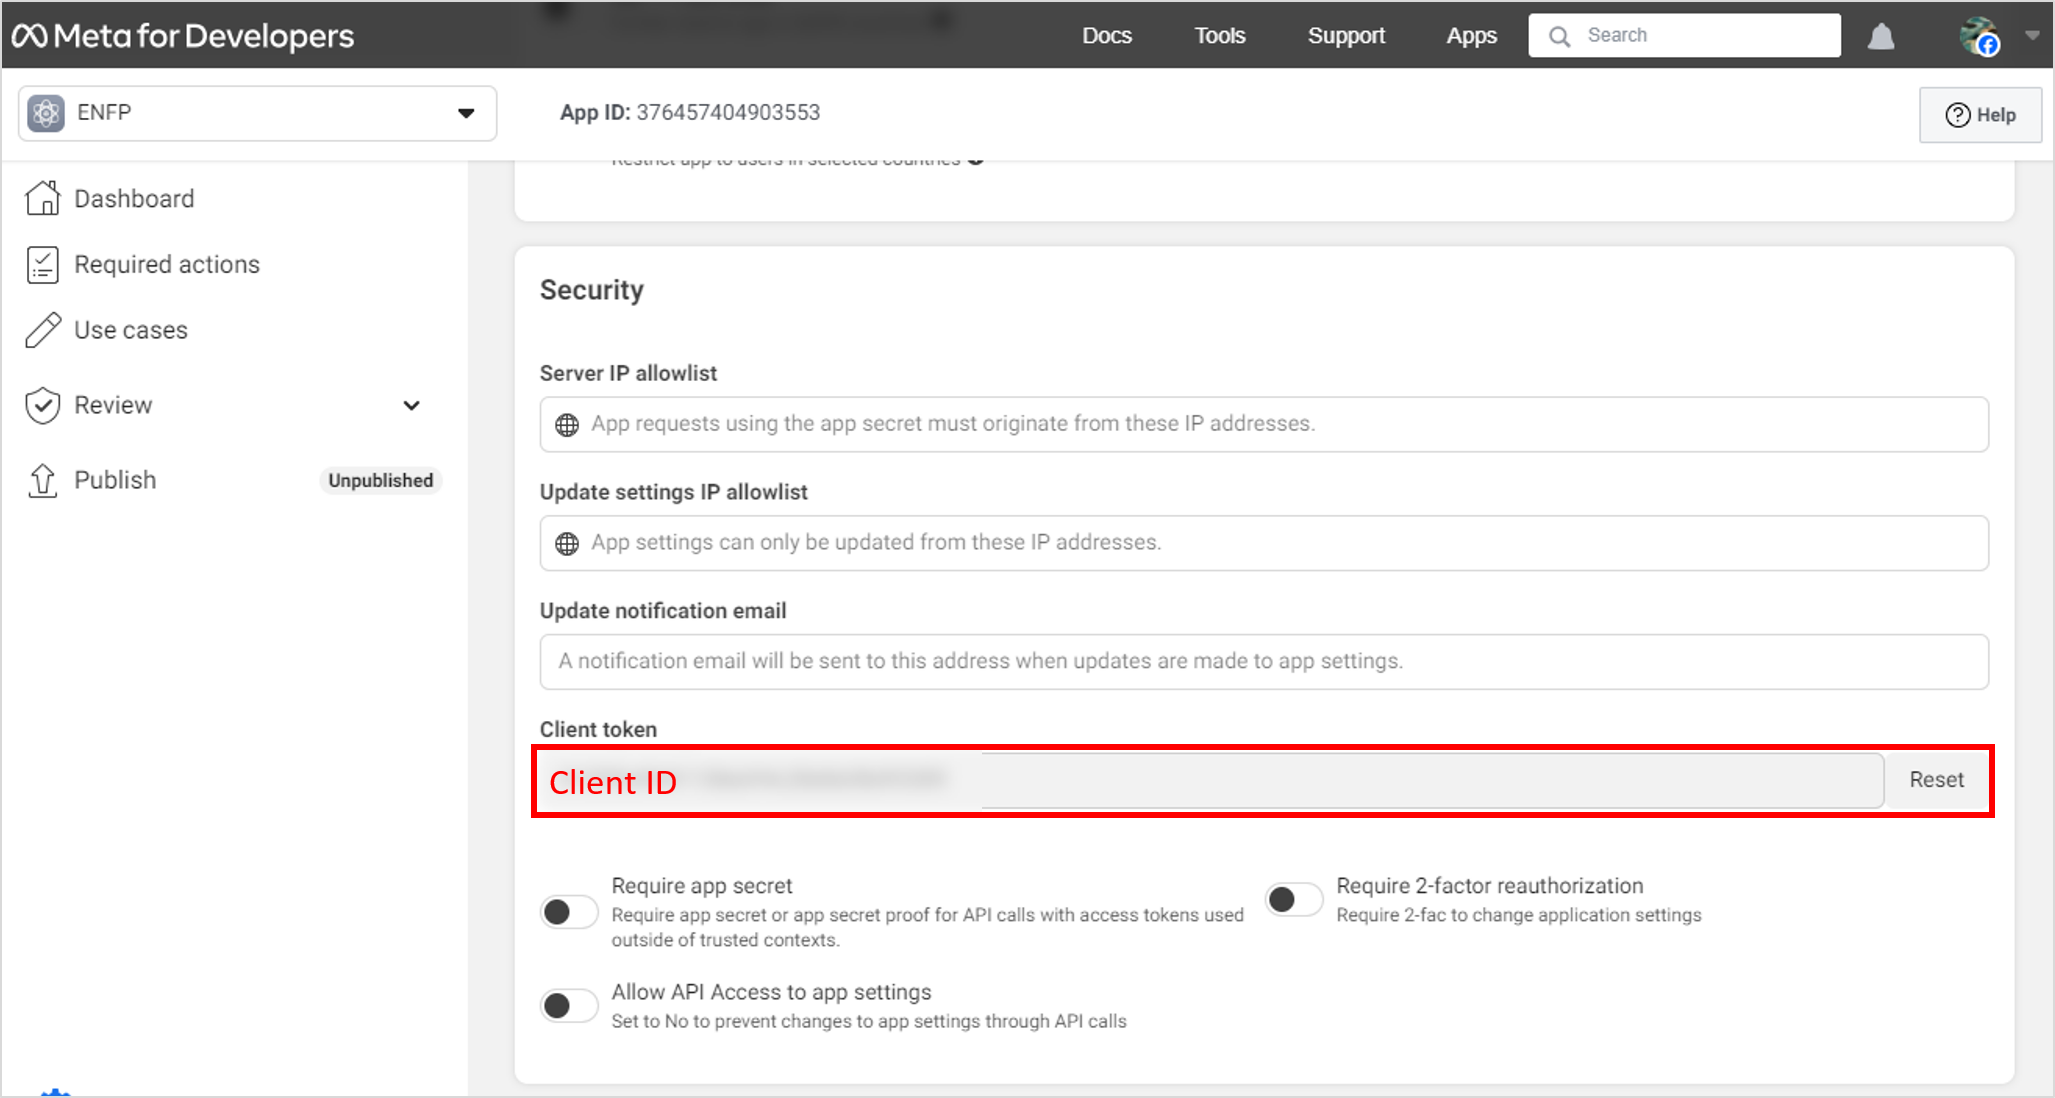
- Additional Info: Facebook Permission & Facebook Client Token (json format)
Additional Info Settings
- Set JSON string type information in NHN Cloud Console > Gamebase > App > Authentication Information > Additional Information.
- For Facebook, set facebook_permission and facebook_client_token, which is the authentication information to request for Facebook when attempting to authenticate with OAuth.
- Example of entering Facebook additional authentication information
{ "facebook_permission": ["public_profile", "email"], "facebook_client_token": "Your Facebook Client Token" }

Reference URL
Android
iOS
2. Google
Google Cloud Console
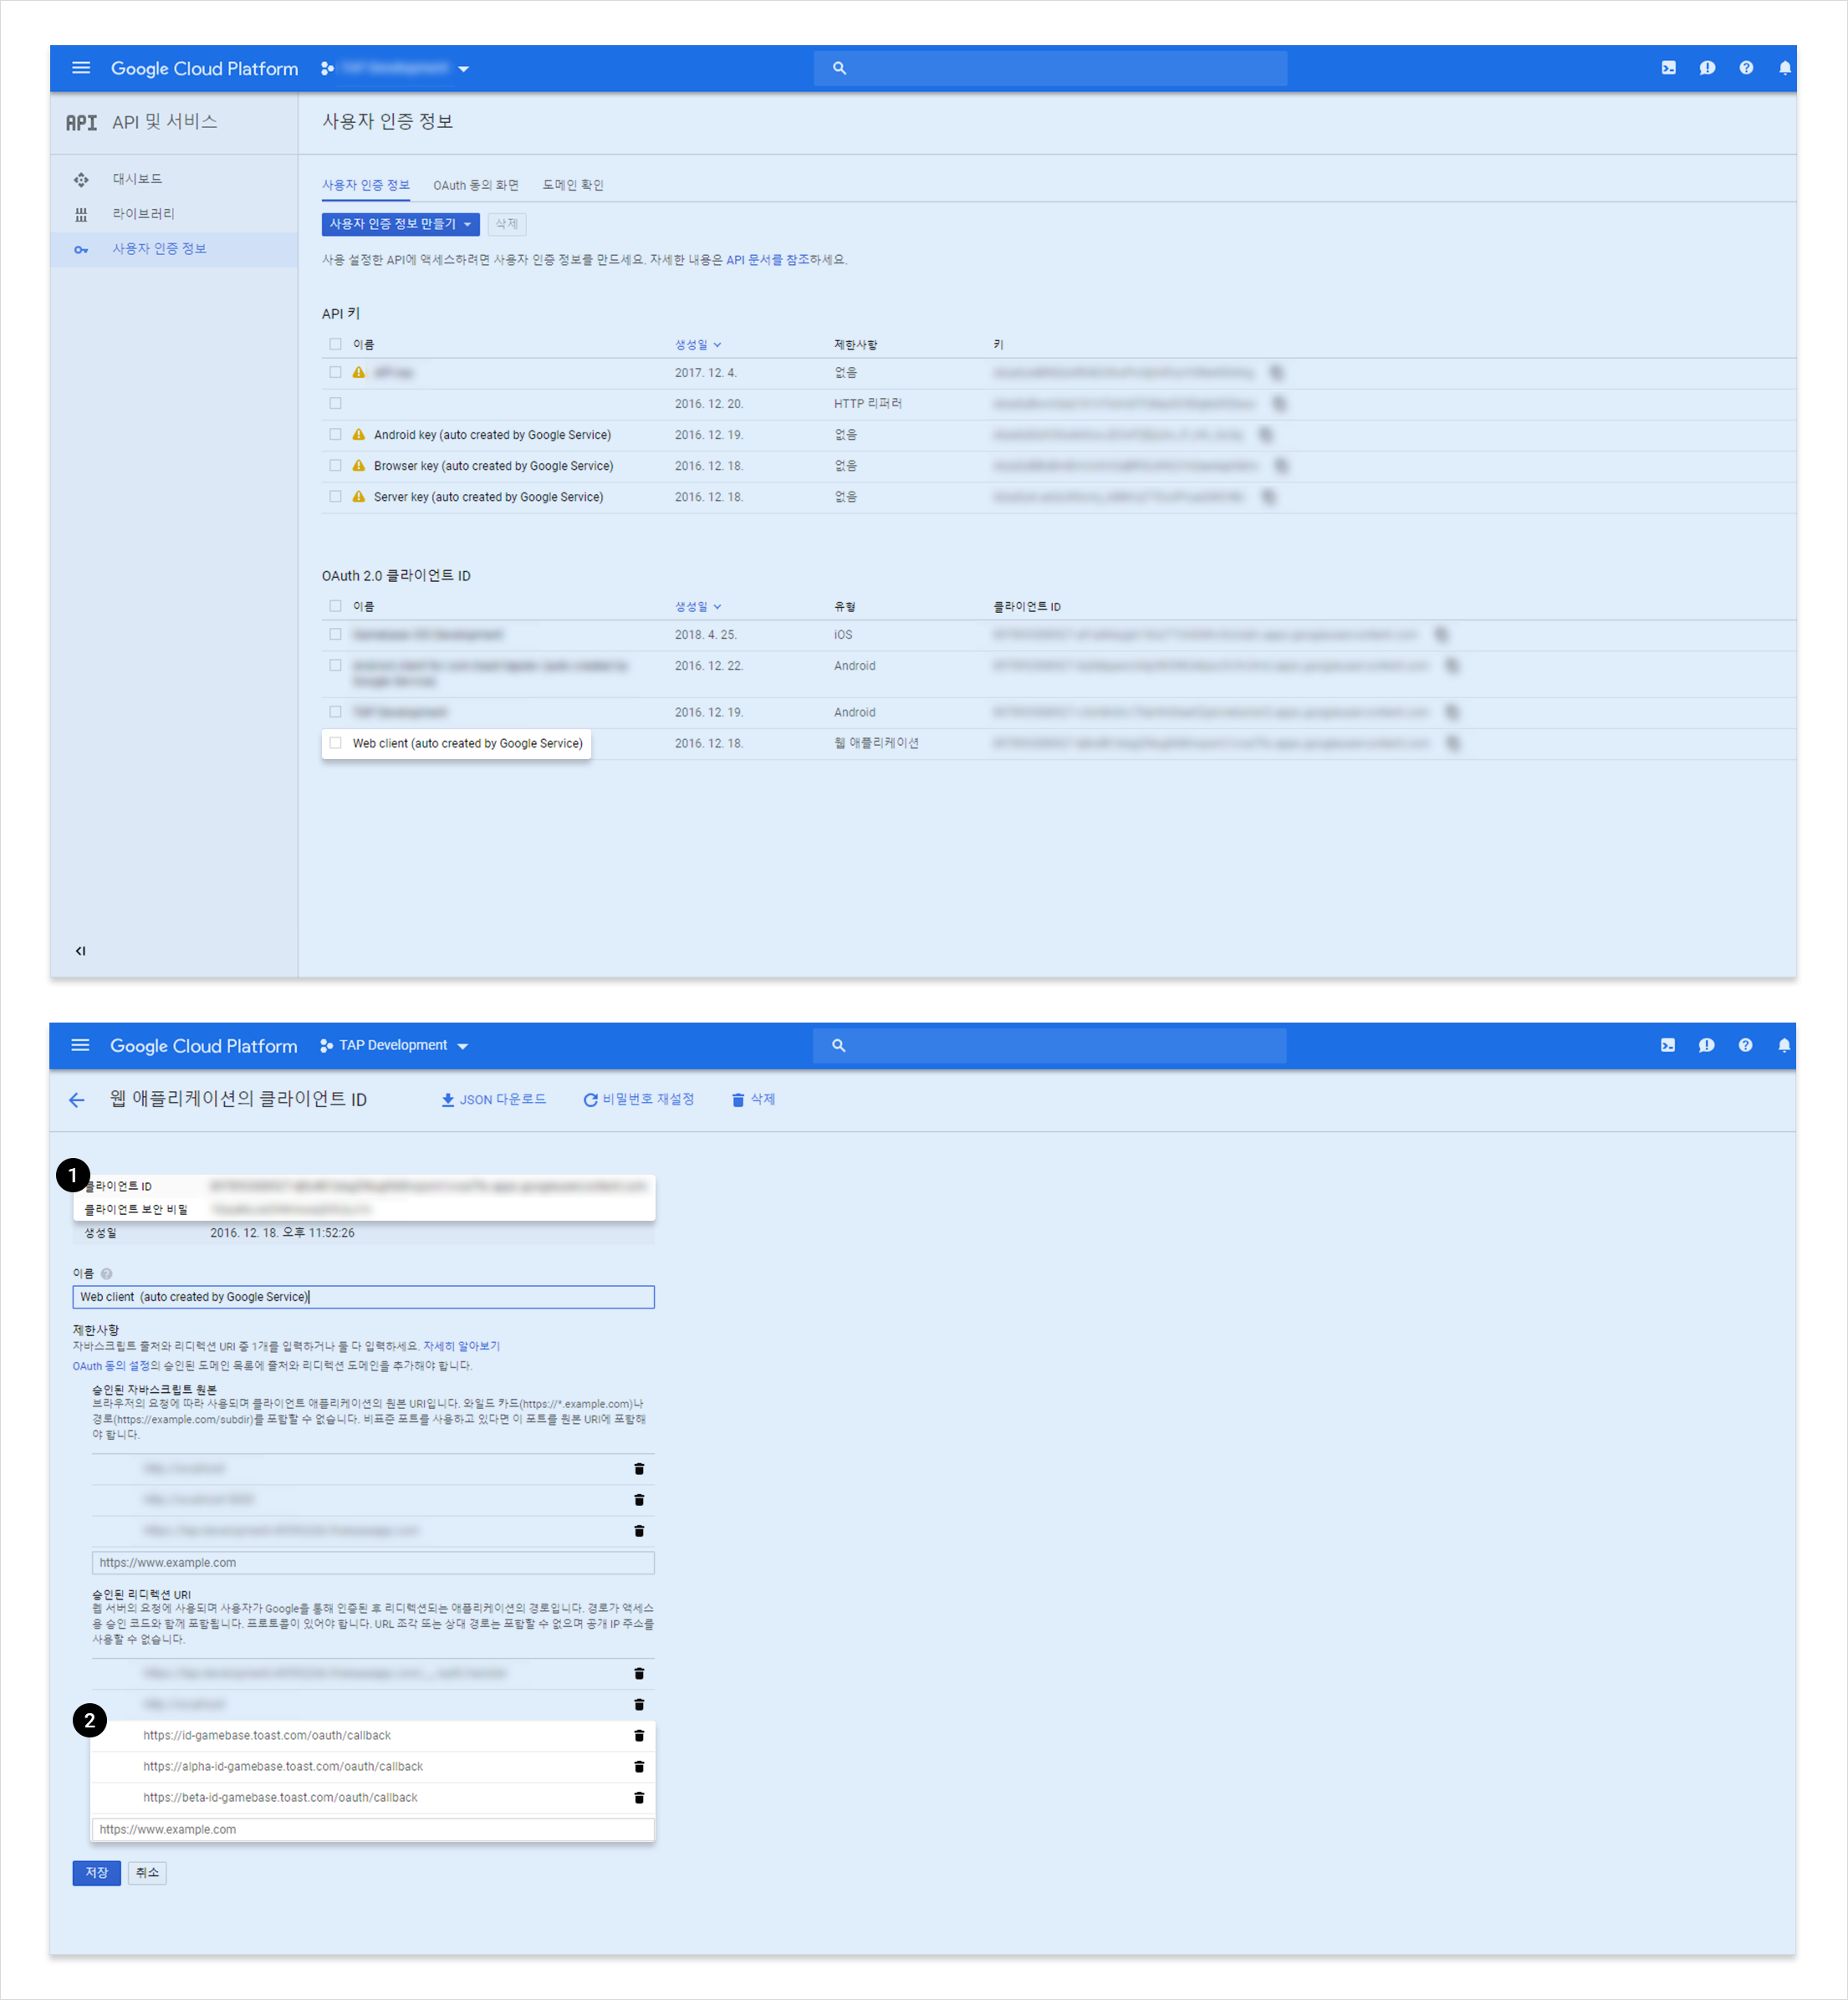
For Google authentication, you must obtain a Web Application Client ID from Google Cloud Console and enter it into Gamebase Console. Enter these URIs in the Authorized redirect URIs field. * https://alpha-id-gamebase.toast.com/oauth/callback * https://beta-id-gamebase.toast.com/oauth/callback * https://id-gamebase.toast.com/oauth/callback
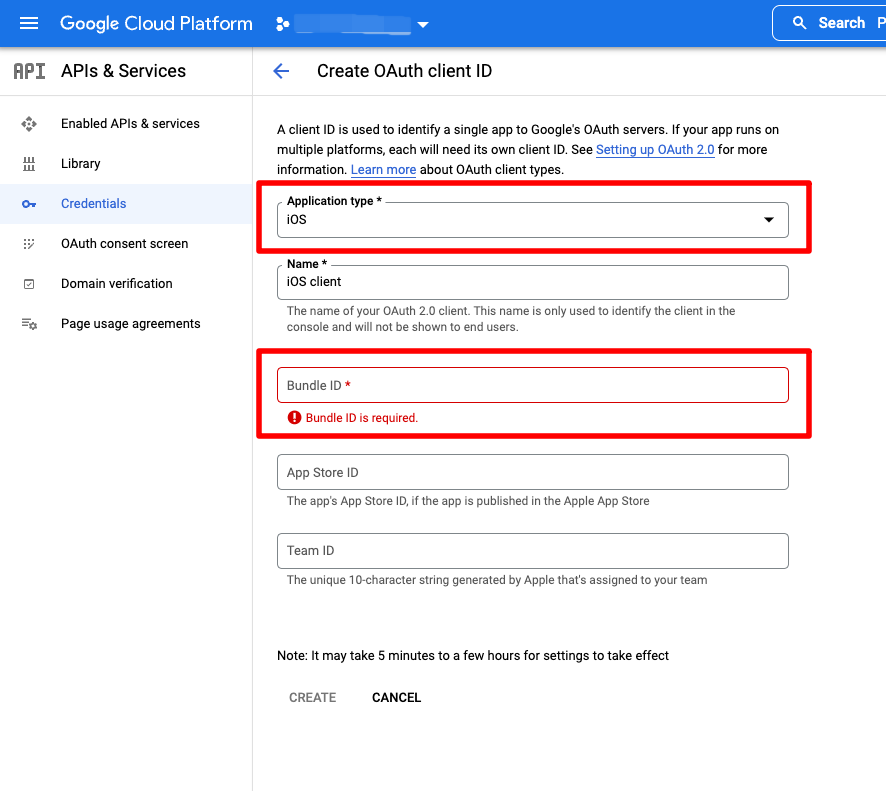
For Google iOS authentication, you must obtain an iOS Client ID from Google Cloud Console and enter it into Gamebase Console.
After selecting APIs & Services > CREATE CREDENTIALS > OAuth client ID,
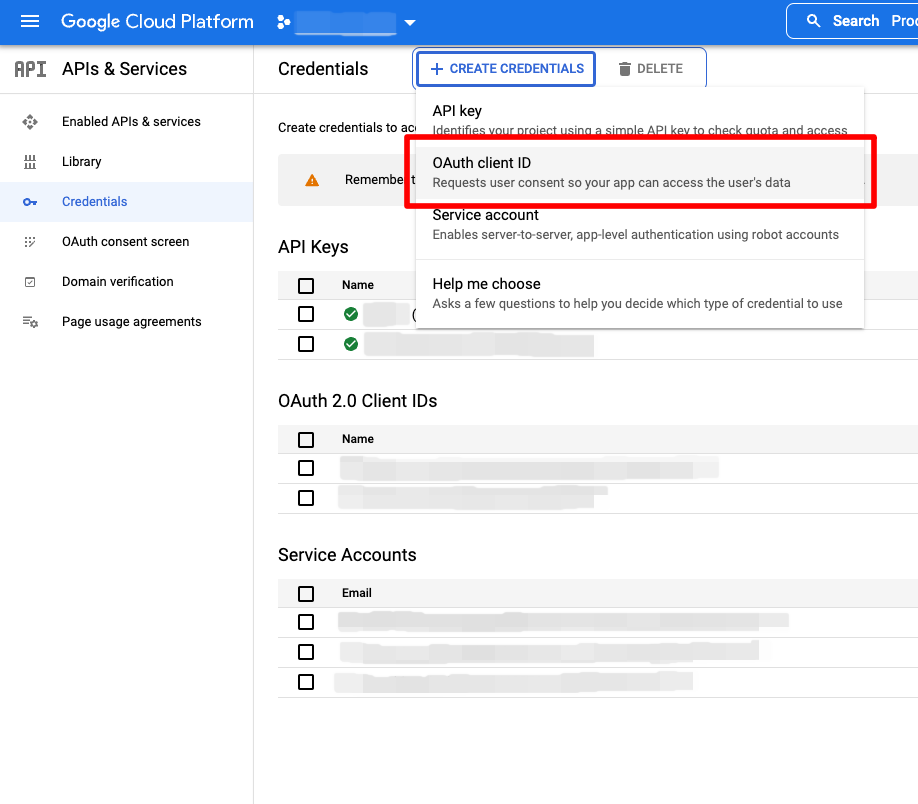
Select Application type as iOS and input the Bundle ID.
Gamebase Console

Input field
- Web Application ID: {Google Web Application Client ID}
- iOS Client ID: {Google iOS Client ID}
- Secret Key: {Google Web Application Client secret}
iOS
3. Apple Game Center
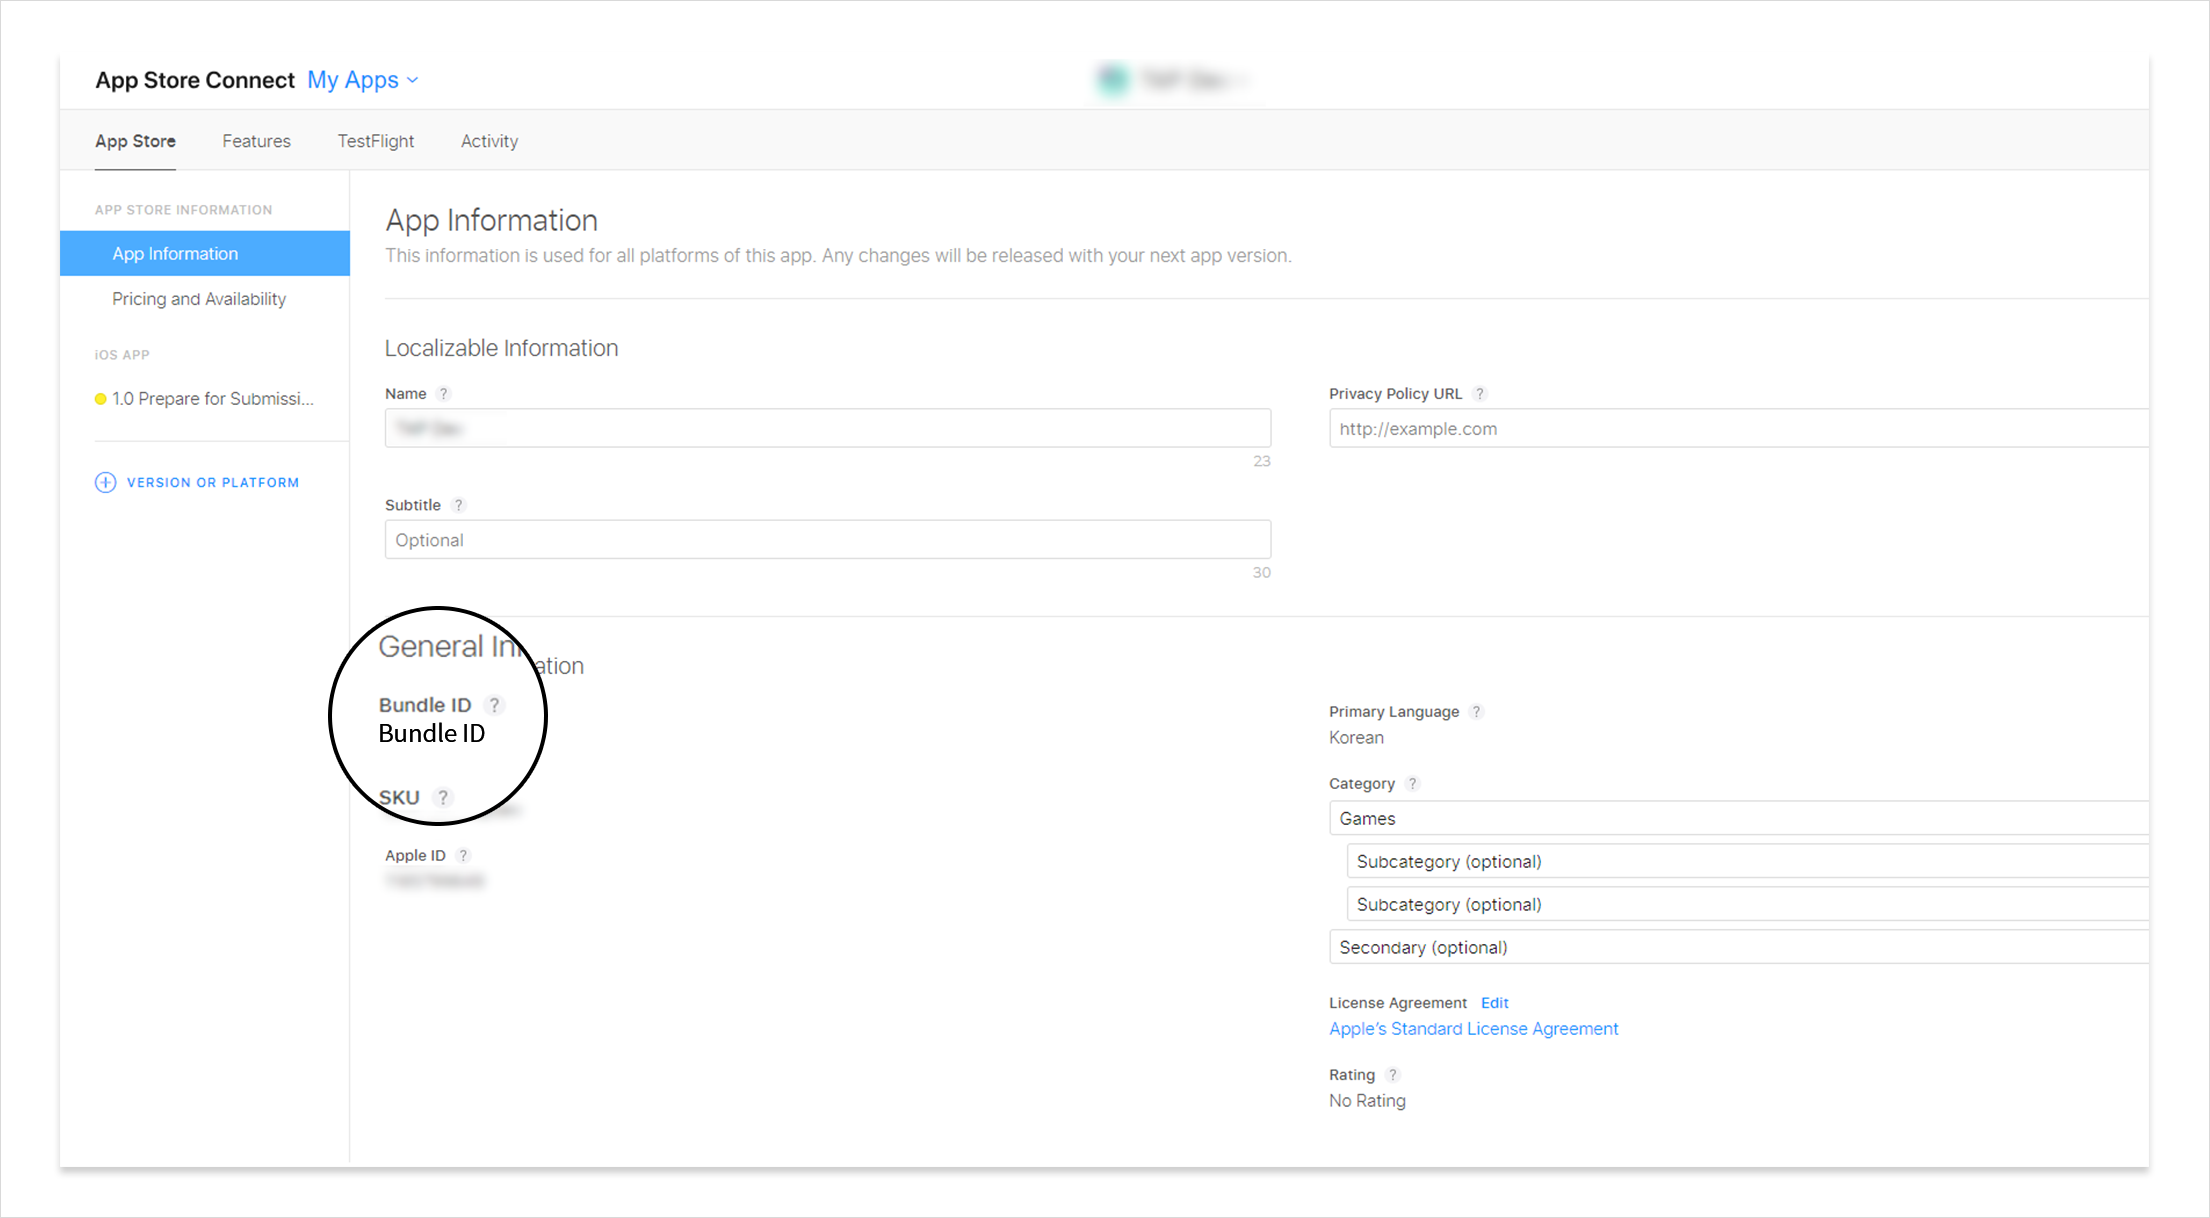
Enter Bundle ID registered on Apple Developer's Site in the TOAST Cloud Gamebase Console.
Entry Fields
- ClientID: {Bundle ID}
Reference URL
4. PAYCO
Enter {client_id} and {client_secret} issued from PAYCO ID application in the TOAST Cloud Gamebase Console.
Entry Fields
- ClientID: {PAYCO client_id}
- Secret Key: {PAYCO client_secret}
- Additional Information: PAYCO Service Code & Service Name (JSON format)
Additional Info Settings
- You need to provide JSON string data at NHN Cloud Console > Gamebase > App > Authentication Information > Additional Info.
-
For PAYCO, set service_code and service_name required by PAYCO SDK.
-
Example of entering the additional authentication information for PAYCO
{ "service_code": "Your Service Code", "service_name": "Your Service Name" }
iOS
5.NAVER
Enter {client_id} and {client_secret} issued by the NAVER Developers website in the Gamebase Console. Here, service_name, which is the name of an application to be displayed in the Agree to Login window, needs to be configured.
Entry Fields
- Client ID: {NAVER client_id}
- Secret Key: {NAVER client_secret}
- Additional information: NAVER Application Name (json format)
Reference URL
Additional Info Settings
- You need to provide JSON String-type data in the Additional Info field in NHN Cloud Console > Gamebase > App > Authentication Information > Additional Info & Callback URL.
- For NAVER, service_name, which is the app name to be displayed on the Agree to Login window, needs to be configured.
{"service_name": "Your Service Name" }
iOS
6. Twitter
You need to provide {Consumer Key} and {consumer Secret} acquired from Twitter Applicaiton Management Website.
Input Fields
- Client ID: {Twitter Consumer Key}
- Secret Key: {Twitter Consumer Secret}
Reference URL - Twitter Application Management
Android
[Caution]
As of July 25 of 2019, Twitter has suspended its support for TLS 1.0 and TLS 1.1, to support TLS 1.2 only. Therefore, Android 4.3 (Jellybean, API Level 18) or lower devices do not support logins to Twitter via Android WebView.
In short, only Android 4.4 and higher devices (KitKat, API Level 19) allow logins to Twitter.
iOS
7. LINE
Input Fields
- Client ID: {LINE Channel ID}
- Secret Key: {LINE Channel Secret}
Reference URL
iOS
8. Sign In with Apple
To enable Sign In with Apple, setting is required for AppStore Connect, Gamebase Console and Xcode.
AppStore Connect Settings
Certificates, Identifiers & Profiles > Keys > Add (+)
- Check
Sign In with Appleand process the setting.
- Select Bundle ID to enable
Sign in with Apple.
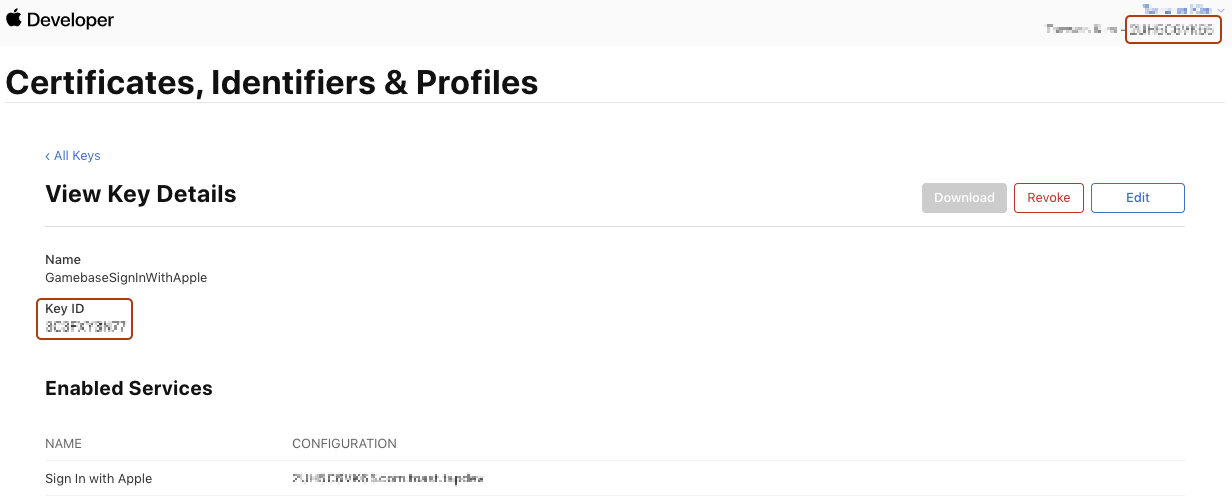
- Download Privatekey and check Key ID which is created and saved.

- Go to Certificates, Identifiers & Profiles > Identifiers > Select Target Apps and enable
Sign In with Apple.- Set
Enable as a primary App ID.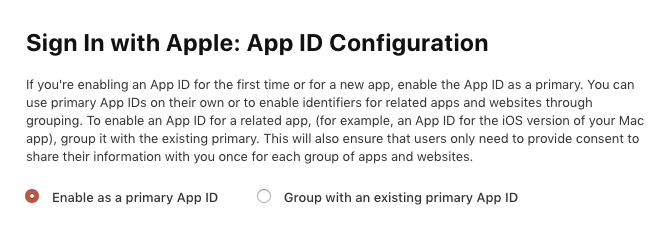
- Set
Gamebase Console > App Settings
Direct link to NHN Cloud Console
- Gamebase
Client ID Settings
Set Bundle ID for the app.
Secret Key Settings
Use TeamID, KeyID, or PrivateKey that are acquired from Apple Developer Account setting to create JSON character strings.
- teamId: Set value on top right of the developer account.
- keyId: Go to Certificates, Identifiers & Profiles > Keys, and check Sign In with Apple to set created value.
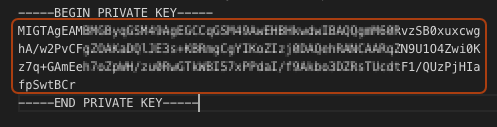
- privateKey: Set PrivateKey file which is created along with the Keys. (Open the downloaded file and apply the value in red rectangle like the screen shot as below.)
Set the values above by creating JSON as in the following example.
{
    "teamId":"2UH5Cxxxx",
    "keyId":"3C3FXYxxxx",
    "privateKey":"MIGTAgEAMBMGByqGSM49AgEGCCqGSM49AwEHBHkwdwIBA.. omitted"
}
[Caution]
Be careful not to include newlines in privateKey.
Additional Info Settings
Getting to know AuthorizationScope of Sign In With Apple
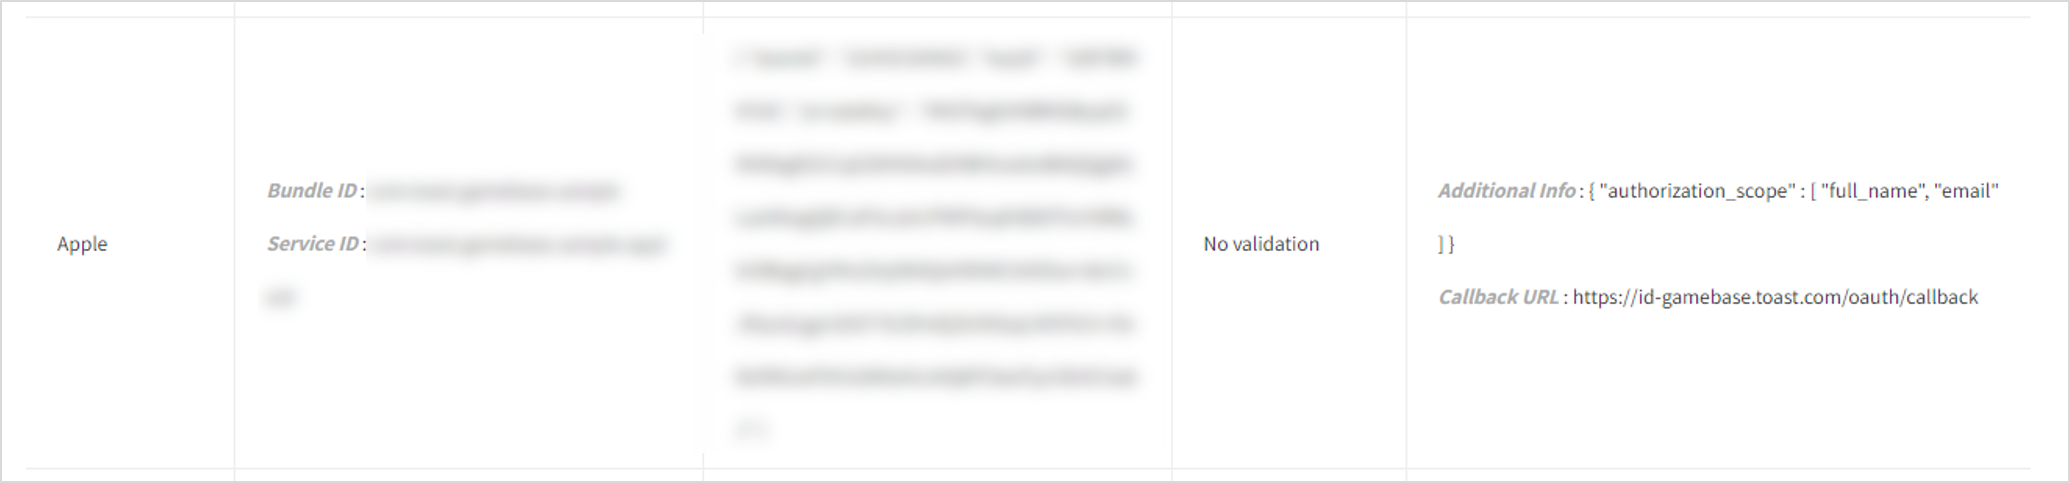
If you add Apple in Gamebase Console > App, the following JSON value is set by default.
As of November 2019, there are only two types of scope, full_name and email, and Gamebase sets the two values as the default.
{ "authorization_scope":["full_name", "email"] }
Xcode Project Settings
[Caution]
The version must be Xcode 11 or later in order to build a project that uses the Sign In with Apple feature.
- Select Target > Signing & Capabilities, and add Sign In with Apple. Capability_SignInWithApple
- Select Target > Build Phases > Link Binary With Libraries, and add Authentication.framework as Optional.

[Caution]
If this is set to Optional instead of Required, the app crashes at runtime for any device running iOS 12 or earlier.
Settings for supporting iOS 12 or earlier (Sign In with Apple JS)
[Caution]
In Gamebase SDK iOS 2.13.0 or later, the Sign In with Apple feature can be used by utilizing WebView on iOS 12 or earlier.
Even for a game that runs on a version earlier than Gamebase SDK iOS 2.13.0, by referring to the Settings for supporting iOS 12 or earlier to configure the previous project
and applying Gamebase SDK iOS 2.13.0 or later, Sign In with Apple feature can be used on iOS 12 or earlier.
- To use Sign In with Apple on iOS 12 or earlier, Sign In with Apple JS must be used to log in through the web page.
- In the Apple ID login web page, you can enter the Apple account and password to log in.
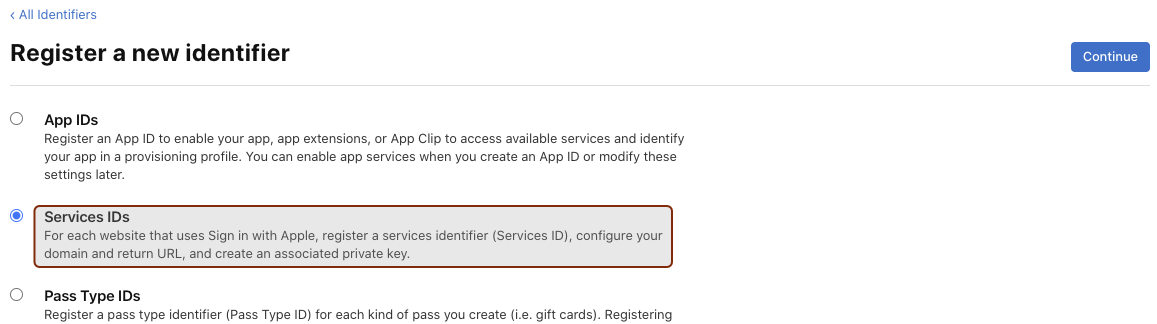
You must follow the below procedure to register a new Service ID in the Apple developer site.
- Add Service ID
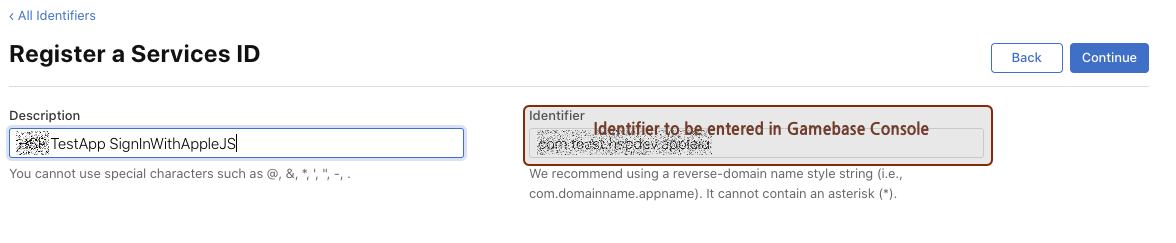
- Set the identifier to use as the Service ID (usually bundle ID + .string to sort)
- Check the registered Service ID and modify it

- Click Configure for the Sign In with Apple at the bottom

- Set the Primary App ID (If Sign In with Apple is already being used, set the bundle ID of that app)

- Authenticate with the Apple ID, and set the Callback URL to receive the authentication info
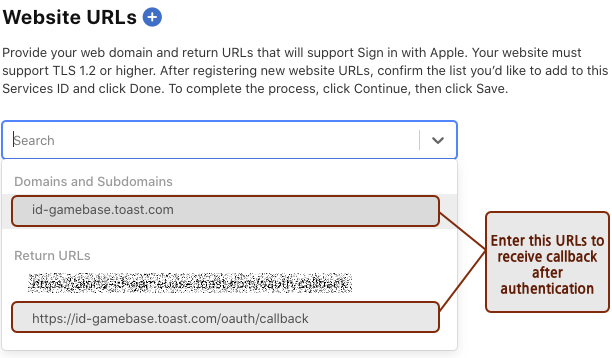
- Set up and save
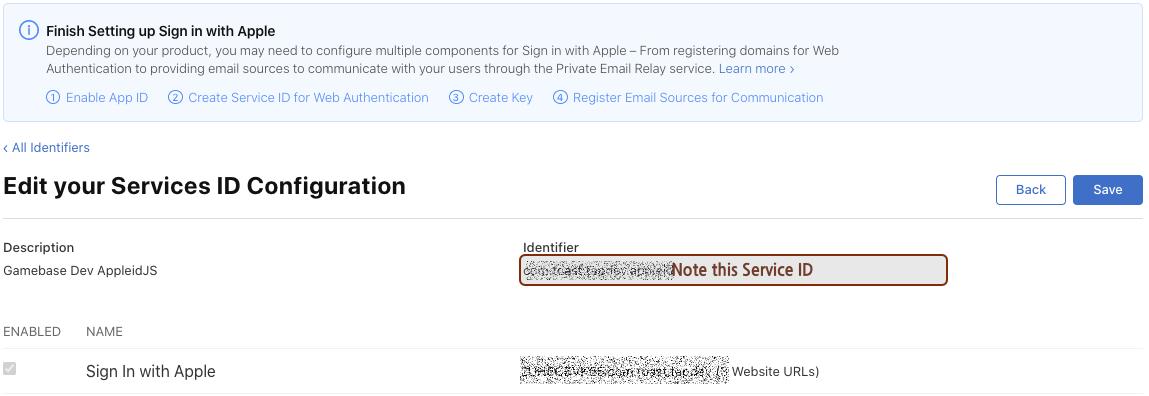
Go to NHN Cloud Gamebase Console > Gamebase > App > Authentication Information > Apple > Service ID, and enter the service ID from above.*
[Caution]
If Sign In with Apple is not previously set up, you need to set up the rest as well.
- Add the Service ID you registered with the Apple developer site in the Service ID field here as follows: (If there is already a setting for Sign In with Apple, no need to change other values.)

9. WEIBO
Weibo Console
- Enter {client_id} and {client_secret} issued by Weibo Developers site in the Gamebase Console. {scope}, which is required for logging in, also needs to be entered in the Additional Info field as a JSON string.
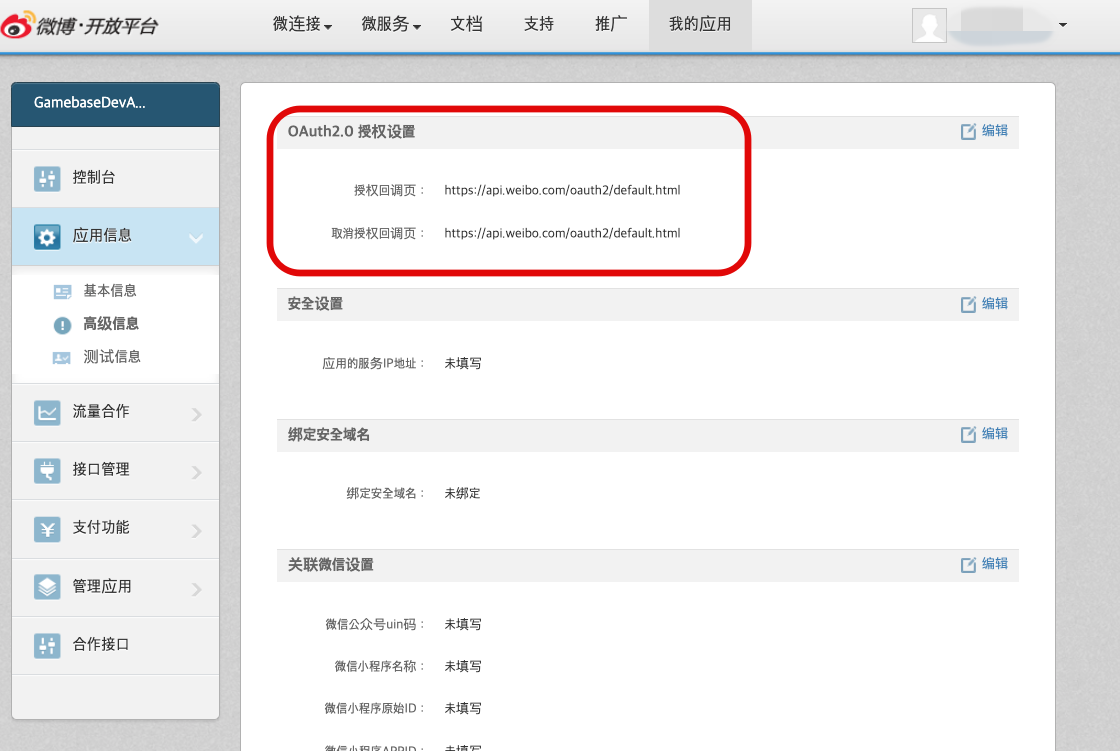
- In the callback URL field, enter the following:
- Authorization callback page: https://api.weibo.com/oauth2/default.html
- Cancel authorization callback page: https://api.weibo.com/oauth2/default.html
Input field
- ClientID: {App Key}
- Secret Key: {App Secret}
- Additional Info: scope (json format)
Additional Info Settings
- Scope
Indicates the permission required by the application. All permissions have been declared as default as per the Weibo guide document. You can add/remove/change them as necessary.
- oauthApiUrl
This is a domain for calling the Weibo Open API internally. You should not change this.
- universalLink
You can set up universalLink according to the Weibo guide document. If not entered, it is set to a random value.

Reference URL - Weibo Developer
Client
Can manage client information by operating system (iOS, Android, Unity WebGL, or Unity Standalone), or version.
Client List
 You can see the list of currently registered clients.
They are sorted by OS, and the number in the icon indicates the version entered when registering the client.
Only the icon list shows only the following service statuses: Test, Beta Service, Review in Progress, In Service, and Update Recommended (In Service). If you click the arrow at the bottom right of each OS, you can see the list of clients in the following statuses: Update Required, and Service Closed.
You can see the service status at a glance thanks to the distinguished icon color per service status.
You can see the list of currently registered clients.
They are sorted by OS, and the number in the icon indicates the version entered when registering the client.
Only the icon list shows only the following service statuses: Test, Beta Service, Review in Progress, In Service, and Update Recommended (In Service). If you click the arrow at the bottom right of each OS, you can see the list of clients in the following statuses: Update Required, and Service Closed.
You can see the service status at a glance thanks to the distinguished icon color per service status.
Properties
Explains about the client registration information managed by the Gamebase Console.
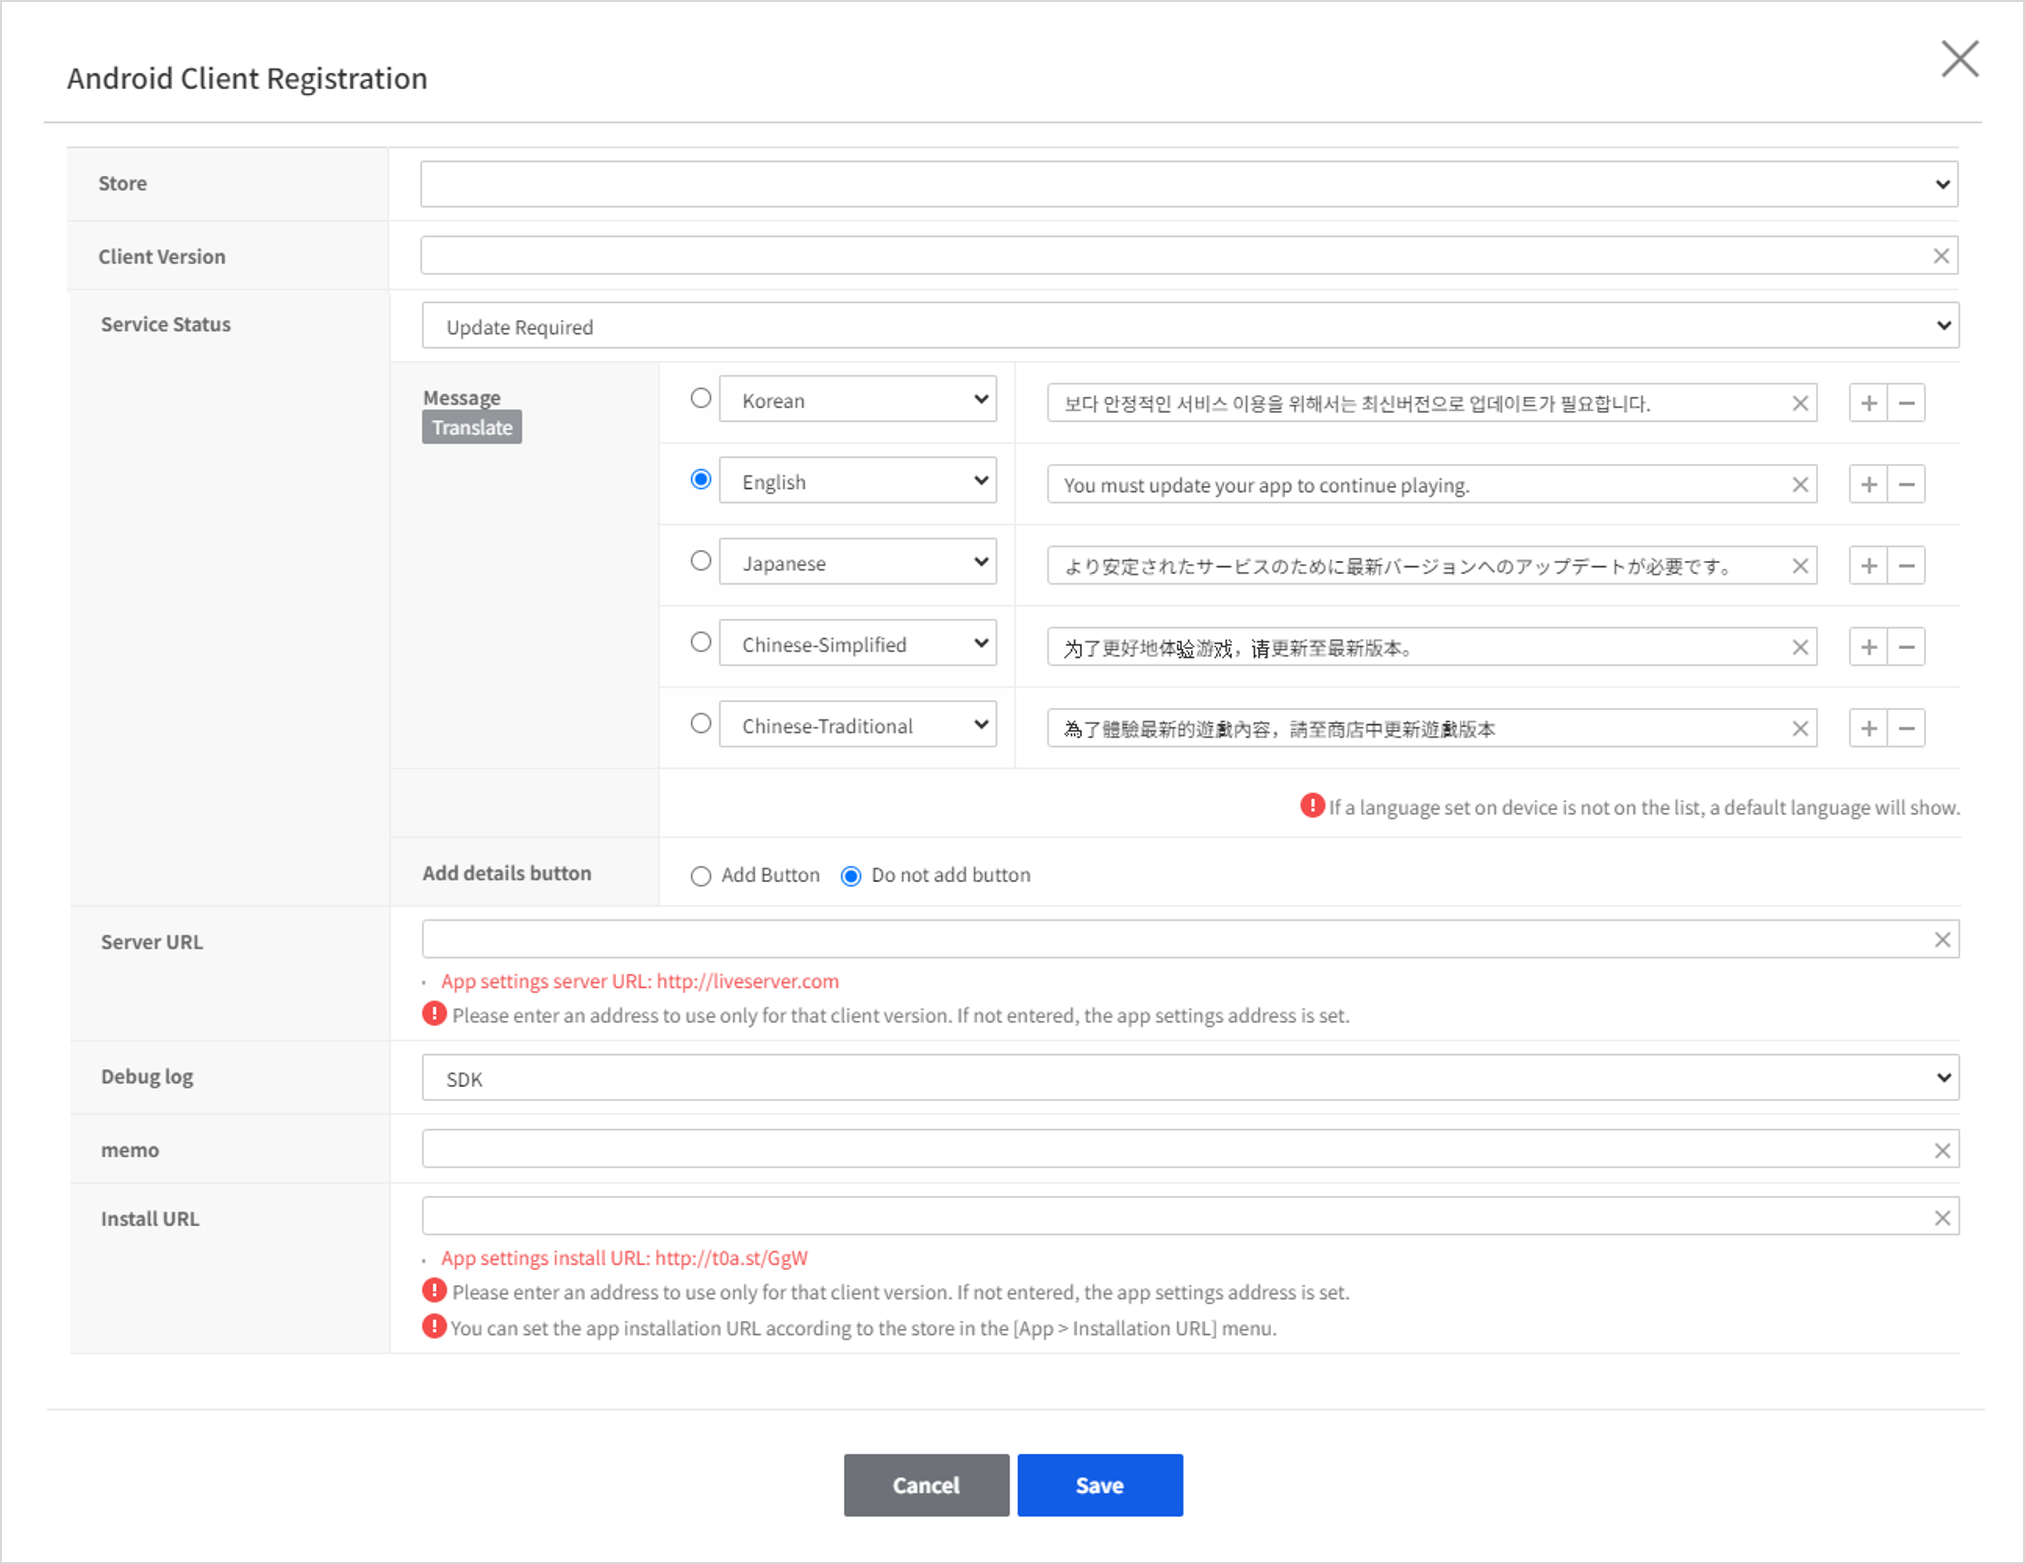
If you click buttons such as Register AOS, and Register iOS on the Client tab, the client registration screen appears. If you want to edit or delete the input value of the registered client, click the icon from the icons list or select the client you want from all clients list.
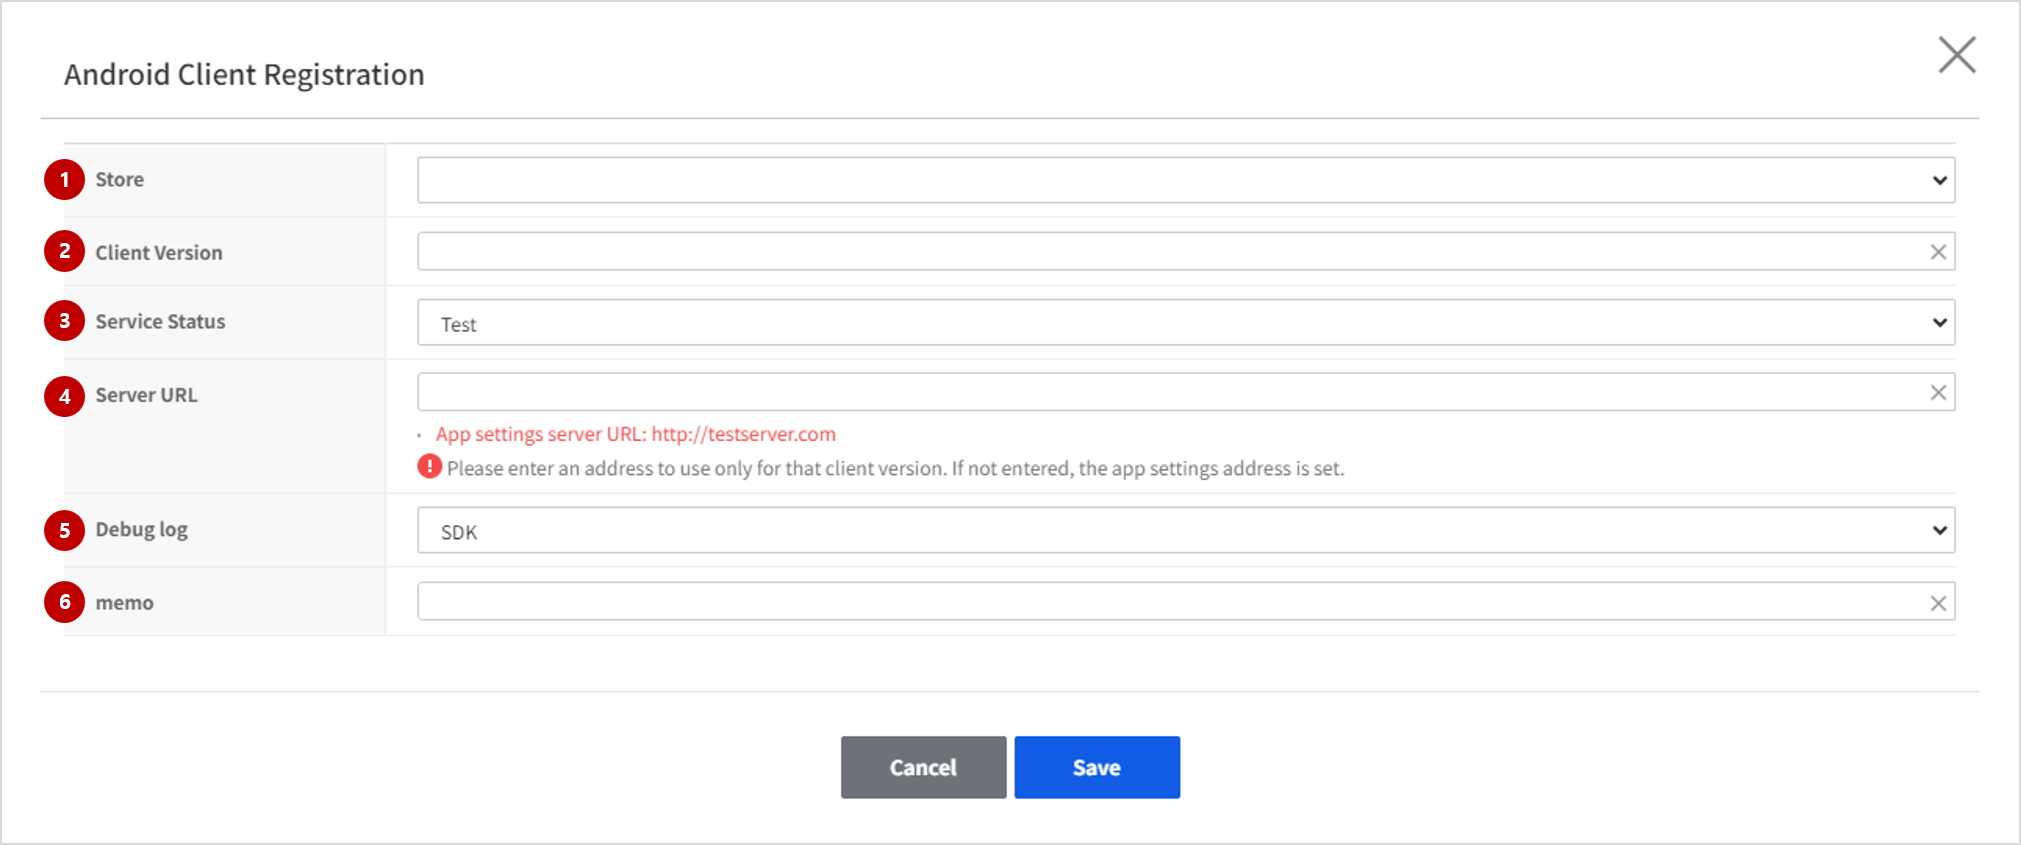
(1) Store
(Required) Select the store to deploy the client. The store you can select varies by OS.
(2) Game version
(Required) Enter the client version. You just need to enter the string according to the rules set forth by the game.
(3) Service status
(Required) Select the service status of the client. There are 6 service statuses: Test, Beta Service, Review in Progress, In Service, Update Recommended (In Service), Updated Required, and Service Closed.
- Test: Internal test
- Beta Service: Select this when you need to connect to a separate beta server instead of the service server.
-
Review in Progress: The store is being reviewed
-
In Service: Normal service
-
Update Recommended (In Service): Normal service.
Pops up a window to prompt users to use the more stable version.
Encourages users to download the latest version, but users can also continue to use the current version of the service.
The following is the default popup provided by Gamebase SDK when the service status is 'Update Recommended (In Service)'. -
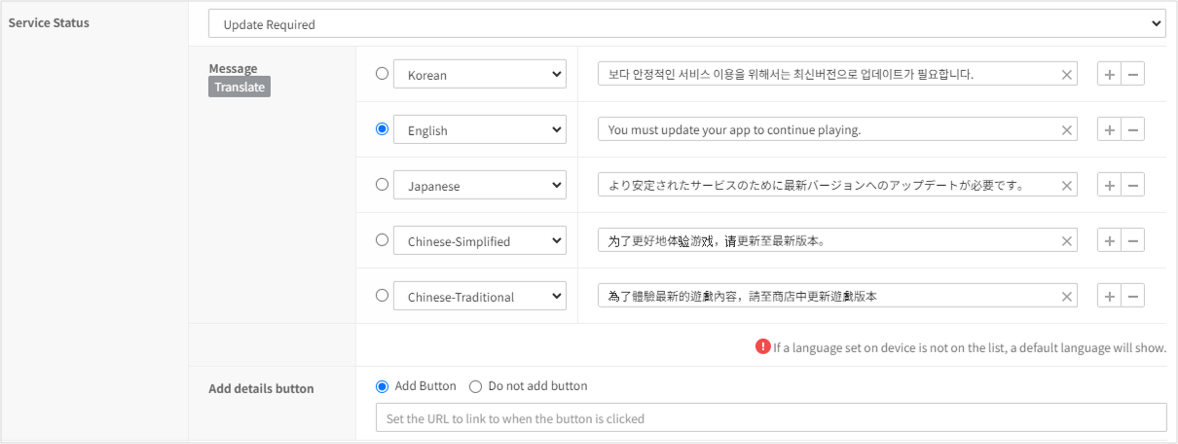
Update Required: Service unavailable.
The game currently does not support the service of this version, so it displays a popup to prompt users to install the latest version.
The following is the default popup provided by Gamebase SDK when the service status is 'Update Required'.
You can add a popup button when the status is 'Update Required'. If you select Add Button in Add Details Button, you can set the URL to connect to.
[Caution] If Update Required and Maintenance are both enabled, the service status becomes 'Update Required'. If you do not want to show a popup about required updates to users during the maintenance, the service status must be changed to 'Update Required' after the maintenance. [Note] Clicking the Update button redirects the user to each store address configured for the installation URL menu. For example, if the client is set to App store and there is a setting related to App store in the Installation URL menu, the user is redirected to that address. If there is no setting configured in the Installation URL menu, the user is redirected to the common URL.
- Service Closed: Service unavailable.
Select this if the service version is no longer available.
The following is the default popup provided by Gamebase SDK when the service status is 'Service Closed'.

[Note] Configure messages to be displayed according to service status For Update Recommended (In Service), Update Required, or Service Closed status, you can set the message to be exposed to users in multiple languages. If you select the service status, default messages are provided according to the language settings configured for the app, and if you want, more languages can be added or change the default message text. If there are already settings for each language, those settings are used regardless of the app's language settings. If there is no information in the app's language settings, the default messages are provided in 5 languages (Korean, English, Japanese, Simplified Chinese, and Traditional Chinese). These languages can be added or the text of the default message can be changed.
(4) Server address
Enter the server address (IP, URL) to be used by client. If you enter the server address in the App tab, it is applied to all clients. So enter the server address only when you want to use a different server address per client.
(5) Debug log
You can change whether to display debug logs of Gamebase SDK in the console in real time. If it is not set, the default value set in the Gamebase SDK will be used. You can set whether to display debug logs in the console or not. Even if the debug log is 'OFF' in the Gamebase SDK, the Gamebase debug logs are displayed on the device if you set debug log to 'ON' for the console.
(6) Memo
You can write a brief memo about the client in no more than 30 characters.
Terms Of Service
Create and configure the terms and conditions to display within the game.
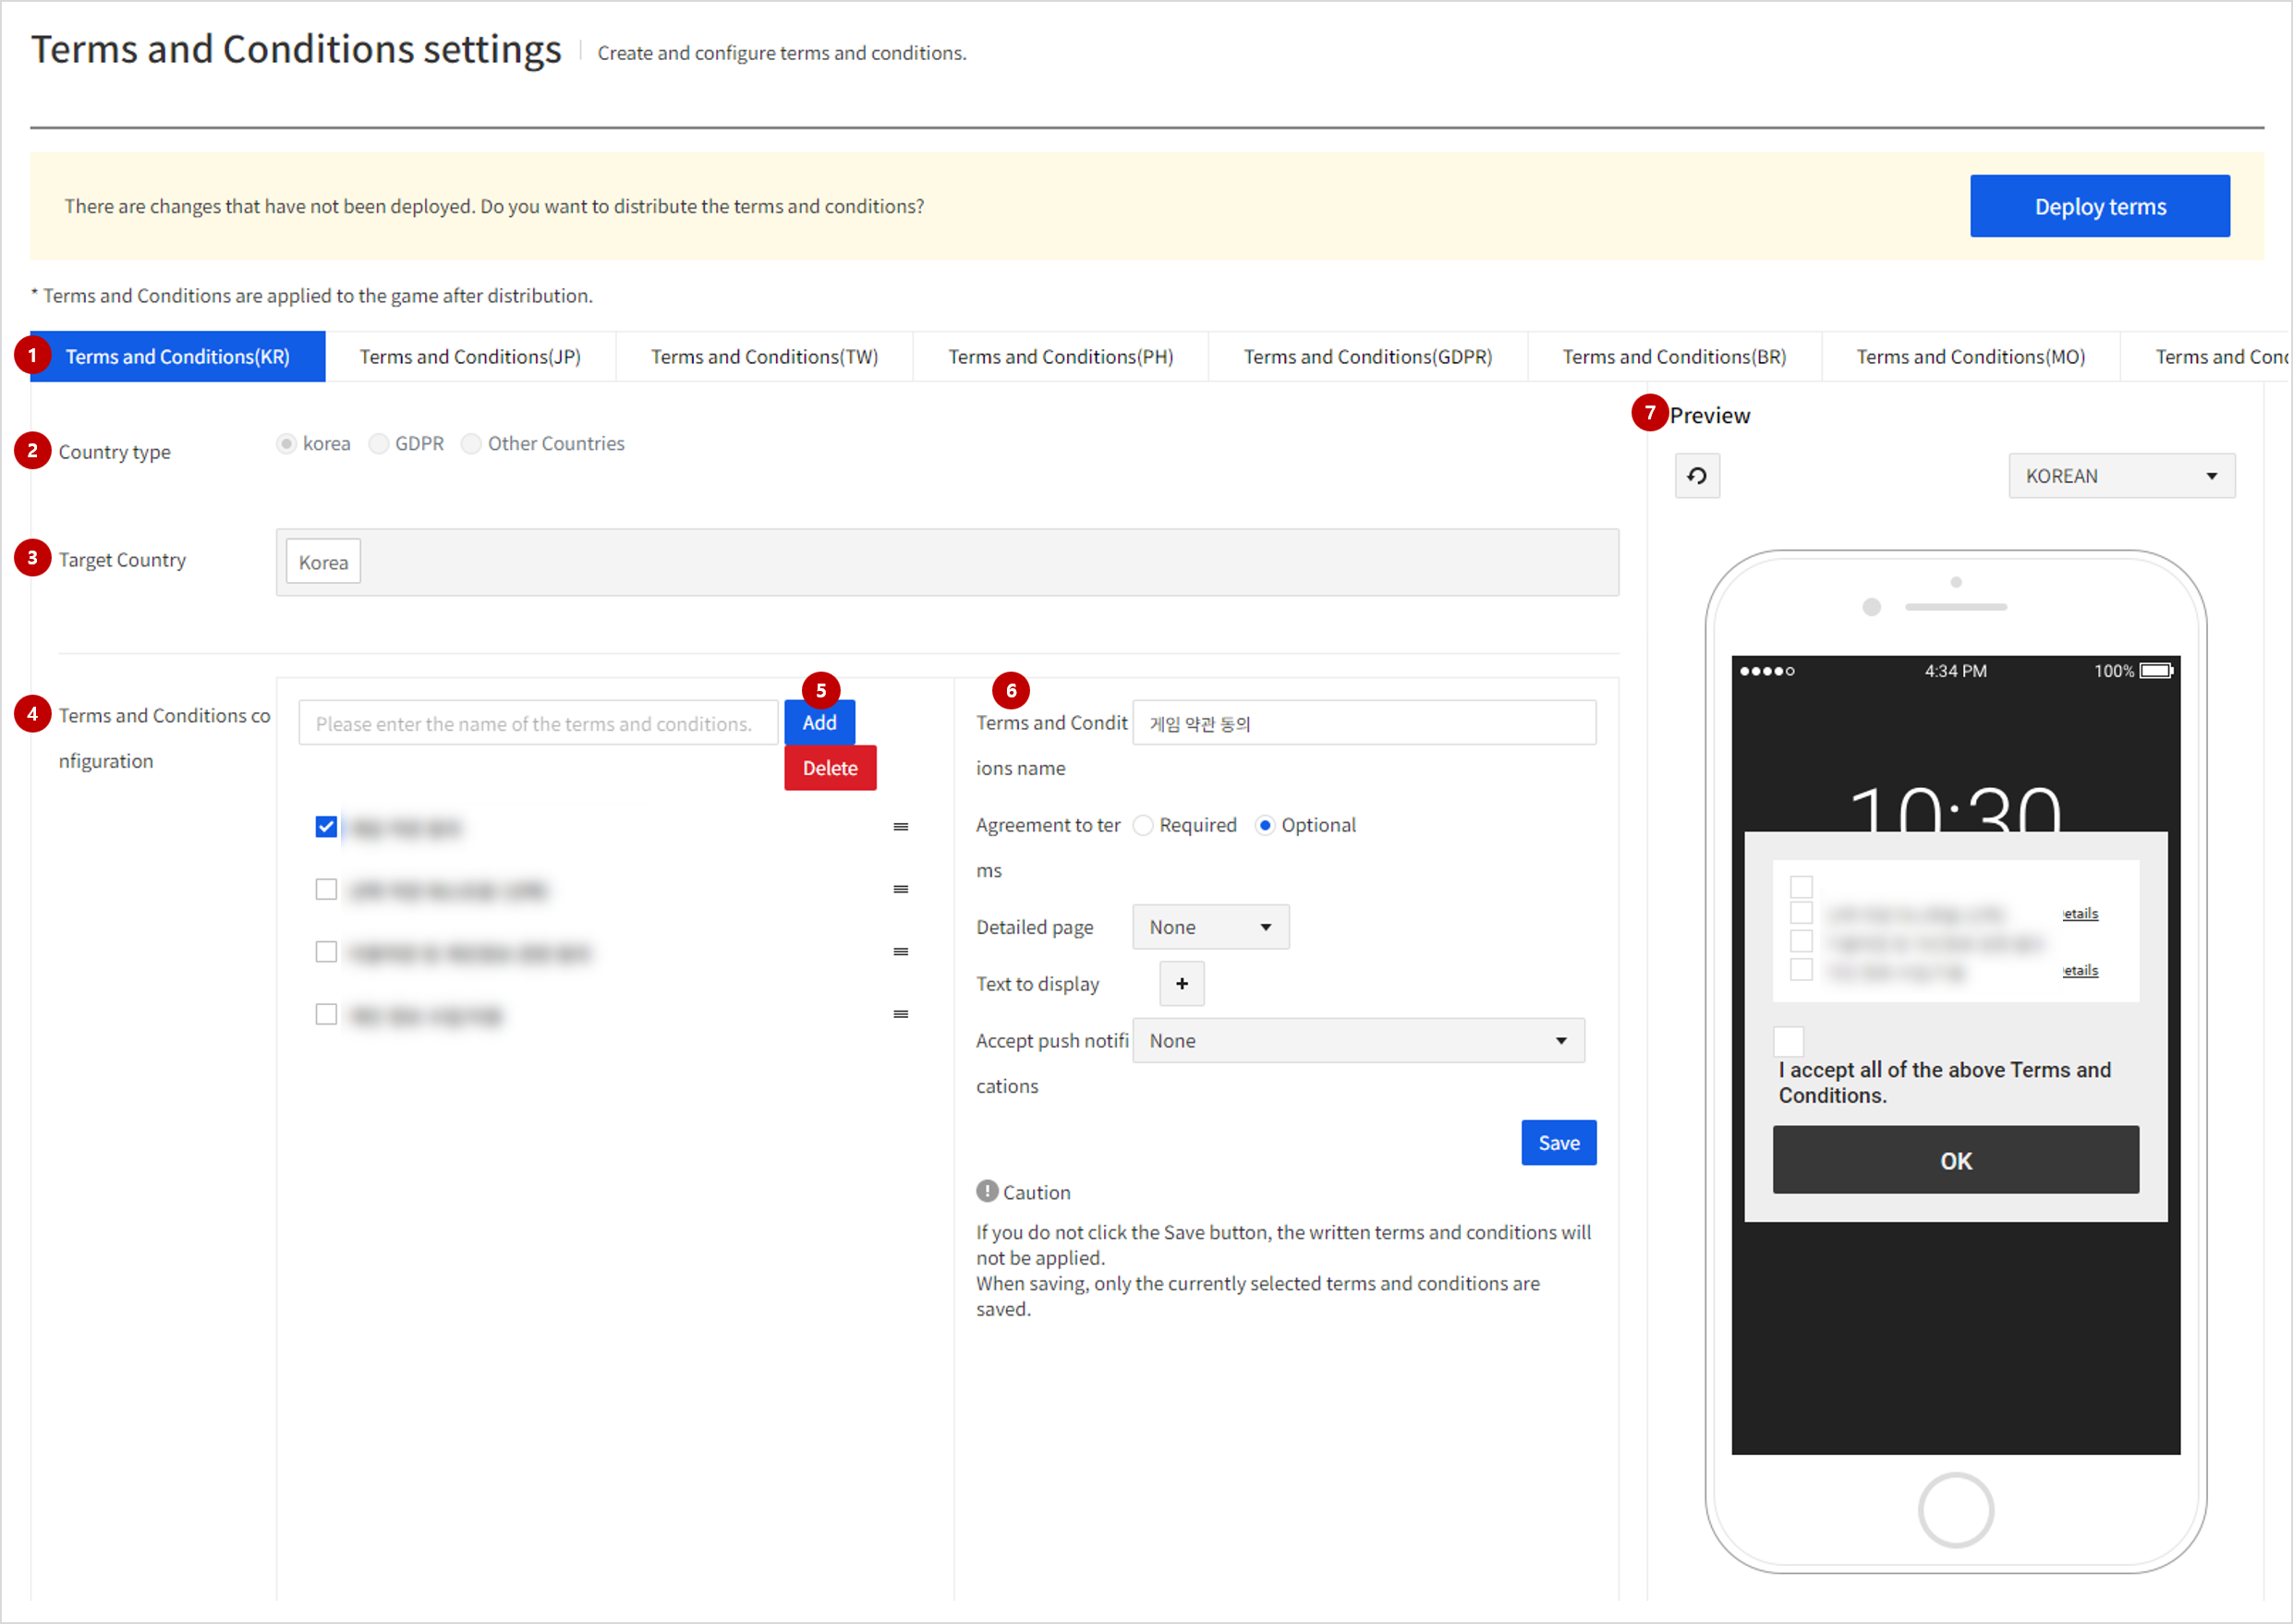
(1) Created terms and conditions list
You can click the - + button to create another terms and conditions.
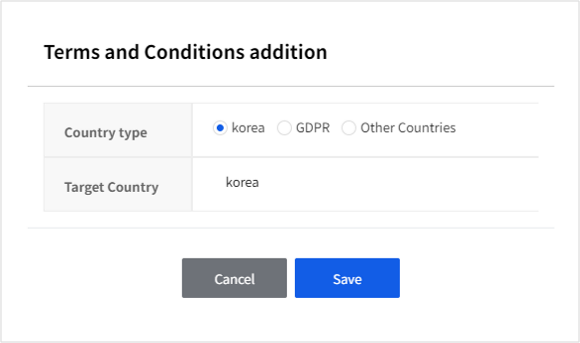
(2) Terms and conditions country type
(3) Target country of the terms and conditions
- If the country type is Other, you can additional select the target country.
(4) Terms and conditions configuration
- You can specify the sequence of the terms and conditions by dragging & dropping.
- A total of 25 terms and conditions can be created (5 high-level T&C and 5 low-level T&C).
(5) Create terms and conditions
- In the terms and conditions list, select the terms and conditions configuration you want and click the Add button to create the low-level terms and conditions.
- If a low-level terms and conditions is selected, you cannot create terms and conditions.
(6) Details of the selected terms and conditions
- Terms and conditions name
- Name for managing the terms and conditions.
- Terms and conditions agreement
- Consent to terms and conditions.
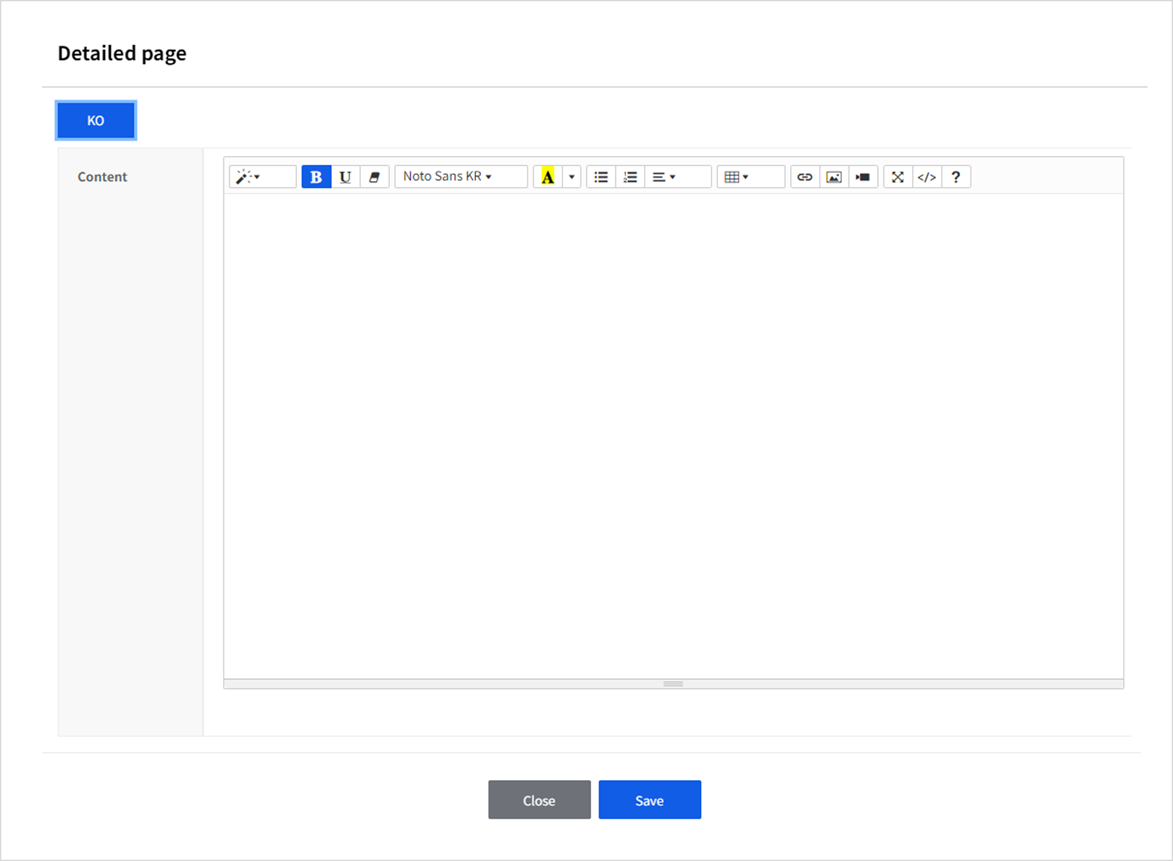
- Details page
- None: Details page does not exist.
- Enter URL: Sets URL for Details page.
- Enter Manually: Creates a Details page.
- Text to display
- Text to display in the game.
- + button allows you to add a language.
- If an unavailable language is requested, it shows the checked language on the button by default.
- Accept push
- None: Not a consent to the push.
- Opt in advertising: Terms and conditions which require advertising push notification opt-in.
- Opt in night advertising: Terms and conditions which require night advertising push notification opt-in.
[Caution]
If you do not click the Save button, the terms and conditions that you wrote won't be applied. Saves only the currently selected terms and conditions details.
Terms Of Service Deploy
The distribute terms and conditions and distribution history to display in game.
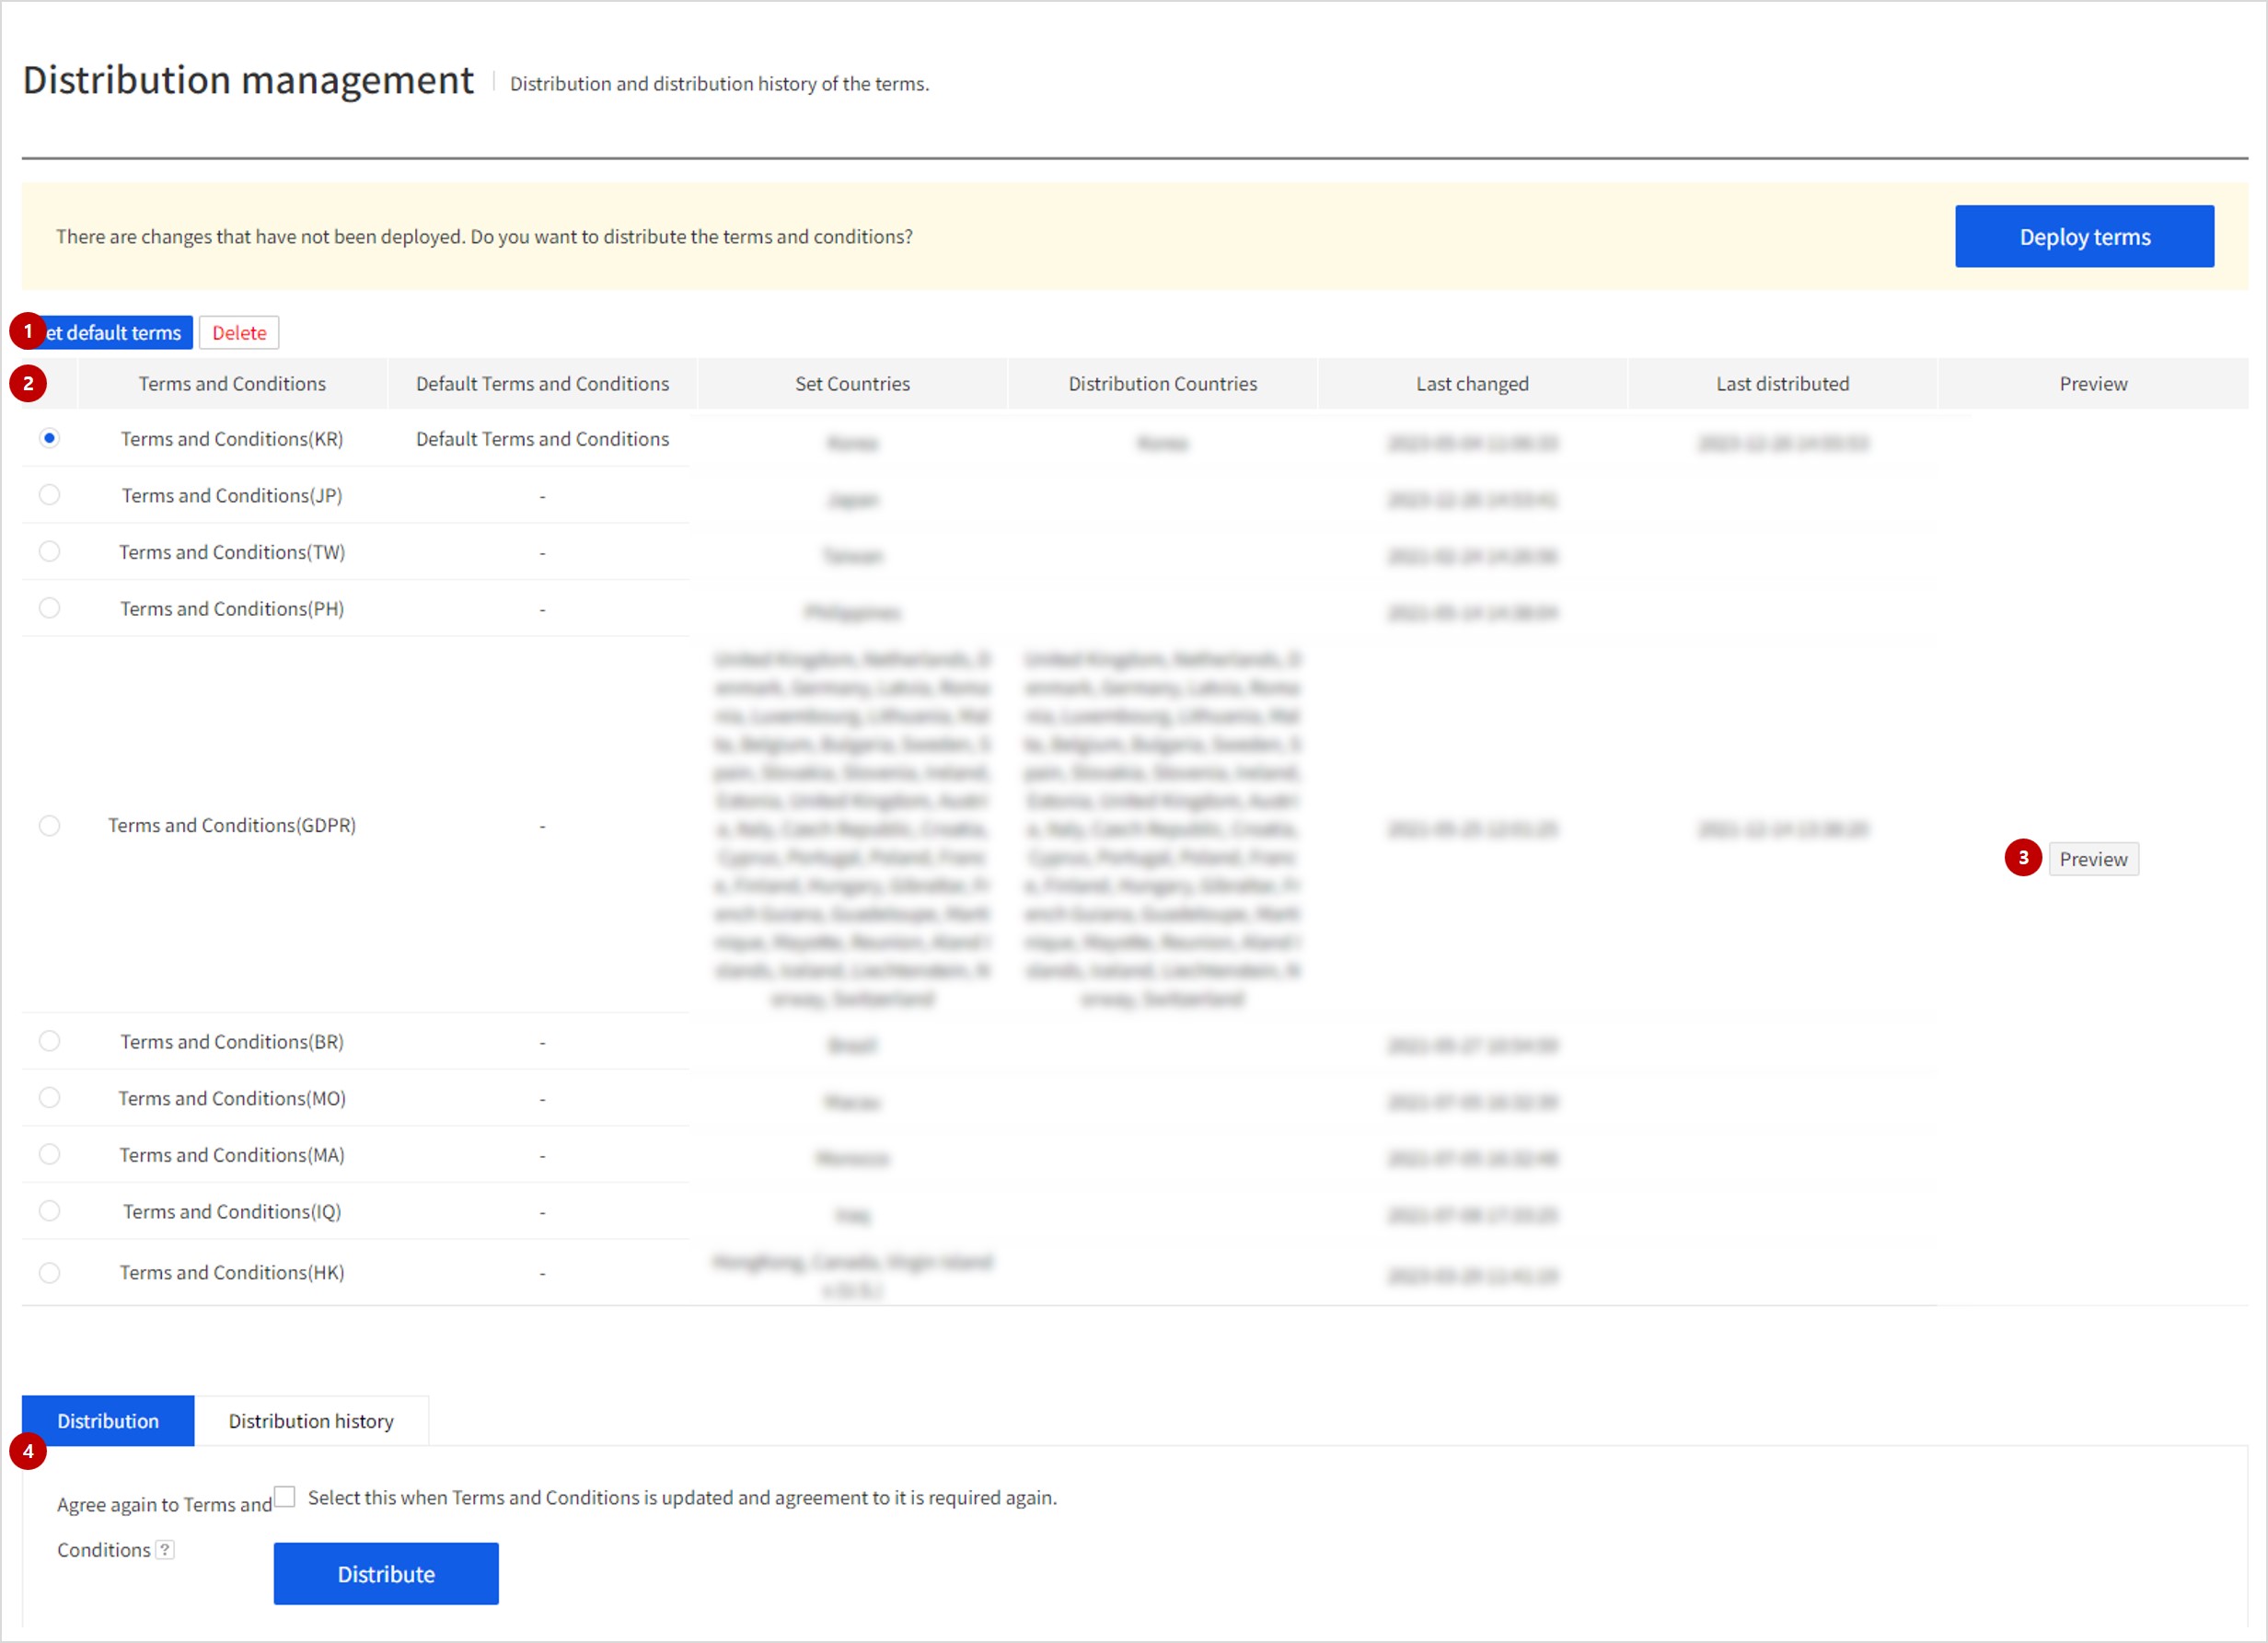
(1) Default terms and conditions settings
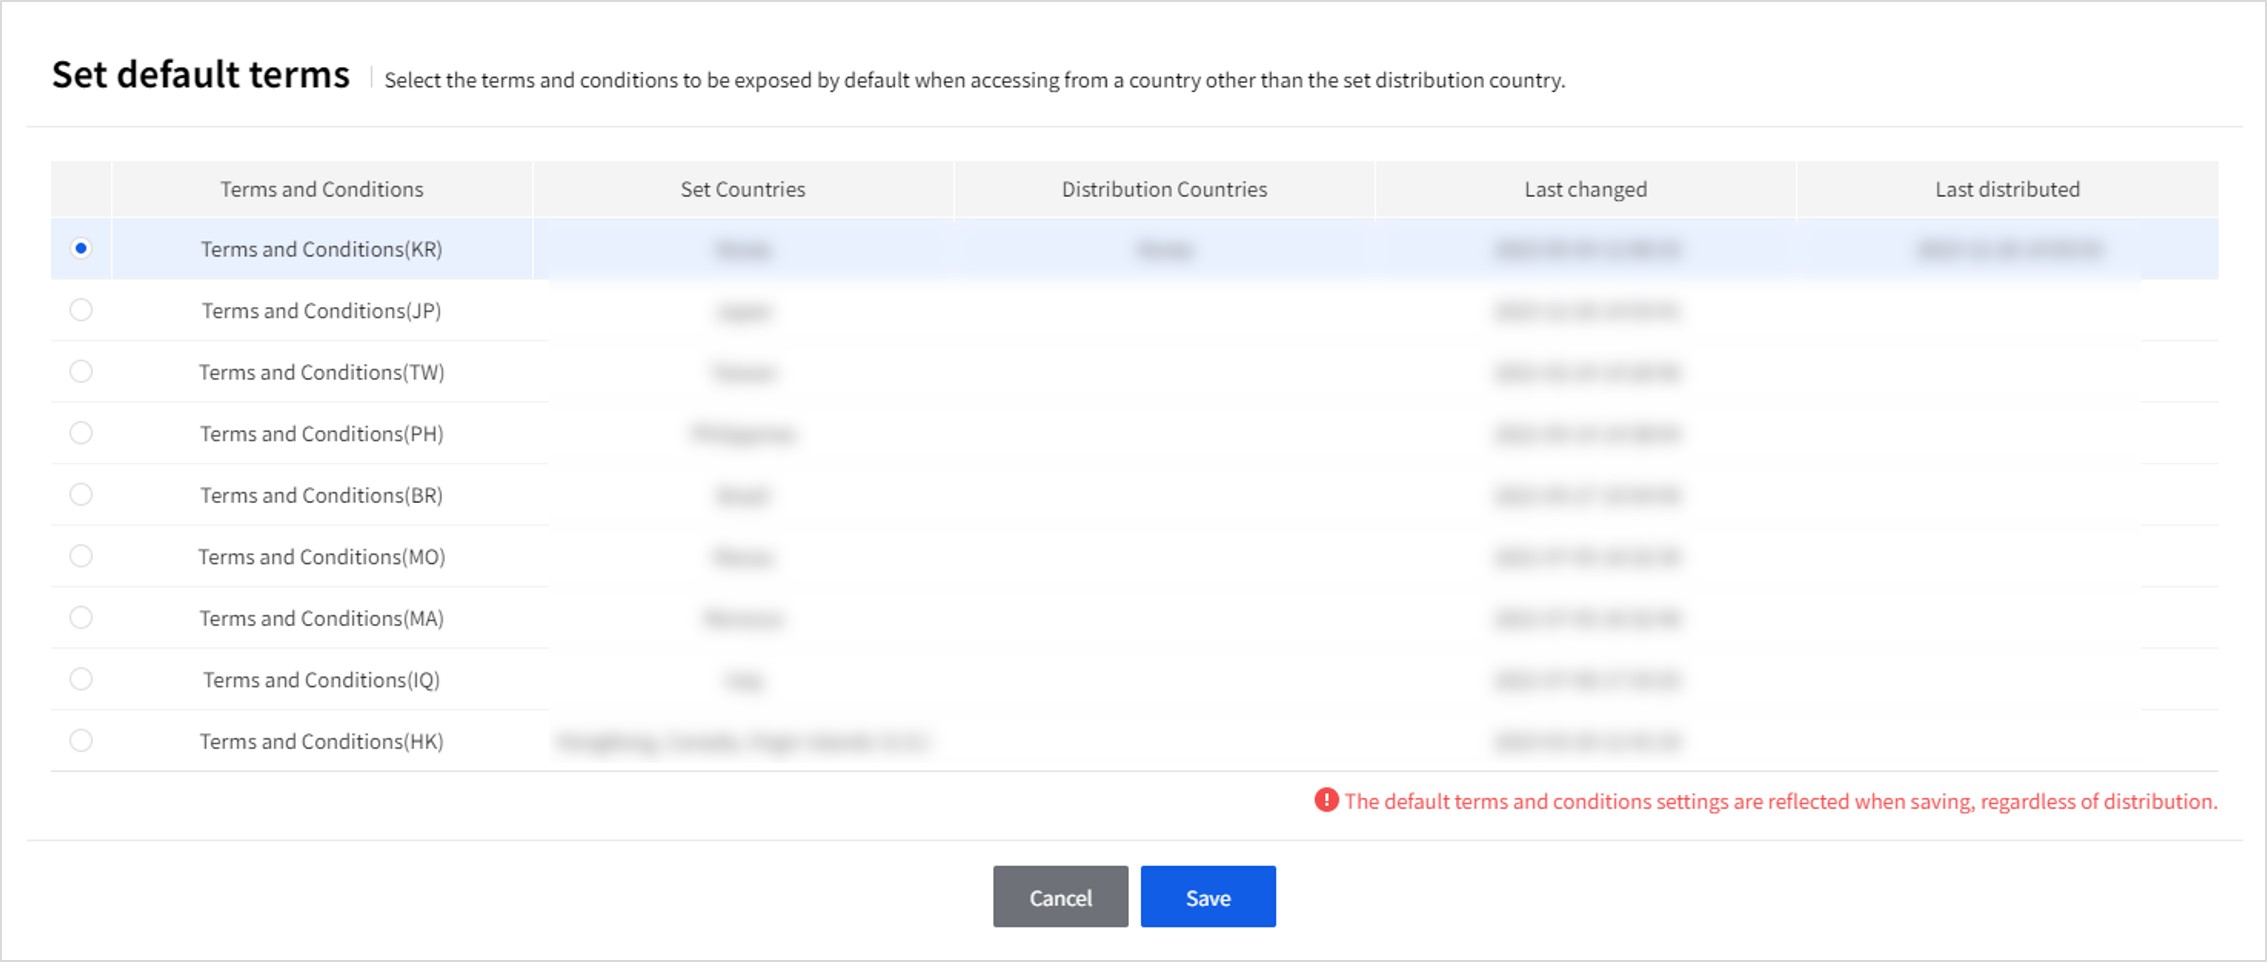
- Select the terms and conditions to expose by default if accessed from a country without distributed terms and conditions.
[Caution]
You may not set the default terms and conditions if you do not want. If the default terms and conditions are not set, the terms and conditions are not exposed when accessed from outside the distributed country.
(2) Terms and conditions list
- List of the currently created terms and conditions.
(3) Preview
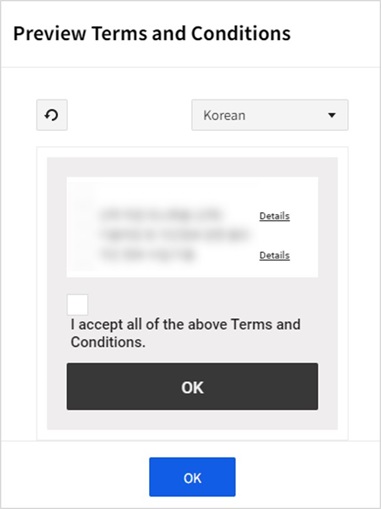
- You can preview the terms and conditions selected from the list of terms and conditions.
(4) Terms and conditions distribution and distribution history
Distribution
- You can distribute the selected terms and conditions from the terms and conditions list.
- If you proceed with distributing after checking 'Agree again to Terms and Conditions', new terms and conditions are exposed to the users who have previously consented to the terms and conditions. For a simple revision, such as some word changes, checking the Agree again to Terms and Conditions box is unnecessary.
Distribution history
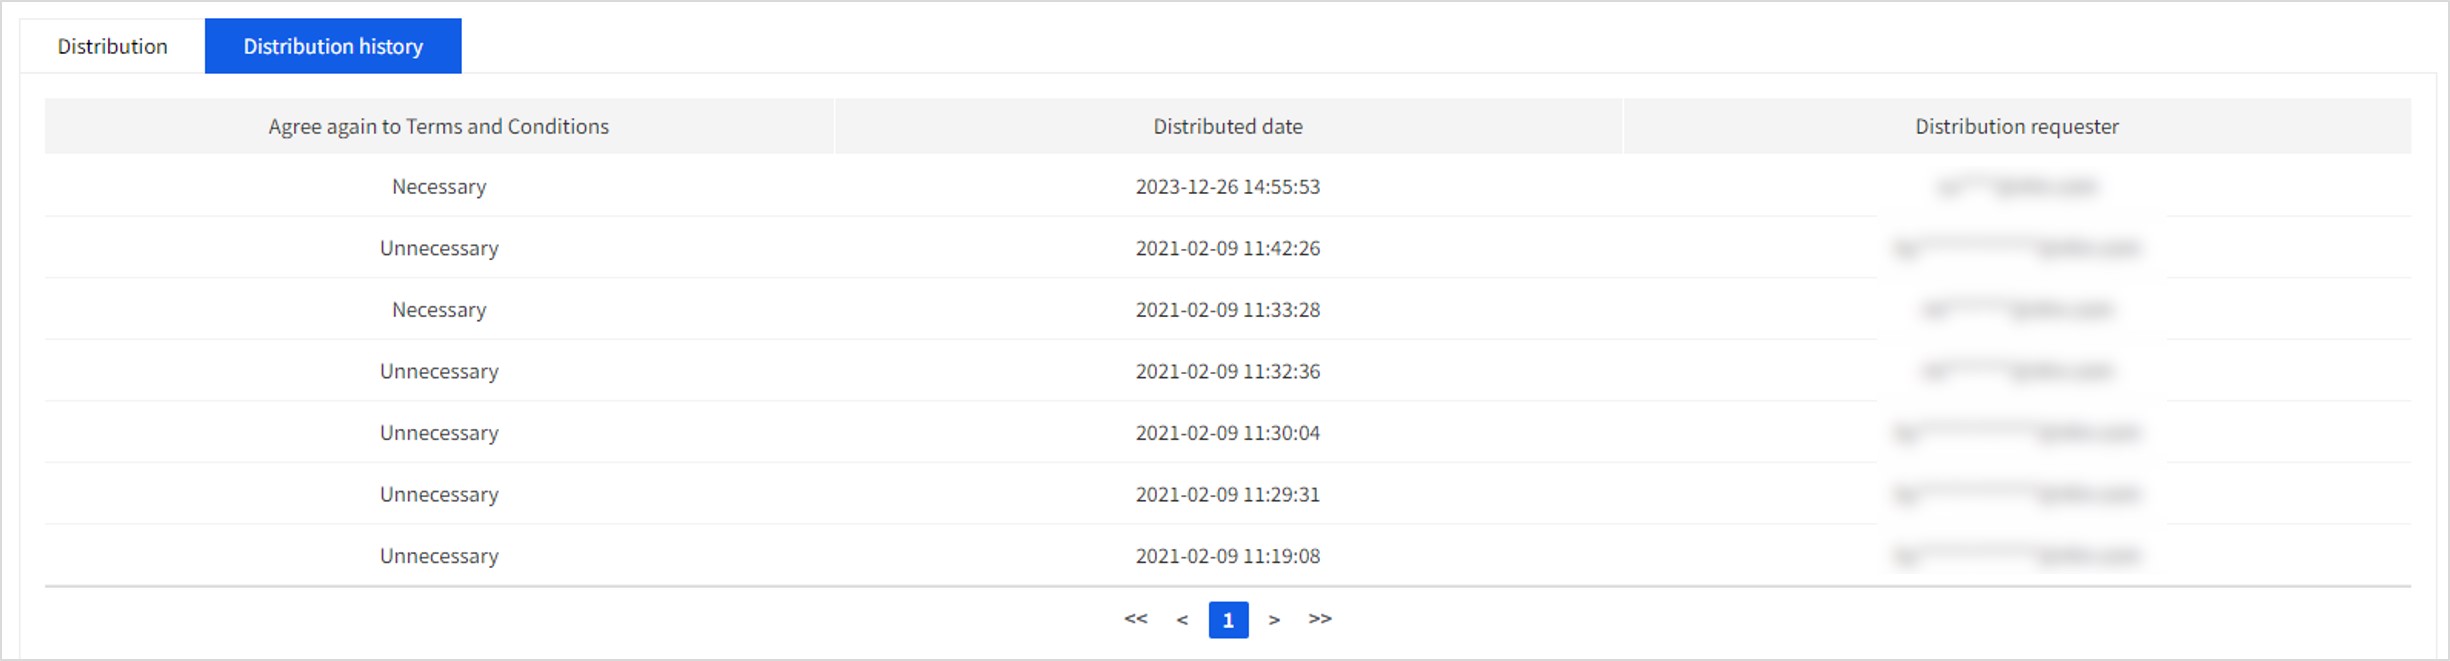 - Distribution history of the terms and conditions selected from the list of terms and conditions.
Installed URL
Manage store URL information to install a game.
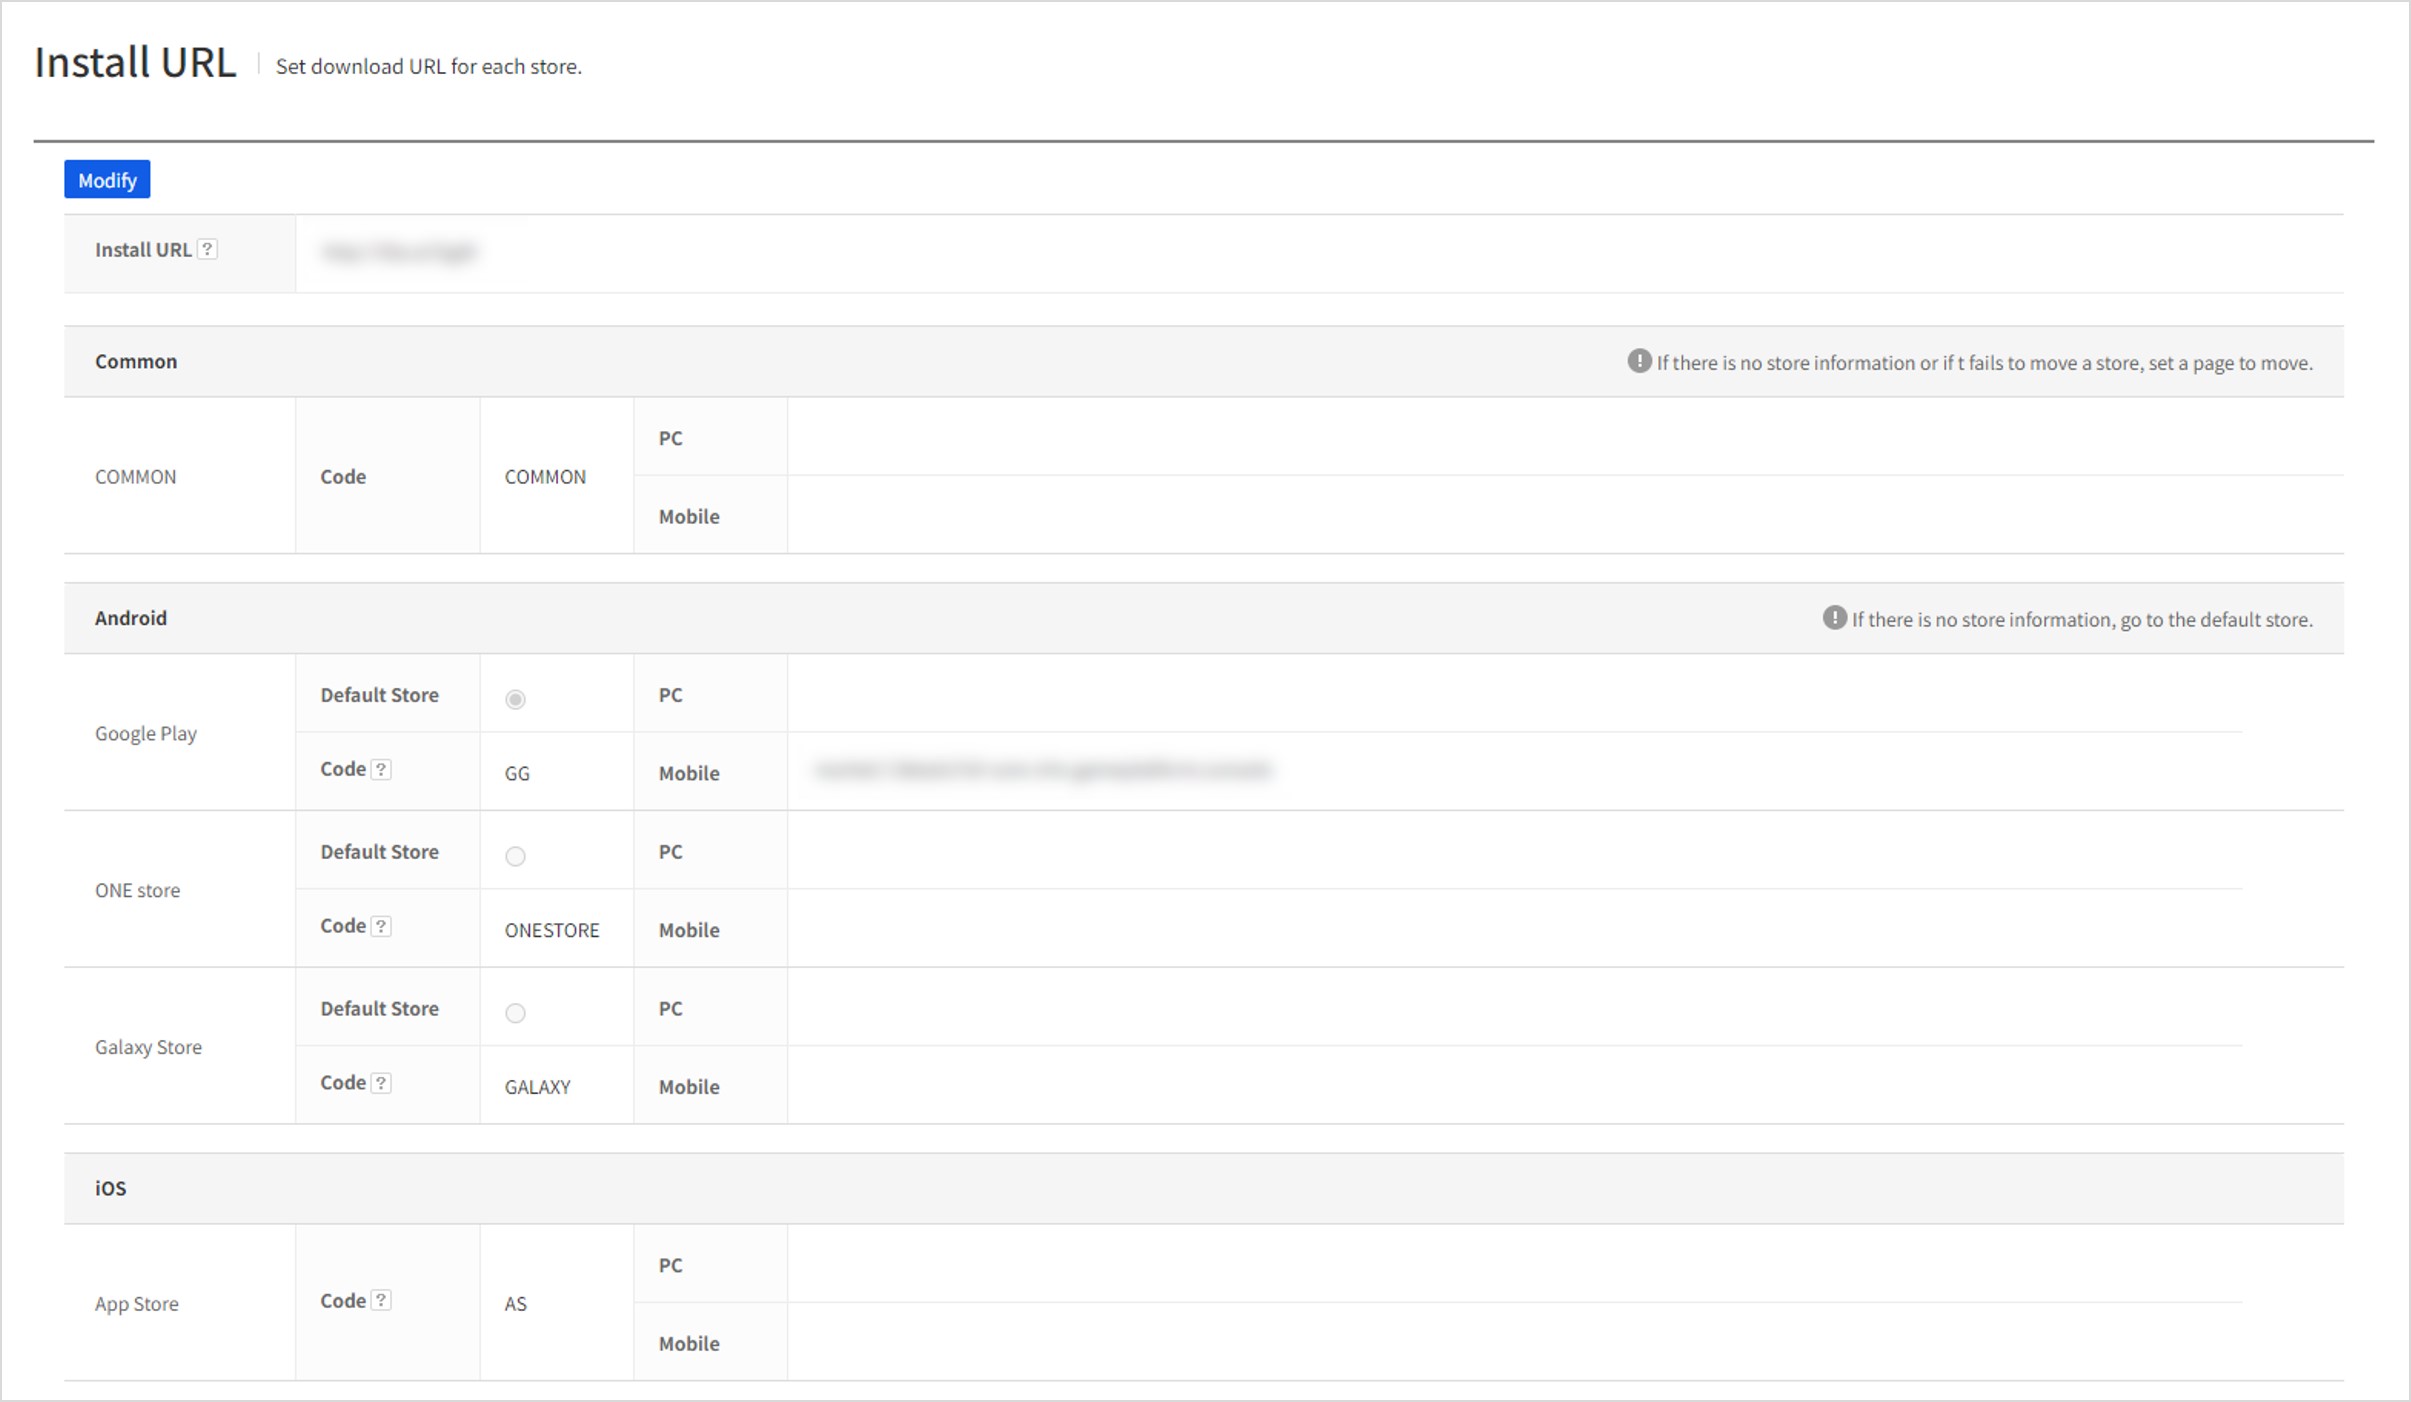
Set the value of address to be provided by store when the client status is Update is recommended(in service ) or update is required. A user's click on a short URL via PC or mobile will be redirected to a site entered on a user device (device, operating system, store, etc.). If there is no store information, or redirection fails, the URL will be linked as set in 'COMMON'.
[Example 1] A user clicks Install URL in a text message on an Android device.
(Device:mobile,OS:Android,Store:N/A) Move to a mobile URL of a representing Android store. In the case of 'Google Play', move to the URL set on the 'Google Play' mobile.
[Example 2] A user playing a game downloaded from 'One Store' clicks 'Update Now' in the 'Update Required' pop-up.
(Device:mobile,OS:Android,Store:One Store) Move to the URL set in 'One Store' mobile (installation page for One Store mobile)
[Example 3] A user enters Install URL on a PC.
(Device:PC,OS:Windows,Store:N/A) Move to URL set in COMMON PC.
Properties
To modify Install URL, click Modify.
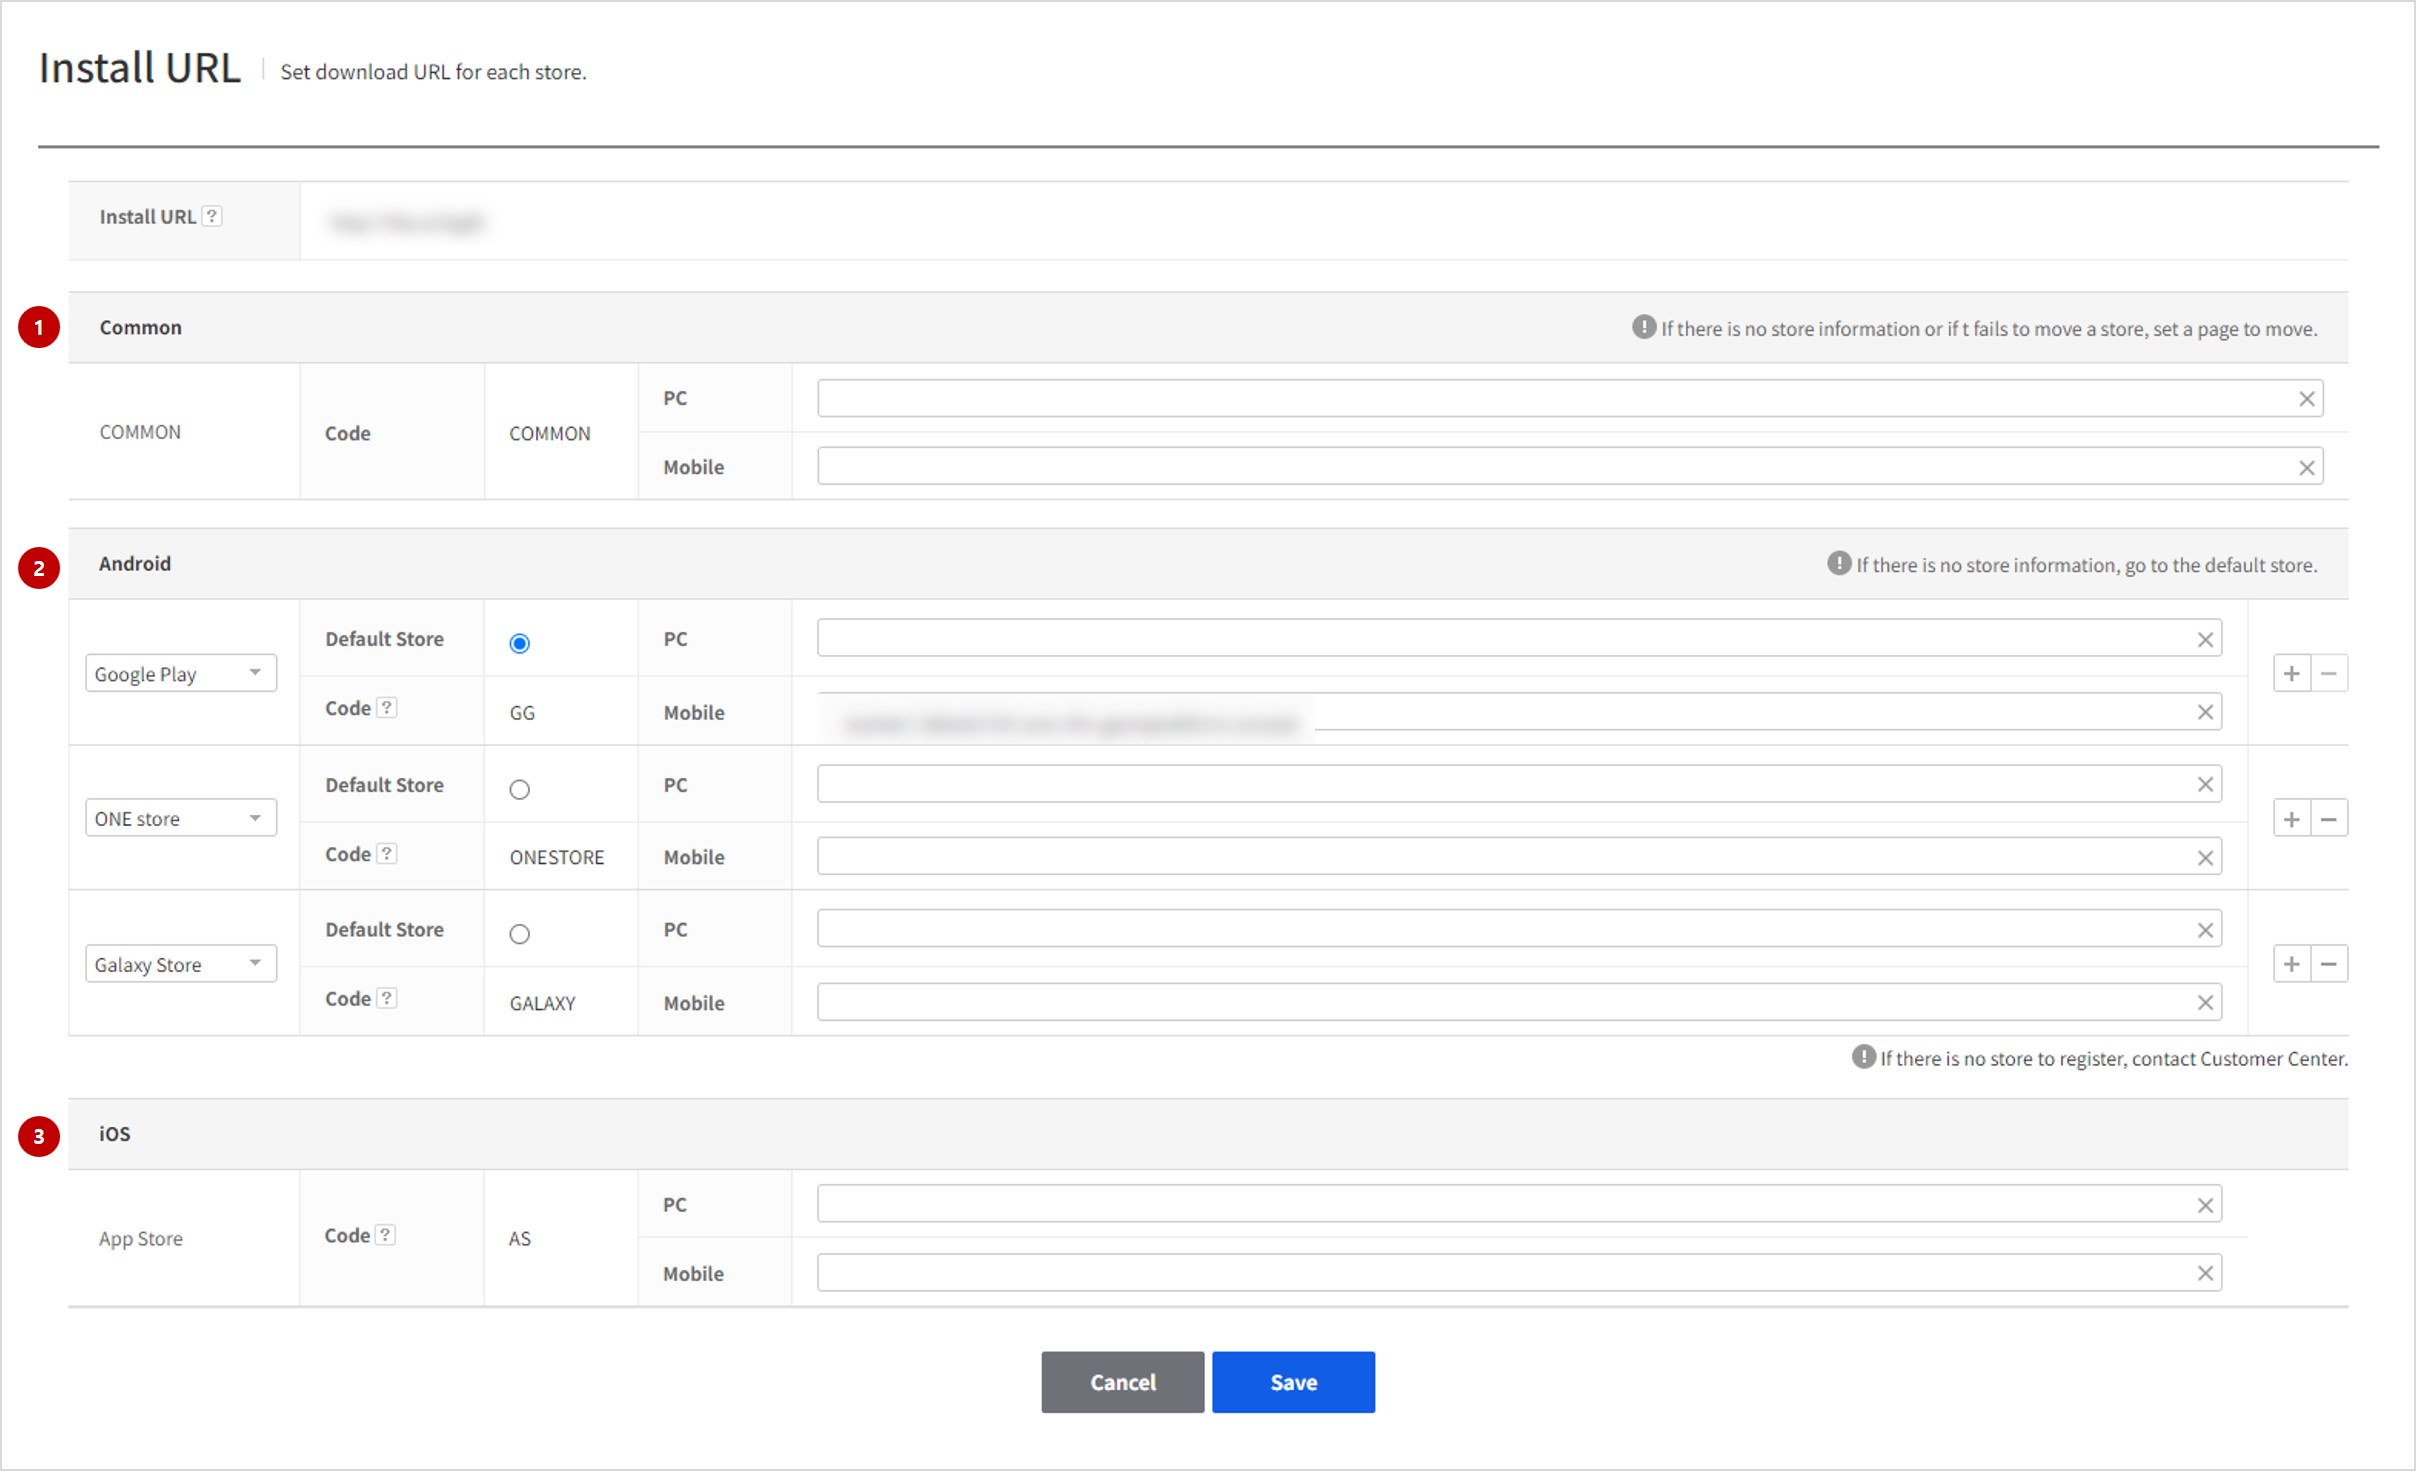
- Item setting can be different for PC and mobile. Enter the same value for each device, if there is no need to separate.
- When a store you want is not on the list, contact CustomerCenter so as to add as required.
(1) Common
Set an URL to connect when store information is unavailable or store relocation has failed.
(2) Android
Set an URL to connect at the request of Android users.
(3) iOS
Set an URL to connect at the request of App Store users.
(4) Standalone
Set an URL to connect from an app of standalone service. Standalone needed PC URL only.
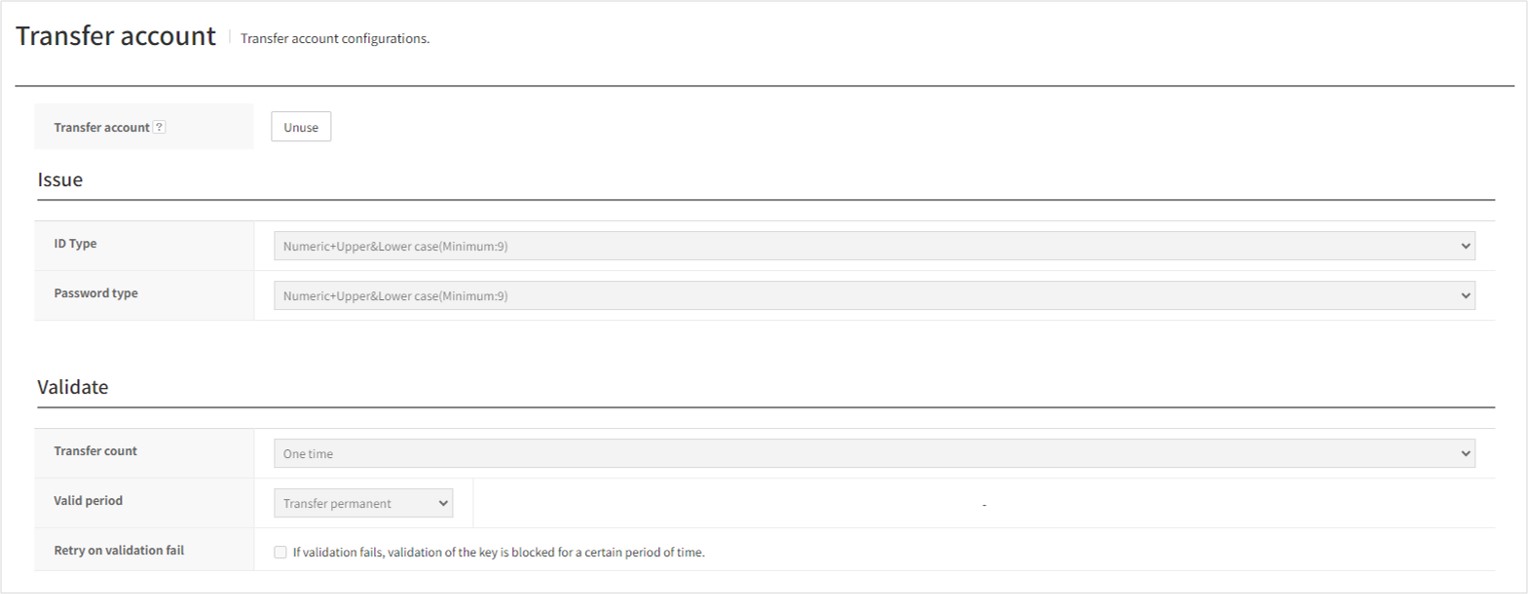
Transfer account
Transfer account allows a game user logged in as Guest to continue the game on another device without using another ID provider. You can change the game device just by getting the transfer key from the current device where the game is being played and entering the key on another device. Transfer Device function is disabled by default. To use this, click Enable on Transfer Device.

Click the Enable button and then enter the information required for transferring to the device.
 Description on each item is as follows:
Properties
Issue
Sets the format of a key issued for device transfer. The key for device transfer can be either ID only or both ID and password. Format of ID and password can be a combination of the desired lowercase letters, uppercase letters, and numbers.
- Auto ID Issue Format: Sets the format of issuing a device transfer ID. The options to be set are as follows:
- Number(Minimum length: 12): Issues an ID with numbers only. The minimum length of the issued ID is 12 characters.
- Number+Lowercase(Minimum length: 10): Issues an ID with numbers and lowercase letters. The minimum length of the issued ID is 10 characters.
- Number+Uppercase(Minimum length: 10): Issues an ID with numbers and uppercase letters. The minimum length of the issued ID is 10 characters.
- Number+Lowercase+Uppercase(Minimum length: 9): Issues an ID with numbers, lowercase letters, and uppercase letters. The minimum length of the issued ID is 9 characters.
-
Lowercase+Uppercase(Minimum length: 9): Issues an ID with lowercase letters and uppercase letters. The minimum length of the issued ID is 9 characters.
-
Password auto issue format: Sets the format for issuing the password to be used for login with the ID transferred to the device. The options to be set are as follows:
- Disable Password: Select this not to use a password. If you select this option, you can set the valid time of the ID only from the verification below.
- Number(Minimum length: 12): Issues a password with numbers only. The minimum length of the issued password is 12 characters.
- Number+Lowercase(Minimum length: 10): Issues a password with numbers and lowercase letters. The minimum length of the issued password is 10 characters.
- Number+Uppercase(Minimum length: 10): Issues an ID with numbers and uppercase letters. The minimum length of the issued password is 10 characters.
- Number+Lowercase+Uppercase(Minimum length: 9): Issues an ID with numbers, lowercase letters, and uppercase letters. The minimum length of the issued password is 9 characters.
- Lowercase+Uppercase(Minimum length: 9): Issues an ID with lowercase letters and uppercase letters. The minimum length of the issued password is 9 characters.
Verification
Sets the verification conditions of the issued device transfer key. For verification of the issued device transfer, you can set the transfer count, expiration date, block upon failure, etc. 3. Device transfer count: Sets the count of allowed number of device transfers for the issued ID. You can select either Unlimited or One-time. 4. Expiration date: Sets the expiration date of the issued account. The issued device transfer ID is affected by this value. You have to select either Unlimited or Set Period. 5. Block reverification upon failure: When a user tried logging in but failed, the account is blocked for a certain period. If you select this option, additional settings will be displayed. 6. Login attempt count until blocking: Displayed when Block reverification upon failure is selected. The account is blocked when login verification fails for the specific count entered here. The value must be 1 or above. 7. Block period: Sets the period of blocking time that must be passed to unblock the account for retry. Select PERMANENT or Specify Period.If you select Specify Period, you can set the desired block hours and minutes.
After initial setting completed
 Once the initial settings are done, game users can disable the device transfer function only if they want. If they need to change the settings, they need to contact Customer Center.
Click Disable to disable the function. In this case, all device transfer keys issued will be deleted. So be careful when you should determine whether to disable the function or not.
Once the initial settings are done, game users can disable the device transfer function only if they want. If they need to change the settings, they need to contact Customer Center.
Click Disable to disable the function. In this case, all device transfer keys issued will be deleted. So be careful when you should determine whether to disable the function or not.
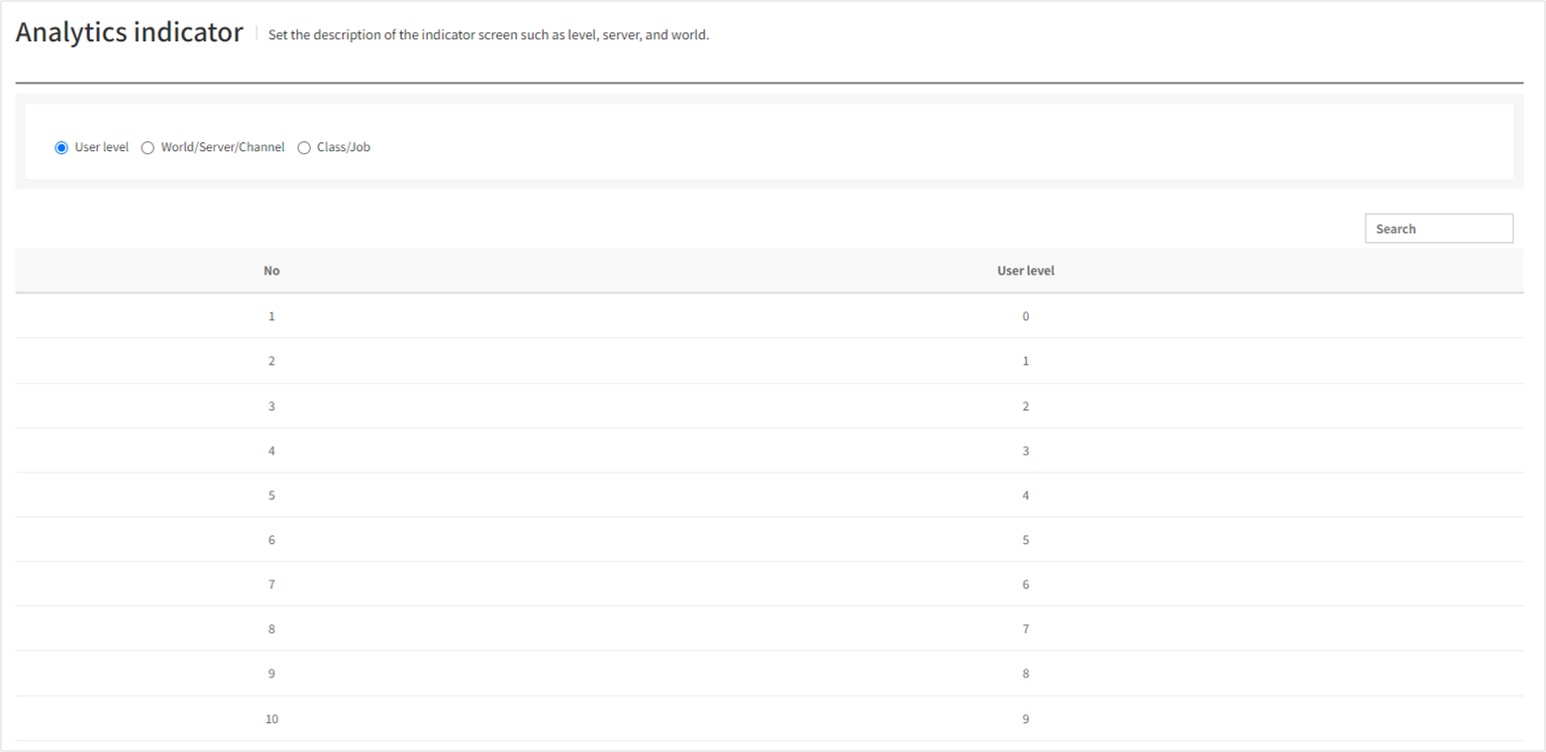
Analytics indicator
The transfer index for stacking indexes in Analytics can be checked and configured. They are divided by user level (INT), world/server/channel, and class/profession. For user level, only the level items actually transferred to Analytics are displayed, for world/server/channel and class/profession items, only the items registered in this menu are stacked in Analytics as indexes.
By User Level (INT)
Can check the level indexes transferred to the Analytics system.
In this item, only search is available, without separate edits.
Search by World/Server/Channel and Class/Profession
Currently, you can check the transfer index configured for each item.
If you do not want to stack the indexes for the items configured in the Search screen, you can delete previously registered items using the Delete button.
Deleted items are not displayed as indexes in the Analytics menu. Be careful when deleting items, as the indexes of deleted items won't be stacked anymore.
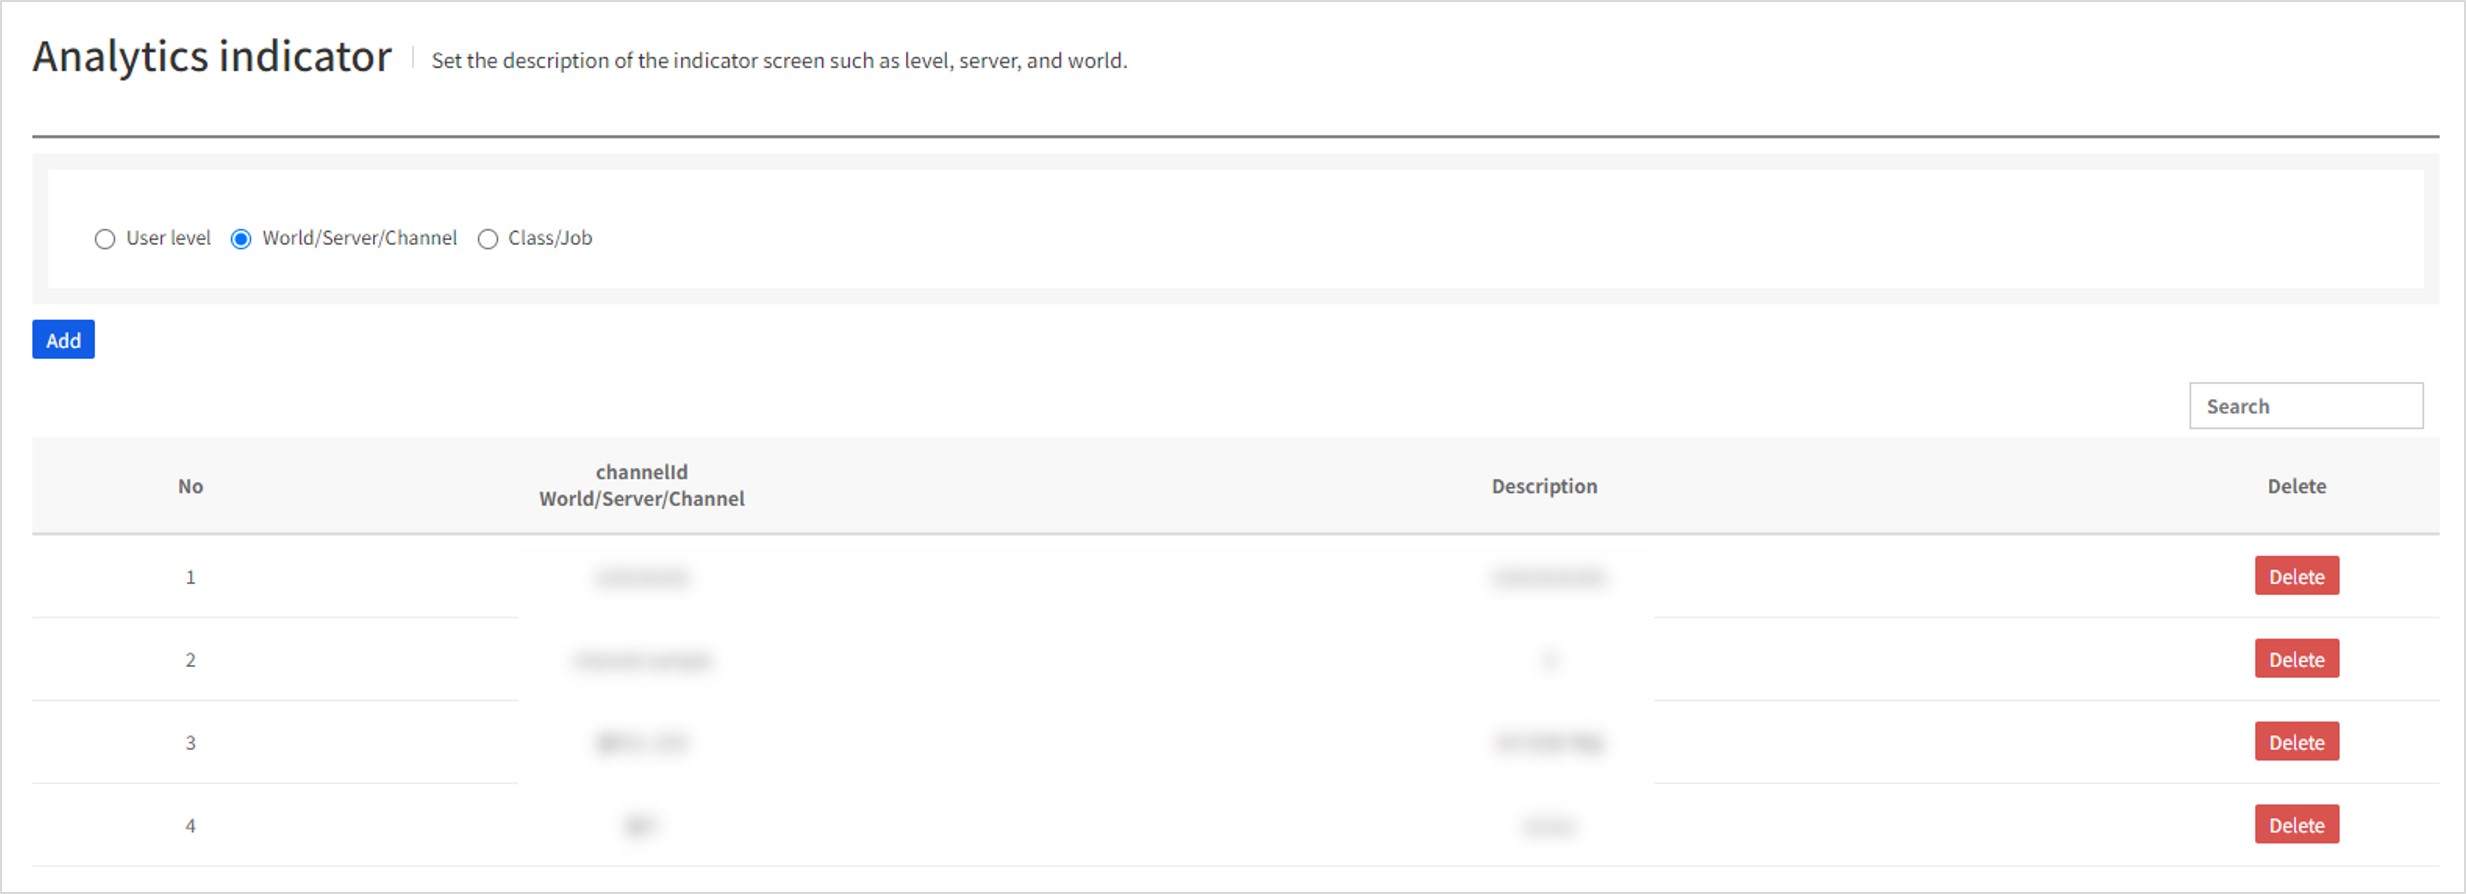
Register each World/Server/Channel and Class/Profession
You can register new information that you want to stack in Analytics indexes.
You can use the Add button below. Up to 100 new items can be registered.
Only those items displayed on the Index screen can be edited among the previously registered data. If you want to delete them, you need to go to the Search screen and delete them there.
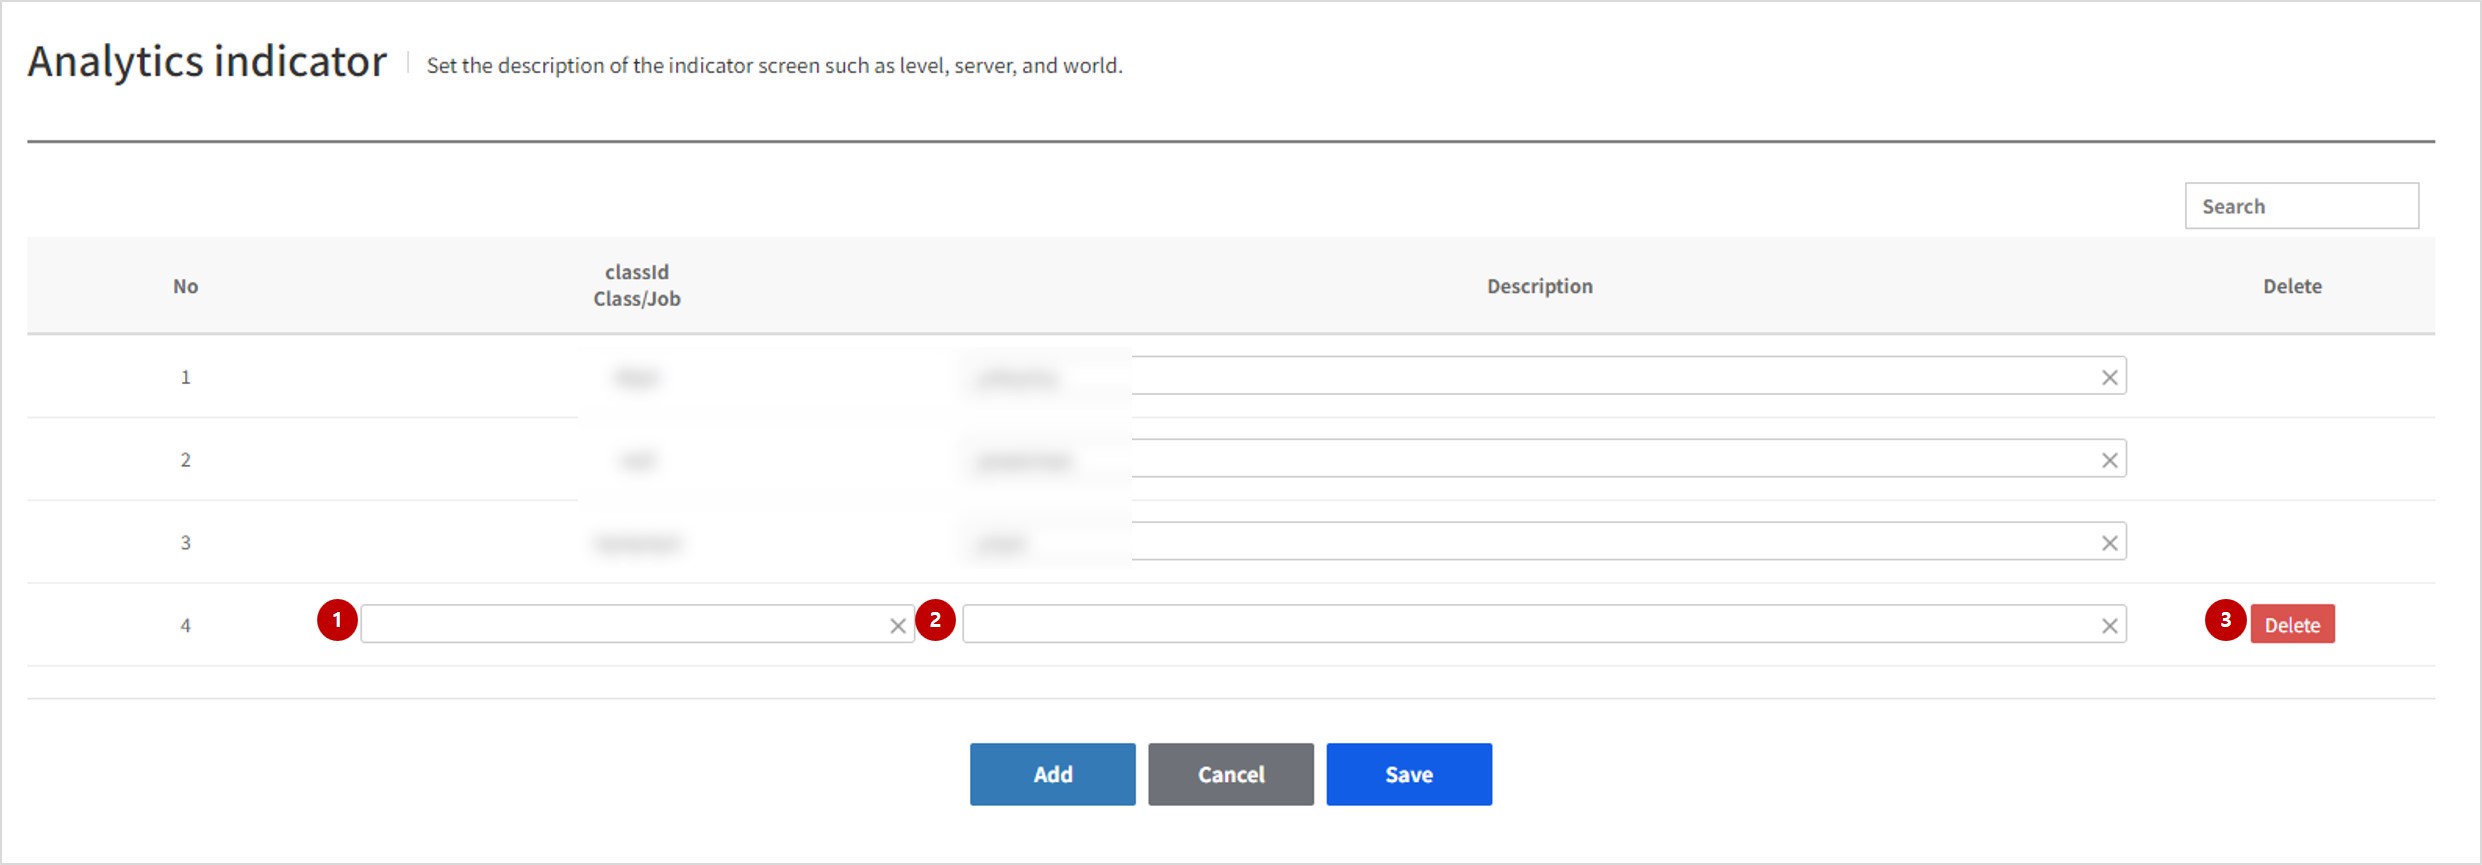
(1) ChannelId/ClassId: Enter the information of the separator to be stacked in Analytics. Enter the ID information you want to set when stacking indexes.
(2) Display index screen: Type in text to display when displaying the index that was transferred to the ID entered as the first item. The information can be used to edit already registered indexes.
(3) Delete: Only the items that are newly added can be deleted in the Register screen.
Table of Contents
- Game > Gamebase > Console Guide > App
- App
- Basic information
- Server address
- Language settings
- Authentication information
- In-app URL
- Customer Center
- Test Device
- Authentication Information
- Client
- Client List
- Properties
- Terms Of Service
- (1) Created terms and conditions list
- (2) Terms and conditions country type
- (3) Target country of the terms and conditions
- (4) Terms and conditions configuration
- (5) Create terms and conditions
- (6) Details of the selected terms and conditions
- Terms Of Service Deploy
- (1) Default terms and conditions settings
- (2) Terms and conditions list
- (3) Preview
- (4) Terms and conditions distribution and distribution history
- Installed URL
- Properties
- Transfer account
- Properties
- Analytics indicator
- By User Level (INT)
- Search by World/Server/Channel and Class/Profession
- Register each World/Server/Channel and Class/Profession