Game > Gamebase > Unity Developer's Guide > Getting Started
This guide describes the environments and initial setting of Gamebase Unity SDK.
Environments
[Note]
Supported Unity versions
- 2018.4.0 ~ 2023.2.5
Android
[Caution]
Since August 1 of 2019, new apps on Google Play must support 64-bit architecture. See Google Play policy and Unity versions supporting 64 bits
Dependencies
Supported Platforms
- iOS
- Android
- Standalone
- Windows 7 or higher
- macOS 10.15 or higher
- WebGL
- Editor
- Supports functions only partially.
To call a Gamebase API which is not supported by a selected platform, following errors are returned as callback. If there is no callback, the output will come with a warning log.
- GamebaseErrorCode.NOT_SUPPORTED
- GamebaseErrorCode.NOT_SUPPORTED_IOS
- GamebaseErrorCode.NOT_SUPPORTED_ANDROID
- GamebaseErrorCode.NOT_SUPPORTED_UNITY_STANDALONE
- GamebaseErrorCode.NOT_SUPPORTED_UNITY_WEBGL
- GamebaseErrorCode.NOT_SUPPORTED_UNITY_EDITOR
Platforms supporting each API are classified by the icons as below.
API
Supported Platforms ■ UNITY_IOS ■ UNITY_ANDROID ■ UNITY_STANDALONE ■ UNITY_WEBGL ■ UNITY_EDITOR
Installation
Setting Tool is provided to install Gamebase SDK easily.
Specification of Setting Tool
- Download SDK
- Supports download of the latest version of SDK.
- Install SDK
- Supports installation of downloaded SDK.
- Unity: Unitypackage
- Android: Gradle
- iOS: CocoaPods
- Supports installation of downloaded SDK.
- Delete SDK
- Supports deletion of installed SDK.
- Update SDK
- Update is not supported.
- Resetting after removing the SDK replaces the update feature.
Using the Setting Tool
- Gamebase SettingTool v2.0.0 has been newly released.
- It is not compatible with the existing v1.5.0, so please use v2.0.0 or later after completely uninstalling it.
AS-IS
- Proceed with build by including the Gamebase SDK for Android and iOS in the Unity project.
- Gradle and CocoaPods are not supported.
TO-BE
- Gradle and CocoaPods are supported.
- EDM4U (External Dependency Manager for Unity) has been adopted as a required library.
- After downloading EDM4U from EDM4U Github, install it.
- If there is no EDM4U, Gamebase SDK for Android and iOS settings are not available.
- If there is EDM4U in a project, you do not need to download EDM4U.
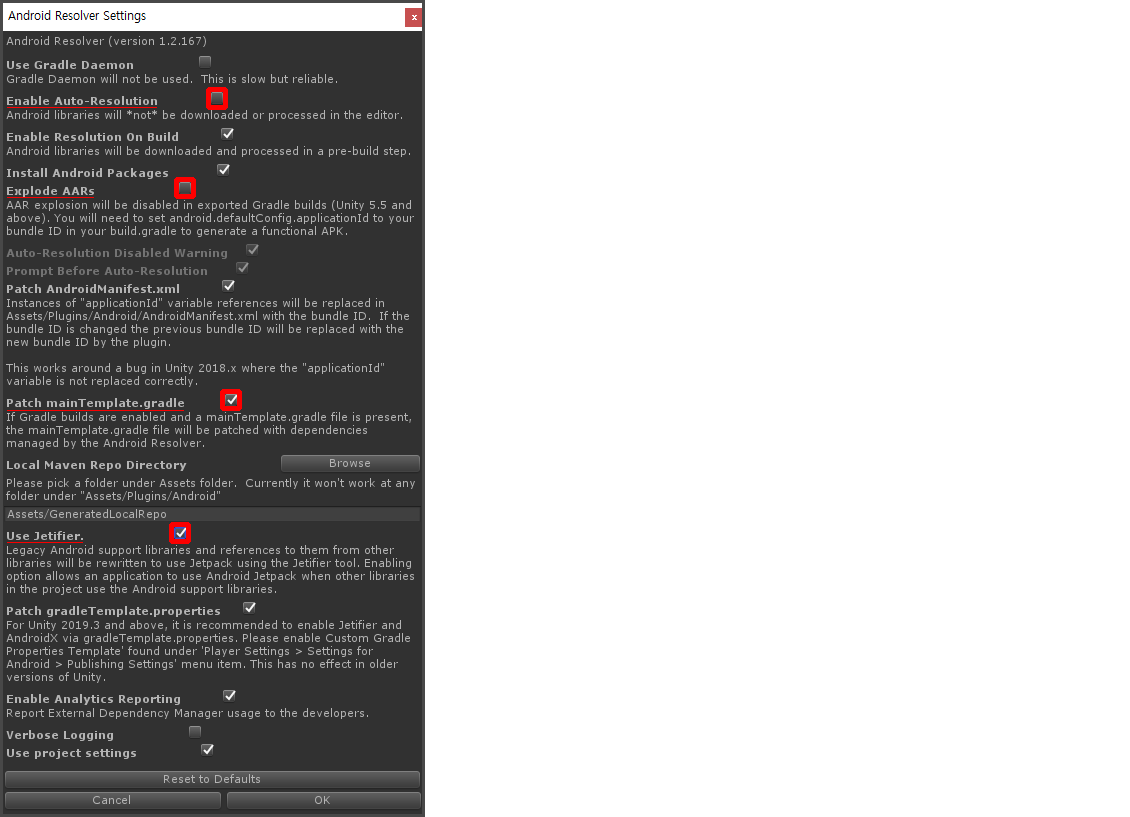
- If you provide a service for the Android platform, select the Top Menu > Assets > External Dependency Manager > Android Resolver > Settings to open the Android Resolver Settings window and set the options as follows.
- Enable Auto-Resolution: Disable
- Explode AARs: Disabled
- Patch mainTemplate.gradle: Enable
- Use Jetifier: Enabled
- If you provide a service for the iOS platform, select the Top Menu > Assets > External Dependency Manager > iOS Resolver > Settings to open the iOS Resolver Settings window and set the options as follows.
- Use Shell to Execute Cocoapod Tool: Disable
- If this feature is enabled, an error occurs where xcworkspace is not created when building iOS in Unity. (CocoaPods 1.11.x bug)
- For users who need to enable this feature, solve the error in one of the 2 ways below.
- Install CocoaPods version 1.10.x.
- Call pod install directly from the Xcode project created in Unity.
- Use Shell to Execute Cocoapod Tool: Disable
[Caution]
If you provide a service for the iOS platform, CocoaPods must be installed. For CocoaPods installation and detailed instructions, refer to cocoapods.org.
Install SDK
- Open a Unity project.
- Import GamebaseUnitySettingTool_{version}.unitypackage.
- In the top menu, select Tools > NhnCloud > Gamebase > SettingTool > Settings.
- In SDK Download, click the [Gamebase SDK] button to download the latest version of SDK.
- Select a platform.
- Android
- iOS
- Select a module for each platform.
- For authentication, integration with an ID Provider (IdP), like Google, is supported.
- For push, FCM(Firebase), Tencent and APNS Push services are supported.
- For purchase, In-App Purchase (IAP) of NHN Cloud is provided.
- Click [Settings] and install SDK.
- If you selected Android and iOS modules, you need to execute EDM4U resolve.
- Android: Select Top Menu > Assets > External Dependency Manager > Android Resolver > Force Resolve.
- iOS: Select Top Menu > Assets > External Dependency Manager > iOS Resolver > install Cocoapods.
[Caution]
If there is no EDM4U, Gamebase SDK for Android and iOS settings are not available.
Before executing EDM4U resolve, click the Switch Platform button in the Build Settings window to switch to the platform you want to build for. If the Android platform is selected, you need to enable Custom Gradle Template in Player Settings > Publishing Settings to create the mainTemplate.gradle file.
When usingUnity 2019.3 or later, you need to enable Custom Gradle Properties Template in Player Settings > Publishing Settings to create a gradleTemplate.properties file.
Update SDK
- In the top menu, select Tools > NhnCloud > Gamebase > SettingTool > Settings.
- In SDK Download, click the [Gamebase SDK] button to download the latest version of SDK.
- If the latest SDK is already downloaded, the button is disabled.
- Click the [Settings] button to install the SDK.
- Previously selected modules per platform can be changed.
Delete SDK
- In the top menu, select Tools > NhnCloud > Gamebase > SettingTool > Settings.
- Click [Remove] to delete installed SDKs.
[Note]
If an unexpected error occurs at Setting Tool, close the window and try again.
If the error is not resolved by re-running, open the SettingToolWindow.cs file in Assets/NhnCloud/GamebaseTools/SettingTool/Editor/Scripts, uncomment SettingTool.SetDebugMode(true); code in the ShowWindow method, and send the log.
Video of Setting Tool Usage
Setting Tool Update
If the Setting Tool needs to be updated, the Setting Tool informs whether update is available or not. Depending on the update type, some functions provided by Setting Tool may be limited.
Force update
- Update required
- SDK download limited
- You can install or uninstall using the SDK downloaded before.

Selective update
- Select update
- SDK download available

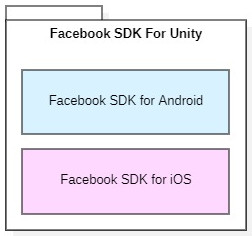
Add Facebook Authentication
Facebook SDK for iOS and Android are included in Facebook SDK.
When you enable Facebook authentication in Unity settings
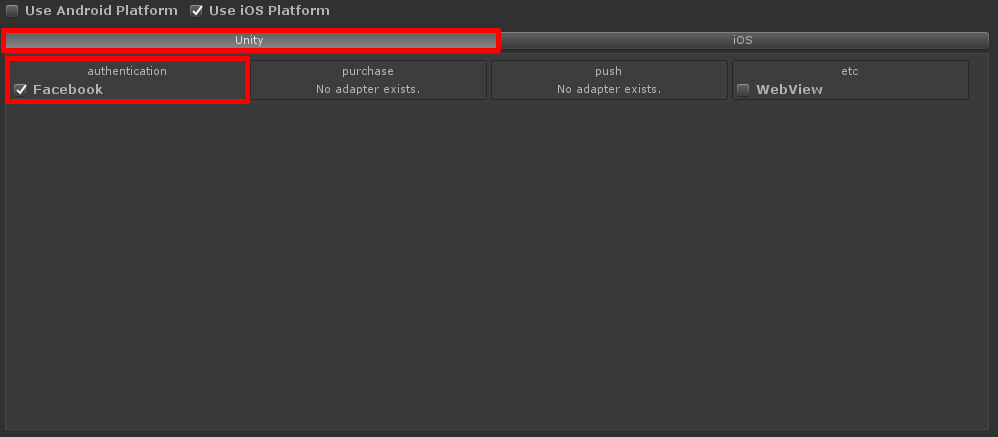
and also enable Facebook authentication in Android and iOS settings,
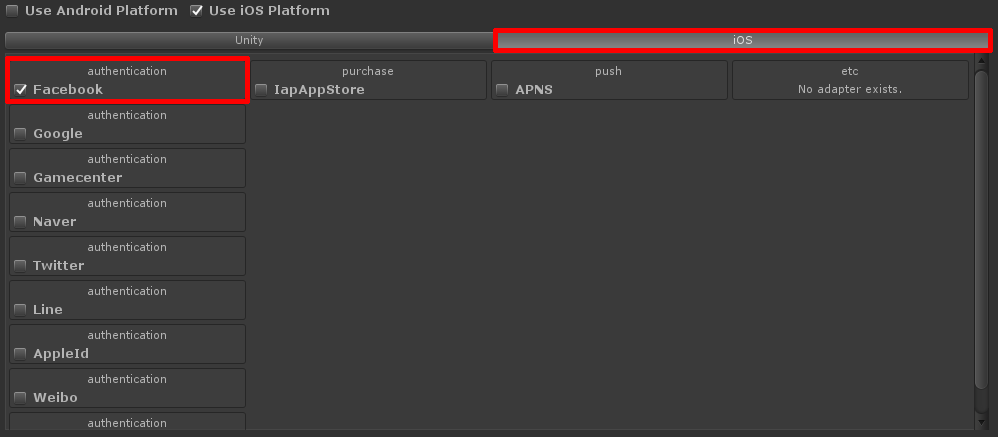
Facebook SDKs are included as duplicate in the project, resulting in errors such as authentication failure or build failure. To prevent such errors, SettingTool is configured to prevent the user from enabling Facebook authentication both in Unity settings and Android & iOS settings.
[Caution]You cannot enable Facebook authentication both in Unity settings and Android & iOS settings. When you enable Facebook authentication in Unity settings, you need to Download Facebook SDK for Unity.
Refer to the table below for SettingTool settings for each game company.
| SettingTool > Unity settings > Enable Facebook authentication | SettingTool > Android, iOS settings > Enable Facebook authentication | |
|---|---|---|
| Features required for games | Gamebase Facebook Login (Android, iOS) Use features such as ShareLink or FeedShare |
Gamebase Facebook Login (Android, iOS) |
| Android, iOS Login API | Gamebase Login with Credential | Gamebase Login with ID Provider |
| Download Facebook SDK for Unity | O | X |
- Case 1. When only using Gamebase Facebook login on Android and iOS platforms
- Enable Facebook authentication in SettingTool > Android, iOS settings.
- Case 2. When you need to use Gamebase Facebook login and Facebook's FeedShare function in your Unity project
- Enable Facebook authentication in SettingTool > Unity settings.
- Gamebase does not support functions other than Facebook authentication, so you must implement it yourself using the Facebook SDK for Unity.
- Case 3. When you enable Facebook authentication in SettingTool > Android, iOS settings, and Facebook SDK for Unity is included in your project
- If you are only using Gamebase Facebook Login, please remove the Facebook SDK for Unity included in your project.
- If you are using Facebook's FeedShare function other than Gamebase Facebook login, enable Facebook authentication in SettingTool > Unity settings.
- In this case, if Android or iOS settings are configured, they are automatically released.
Android Lifecycle
To manage lifecycle, set "com.toast.gamebase.activity.GamebaseMainActivity" as the MainActivity. "com.toast.gamebase.activity.GamebaseMainActivity" has been inherited from "com.unity3d.player.UnityPlayerNativeActivity".
[Caution]
AndroidPlugin should be developed in inheritance of GamebaseMainActivity. GamebaseMainActivity is included to GamebasePlugin.jar. The launchMode should be a singleTask (Unity&'s default activity will also be fixed as singleTask). Otherwise, crash may occur when an app starts.
To change the Lifecycle, you need to activate Project Settings > Settings for Android > Publish Settings > Build > Custom Main Manifest and edit the AndroidManifest.xml.
[Caution]
When setting Android's targetSdkVersion to 31 or higher, you must declare the android:exported attribute in the tag where the intent-filter exists. Even when setting GamebaseMainActivity, which is provided by Gamebase to manage lifecycle, as MainActivity, android:exported="true" must be added to the attribute.
<manifest>
    ...
    <application>
    ...
        <activity android:name="com.toast.android.gamebase.activity.GamebaseMainActivity"
            android:launchMode="singleTask"
            android:configChanges="keyboard|keyboardHidden|screenLayout|screenSize|orientation"
            android:label="@string/app_name"
            android:exported="true">
            <intent-filter>
                <action android:name="android.intent.action.MAIN" />
                <category android:name="android.intent.category.LAUNCHER" />
            </intent-filter>
        </activity>
    ...
    </application>
    ...
</manifest>
iOS Settings
[Caution]
- Caution for Unity 2019.3 or later
- Go to TARGETS > UnityFramework and add iOS SDK setting.
- Perform iOS build in the Unity project.
- Add the setting to the created XCode project.
API Reference
API Reference is included in GamebaseUnitySDK.
API Deprecate Governance
The API which is not supported by Gamebase anymore is processed as deprecated (deprecate). A deprecated API can be deleted without any prior notice when the following conditions are met:
- Minor version updates of five or more times.
-
Gamebase version format - XX.YY.ZZ
- XX: Major
- YY: Minor
- ZZ: Hotfix
-
Time elapse of at least five months
Table of Contents
- Game > Gamebase > Unity Developer's Guide > Getting Started
- Environments
- Android
- Dependencies
- Supported Platforms
- Installation
- Specification of Setting Tool
- Using the Setting Tool
- Video of Setting Tool Usage
- Setting Tool Update
- Add Facebook Authentication
- Android Lifecycle
- iOS Settings
- API Reference
- API Deprecate Governance