NHN Cloud > SDK使用ガイド > OCR > ID Card (iOS)
事前準備
- NHN Cloud SDKをインストールします。
- NHN Cloud Consoleで[AI Service > OCR]サービスを有効にします。
- OCRコンソールでAppKeyとSecretKeyを確認します。
サポート環境
NHN Cloud OCRはiOS 11.0以上で動作します。
NHN Cloud OCR構成
iOS用NHN Cloud OCR SDKの構成は次のとおりです。
| Service | Cocoapods Pod Name | Framework | Dependency | Build Settings |
|---|---|---|---|---|
| OCR | NHNCloudOCR | NHNCloudOCR.framework | * Vision.framework * AVFoundation.framework |
|
| Mandatory | NHNCloudCore NHNCloudCommon |
NHNCloudCore.framework NHNCloudCommon.framework |
OTHER_LDFLAGS = ( "-ObjC", "-lc++" ); |
NHN Cloud OCR SDKをXcodeプロジェクトに適用
1. Cococapodsを利用して適用
- Podfileを作成してNHN Cloud SDKに対するPodを追加します。
platform :ios, '11.0'
use_frameworks!

target '{YOUR PROJECT TARGET NAME}' do
    pod 'NHNCloudOCR'
end
2. Swift Package Managerを使用してNHN Cloud SDK適用
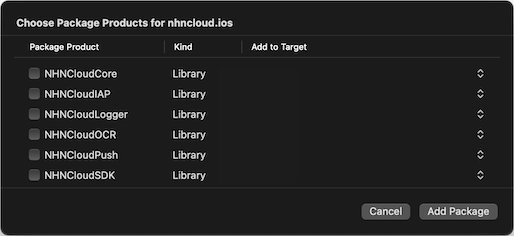
- XcodeでFile > Add Packages...メニューを選択します。
- Package URLに'https://github.com/nhn/nhncloud.ios.sdk'を入力し、Add Package ボタンを選択します。
- NHNCloudOCRを選択します。
プロジェクト設定
- Build SettingsのOther Linker Flagsに-lc++と-ObjC項目を追加します。
- Project Target > Build Settings > Linking > Other Linker Flags
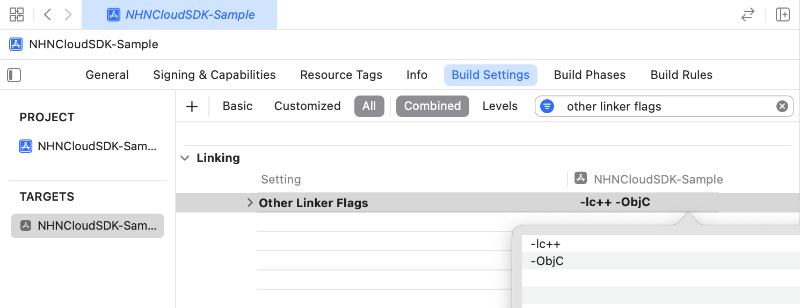
- Project Target > Build Settings > Linking > Other Linker Flags
3. バイナリをダウンロードしてNHN Cloud SDK適用
フレームワーク設定
- NHN Cloud Downloadsページで全体iOS SDKをダウンロードできます。
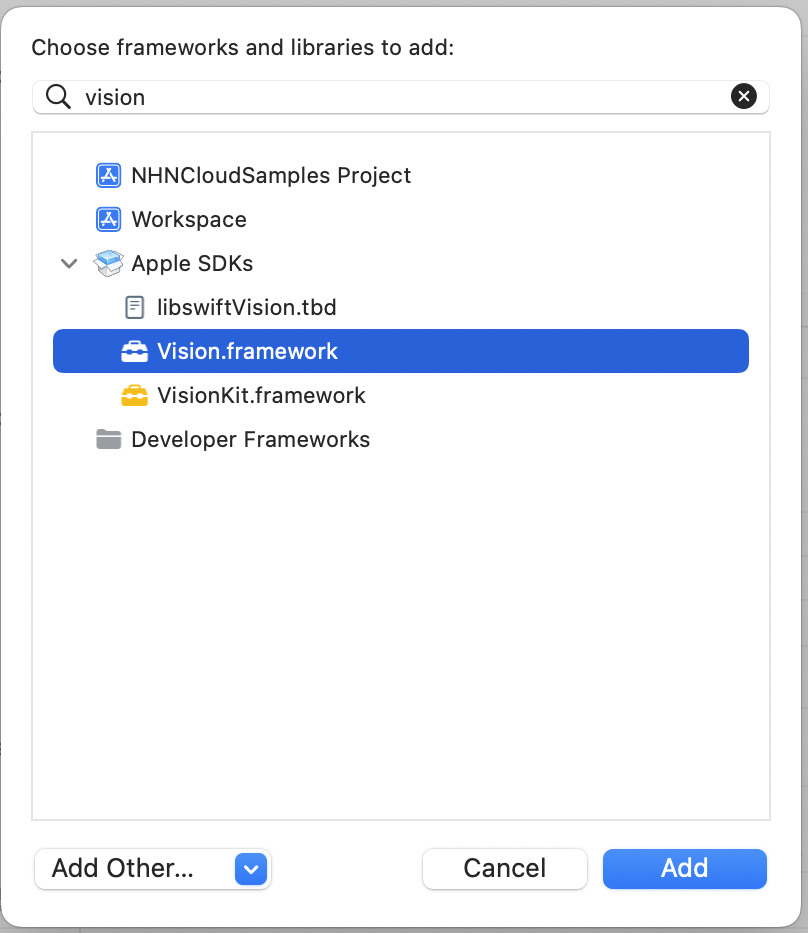
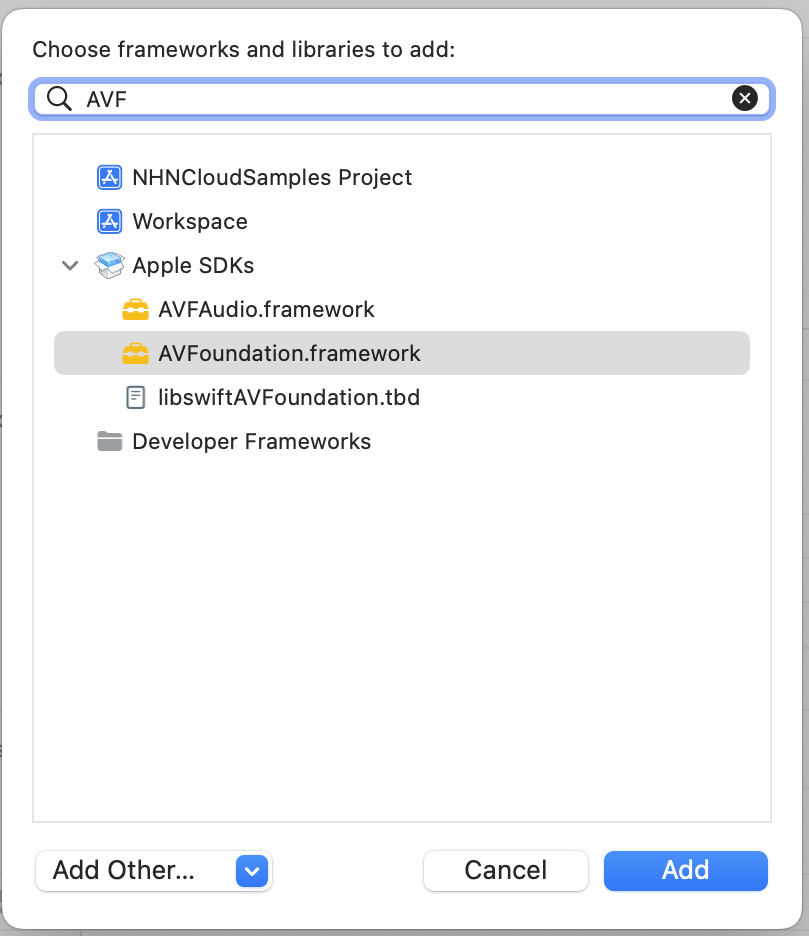
- Xcode ProjectにNHNCloudOCR.framework, NHNCloudCore.framework, NHNCloudCommon.framework, vision.framework, AVFoundation.frameworkを追加します。
- vision.frameworkとAVFoundation.frameworkは以下の方法で追加できます。

プロジェクト設定
- Build Settingsの Other Linker Flagsに-lc++と-ObjC項目を追加します。
- Project Target > Build Settings > Linking > Other Linker Flags
- Project Target > Build Settings > Linking > Other Linker Flags
NHNCloudOCR SDK初期化
- NHN Cloud Consoleで発行されたAppKeyとSecretをNHNCloudOCRConfigurationオブジェクトに設定します。
- AI Service -> OCR -> Document OCR -> 身分証
- NHNCloudOCRは初期化にNHNCloudOCRConfigurationオブジェクトをパラメータとして使用します。
- カメラの使用権限を取得するためにinfo.plistに以下の内容を追加します。
Key : NSCameraUsageDescription
Value : [カメラ権限リクエストメッセージ]
初期化APIの仕様
// 初期化
+ (void)initWithConfiguration:(NHNCloudOCRConfiguration *)configuration;

// Delegate設定
+ (void)setIDCardRecognizerDelegate:(nullable id<NHNCloudIDCardRecognizerDelegate>)delegate;
Delegate APIの仕様
- NHNCloudIDCardRecognizerDelegate登録すると、認識結果の通知を受け取ることができます。
- OCRが実行中のとき、画面のスクリーンキャプチャと動画録画イベントを受信できます。
- SDKで提供する基本画面使用時(NHNCloudIDCardRecognizerViewController継承実装)閉じる、確認イベントを受信できます。
@protocol NHNCloudIDCardRecognizerDelegate <NSObject>

// 身分証認識結果を返す
- (void)didDetectIDCardInfo:(nullable NHNCloudIDCardInfo *)cardInfo error:(nullable NSError *)error;

@optional

// スクリーンキャプチャイベント受信
- (void)didDetectIDCardSecurityEvent:(NHNCloudSecurityEvent)event;

// 閉じるボタンイベント受信(NHNCloudIDCardRecognizerViewController継承実装時にのみ受信可能)
- (void)IDCardRecognizerViewControllerCancel;

// 確認ボタンイベント受信(NHNCloudIDCardRecognizerViewController継承実装時にのみ受信可能)
- (void)IDCardRecognizerViewControllerConfirm;

@end
検出画像を返す設定を行う
- OCR結果であるNHNCloudIDCardInfoデータに検出された画像を一緒に返すことができます。
- デフォルト値は無効です。
検出画像を返す設定APIの仕様
@interface NHNCloudOCR : NSObject
//..
+ (void)setDetectedImageReturn:(BOOL)enable;
+ (BOOL)isEnableDetectedImageReturn;
//..
@end
認識領域を表示する
認識領域返却API
- OCR結果であるNHNCloudIDCardInfoデータに認識した領域の座標情報を返すことができます。
@interface NHNCloudIDCardInfo: NSObject

// 身分証認識領域
@property(nonatomic, strong, readonly, nullable) NSArray<NSValue *> *numberBoundingBoxes;

@end
認識領域ImageViewに描画
- (void)viewDidLoad {
    [super viewDidLoad];

    // 認識した画像を返すように設定
    [NHNCloudOCR setDetectedImageReturn:YES];
}

// 身分証認識結果を返す
- (void)didDetectIDCardInfo:(NHNCloudIDCardInfo *)cardInfo error:(NSError *)error {

    if (cardInfo.detectedImage != nil) {
        UIImageView *imageView = [[UIImageView alloc] initWithImage:cardInfo.detectedImage.image];
        imageView.contentMode = UIViewContentModeScaleAspectFit;

        // imageViewに認識領域を描写する。
        [self drawBoundingBoxes:cardInfo.boundingBoxes over:imageView];

        [self.view addSubview:imageView];
    }
}

- (void)drawBoundingBoxes:(NSArray *)boundingBoxes
                     over:(UIImageView *)imageView {
    UIGraphicsBeginImageContextWithOptions(imageView.frame.size, NO, 0.0);
    CGContextRef context = UIGraphicsGetCurrentContext();

    [imageView.image drawInRect:CGRectMake(0, 0, imageView.frame.size.width, imageView.frame.size.height)];

    for (NSValue *rectValue in boundingBoxes) {
        CGRect boundingBox = [self dividedRect:rectValue.CGRectValue
                                         // デバイスの解像度を考慮してscaleの値で座標を分割します。
                                         scale:[UIScreen mainScreen].scale];
        CGContextSetStrokeColorWithColor(context, [UIColor orangeColor].CGColor);
        CGContextSetLineWidth(context, 5.0);
        CGContextStrokeRect(context, boundingBox);
    }

    UIImage *newImage = UIGraphicsGetImageFromCurrentImageContext();
    UIGraphicsEndImageContext();

    imageView.image = newImage;
}

- (CGRect)dividedRect:(CGRect)rect
                scale:(CGFloat)scale {
    return CGRectMake(rect.origin.x / scale, rect.origin.y / scale,
                      rect.size.width / scale, rect.size.height / scale);
}
初期化プロセス例
#import <NHNCloudOCR/NHNCloudOCR.h>

@interface ViewController () <NHNCloudIDCardRecognizerDelegate>
@end

@implementation ViewController

- (void)initializeOCR {
    // 初期化およびDelegate設定
    NHNCloudOCRConfiguration *configuration = [NHNCloudOCRConfiguration configurationWithAppKey:@"{AppKey}" secret:@"{Secret}"];

    // 検出画像を返す設定
    [NHNCloudOCR setDetectedImageReturn:YES];

    // 初期化
    [NHNCloudOCR initWithConfiguration:configuration];

    // Delegate設定
    [NHNCloudOCR setIDCardRecognizerDelegate:self];
}

// 身分証認識結果を返す
- (void)didDetectIDCardInfo:(NHNCloudIDCardInfo *)cardInfo error:(NSError *)error {
    NSLog(@"didDetectIDCardInfo : cardInfo : %@", cardInfo);
    NSLog(@"didDetectIDCardInfo : error : %@", error);
}

// スクリーンキャプチャイベント受信
- (void)didDetectIDCardSecurityEvent:(NHNCloudSecurityEvent)event {

    // スクリーンキャプチャ警告Alert表示例
    if (event == NHNCloudSecurityEventScreenshot || event == NHNCloudSecurityEventScreenRecordingOn) {
        UIAlertController *alert = [UIAlertController alertControllerWithTitle:nil message:@"キャプチャが検出されました。" preferredStyle:UIAlertControllerStyleAlert];
        [alert addAction:[UIAlertAction actionWithTitle:@"OK" style:UIAlertActionStyleDefault handler:nil]];

        [self presentViewController:alert animated:YES completion:nil];
    }

    // 動画録画時の画面表示例
    if (event == NHNCloudSecurityEventScreenRecordingOn || event == NHNCloudSecurityEventScreenRecordingOff) {
        if ([[UIScreen mainScreen] isCaptured] ) {
            [[[UIApplication sharedApplication] windows] firstObject].hidden = YES;
        } else {
            [[[UIApplication sharedApplication] windows] firstObject].hidden = NO;
        }
    }
}

// 確認ボタンイベント受信(NHNCloudIDCardRecognizerViewController継承実装時にのみ受信可能)
- (void)IDCardRecognizerViewControllerConfirm {
    // 身分証認識結果画面で確認ボタンを押した時の処理
}

// 閉じるボタンイベント受信(NHNCloudIDCardRecognizerViewController継承実装時にのみ受信可能)
- (void)IDCardRecognizerViewControllerCancel {
    // 身分証認識または結果画面で閉じるボタンを押した時の処理
}

@end
ID Card適用方法
NHNCloudIDCardRecognizerViewController
1. ID-Card Recognizer ViewControllerを使用する
- NHNCloudIDCardRecognizerViewControllerを継承実装したClassをStoryboardのViewControllerに接続して基本UIが適用されたID-Card Recognizerを簡単に使用できます。
2. Class作成
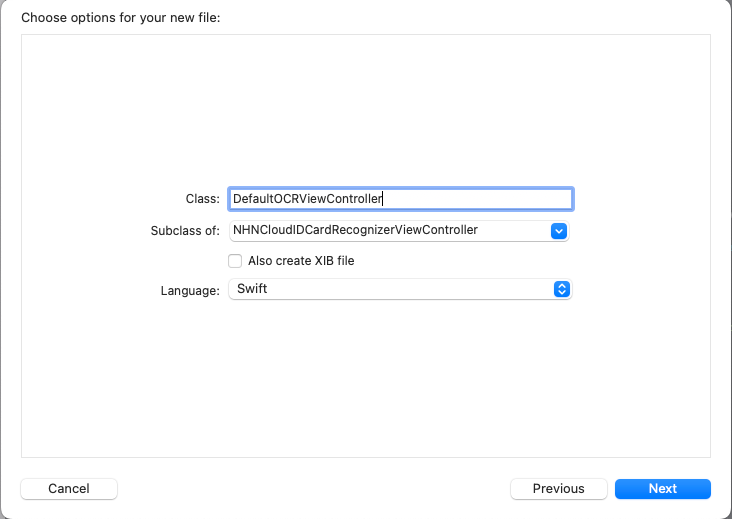 * NHNCloudIDCardRecognizerViewControllerをsubclassに持つViewController Classを作成します。
3. Storyboardに接続
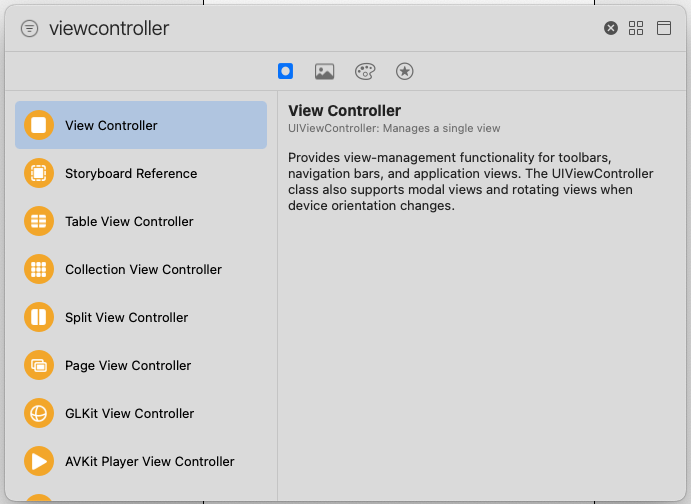 * StoryboardにViewControllerを追加します。
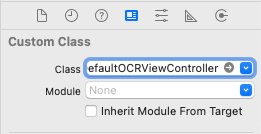 * 追加したViewControllerにCustom Classに作成したClassを設定します。
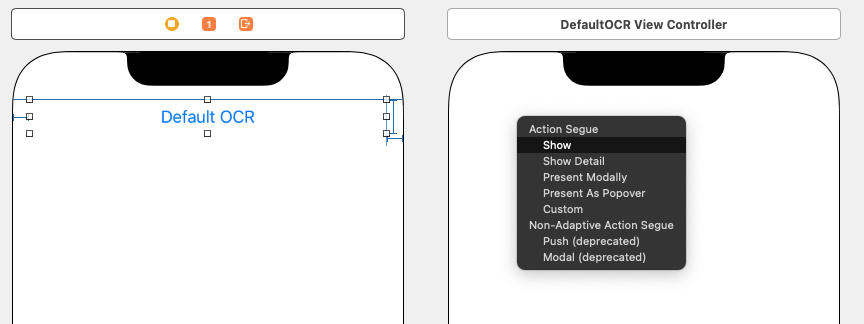 * ViewController Segue Eventを設定します。
- Delegateを設定し、実装します。
NHNCloudIDCardRecognizerServiceViewControllerのカスタマイズ
- NHNCloudIDCardRecognizerServiceViewControllerを使用してUIをカスタマイズできます。
- ID-Cardガイドの場合、あらかじめ定義された値を使用するため、変更ができません。
1. NHNCloudIDCardRecognizerServiceViewController継承
- NHNCloudIDCardRecognizerServiceViewControllerを継承実装してカスタマイズできます。
Override関数の仕様
// ビューがメモリに作成される時、初期設定やデータの準備作業を実行
- (void)viewDidLoad;

// ビューが画面に表示される直前に最後の処理を実行
- (void)viewWillAppear:(BOOL)animated;

// ビューが画面から消える直前にクリーンアップを実行
- (void)viewWillDisappear:(BOOL)animated;

// ビューが画面から完全に消えた後、追加のクリーンアップを実行
- (void)viewDidDisappear:(BOOL)animated;

// Custom UI更新
- (void)didUpdateIDCardGuide:(CGRect)rect;

// 身分証認識時、UI更新
- (void)imageDidDetect:(BOOL)detected;
Override使用例
@interface OCRViewController : NHNCloudIDCardRecognizerServiceViewController <NHNCloudIDCardRecognizerDelegate>

@end

@implementation OCRViewController

- (void)viewDidLoad {
    [super viewDidLoad];

    [NHNCloudOCR setIDCardRecognizerDelegate:self];
    // Custom UI作成
}

- (void)viewWillAppear:(BOOL)animated {
    [super viewWillAppear:animated];

    [self startRunning];
}

- (void)viewWillDisappear:(BOOL)animated {
    [super viewWillDisappear:animated];
}

- (void)viewDidDisappear:(BOOL)animated {
    [super viewDidDisappear:animated];
}

- (void)didUpdateIDCardGuide:(CGRect)rect {
    [super didUpdateIDCardGuide:rect];

    // Custom UI更新
}

- (void)imageDidDetect:(BOOL)detected {
    [super imageDidDetect:detected];

    // 身分証認識時、UI更新
}

- (void)didDetectIDCardInfo:(nullable NHNCloudIDCardInfo *)cardInfo error:(nullable NSError *)error {

    NSLog(@"didDetectIDCardInfo : cardInfo : %@", cardInfo);
    NSLog(@"didDetectIDCardInfo : error : %@", error);
}
テスト環境を使う
- NHNCloudOCR SDKでテストのために提供するID-Cardガイドを使用してOCRをテストできます。
- 身分証がID-Cardガイド内に存在する場合、OCRが始まります。
- デフォルト値はhiddenで目に見えないガイドが存在します。
enableTestGuideを使用してテスト用ガイドを表示できます。
ID-CardガイドAPIの仕様
@interface NHNCloudOCRConfiguration : NSObject
- (void)enableTestGuide;
@end
ID-Cardガイド使用例
- (void)initializeOCR {
    // 初期化およびDelegate設定
    NHNCloudOCRConfiguration *configuration = [NHNCloudOCRConfiguration configurationWithAppKey:@"{AppKey}" secret:@"{Secret}" ];

    [configuration enableTestGuide];

    [NHNCloudOCR initWithConfiguration:configuration];
    [NHNCloudOCR setIDCardRecognizerDelegate:self];
}
ID-Card Recognizer ViewControllerを制御する
ID Card適用方法を見てNHNCloudIDCardRecognizerViewControllerまたはNHNCloudIDCardRecognizerServiceViewController継承実装必要
1. ID-Card Recognizerの開始/停止
- ID-Card Recognizerを開始または停止します。
ID-Card Recognizer開始/停止APIの仕様
- (void)startRunning;
- (void)stopRunning;
- (BOOL)isRunning;
ID-Card Recognizer開始/停止の使用例
- (void)start {
  [self startRunning];
}

// 身分証認識結果を返す
- (void)didDetectIDCardInfo:(nullable NHNCloudIDCardInfo *)cardInfo error:(nullable NSError *)error {
    [self stopRunning];
}
2. カメラ有効/無効
- デバイスのカメラを有効化または無効化します。
カメラ有効/無効APIの仕様
- (void)startRunningCamera;
- (void)stopRunningCamera;
- (BOOL)isRunnginCamera;
カメラ有効/無効使用例
- (void)cameraButtonAction:(UIButton *)button {
    if ([self isRunnginCamera] == YES) {
        [self stopRunningCamera];
    } else {
        [self startRunningCamera];
    }
}
身分証真偽確認
認識された結果で真偽確認
- 認識された身分証の真偽を確認します。
- 真正性確認には、身分証明書認識の結果として受け取ったrequestKeyが必要です。
requestKeyの有効期限
- 1回限りの値で1回使用後、有効期限が切れます。
- 1時間後に有効期限が切れます。
身分証真偽確認APIの仕様
+ (void)verificateAuthenticityIDCard:(nonnull NHNCloudIDCardInfo *)IDCardInfo
                   completionHandler:(nullable void (^)(BOOL isAuthenticity, NSError * _Nullable error))completionHandler
身分証真偽確認APIの使用例
[NHNCloudOCR verificateAuthenticityIDCard:cardInfo // didDetectIDCardInfoの結果として受け取ったcardInfo
                            completionHandler:^(BOOL isAuthenticity, NSError * _Nullable error) {
    if (isAuthenticity) {
        // 身分証認識成功
    } else {
        // 身分証認識失敗
    }
}];
目次
- NHN Cloud > SDK使用ガイド > OCR > ID Card (iOS)
- 事前準備
- サポート環境
- NHN Cloud OCR構成
- NHN Cloud OCR SDKをXcodeプロジェクトに適用
- 1. Cococapodsを利用して適用
- 2. Swift Package Managerを使用してNHN Cloud SDK適用
- 3. バイナリをダウンロードしてNHN Cloud SDK適用
- NHNCloudOCR SDK初期化
- 初期化APIの仕様
- Delegate APIの仕様
- 検出画像を返す設定を行う
- 認識領域を表示する
- 初期化プロセス例
- ID Card適用方法
- NHNCloudIDCardRecognizerViewController
- NHNCloudIDCardRecognizerServiceViewControllerのカスタマイズ
- テスト環境を使う
- ID-Card Recognizer ViewControllerを制御する
- 1. ID-Card Recognizerの開始/停止
- 2. カメラ有効/無効
- 身分証真偽確認
- 認識された結果で真偽確認
- 身分証真偽確認APIの仕様
- 身分証真偽確認APIの使用例