Game > GameAnvil > 서버 개발 가이드 > 시작하기
시작하기에 앞서
이 문서는 GameAnvil을 이용해 서버를 구현할 때 필요한 기본 요소들과 구현 방법에 대해 설명합니다. 이 문서와 함께 제공되는 레퍼런스 프로젝트 GameAnvil 레퍼런스 서버를 참고하시길 권장합니다. 또한 JavaDoc 문서를 통해 각각의 API 설명과 UML 다이어그램을 참고하십시오.
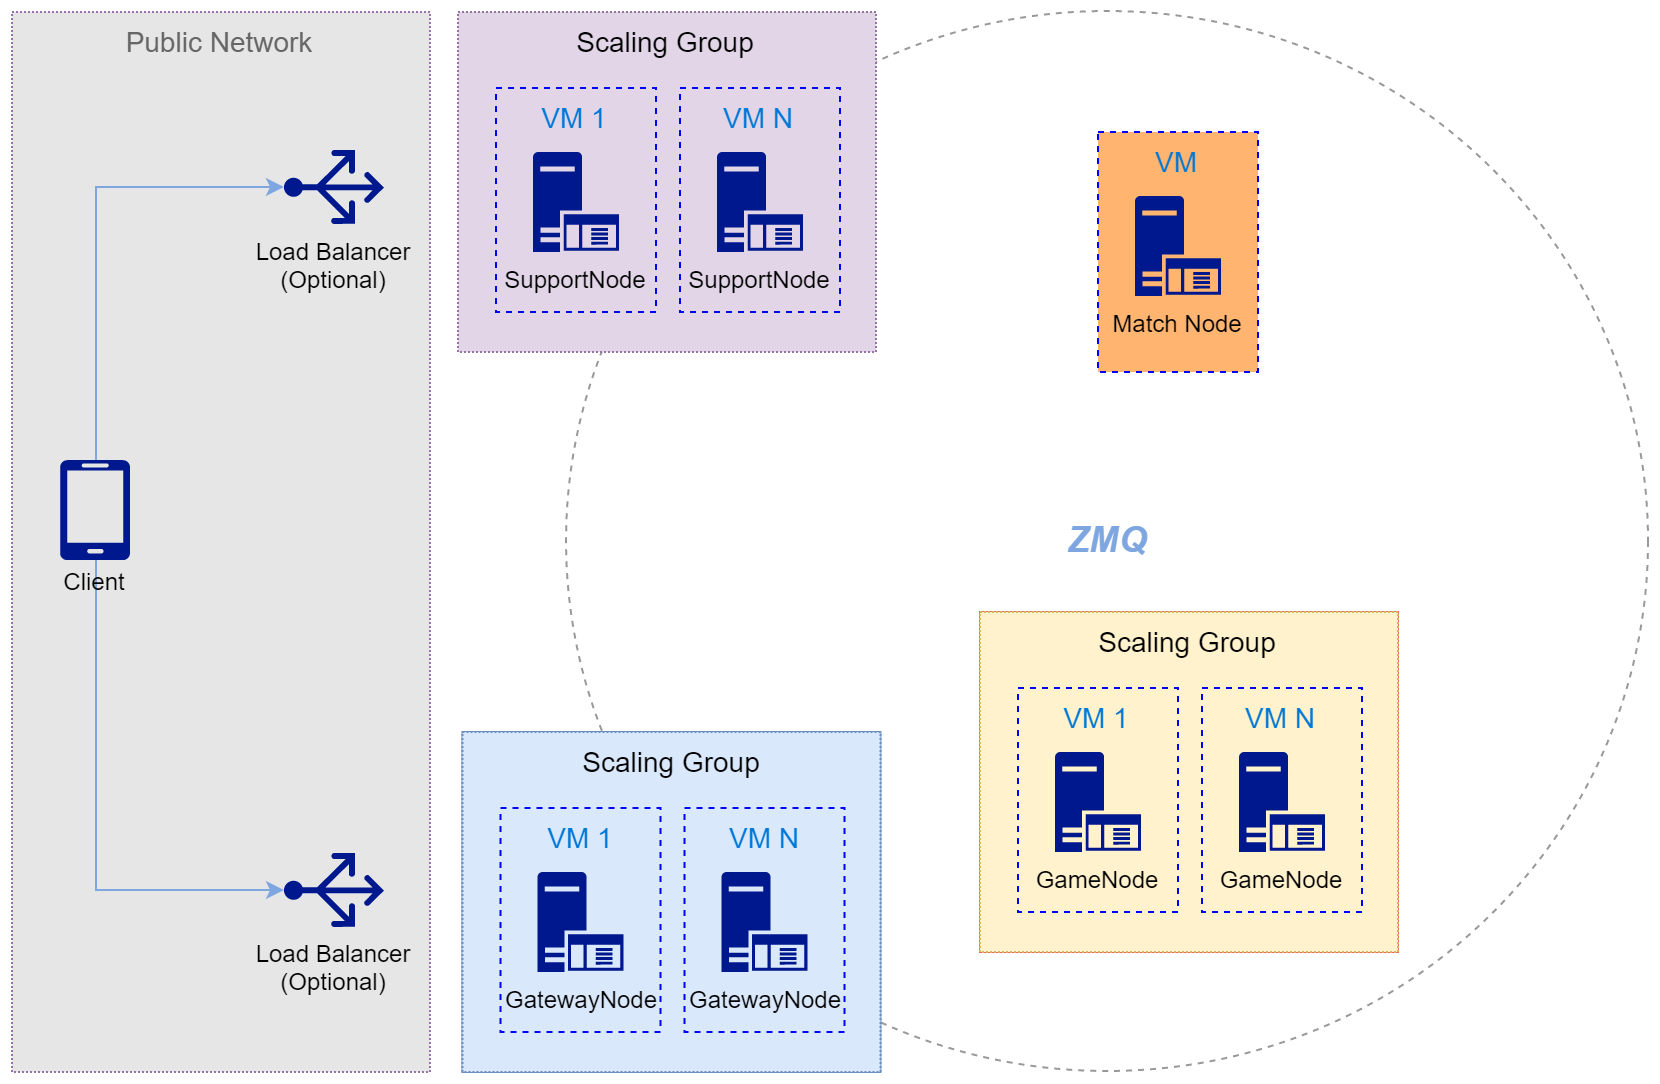
GameAnvil 서버는 기본적으로 노드(Node) 단위로 구성합니다. 그 중 사용자의 코드가 구동되는 노드는 아래의 그림과 같이 총 네 가지입니다. 여기에서는 이 네 가지 노드의 구현 방법을 중심으로 서버 개발 방법을 설명합니다.
콜백 재정의
기본적으로 GameAnvil 대부분의 기능은 콜백 형태로 제공합니다. 즉, 엔진 사용자는 GameAnvil이 제공하는 기본 클래스(Base Classes)를 상속한 후 이러한 콜백 메서드를 재정의하는 형태로 대부분의 기능을 사용하게 됩니다. 이 과정에서 엔진 사용자가 필요한 콜백 메서드만 구현하면 되므로 일부 콜백 메서드는 무시할 수도 있습니다. 이러한 기본 클래스들은 모두 "Base"로 시작하는 이름을 가지며 com.nhn.gameanvil 패키지 혹은 그 하위 패키지로 제공됩니다.
모든 구현의 시작, 노드
예를 들어, 모든 노드는 공통적으로 아래의 콜백 메서드들을 재정의해야 합니다. 그리고 각각의 노드는 그 역할에 맞는 추가 콜백 메서드의 구현을 요구할 수 있습니다. 아래의 코드에서 예를 든, SampleGatewayNode는 GatewayNode의 기본 클래스인 BaseGatewayNode를 상속하고 있습니다.
BaseGatewayNode를 포함한 모든 BaseNode들은 공통적으로 아래와 같은 콜백 메서드들을 제공합니다. 사용자가 이 콜백 메서드를 구현하면 엔진이 특정 시점에 해당 콜백을 호출합니다. 이것이 바로 GameAnvil의 가장 기본적인 사용법입니다. 이러한 사용법은 문서 전체에 걸쳐 대동소이하므로, 큰 이질감 없이 각 챕터를 이해할 수 있을 것입니다.
@GatewayNode
public class SampleGatewayNode extends BaseGatewayNode {

    /**
     * 초기화할 때 호출
     *
     * @throws SuspendExecution 이 메서드는 파이버를 suspend할 수 있음을 의미
     */
    @Override
    public void onInit() throws SuspendExecution {
    }

    /**
     * Ready 되기 전에 처리할 부분을 위해 호출
     *
     * @throws SuspendExecution 이 메서드는 파이버를 suspend할 수 있음을 의미
     */
    @Override
    public void onPrepare() throws SuspendExecution {
    }

    /**
     * Ready 될 때 호출
     *
     * @throws SuspendExecution 이 메서드는 파이버를 suspend할 수 있음을 의미
     */
    @Override
    public void onReady() throws SuspendExecution {
    }

    /**
     * pause 될 때 호출
     *
     * @param payload contents 에서 전달하고자 하는 추가 정보
     * @throws SuspendExecution 이 메서드는 파이버를 suspend할 수 있음을 의미
     */
    @Override
    public void onPause(Payload payload) throws SuspendExecution {
    }

    /**
     * resume 될 때 호출
     *
     * @param payload contents에서 전달하고자 하는 추가 정보
     * @throws SuspendExecution 이 메서드는 파이버를 suspend할 수 있음을 의미
     */
    @Override
    public void onResume(Payload payload) throws SuspendExecution {
    }

    /**
     * shutdown 명령을 받으면 호출
     *
     * @throws SuspendExecution 이 메서드는 파이버를 suspend할 수 있음을 의미
     */
    @Override
    public void onShutdown() throws SuspendExecution {
    }
}
이러한 노드 공통 콜백의 의미와 용도는 아래의 표를 참고하세요.
| 콜백 이름 | 의미 | 설명 |
|---|---|---|
| onInit | 초기화 | 노드가 최초 초기화를 진행할 때 호출합니다. 노드 구동 전에 필요한 초기화 작업이 있다면 이 콜백이 적합합니다. 이때, 노드는 아직 메시지를 처리하지 않습니다. |
| onPrepare | 준비 | 노드 초기화가 완료된 후 호출됩니다. 사용자는 노드가 준비 완료되기 전에 임의의 작업을 이곳에서 처리할 수 있습니다. 이때, 노드는 메시지를 처리할 수 있습니다. |
| onReady | 준비 완료 | 노드가 모든 준비를 마친 후, 구동 완료 단계입니다. 이때, 노드는 Ready 상태이므로 사용자는 이때부터 모든 기능을 사용할 수 있습니다. |
| onPause | 일시 정지 | 노드를 일시 정지하면 호출됩니다. 사용자는 노드가 일시 정지될 때 추가로 처리하고 싶은 코드를 이곳에 구현할 수 있습니다. |
| onResume | 재개 | 노드가 일시 정지 상태에서 다시 구동을 재개할 때 호출됩니다. 사용자는 재개 상태에서 처리하고 싶은 코드를 이곳에 구현할 수 있습니다. |
| onShutdown | 노드 정지 | 노드가 완전히 중지될 때 호출됩니다. 중지된 노드는 재개(Resume)할 수 없습니다. |
| getMessageDispatcher | 처리할 패킷이 있음 | 노드에 처리할 메시지가 있을 때 반환시킵니다. 사용자는 자신이 선언한 디스패처를 사용할 수 있습니다 자세한 내용은 메시지 처리를 참고하십시오. |
throws SuspendExecution
앞의 예제 코드에서 모든 콜백 메서드의 다음과 같은 예외 시그니처를 살펴보았습니다.
throws SuspendExecution
이것은 실제 예외가 아닙니다. 파이버의 흐름을 제어하기 위해 Quasar에서 사용하는 일종의 우회법입니다. 이 예외 시그니처는 해당 메서드가 언제든 파이버를 일시 정지(Suspend)시킬 수 있음을 의미합니다.
그러므로 절대 이 예외를 아래와 같은 방식으로 직접 처리해서는 안 됩니다. 더 자세한 내용은 Suspendable을 참고하십시오.
try {
    ...
} catch (SuspendExecution e)
{
    // 절대 SuspendExecution 예외는 catch하지 마십시오.
}
_(underscore)로 시작하는 메서드와 변수
엔진을 사용하다 보면 사용자가 상속한 Base 클래스에서 _로 시작하는 메서드나 변수를 볼 수 있습니다. 이는 엔진 내부에서만 사용하기 위함을 의미합니다. 즉, 사용자는 _로 시작하는 변수나 메서드에 접근하면 안 됩니다. 이는 C++와 달리 Java의 스코프 제어가 유연하지 못함으로 인해 일부 노출을 허용한 경우이므로 주의가 필요합니다.
gameanvil 패키지와 gameanvilcore 패키지
엔진은 크게 2가지의 상위 패키지로 구성됩니다. 그 중 하나인 gameanvil 패키지는 사용자를 위한 것입니다. 이 패키지 안의 모든 클래스나 API는 자유롭게 사용 가능합니다.
반면에 gameanvilcore 패키지는 엔진 코어 로직을 포함하고 있으므로 사용자가 직접 접근하는 것을 허용하지 않습니다. 그럼에도 불구하고 사용자에게 노출되는 것은 현재 GameAnvil이 지원하는 Java 버전의 스코프 제어 한계 때문입니다. 사용자 코드를 작성하는 과정에서 gameanvilcore 패키지의 내용이 포함되지 않도록 각별한 주의가 필요합니다.
IntelliJ 템플릿으로 프로젝트 구성
GameAnvil 프로젝트를 처음부터 하나씩 구성하는 것은 여러 가지 복잡한 과정을 요구합니다. 엔진 라이브러리를 불러오는 것과 더불어 구성 파일을 작성해야 하고, 프로토콜 명세를 작성할 스크립트와 이를 컴파일할 컴파일러도 필요합니다. 이와 같은 일련의 과정으로 인해 개발 시간을 불필요하게 낭비하는 것을 방지하기 위해 GameAnvil은 이러한 내용들을 모두 포함한 IntelliJ용 템플릿을 제공합니다. 아래 링크에서 템플릿 파일을 다운로드한 뒤 다음 과정을 따라하십시오.
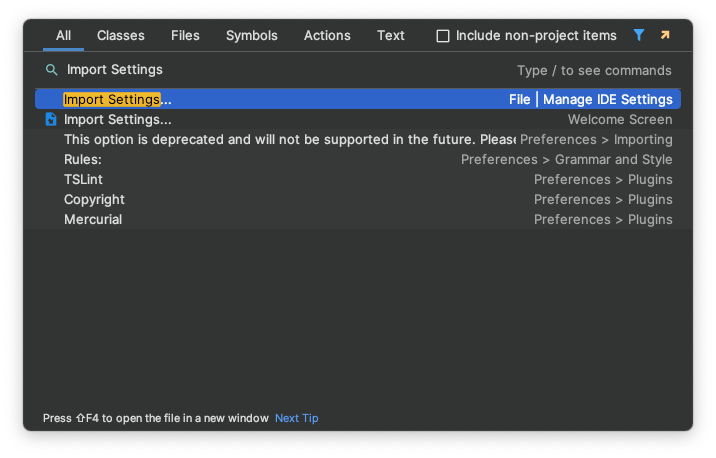
IntelliJ를 실행한 뒤 단축키 Shift Shift 로 전체 검색창을 띄워 Import Settings... 을 검색합니다. 또는 File > Manage IDE Settings > Import Settings... 를 선택합니다.
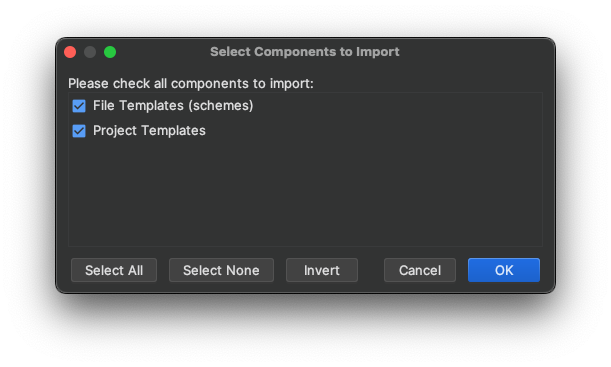
파인더 화면에서 다운로드한 템플릿 파일을 선택합니다. 아래 그림과 같이 가져올 요소들을 선택하는 창이 표시되면 파일 템플릿과 프로젝트 템플릿을 모두 체크한 뒤 OK를 클릭합니다. 가져오기가 완료되면
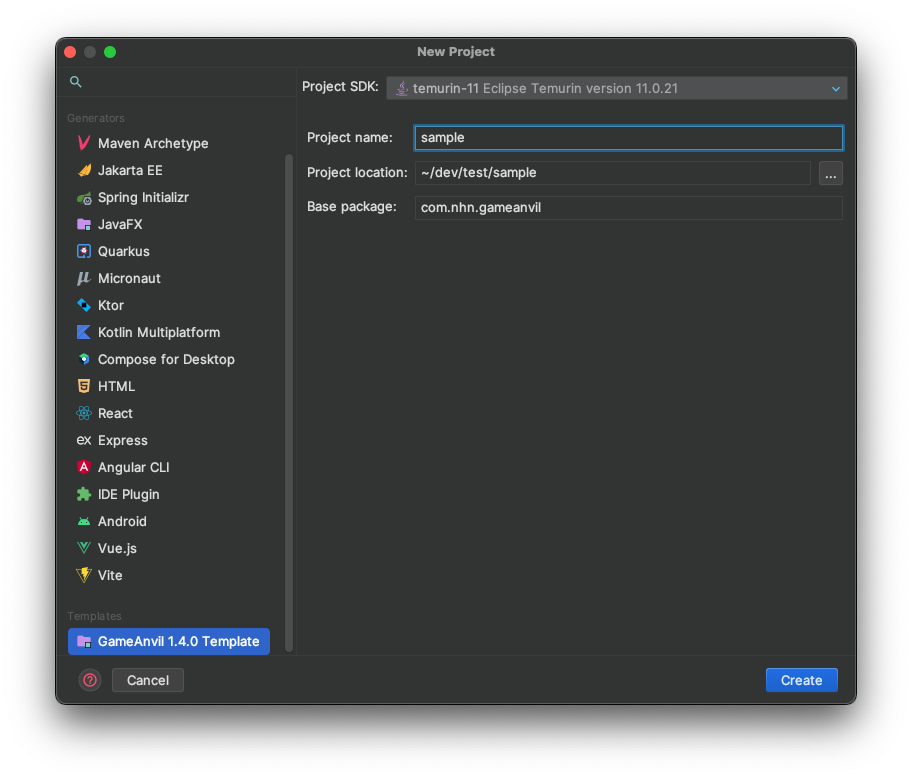
새로운 프로젝트 생성 창이 열리면 좌측 메뉴의 User-defined 탭에서 GameAnvil Template를 선택합니다.
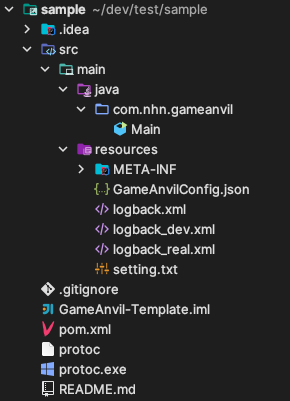
마치면 다음 그림과 같이 GameAnvil 서버 개발을 바로 시작할 수 있는 템플릿 프로젝트가 생성됩니다.
GameAnvil에서 제공하는 여러 가지 클래스를 바로 생성할 수 있는 파일 템플릿도 제공하고 있습니다. 프로젝트에서 원하는 패키지를 선택한 후 우클릭으로 콘텍스트 메뉴를 엽니다. 이때, 다음 그림과 같이 각 클래스별 파일 템플릿을 이용할 수 있습니다.
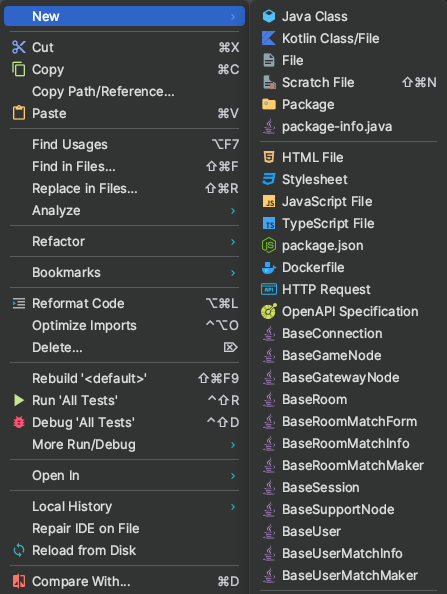
다음은 파일 템플릿으로 제공되는 목록입니다. 각각의 파일 템플릿은 하나의 클래스 템플릿을 구현합니다.
| 파일 템플릿 | 설명 |
|---|---|
| GatewayNode | 게이트웨이 노드의 기본 구현 |
| GameNode | 게임 노드의 기본 구현 |
| SupportNode | 서포트 노드의 기본 구현 |
| Connection | 커넥션 클래스의 기본 구현 |
| Session | 세션 클래스의 기본 구현 |
| GameUser | 게임 유저의 기본 구현 |
| GameRoom | 게임 룸의 기본 구현 |
| UserMatchMaker | 유저 매치 메이커의 기본 구현 |
| UserMatchInfo | 유저 매치 정보의 기본 구현 |
| RoomMatchMaker | 룸 매치 메이커의 기본 구현 |
| RoomMatchForm | 룸 매칭 신청 기본 구현 |
| RoomMatchInfo | 룸 매칭 정보 기본 구현 |