Game > GameAnvil > 심화 튜토리얼
GameAnvil로 게임 서버 쉽게 만들기
GameAnvil은 실시간 멀티플레이어 게임 서버 제작 플랫폼입니다. GameAnvil을 사용하면 손쉽게 게임 서버와 클라이언트를 개발하고 운영할 수 있습니다. GameAnvil을 사용하기 위해서는 게임 서버와 클라이언트 개발 부터 시작해야 합니다. 이 문서는 GameAnvil의 기본적인 기능을 이용하여 멀티플레이어 게임 서버를 개발하는 과정을 다룹니다. 이 문서를 통해 GameAnvil의 기본 개념, 개발 프로젝트 구성 방법 및 구현 방법 등을 쉽게 익힐 수 있을 것입니다.
GameAnvil은 서버 엔진뿐만 아니라, 서버에 클라이언트를 연결하기 위한 커넥트를 제공합니다. 이 문서는 서버 개발 및 커넥터를 이용한 클라이언트 개발도 다룹니다. 서버와 클라이언트가 상호 작용하는 모습을 볼 수 있는 샘플을 완성해 나가면서 GameAnvil을 사용하여 게임을 개발하는 전체적인 흐름에 익숙해질 수 있습니다.
이 문서는 서버의 개념과 API를 단순 나열하는 대신 좀 더 구체적인 예시를 통해 설명하고 이해를 돕기 위해 실제 플레이가 가능한 멀티플레이어 직소 퍼즐 게임을 개발하는 과정을 순서대로 설명합니다. 문서의 내용을 직접 하나씩 따라하며 자연스럽게 GameAnvil과 멀티플레이어 게임 개발에 대한 이해도를 높일 수 있습니다.
프로젝트 구성
멀티플레이어 게임을 만들려면 클라이언트와 대응하는 서버 프로그램이 필요합니다. 이 예제에서는 클라이언트 프로그램 제작에 Unity와 GameAnvil 커넥터를, 서버 프로그램 제작에 앞서 소개한 서버 엔진 GameAnvil을 사용합니다. 먼저 GameAnvil을 이용한 서버 프로그램 프로젝트를 생성한 뒤 Unity와 GameAnvil 커넥터를 이용해 클라이언트 프로그램 프로젝트를 생성합니다.
GameAnvil 프로젝트 구성
프로젝트에 GameAnvil을 적용하려면 Maven 저장소에서 GameAnvil 라이브러리를 내려받고 GameAnvil을 구동하는 데 필수인 설정 파일을 작성해야 합니다. 마지막으로 약간의 보일러플레이트 코드를 작성하면 개발 초기 설정이 끝납니다. 이번 챕터에서는 개발을 시작하기 위한 초기 설정을 완료하는 것을 목표로 합니다. 실제 프로세스를 실행해 서버를 구동하는 것은 다음 챕터에서 다룹니다.
GameAnvil에서는 이와 같은 일련의 과정을 대신해 주는 IntelliJ 템플릿을 제공하여 보다 간단하게 초기 작업을 완료할 수 있습니다. 다음 링크에서 IntelliJ용 프로젝트 파일 템플릿을 다운로드할 수 있습니다. 다운로드한 템플릿은 압축을 풀지 않도록 합니다.
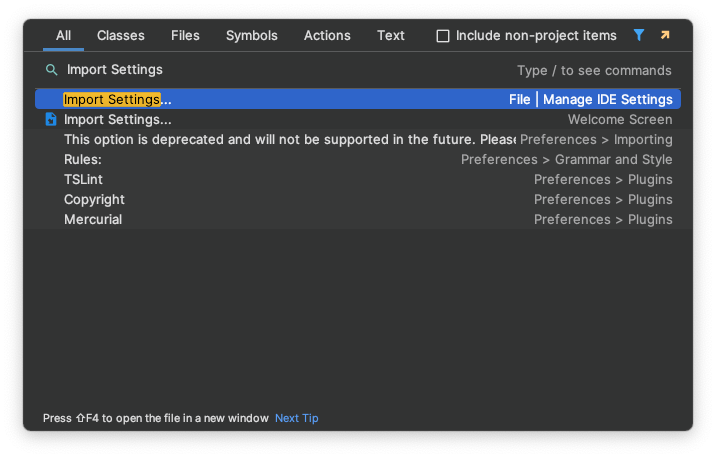
다운로드한 템플릿을 적용하기 위해 IntelliJ를 실행합니다. Welcome to IntelliJ IDEA 화면 좌측 메뉴에서 Customize를 선택한 뒤 Import Settings... 를 클릭합니다. 또는 전체 검색창에서 Import Settings... 를 검색합니다.
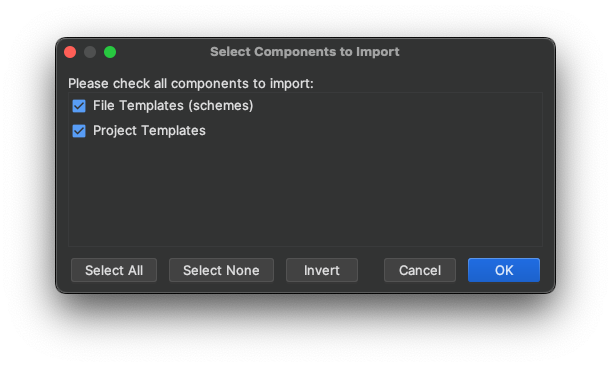
파인더 또는 파일 탐색기에서 템플릿을 다운로드한 경로로 이동해 압축 파일을 선택합니다. Select Components to Import 창이 열리면 File templates 항목과 Project Templates 항목을 모두 체크해 선택합니다. OK를 클릭한 뒤 가져오기가 완료되면 IntelliJ를 다시 시작해 템플릿 적용을 완료합니다.
템플릿을 이용해 프로젝트를 구성할 수도 있지만, 여기에서는 이미 초기 설정이 완료되어 있는 프로젝트를 다운로드해 사용합니다. 아래 링크를 클릭해 튜토리얼용 프로젝트를 내려받아 압축을 해제하고 IntelliJ로 실행합니다.
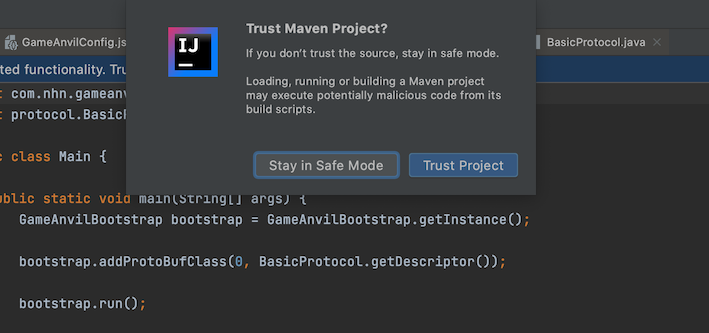
처음 프로젝트를 열면 아래와 같이 Gradle을 통해 스크립트를 실행할 수 있도록 허용할 것인지 묻는 프롬프트가 나타날 수 있습니다. Trust Project를 선택해 온전한 프로젝트를 엽니다.
이제 IntelliJ에 서버 프로젝트 골격이 구성되었습니다. Project 패널을 보면 코드와 설정 파일들이 생성된 것을 확인할 수 있습니다. - protocol 패키지: java로 컴파일된 프로토콜 버퍼 파일을 포함하는 패키지입니다. - Main: 프로그램의 진입점 Main 함수를 포함하는 클래스입니다. - BasicProtocol.proto: 프로토콜 버퍼를 이용해 작성된 프로토콜 파일입니다. - GameAnvilConfig.json: GameAnvil 구동에 필요한 서버 설정 정보를 기록한 파일입니다. 서버 구현에 맞게 수정할 수 있습니다.

먼저 JDK 설정을 확인합니다. 왼쪽 상단 메뉴에서 File > Project Structure를 선택을 클릭합니다. Mac 사용자의 경우 Command + ; 단축키를 사용할 수 있습니다.
Project 탭에서 SDK 설정을 확인합니다. 만약 설정된 SDK가 없다면 Add SDK > Download JDK를 통해서 원하는 버전의 JDK를 다운로드해 설정합니다. Language level은 SDK default로 설정합니다. 다음으로 Modules 탭에서 Language level을 Project default로 설정합니다.
Project 탭에서 SDK 설정을 확인합니다. 만약 설정된 SDK가 없다면 Add SDK > Download JDK를 클릭해 원하는 버전의 JDK를 다운로드해 설정합니다. Language level은 SDK default로 설정합니다. 다음으로 Modules 탭에서 Language level을 Project default로 설정합니다.

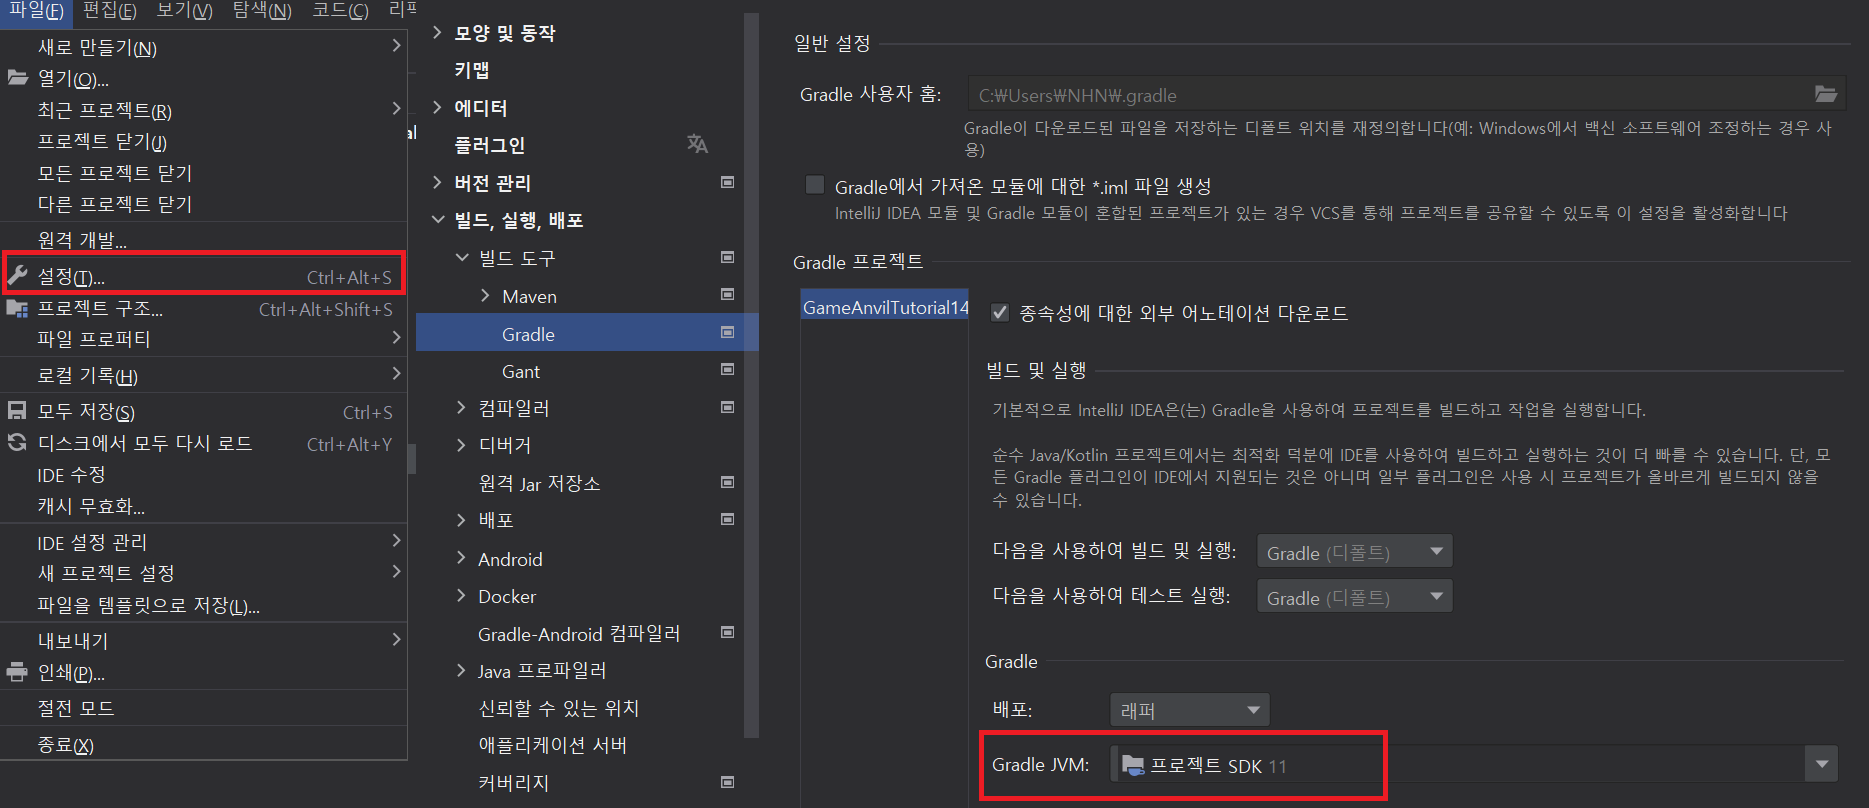
설정 메뉴에서 gradle 에서 사용하는 JVM 을 확인합니다. 프로젝트 SDK 와 동일한 gradle 버전으로 설정합니다.
프로젝트 준비가 거의 끝났지만 실행을 위해서는 몇 가지 설정이 필요합니다. 여기에서는 우선 클라이언트 프로젝트를 먼저 생성한 뒤 서버 설정을 마치고 실행합니다.
Unity 프로젝트 구성
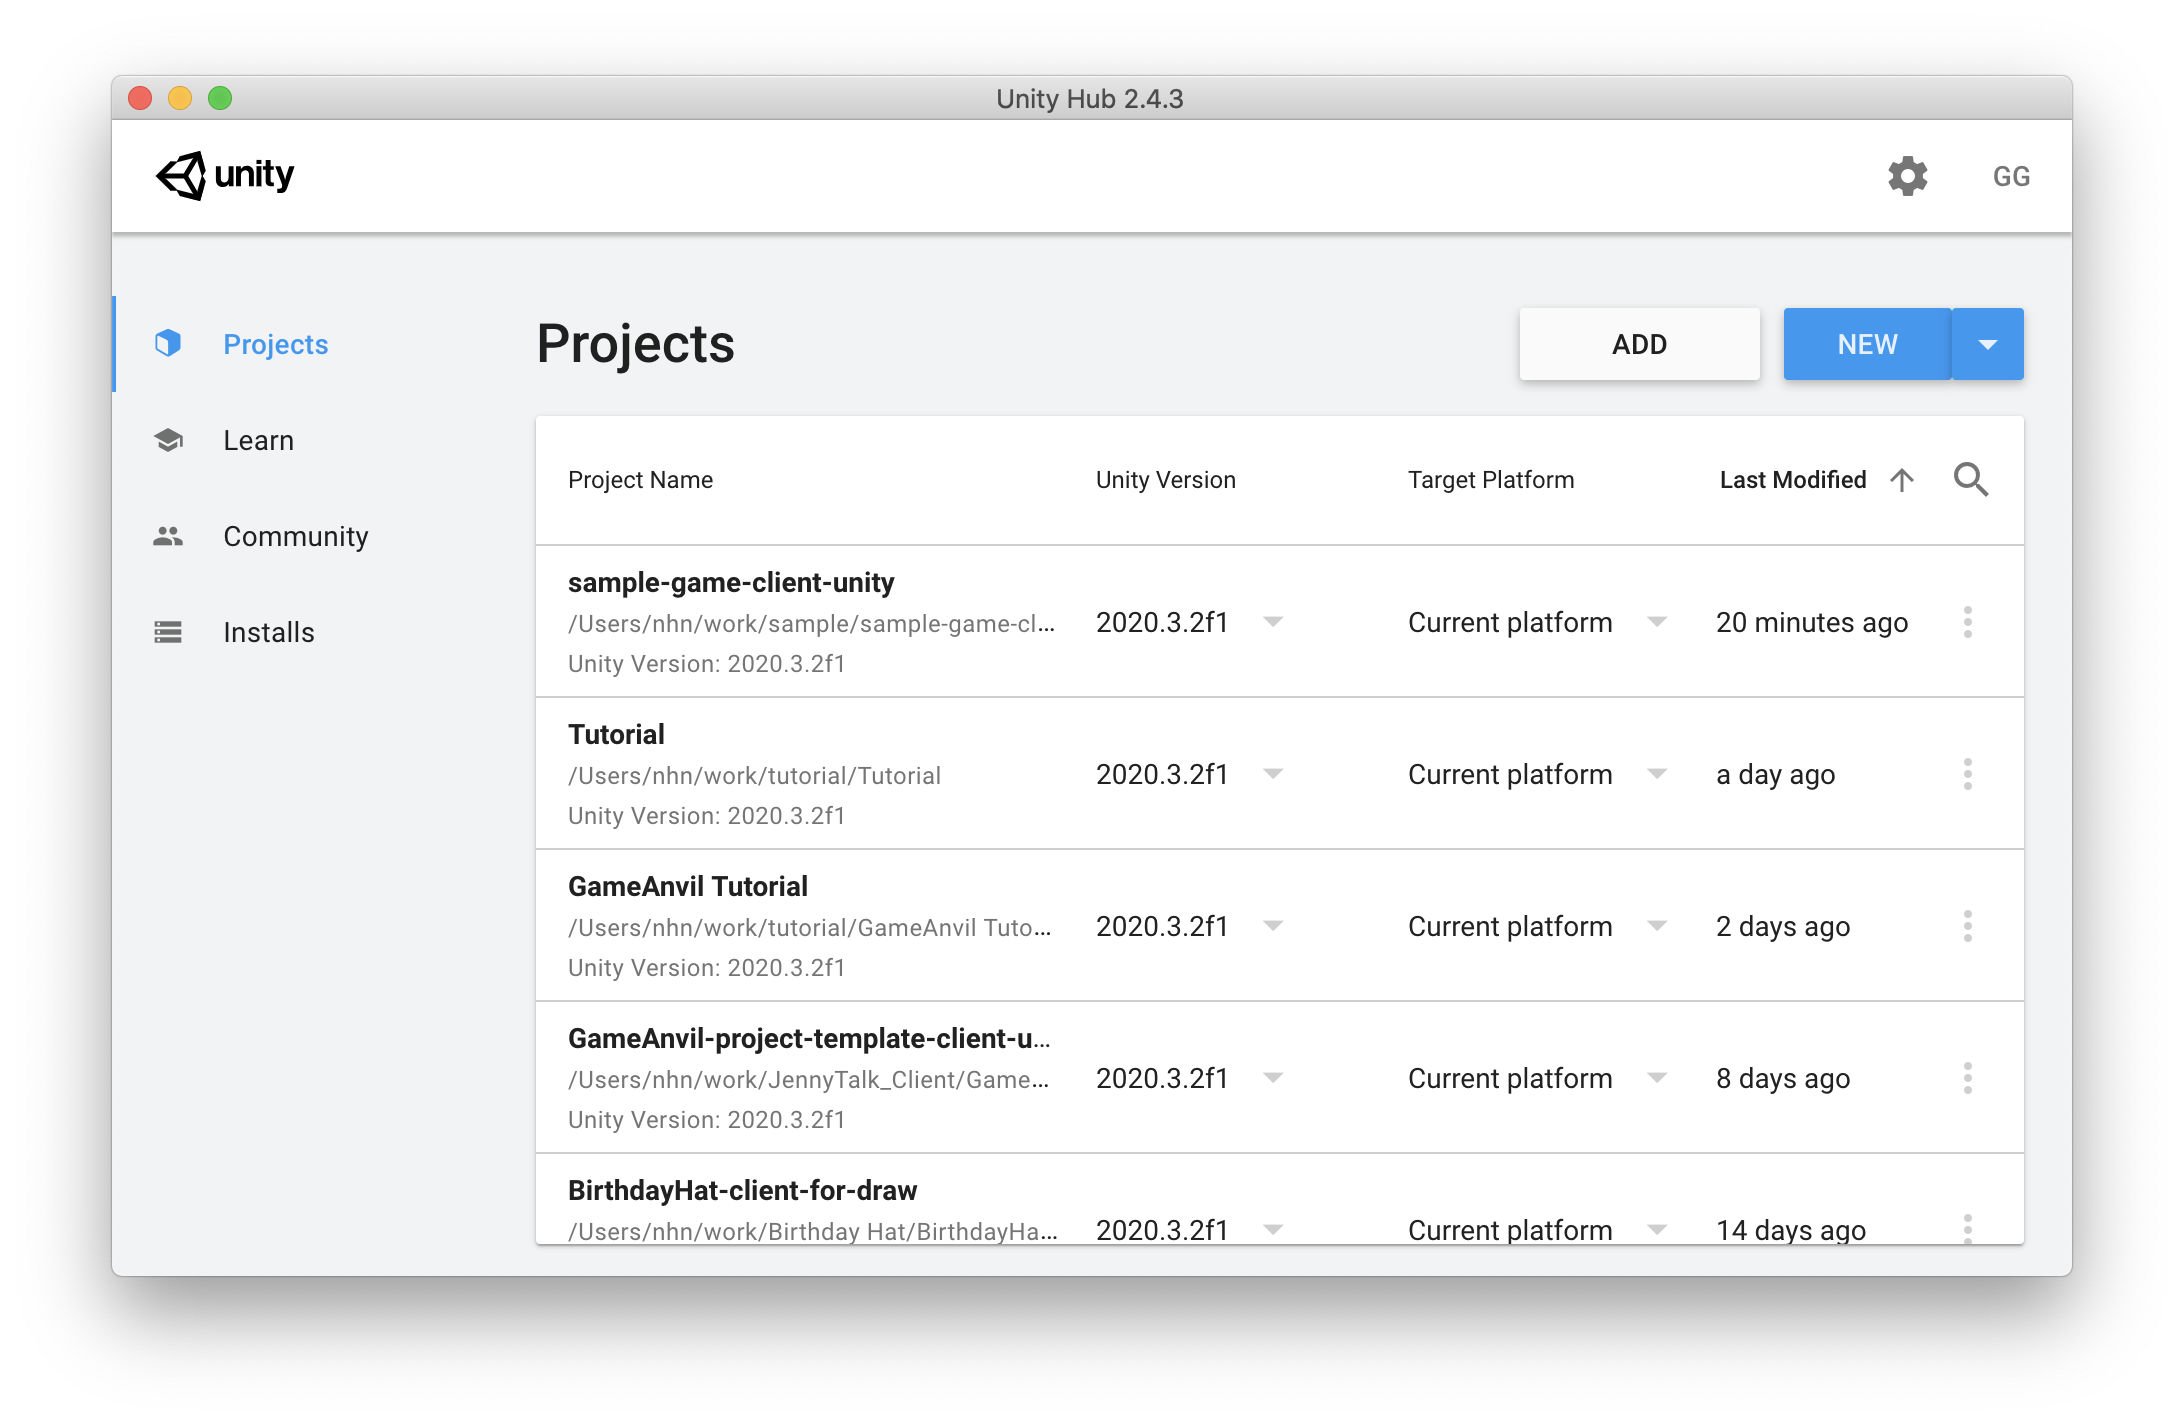
Unity Hub를 실행합니다. 오른쪽 상단의 NEW를 클릭해 새로운 프로젝트 생성 창을 엽니다
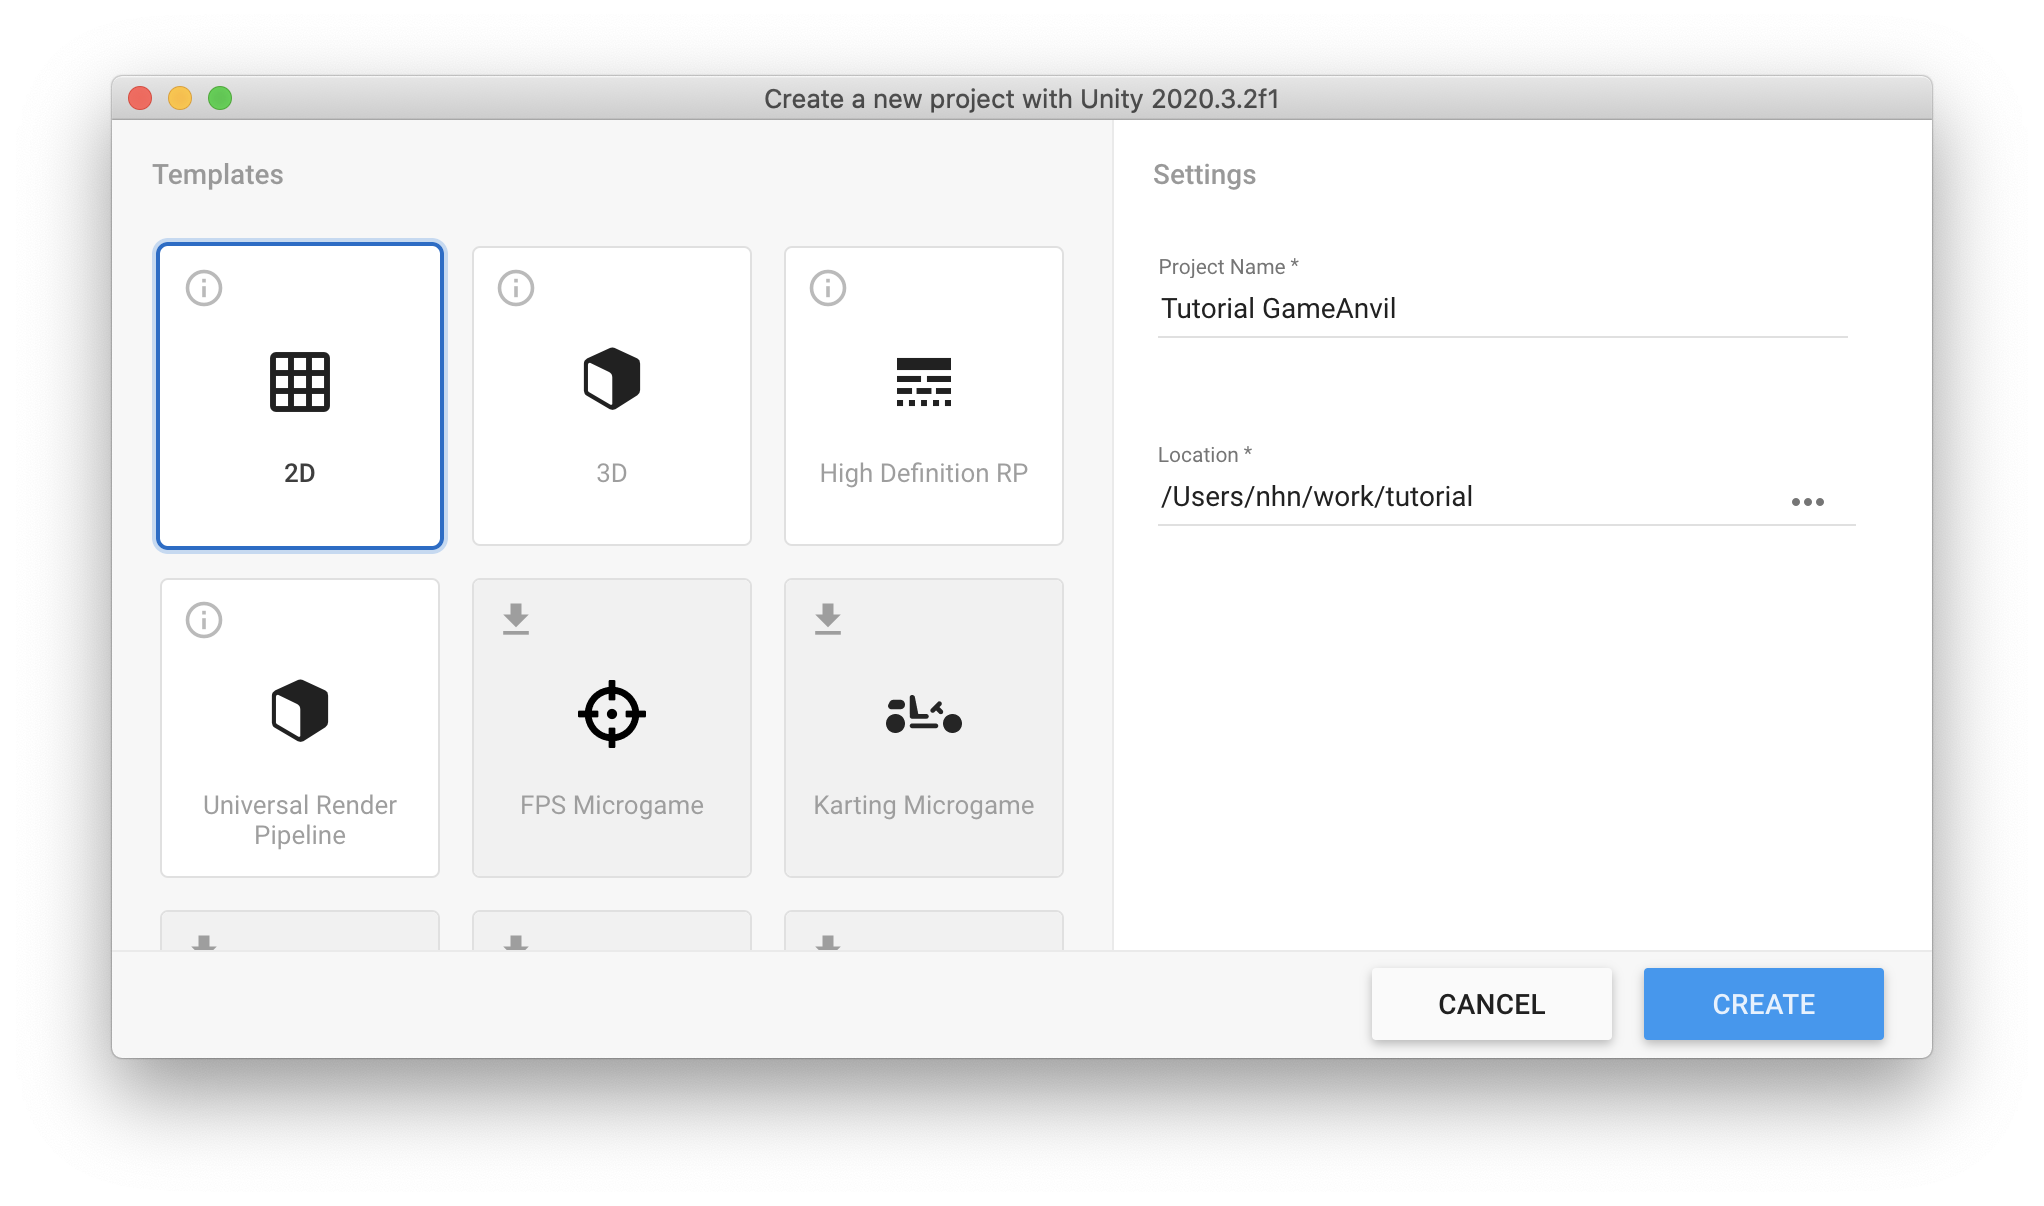
템플릿 목록에서 2D를 선택하고, 프로젝트 이름과 위치를 확인한 뒤 CREATE를 클릭해 프로젝트 생성을 완료합니다.
다음 링크에서 GameAnvil 커넥터를 내려받으십시오. 커넥터는 GameAnvil 서버와의 통신에 필요한 클라이언트 API를 제공하여 간단한 코드만으로 클라이언트를 구현할 수 있도록 도와주는 패키지입니다.
[ gameanvil-connector.unitypackage ]
서버 프로젝트 생성과 마찬가지로 빠른 진행을 위해 작성된 보일러 플레이트 코드를 내려받아 사용합니다. 다음 링크에서 튜토리얼용 코드와 이미지 소스 등이 포함된 패키지를 다운로드합니다.
[ GameAnvilTutorial.unitypacakge ]
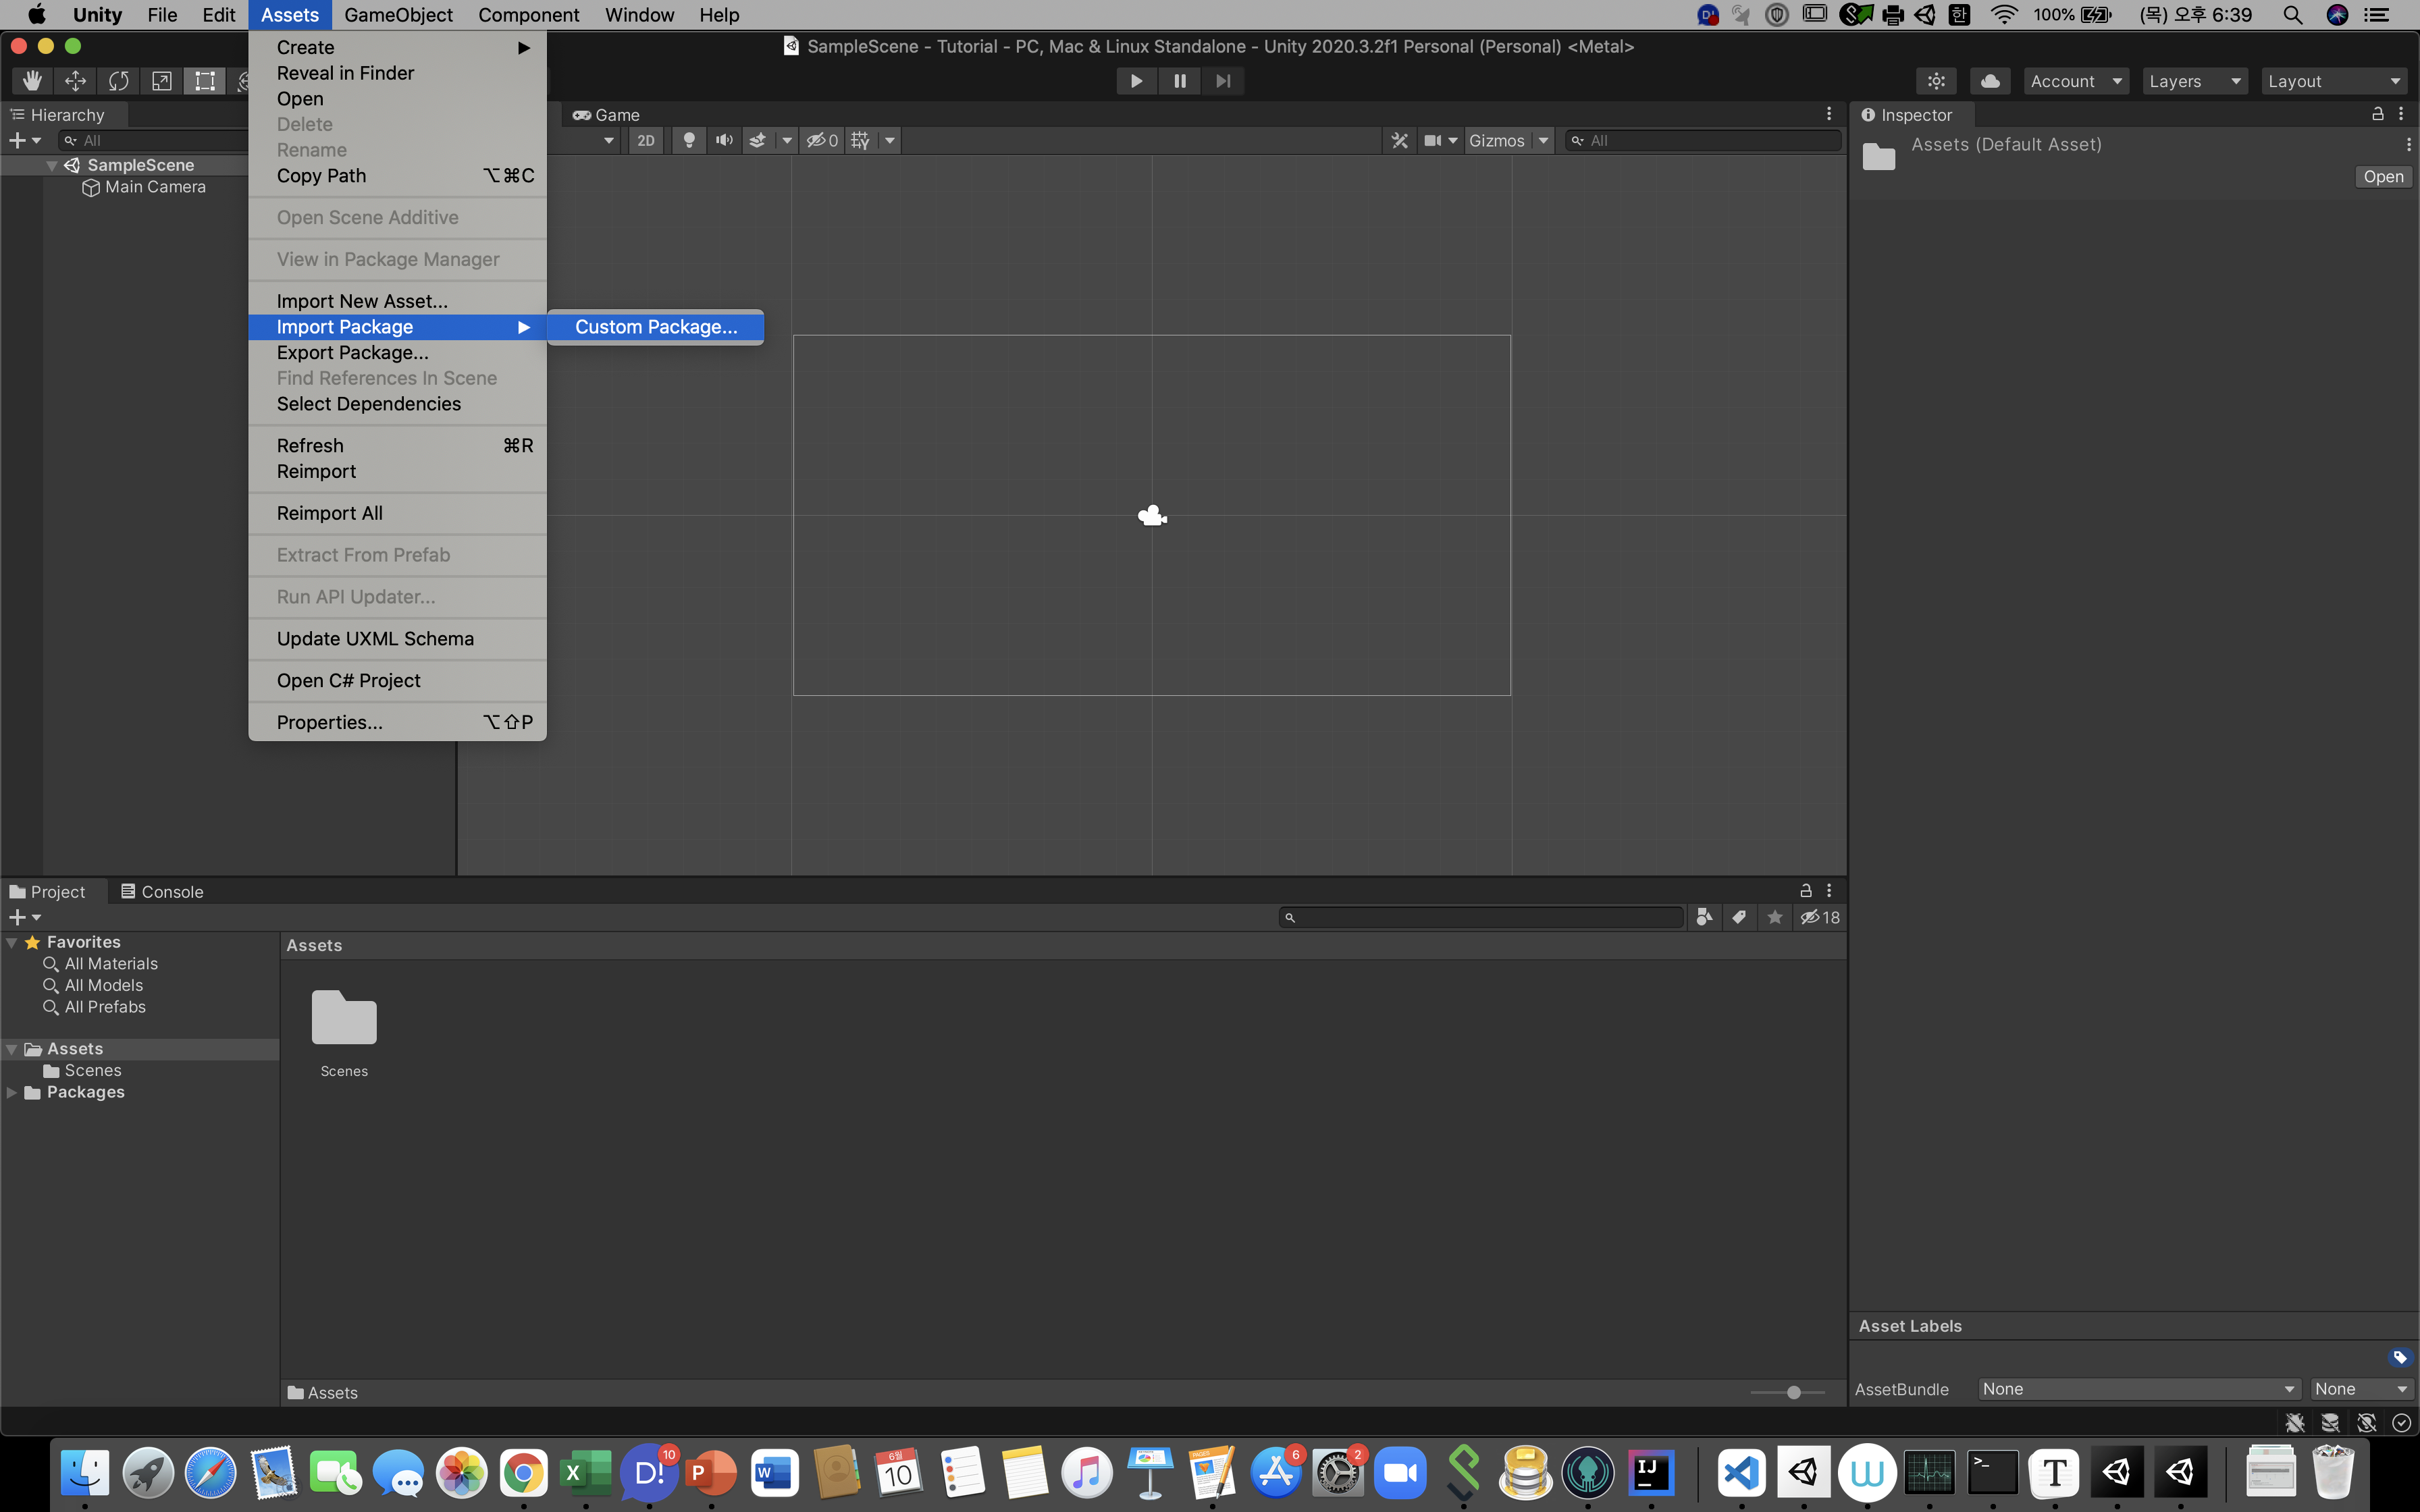
다운로드한 패키지 파일을 Unity 프로젝트로 드래그해 가져옵니다. 또는 Asset > Import Package > Custom Package... 메뉴를 열어 파인더 또는 파일 탐색기에서 패키지 파일을 선택합니다.
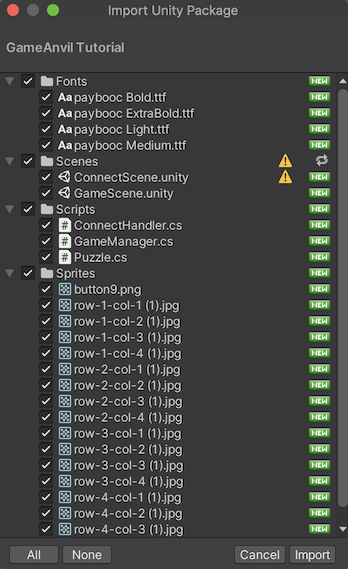
Import Unity Package 대화 상자에서 목록의 모든 체크 박스를 선택한 뒤 Import를 클릭합니다.
마지막으로, 편리하게 테스트하기 위해서는 Project Settings 윈도우에서 Player 탭을 선택하고, Resoultion and Presentation 항목에서 아래와 같이 프로젝트 기본 창 폭과 높이를 각각 1920, 1080으로 설정합니다.
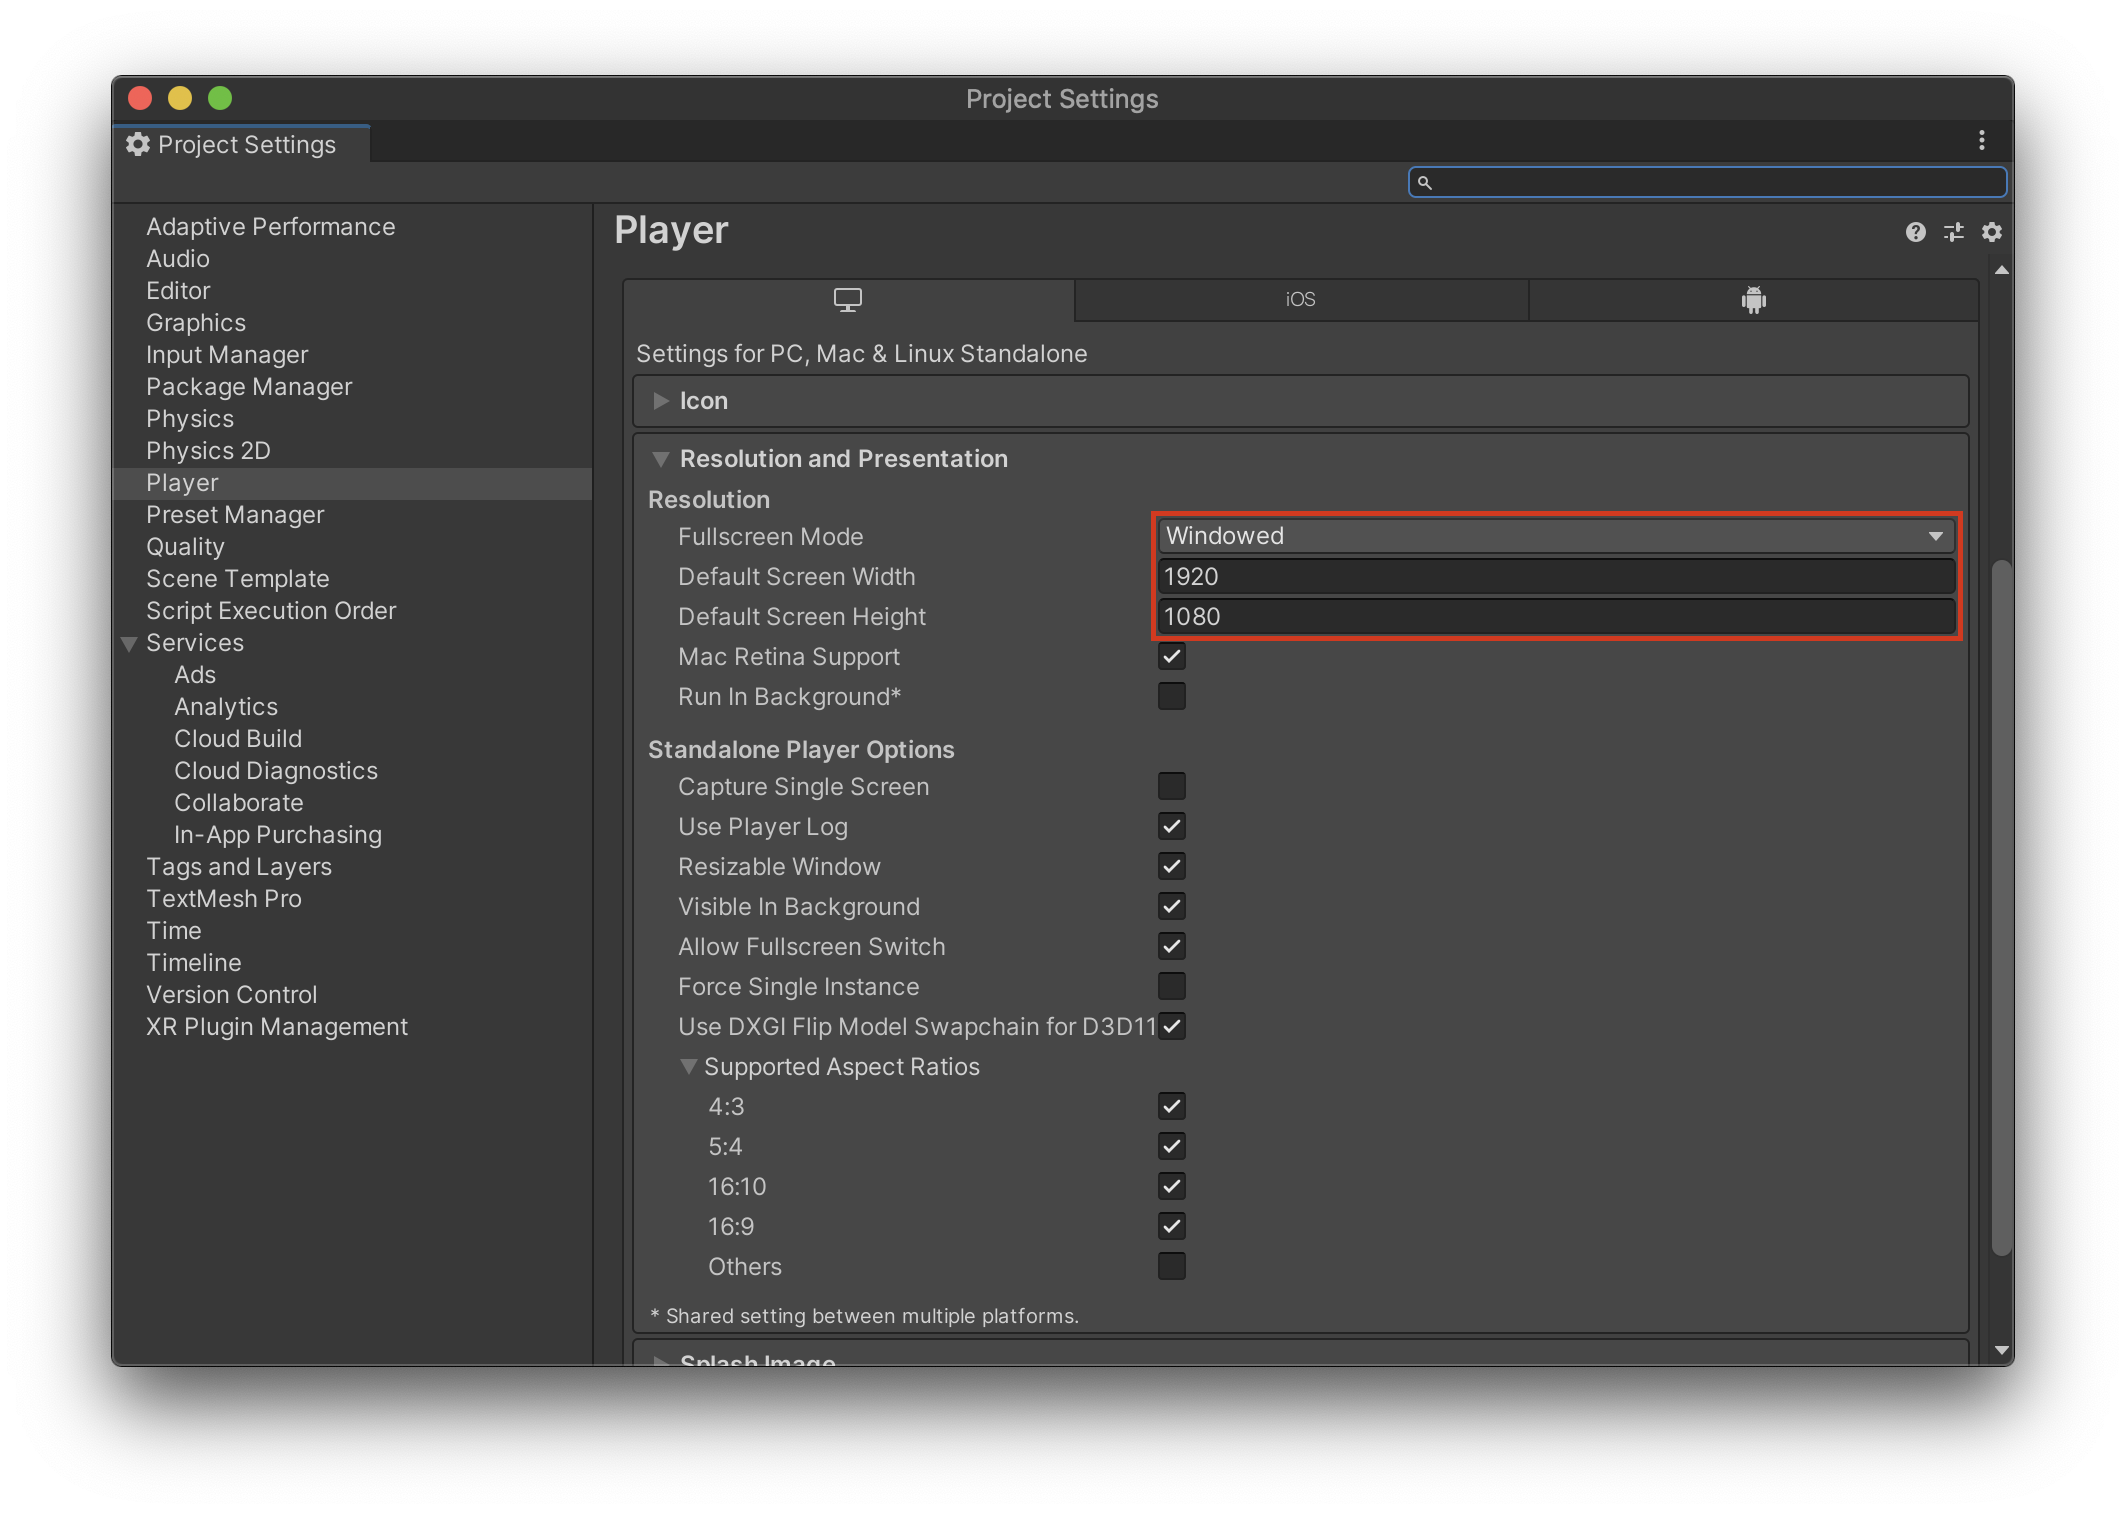
클라이언트 프로젝트 설정이 완료되었습니다.
서버 구동 및 연결
다시 IntelliJ로 이동해 서버 프로젝트를 실행합니다
GameAnvil 서버 구동
실행 설정이 완료되면 Main 클래스의 main() 함수 왼쪽 초록색 삼각형 아이콘을 클릭해 Main.main() 실행을 선택합니다. 최초 실행한 이후에는 IntelliJ 오른쪽 상단 초록색 삼각형 Run 아이콘을 클릭해도 서버가 실행됩니다.
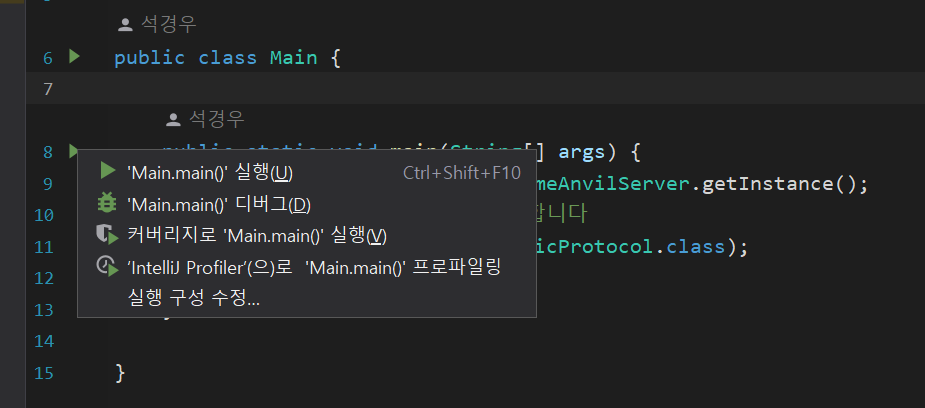
build.gradle에는 편의를 위해 JVM 옵션이 미리 설정되어 있습니다. 이 설정을 활용하여 서버를 실행하려면 IntelliJ 의 Gradle 창에서Task > others > runMain을 마우스 오른쪽 버튼으로 클릭한 뒤 GameAnvilTutorial 실행을 클릭합니다.
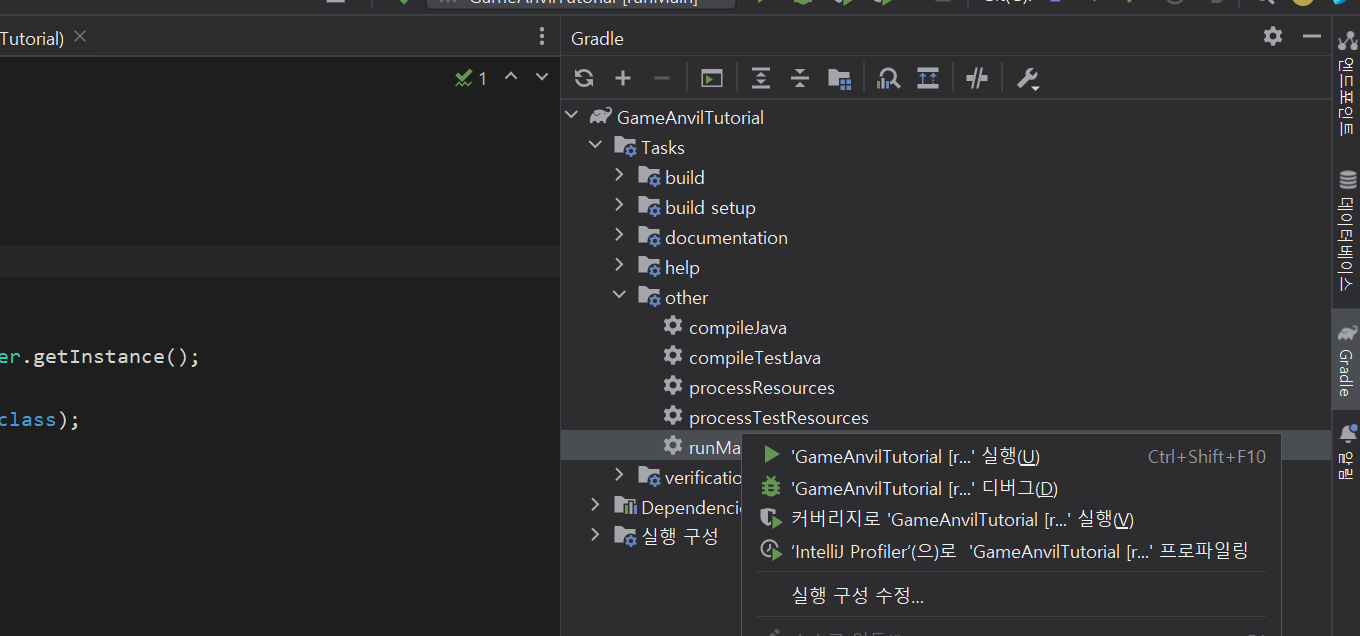
서버가 정상적으로 구동되면 서버 구동 상태 관련 로그들이 다수 출력됩니다. GameAnvil 서버는 수행할 역할을 여러 개로 분담하는 이벤트 루프인 노드들로 구성되어 있습니다. 각각의 노드는 코드를 실행하기 위해 준비하는 데 시간이 필요합니다. 각 노드가 준비 완료되면 onReady 로그를 출력합니다. 노드 중에 클라이언트가 서버로 접속하는 데 직접적인 역할을 수행하는 GatewayNode가 준비되어 해당 노드에서 onReady 로그가 출력되었다면 GameAnvil 서버는 이제 언제든 접속이 가능한 상태입니다.
커넥트 핸들러 작성
이제 Unity 프로젝트로 이동하여 GameAnvil 서버에 접속할 수 있도록 코드를 작성해 보겠습니다. 서버와 연결하려면 먼저 커넥터 객체를 생성해야 합니다.
Asset 패널에서 Scene 폴더 안의 Connect.scene을 더블 클릭해서 씬을 준비합니다. 계층 관계 패널에서 ConnectHandler 게임 오브젝트를 선택하여 적용된 컴포넌트의 스크립트 ConnectHandler.cs 파일의 구현을 추가 수정해 보겠습니다.
using System.Collections;
using System.Collections.Generic;
using UnityEngine;
using UnityEngine.UI;
using GameAnvil;
using GameAnvil.Defines;
using GameAnvil.Connection;
using GameAnvil.Connection.Defines;
using GameAnvil.User;
using UnityEngine.SceneManagement;
using Protocol;

public class ConnectHandler : MonoBehaviour
{
    [SerializeField]
    GameAnvil.Connector.Config config;

    private GameAnvil.Connector connector;
    private static ConnectHandler instance;

    [Header("Object Reference")]
    public Text serverInfoText;
    public Text clientInfoText;
    public Text logText;

    public GameObject popupCanvas;
    public InputField roomIdInput;

    public GameAnvil.Connector GetConnector()
    {
        return connector;
    }

    public static ConnectHandler GetInstance()
    {
        return instance;
    }

    private void Awake()
    {
        if (instance != null)
        {
            DestroyImmediate(this.gameObject);
        }
        instance = this;
        DontDestroyOnLoad(this.gameObject);
        connector = new GameAnvil.Connector(config);
    }

    private void OnDisable()
    {
        if (connector.IsConnected())
        {
            connector.CloseSocket();
        }
    }

    private void OnApplicationPause(bool pause)
    {
        if (pause)
        {
            // 입력한 시간동안 서버의 clientStateCheck 기능을 정지시킨다
            // 이시간이 지나면 clientStateCheck 기능이 동작하여 연결이 끊어질 수 있다.
            connector.GetConnectionAgent().PauseClientStateCheck(10 * 60);

            connector.Update();
        }
        else
        {
            connector.Update();

            // 서버의 clientStateCheck 기능을 다시 동작시킨다.
            connector.GetConnectionAgent().ResumeClientStateCheck();
        }
    }
}
Awake() 함수에서 새로운 Connector 객체를 생성하여 connector 필드에 저장합니다. 서버와 주고받는 메시지 처리를 위해 커넥터의 Update() 메서드를 주기적으로 호출해야 함에 주의합니다. 매 프레임마다 유니티에서 호출하는 함수인 Update() 함수에서 connector의 Update()를 호출해 주도록 작성합니다.
GameAnvil 서버와 클라이언트는 주기적으로 상태 체크 패킷을 주고받아야 합니다. 클라이언트가 일시 중지된 상황 등에서 상태 체크 패킷을 주고받는 것을 멈추려면 PauseClientStateCheck() 메서드를 이용합니다. 상태 체크를 재개하려면 ResumeClientStateCheck() 메서드를 호출합니다. OnApplicationPause() 함수에서 클라이언트의 일시 중지를 감지해 알맞은 메서드를 호출합니다.
서버 연결 코드 추가
커넥터에서 여러 기능을 이용하기 위해서 사용되는 창구를 Agent라고 합니다. Agent는 수행하는 기능에 따라 ConnectionAgent와 UserAgent로 나뉩니다. 서버 접속 및 인증 기능은 ConnectionAgent를 사용해서 접근 가능합니다. Unity가 시작되는 시점에 연결이 수행되도록 ConnectionHandler 코드에 아래와 같이 Start() 메서드와 Connect() 메서드를 추가합니다.
// Client-side

[SerializeField]
GameAnvil.Connector.Config config;

public GameAnvil.Connector connector = null;
private ConnectionAgent connectionAgent;

public string ip = "127.0.0.1";
public int port = 11200;


[Header("Object Reference")]
public Text serverInfoText;
public Text clientInfoText;
public Text logText;

void Start () {
    // 시작 시점에 바로 연결을 시도합니다.
    Connect();

    // 연결 정보를 화면에 출력합니다.
    serverInfoText.text = "서버정보:" + ip + ":" + port;
}

public void Connect(){
  connectionAgent = connector.GetConnectionAgent();
    connectionAgent.Connect(ip, port,
            (ConnectionAgent connectionAgent, ResultCodeConnect result) => {
                Debug.Log(result);

                // 게임 화면 상에 결과를 표시합니다.
                if (result == ResultCodeConnect.CONNECT_FAIL) {
                    logText.text = "연결 정보 : 연결 실패";
                } else {
                    logText.text = "연결 정보 : 연결 성공";
                }
            }
        );
}
Connect() 함수에서는 connector를 통해 ConnectionAgent 객체를 참조하여 Connect메서드를 호출하고 있습니다. 이를 통해 인자로 주어진 ip와 port 정보로 서버 접속을 시도합니다. 세 번째 인자로는 연결 시도 결과를 전달 받는 콜백을 등록합니다.
콜백으로는 해당 연결을 수행한 ConnectionAgent 객체와 연결 시도 결과 코드를 파라미터로 전달 받습니다. 연결 시도 결과 코드를 콘솔에 출력하고 화면상에서도 알 수 있도록 결과에 따라 다른 문구를 띄우도록 설정합니다. 예제 코드에서는 연결에 실패할 경우 연결 정보 : 연결 실패를 화면에 띄우도록 하였습니다.
이것으로 서버가 접속을 받아들일 준비가 된 것 처럼 클라이언트도 서버에 접속할 준비가 완료되었습니다.
서버 연결 확인
이제 Unity 클라이언트에서 플레이 모드로 진입하여 콘솔상에 결과 코드가 제대로 출력되는지 확인합니다. 게임 화면의 텍스트상에 IP, Port의 접속 정보와 더불어 연결 성공 메시지를 확인할 수 있습니다. 게임 서버에 접속 완료된 클라이언트는 이제 서버를 통해 메시지를 주고받을 수 있습니다.
Room 및 User 생성
서버에 접속한 클라이언트를 게임 유저라고 합니다. 서버에 접속한 클라이언트는 서버상에서 하나 이상의 게임 유저(User)로 로그인할 수 있습니다(이 예제에서는 하나의 유저로 로그인하는 경우를 다룹니다). 게임 유저는 하나의 게임 룸에 속함으로써 동일한 룸에 속한 다른 유저들과 통신할 수 있습니다. 즉, 유저들이 서로 다른 유저와 게임 관련 메지시를 교환하려면 해당 유저들은 같은 방(Room) 안에 속해 있어야 합니다.
GameAnvil에서는 게임 유저와 게임 룸의 기본 구현을 미리 준비해 두었으므로 엔진의 클래스를 확장하고 커넥터의 API를 이용해 쉽게 게임 유저와 룸의 구조를 완성할 수 있습니다. 엔진 측에서는 게임 유저와 룸을 정의하는 방법을 다루고, 커넥터 측에서는 방 생성이나 참여 등을 요청하는 API를 사용하는 예제를 다루고자 합니다.
서버 작업
서버에서는 게임 유저와 게임 룸의 기능을 클래스로 정의합니다. 정의한 클래스에 GameAnvil에서 제공하는 애너테이션을 부착하면 게임 실행 시점에 자동으로 클래스를 스캔하고, 적절한 시점에 게임 유저와 룸 객체가 생성됩니다. 우선 게임 유저를 정의해 보겠습니다. Ctrl + N 또는 Cmd + N으로 새 파일 생성 컨텍스트 메뉴를 열어 GameUser를 선택합니다. (앞서 파일 템플릿이 제대로 설치 되지 않았다면, GameUser 항목이 존재하지 않을 것입니다. 파일 템플릿을 설치한 뒤 진행하십시오.)
대화 상자가 표시되면 위와 같이 필드를 채웁니다. 각 값들은 클라이언트와 서버 간에 미리 협의된 값으로 지정해야 합니다. 만약 아래 필드에 원하는 다른 값을 입력했다면 기억해 두었다가 클라이언트에서 유저를 생성하기 위해 로그인할 때 동일한 값을 입력해야 합니다. 여기에서는 단일 서비스와 단일 유저 타입을 사용하는 게임 서버를 제작하고 있으므로, GameAnvil의 다중 서비스와 유저 타입 개념에 대해서는 이 문서에서 자세히 다루지 않습니다.
GameAnvil에서 제공하는 BaseUser 클래스를 상속하여 게임 유저를 구현하는 기본 코드가 작성된 파일이 생성됩니다. GameAnvil에서 원하는 기능의 게임 유저를 구현하려면, BaseUser 클래스를 상속한 후 상황에 맞게 호출되는 여러 콜백 함수들을 오버라이딩하여 원하는 코드를 실행하도록 설정하면 됩니다. 다음은 지원하는 콜백 함수 목록의 일부입니다.
- onLogin: 로그인 요청 시에 실행되는 콜백입니다. 반환값으로 로그인 요청 허용 여부를 전달해야 합니다. false를 반환하면 클라이언트는 로그인에 실패할 것입니다. 파라미터를 통해 클라이언트로부터 받은 페이로드를 참조할 수 있으며, 클라이언트로 되돌려줄 페이로드에 대한 참조를 통해 로그인 허용 정보 외에 추가 정보를 클라이언트에 전달할 수 있습니다.
- onPostLogin: 로그인 이후에 실행되는 콜백입니다.
- onReLogin: 이미 로그인 된 바 있는 유저에 대해서 또 다시 로그인 요청이 오는 경우는 이 콜백에서 따로 처리할 수 있습니다.
- onDisconnect: 클라이언트 요청에 따른 로그아웃 또는 서버에 의한 강제 로그아웃에 의해서 서버에 등록된 유저 정보와 연결이 끊어졌을 때 호출되는 콜백입니다.
이외의 콜백 함수들은 로그인 과정에 관여하지 않으므로 당장 모든 콜백이 무슨 의미인지 완벽하게 알아야 할 필요는 없습니다.
onLogin 콜백 메서드에서는 로그인 과정에 실행되어야 하는 동작을 구현합니다. 이 예제에서는 별다른 로그인 구현 없이, 무조건 로그인에 성공하도록 true를 반환하도록 합니다.
import co.paralleluniverse.fibers.SuspendExecution;
import com.nhn.gameanvil.annotation.ServiceName;
import com.nhn.gameanvil.annotation.UserType;
import com.nhn.gameanvil.node.game.BaseUser;
import com.nhn.gameanvil.node.game.data.RoomMatchResult;
import com.nhn.gameanvil.packet.Payload;
import com.nhn.gameanvil.packet.message.MessageDispatcher;
import com.nhn.gameanvil.serializer.TransferPack;

@ServiceName("BASIC_SERVICE")
@UserType("BASIC_USER")
public class BasicUser extends BaseUser {

    private static final MessageDispatcher<BasicUser> messageDispatcher = new MessageDispatcher<>();

    static {
        // messageDispatcher.registerMsg();
    }

    @Override
    public MessageDispatcher<BasicUser> getMessageDispatcher() {
        return messageDispatcher;
    }

    @Override
    public boolean onLogin(Payload payload, Payload sessionPayload, Payload outPayload) throws SuspendExecution {
        boolean isSuccess = true;
        return isSuccess;
    }

    @Override
    public void onPostLogin() throws SuspendExecution {

    }

    @Override
    public boolean onLoginByOtherDevice(String newDeviceId, Payload outPayloadForKickUser) throws SuspendExecution {
        return true;
    }

    @Override
    public boolean onLoginByOtherUserType(String userType, Payload outPayload) throws SuspendExecution {
        return true;
    }

    @Override
    public void onLoginByOtherConnection(Payload outPayload) throws SuspendExecution {

    }

    @Override
    public boolean onReLogin(Payload payload, Payload sessionPayload, Payload outPayload) throws SuspendExecution {
        boolean isSuccess = true;
        return isSuccess;
    }

    @Override
    public void onDisconnect() throws SuspendExecution {
    }


    @Override
    public void onPause() throws SuspendExecution {

    }

    @Override
    public void onResume() throws SuspendExecution {

    }

    @Override
    public void onLogout(Payload payload, Payload outPayload) throws SuspendExecution {

    }

    @Override
    public boolean canLogout() throws SuspendExecution {
        boolean canLogout = true;
        return canLogout;
    }

    @Override
    public void onPostLeaveRoom() throws SuspendExecution {

    }

    @Override
    public RoomMatchResult onMatchRoom(String roomType, String matchingGroup, String matchingUserCategory, Payload payload) throws SuspendExecution {
        return null;
    }

    @Override
    public boolean onMatchUser(String roomType, String matchingGroup, Payload payload, Payload outPayload) throws SuspendExecution {
        return false;
    }

    @Override
    public boolean canTransfer() throws SuspendExecution {
        return true;
    }

    @Override
    public void onTransferOut(TransferPack transferPack) throws SuspendExecution {

    }

    @Override
    public void onTransferIn(TransferPack transferPack) throws SuspendExecution {

    }

    @Override
    public void onPostTransferIn() throws SuspendExecution {

    }

    @Override
    public boolean onCheckMoveOutChannel(String destinationChannelId, Payload payload, Payload errorPayload) throws SuspendExecution {
        boolean canMoveOut = false;
        return canMoveOut;
    }

    @Override
    public void onMoveOutChannel(String destinationChannelId, Payload outPayload) throws SuspendExecution {
    }

    @Override
    public void onPostMoveOutChannel() throws SuspendExecution {
    }

    @Override
    public void onMoveInChannel(String sourceChannelId, Payload payload, Payload outPayload) throws SuspendExecution {
    }

    @Override
    public void onPostMoveInChannel() throws SuspendExecution {

    }
}
로그인 가능한 유저 구현을 완료했습니다. 이제 게임 룸을 구현합니다. 유저 생성 방법과 마찬가지로 파일 템플릿을 이용해 BaseRoom 클래스의 하위 클래스를 생성합니다. 이때 게임 유저 생성 시 입력한 서비스명과 동일한 서비스명을 입력해야 합니다. 룸 타입 정보는 이후 클라이언트에서 룸 생성을 요청할 때 필요하므로 기억해 둡니다. 유저 클래스 입력 필드에는 이전 단계에서 생성한 BaseUser 구현 클래스의 클래스명을 입력합니다.
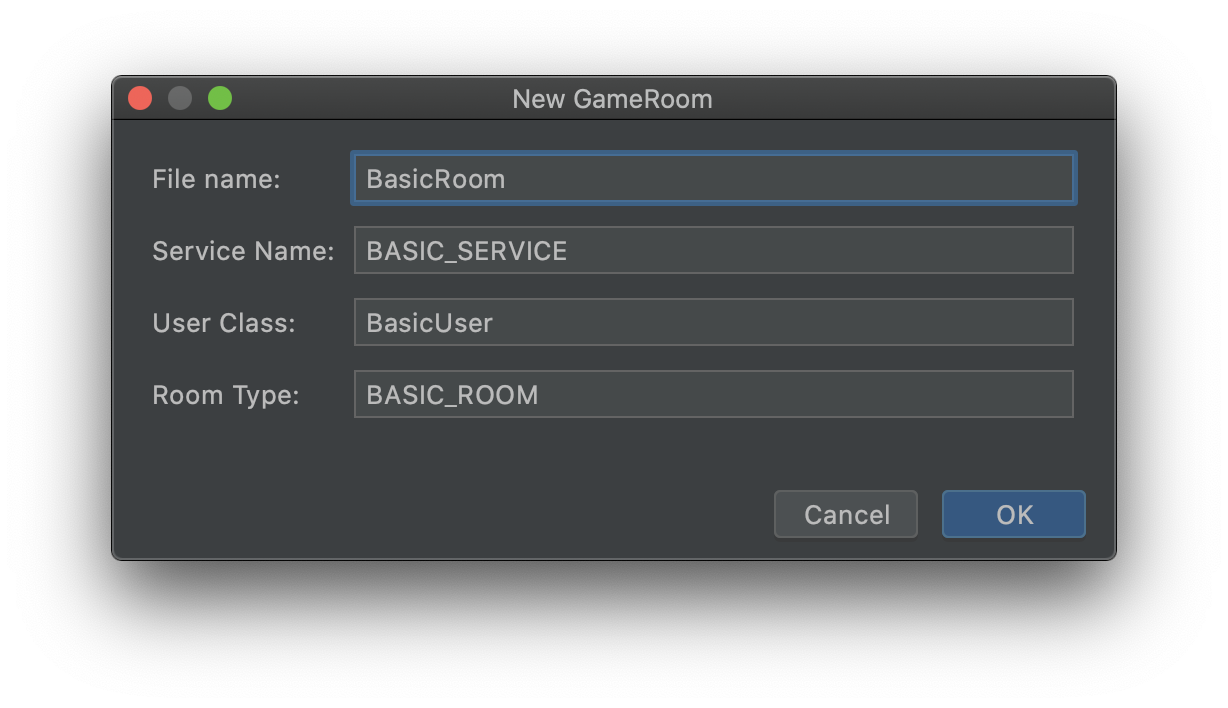
OK를 클릭하면 지원하는 콜백 메서드가 자동으로 작성됩니다. GameAnvil에서 지원하는 콜백을 설명하기 위해 잠시 클라이언트의 API를 간단하게 설명하겠습니다. 클라이언트에서는 커넥터로 로그인 후에 다른 유저들과 통신하기 위해 방 관련 API를 호출할 수 있습니다. 방을 만들거나, 다른 유저가 만든 방에 참여하거나, 방에서 나가는 등의 동작을 지원합니다.
- onCreateRoom: 유저가 방 생성을 요청했을 때 실행됩니다. 방 생성을 요청한 유저 정보와 함께 방 생성 시 클라이언트에서 전달한 추가 정보를 파라미터로 제공하므로 이 정보를 토대로 방 생성을 허용할 것인지 여부를 결정해 반환해서 구현합니다.
- onJoinRoom: 다른 유저가 생성한 방에 입장을 요청할 때 실행됩니다. 다른 콜백들과 마찬가지로 방 입장을 요청한 유저 정보와 함께 방 입장 시 클라이언트에서 전달한 추가 정보를 제공하므로 이 정보를 토대로 방 입장을 허용할 것인지 여부를 결정해 반환해서 구현합니다.
- onLeaveRoom: 유저가 방에서 퇴장을 요청할 때 실행됩니다. 다른 콜백들과 마찬가지로 방 퇴장으로 요청한 유저 정보와 함께 방 퇴장 요청 시에 같이 전달한 추가 정보를 제공하므로 이 정보를 토대로 방 퇴장을 허용할 것인지 여부를 결정해 반환해서 구현합니다.
GameAnvil 콜백의 호출 시점과 반환값의 의미에 일관성이 있으므로 다른 콜백의 동작을 유추하기에 용이합니다. GameAnvil 콜백은 어떠한 동작이 요청되고 처리되기 직전 또는 직후에 호출되며, 반환값은 요청을 서버에서 처리하는 것을 허용할지 여부를 결정합니다. 서버가 요청을 완전히 처리했는지의 여부는 패킷 형태로 엔진을 통해 클라이언트로 전달됩니다.
여기에서는 이러한 콜백들을 이용해 방에 입장해 있는 유저의 정보를 저장하는 기능을 구현합니다. 유저가 방을 생성하거나 방에 입장하는 시점에서 요청을 전달한 유저를 방 객체의 필드 users 맵에 저장합니다. 유저가 방에서 퇴장하는 시점에서는 users 맵에서 해당 유저를 삭제합니다. 아래 코드를 참조하여 게임 룸 클래스 구현을 완료합니다.
import co.paralleluniverse.fibers.SuspendExecution;
import com.nhn.gameanvil.annotation.RoomType;
import com.nhn.gameanvil.annotation.ServiceName;
import com.nhn.gameanvil.node.game.BaseRoom;
import com.nhn.gameanvil.node.game.BaseUser;
import com.nhn.gameanvil.node.game.RoomMessageDispatcher;
import com.nhn.gameanvil.packet.Payload;

import java.util.HashMap;
import java.util.Map;

@ServiceName("BASIC_SERVICE")
@RoomType("BASIC_ROOM")
public class BasicRoom extends BaseRoom<BasicUser> {
    private static RoomMessageDispatcher<BasicRoom, BasicUser> dispatcher = new RoomMessageDispatcher<>();
    private Map<Integer, BaseUser> users = new HashMap<>();

    @Override
    public final RoomMessageDispatcher<BasicRoom, BasicUser> getMessageDispatcher() {
        return dispatcher;
    }

    @Override
    public boolean onCreateRoom(BasicUser user, Payload inPayload, Payload outPayload) throws SuspendExecution {
        users.put(user.getUserId(), user);
        return true;
    }

    @Override
    public boolean onJoinRoom(BasicUser user, Payload inPayload, Payload outPayload) throws SuspendExecution {
        users.put(user.getUserId(), user);
        return true;
    }

    @Override
    public void onInit() throws SuspendExecution {

    }

    @Override
    public void onDestroy() throws SuspendExecution {

    }

    @Override
    public boolean onLeaveRoom(BasicUser user, Payload inPayload, Payload outPayload) throws SuspendExecution {
        users.remove(user);
        return true;
    }

    @Override
    public void onLeaveRoom(BasicUser user) throws SuspendExecution {

    }

    @Override
    public void onPostLeaveRoom() throws SuspendExecution {

    }

    @Override
    public void onRejoinRoom(BasicUser user, Payload outPayload) throws SuspendExecution {

    }

    @Override
    public boolean canTransfer() throws SuspendExecution {
        return false;
    }
}
이제 게임 유저와 게임 방이 준비되었습니다. 하지만 아직 게임 유저/게임 룸의 생성과 삭제 요청을 처리하는 노드가 없습니다. 게임 유저와 게임 룸을 관리하는 역할을 하는 노드는 GameNode입니다. 이 노드는 일반적으로 게임 서버가 하기를 기대하는 대부분의 게임 로직 처리 역할을 수행하는 노드입니다. GameAnvil에 노드를 추가하는 방법은 자연스럽고 간단합니다. 게임 유저와 게임 룸을 정의했던 것과 마찬가지로, 미리 정의된 클래스를 상속해서 클래스를 만든 뒤 원하는 기능을 추가 구현하면 됩니다. GameAnvil에서 제공하는 애너테이션을 부착하면, 런타임에 알맞은 시점에서 노드 인스턴스가 생성되어 자동으로 실행될 것입니다.
서비스 이름을 입력할 때 앞서 생성한 게임 유저와 게임 룸에서 사용한 서비스명과 동일한 서비스명을 입력해야 합니다. 튜토리얼을 그대로 따라 작성하고 있었다면 아래와 같이 입력한 뒤 OK를 클릭해 완료합니다.
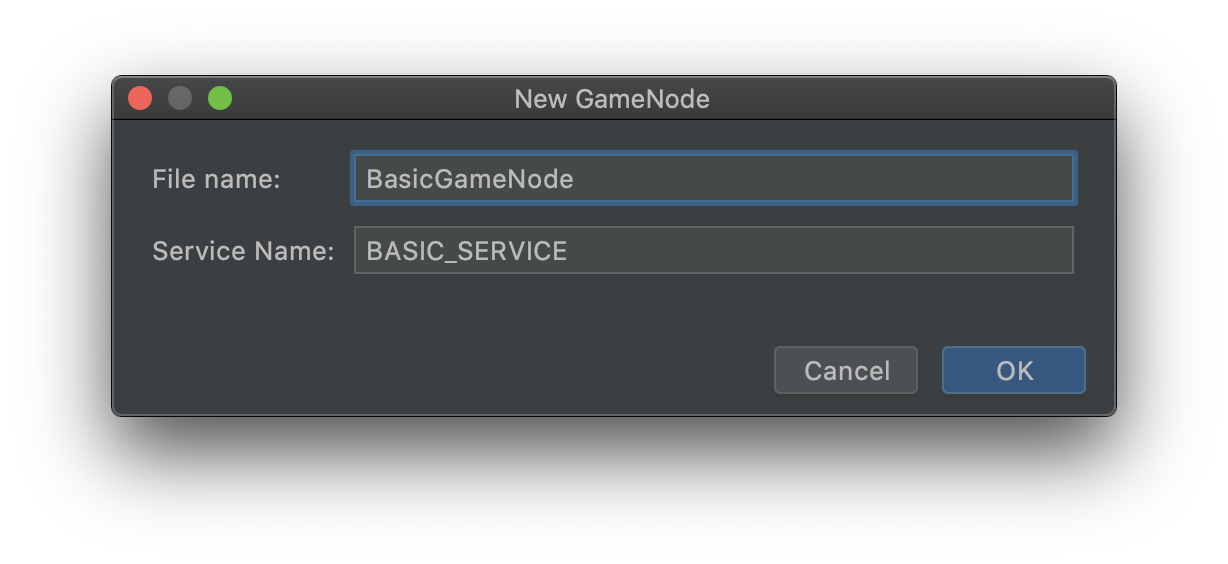
노드가 역할을 수행하기 위해서는 우선 노드가 루프를 실행해야 합니다. 노드가 실행될 때는 일련의 과정을 거치게 되므로 약간의 시간이 필요합니다. 노드의 실행 여부나 실행 과정 중 어느 단계에 있느냐를 나타내는 지표를 노드의 상태라고 부릅니다. 노드의 상태는 보통 아래 순서에 따라서 순차적으로 변경되면서 READY 상태에 도달합니다.
- INIT
- PREPARE
- READY
READY 상태에 도달한 노드는 이제 미리 사용자가 작성한 로직들을 실행할 준비가 된 상태입니다. 각 준비 단계에 도달했을 때 특정한 코드를 실행하고 싶다면, 콜백 메서드를 구현하여 엔진에서 콜백 메서드를 호출했을 때 해당 코드가 실행되도록 설정할 수 있습니다. 지금은 특별하게 실행해야할 코드가 없으므로 생성된 코드를 그대로 사용합니다.
import co.paralleluniverse.fibers.SuspendExecution;
import com.nhn.gameanvil.annotation.ServiceName;
import com.nhn.gameanvil.node.game.BaseGameNode;
import com.nhn.gameanvil.node.game.data.BaseChannelRoomInfo;
import com.nhn.gameanvil.node.game.data.BaseChannelUserInfo;
import com.nhn.gameanvil.node.game.data.ChannelUpdateType;
import com.nhn.gameanvil.packet.Packet;
import com.nhn.gameanvil.packet.message.MessageDispatcher;
import com.nhn.gameanvil.packet.Payload;

@ServiceName("BASIC_SERVICE")
public class BasicGameNode extends BaseGameNode {

    private static final MessageDispatcher<BasicGameNode> messageDispatcher = new MessageDispatcher<>();

    static {
        // messageDispatcher.registerMsg();
    }

    @Override
    public void onInit() throws SuspendExecution {

    }

    @Override
    public void onPrepare() throws SuspendExecution {

    }

    @Override
    public void onReady() throws SuspendExecution {

    }

    @Override
    public MessageDispatcher<BasicGameNode> getMessageDispatcher() {
        return messageDispatcher;
    }

    @Override
    public void onPause(Payload payload) throws SuspendExecution {

    }

    @Override
    public void onResume(Payload payload) throws SuspendExecution {

    }

    @Override
    public void onShutdown() throws SuspendExecution {

    }

    @Override
    public boolean onNonStopPatchSrcStart() throws SuspendExecution {
        return false;
    }

    @Override
    public boolean onNonStopPatchSrcEnd() throws SuspendExecution {
        return false;
    }

    @Override
    public boolean canNonStopPatchSrcEnd() throws SuspendExecution {
        return false;
    }

    @Override
    public boolean onNonStopPatchDstStart() throws SuspendExecution {
        return false;
    }

    @Override
    public boolean onNonStopPatchDstEnd() throws SuspendExecution {
        return false;
    }

    @Override
    public boolean canNonStopPatchDstEnd() throws SuspendExecution {
        return false;
    }

    @Override
    public void onChannelUserInfoUpdate(ChannelUpdateType channelUpdateType, BaseChannelUserInfo baseChannelUserInfo, int i, String s) throws SuspendExecution {

    }

    @Override
    public void onChannelRoomInfoUpdate(ChannelUpdateType channelUpdateType, BaseChannelRoomInfo baseChannelRoomInfo, int i) throws SuspendExecution {

    }

    @Override
    public void onChannelInfo(Payload outPayload) throws SuspendExecution {

    }

}
마지막으로 작성한 게임 유저와 게임 룸을 GameNode에 연동하기 위해 설정 파일에도 이를 등록합니다. GameAnvilConfig.json 파일의 'game' 항목에 아래의 내용을 추가합니다.
// 게임 로비 역할을 하는 노드. (게임 룸, 유저를 포함 하고 있음)
  "game": [
    {
      "nodeCnt": 8,
      "serviceId": 1,
      "serviceName": "BASIC_SERVICE",
      "channelIDs": [
        "",
        "",
        "",
        "",
        "",
        "",
        "",
        ""
      ],
      "userTimeout": 5000,                // 노드마다 부여할 채널 ID. (유니크하지 않아도 됨. "" 문자열로 채널 구분 없이 중복 사용도 가능)
      "safeCreateTime": 1000,             //테스트 위해서 설정 보통 설정 필요 없음 기본 60초

      "checkClientStateCycle": 10000,       // 체크 루틴 호출 주기
      "demandClientStateTimeout": 10000,    // 마지막 메시지를 받은 이후 demandClientStateTimeout 경과하면 demandClientState를 수행한다.
      "clientStateOkDeadline": 10000        // demandClientState를 요청에 대해 ClientStateOK를 응답해야 할 데드라인(시간)
    }
  ],
이제 클라이언트가 서버에 접속해서 게임 유저로서 로그인하고, 게임 룸을 생성할 수 있는 기능이 구현 완료되었습니다. 하지만 서버에 접속한다고 해서 바로 게임 관련 기능(게임 유저 생성, 게임 룸 생성 등)을 요청할 수 있는 것은 아닙니다. 지금 상태에서 서버와 클라이언트를 실행한다고 해도 클라이언트는 게임 서버의 기능을 사용할 수 없을 것입니다. 서버에 이러한 것들을 요청하려면 서버 접속 이후에 클라이언트 인증 과정이 필요합니다. 다음 챕터에서는 서버와 클라이언트에서 인증을 어떻게 처리하는지 다룹니다.
접속 인증
클라이언트가 서버에 접속하고나서 게임에 로그인하기 전에 유저의 신원을 확인하고 인증 과정을 거칠 필요가 있습니다. 게임 노드가 게임 유저와 게임 룸 생성 역할을 담당한다면, 게이트웨이 노드는 유저의 접속과 인증 기능을 담당합니다. 게임 노드를 클래스 작성을 통해 구현한 것처럼 게이트웨이 노드도 일관성 있는 방식으로 구현할 수 있습니다. GameAnvil에서는 기본 게이트웨이를 자동으로 생성하므로 이번 챕터에서 서버측 구현은 생략하겠습니다.
접속 인증 코드 추가
유니티 프로젝트로 이동해서 클라이언트 측 구현을 해보겠습니다. 클라이언트에서는 연결 요청과 마찬가지로 인증 요청을 커넥터 커넥션에이전트 API를 통해 요청할 수 있습니다. 인증 요청은 연결 요청 이후에만 성립할 수 있으므로, 연결에 성공한 직후에 바로 인증 요청을 하는 것으로 코드를 수정하도록 하겠습니다. 인증 요청을 할 때는 인증 요청 결과에 따른 콜백을 전달하여 결과를 받아 화면 상의 텍스트와 콘솔을 통해 출력하여 연결 정보를 알 수 있도록 하겠습니다.
// Client-side

[SerializeField]
GameAnvil.Connector.Config config;

public GameAnvil.Connector connector = null;
private ConnectionAgent connectionAgent;

public string ip = "127.0.0.1";
public int port = 11200;

public string deviceId = "";
public string password = "";
public string accountId = "";

public Text connectInfoText;
public Text accountIdText;

void Start () {
    Connect();

    serverInfoText.text = "서버정보 : " + ip + ":" + port;
}

public void Connect(){
    connectionAgent = connector.GetConnectionAgent();
    connectionAgent.Connect(ip, port,
        (ConnectionAgent connectionAgent, ResultCodeConnect result) => {
            Debug.Log(result);

           if (result == ResultCodeConnect.CONNECT_FAIL) {
                logText.text = "연결 정보 : 연결 실패";
            } else {
                logText.text = "연결 정보 : 연결 성공";

                // 연결에 성공하면 바로 인증을 시도합니다.
                Auth();
            }
        }
    );
}
public void Auth(){
    accountId = Random.Range(1000,9999) + "";
    clientInfoText.text = "클라이언트정보 : " + accountId;
        connectionAgent.Authenticate(deviceId, accountId, password,
         (ConnectionAgent connectionAgent, ResultCodeAuth result, List<ConnectionAgent.LoginedUserInfo> loginedUserInfoList, string message, Payload payload) => {
                Debug.Log(result);

                if (result == ResultCodeAuth.AUTH_SUCCESS) {
                    logText.text = "인증 정보 : 인증 성공";
                } else {
                    logText.text = "인증 정보 : 인증 실패";
                }
            }
            );
}
이제 클라이언트가 서버에 접속할 뿐만 아니라 인증 과정까지 요청할 수 있도록 설정되었습니다.
접속 인증 확인
Unity 클라이언트에서 플레이 모드로 진입합니다. 콘솔상에 로그가 접속, 인증 순으로 순차 출력됨을 확인합니다. 게임 화면상에 인증 정보와 인증 성공 여부가 나타남을 확인할 수 있습니다. 다시 정리하면, 클라이언트의 Auth 요청에 따라 서버의 게이트웨이 노드에서 사용자 인증이 완료되어 서버에 로그인할 수 있는 상태가 된 것입니다.
로그인
이제 마지막으로 수행할 과정은 게임 노드에 로그인하여 게임 유저를 생성하는 것입니다. 게임 유저는 서버에 접속한 다른 클라이언트와 통신하기 위해 필요한 개념으로, 클라이언트 간에 통신을 하려면 각 클라이언트는 게임 유저를 생성하여 게임 룸을 통해서 메시지를 주고받도록 하고 있습니다.
로그인 코드 추가
접속 및 인증이 완료된 클라이언트는 게임 노드로 로그인을 할 수 있습니다. 서버에 로그인하면 게임 노드에 해당 클라이언트를 위한 게임 유저 객체가 생성됩니다. 클라이언트는 자신의 서버측 게임 유저 객체를 통해 서버 혹은 다른 유저들과 메시지를 주고 받을 수 있게 됩니다. 앞서 작성한 인증 코드를 아래와 같이 수정하여 인증이 성공한 경우에 바로 로그인을 진행하도록 합니다.
// Client-side

public void Auth(){
    accountId = Random.Range(1000,9999) + "";
    connectionAgent.Authenticate(deviceId, accountId, password,
     (ConnectionAgent connectionAgent, ResultCodeAuth result, List<ConnectionAgent.LoginedUserInfo> loginedUserInfoList, string message, Payload payload) => {
        Debug.Log(result);

        if (result == ResultCodeAuth.AUTH_SUCCESS) {
            logText.text = "인증 정보 : 인증 성공";

            Login(); // 인증에 성공한 경우 바로 로그인을 시도합니다.
        } else {
            logText.text = "인증 정보 : 인증 실패";
        }
    });
}

public void Login()
{
    connector.CreateUserAgent("BASIC_SERVICE", 1).Login("BASIC_USER", "", null, (UserAgent userAgent, ResultCodeLogin result, UserAgent.LoginInfo loginInfo) => {
        Debug.Log(result);

        if (result == ResultCodeLogin.LOGIN_SUCCESS) {
            logText.text = "로그인 정보 : 로그인 성공";
        } else {
            logText.text = "로그인 정보 : 로그인 실패";
        }
    });
}
로그인을 요청할 때 같이 전달한 콜백 메서드가 로그인 요청 결과를 로그로 출력하도록 합니다.
로그인 확인
Unity 테스트 모드를 통해 성공적으로 로그인되는 것을 확인합니다.
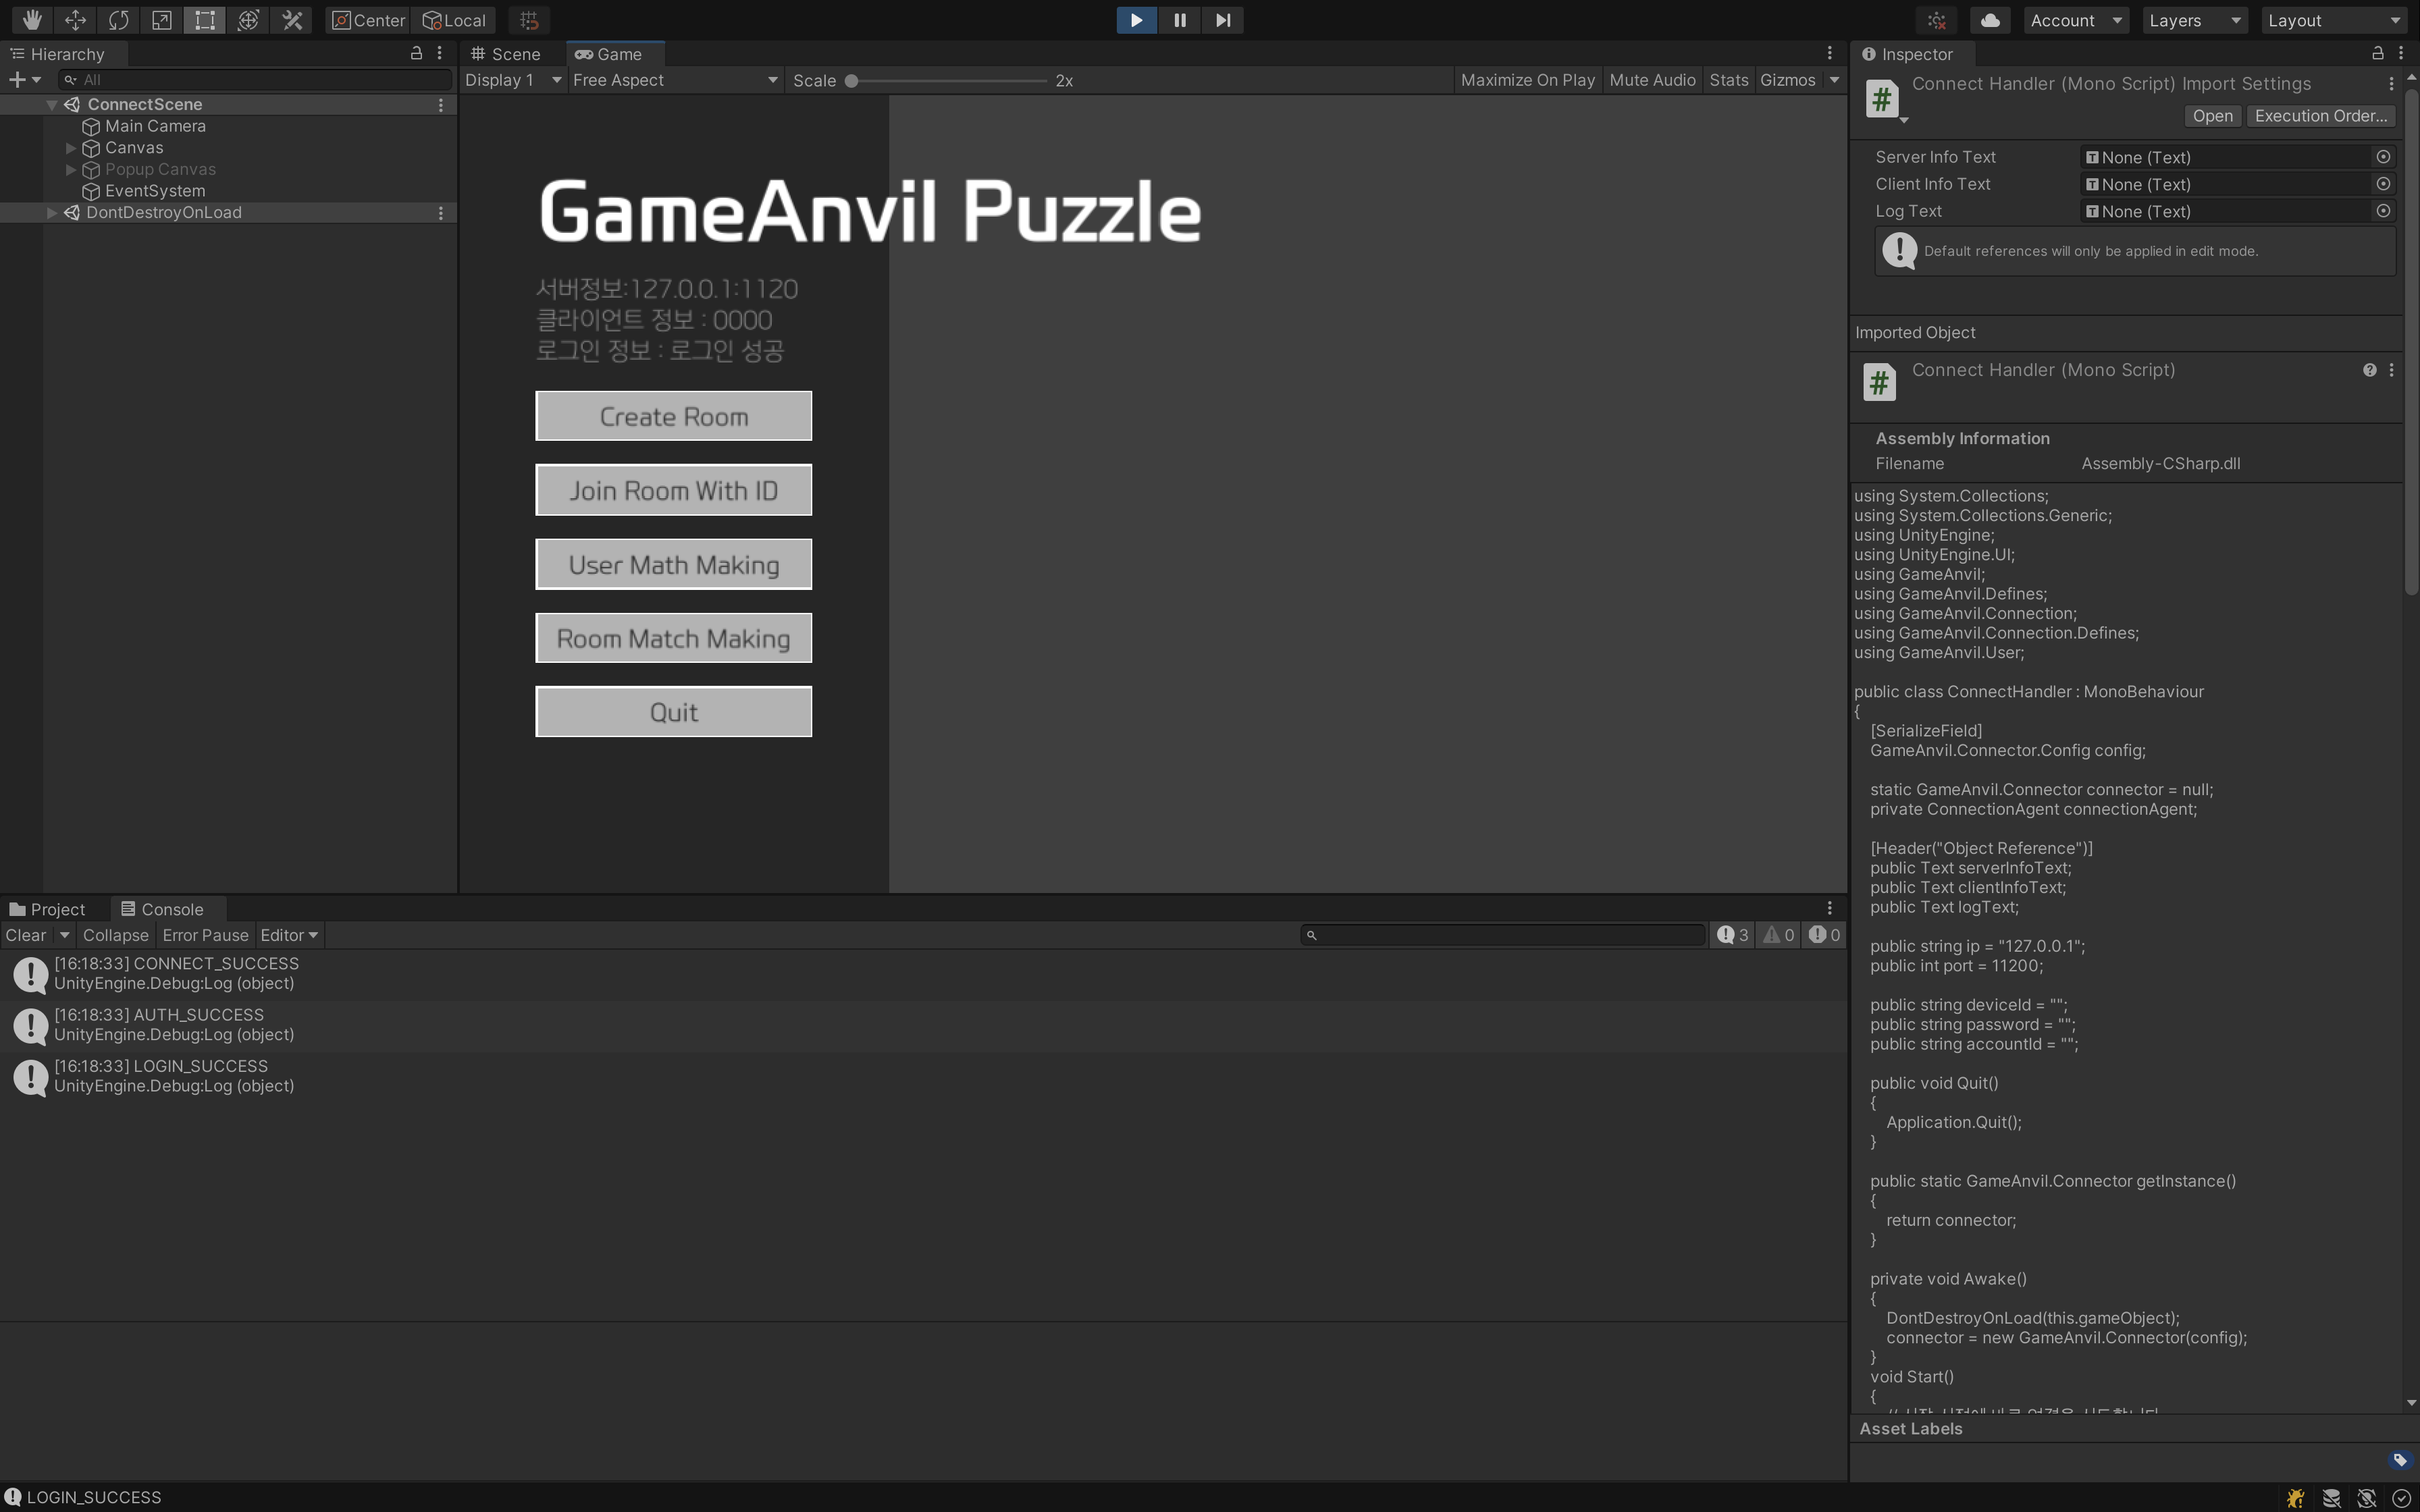
방 생성 및 참가
클라이언트 작업
Unity 프로젝트에서 ConnectHandler 코드에 방 생성을 요청하는 메서드를 추가합니다. 이때, userAgent.CreateRoom 메서드의 첫 번째 인자인 RoomType은 반드시 서버에서 지정한 값과 같아야 함에 유의합니다. 일반적으로 이러한 RoomType 등의 프로토콜은 서버와 클라이언트 개발자가 사전에 값을 미리 정의해두고 사용합니다. 서버 개발 단계에서 튜토리얼과 동일한 값을 지정해 주었다면, 아래 코드의 서비스 명을 그대로 사용하시면 됩니다. 방 생성 결과를 받는 콜백을 등록하고 결과 코드를 콘솔에 출력합니다. 또, 방 생성에 성공하면 roomId를 클라이언트 측에 저장해두고, 게임 씬으로 이동하도록 코드를 작성합니다.
using UnityEngine.SceneManagement;

public int roomId;
public UserAgent userAgent;

public void CreateRoom(){
    connector.GetUserAgent("BASIC_SERVICE", 1).CreateRoom("BASIC_ROOM", (UserAgent ua, ResultCodeCreateRoom resultCode, int roomId, string roomName, Payload payload) => {
        Debug.Log(resultCode);
        if (resultCode == ResultCodeCreateRoom.CREATE_ROOM_SUCCESS){
            this.roomId = roomId;

            SceneManager.LoadScene("GameScene");
        }
    });
}
코드를 작성한 뒤에는 계층 관계 패널에서 Create Room을 클릭합니다. 인스펙터의 Button 컴포넌트에서 OnClick 리스너 항목으로 ConnectHandler 컴포넌트를 드래그해 레퍼런스를 등록하고, 드롭다운 메뉴에서 CreateRoom 메서드를 선택해 화면상 버튼으로 메서드를 실행할 수 있도록 설정합니다.
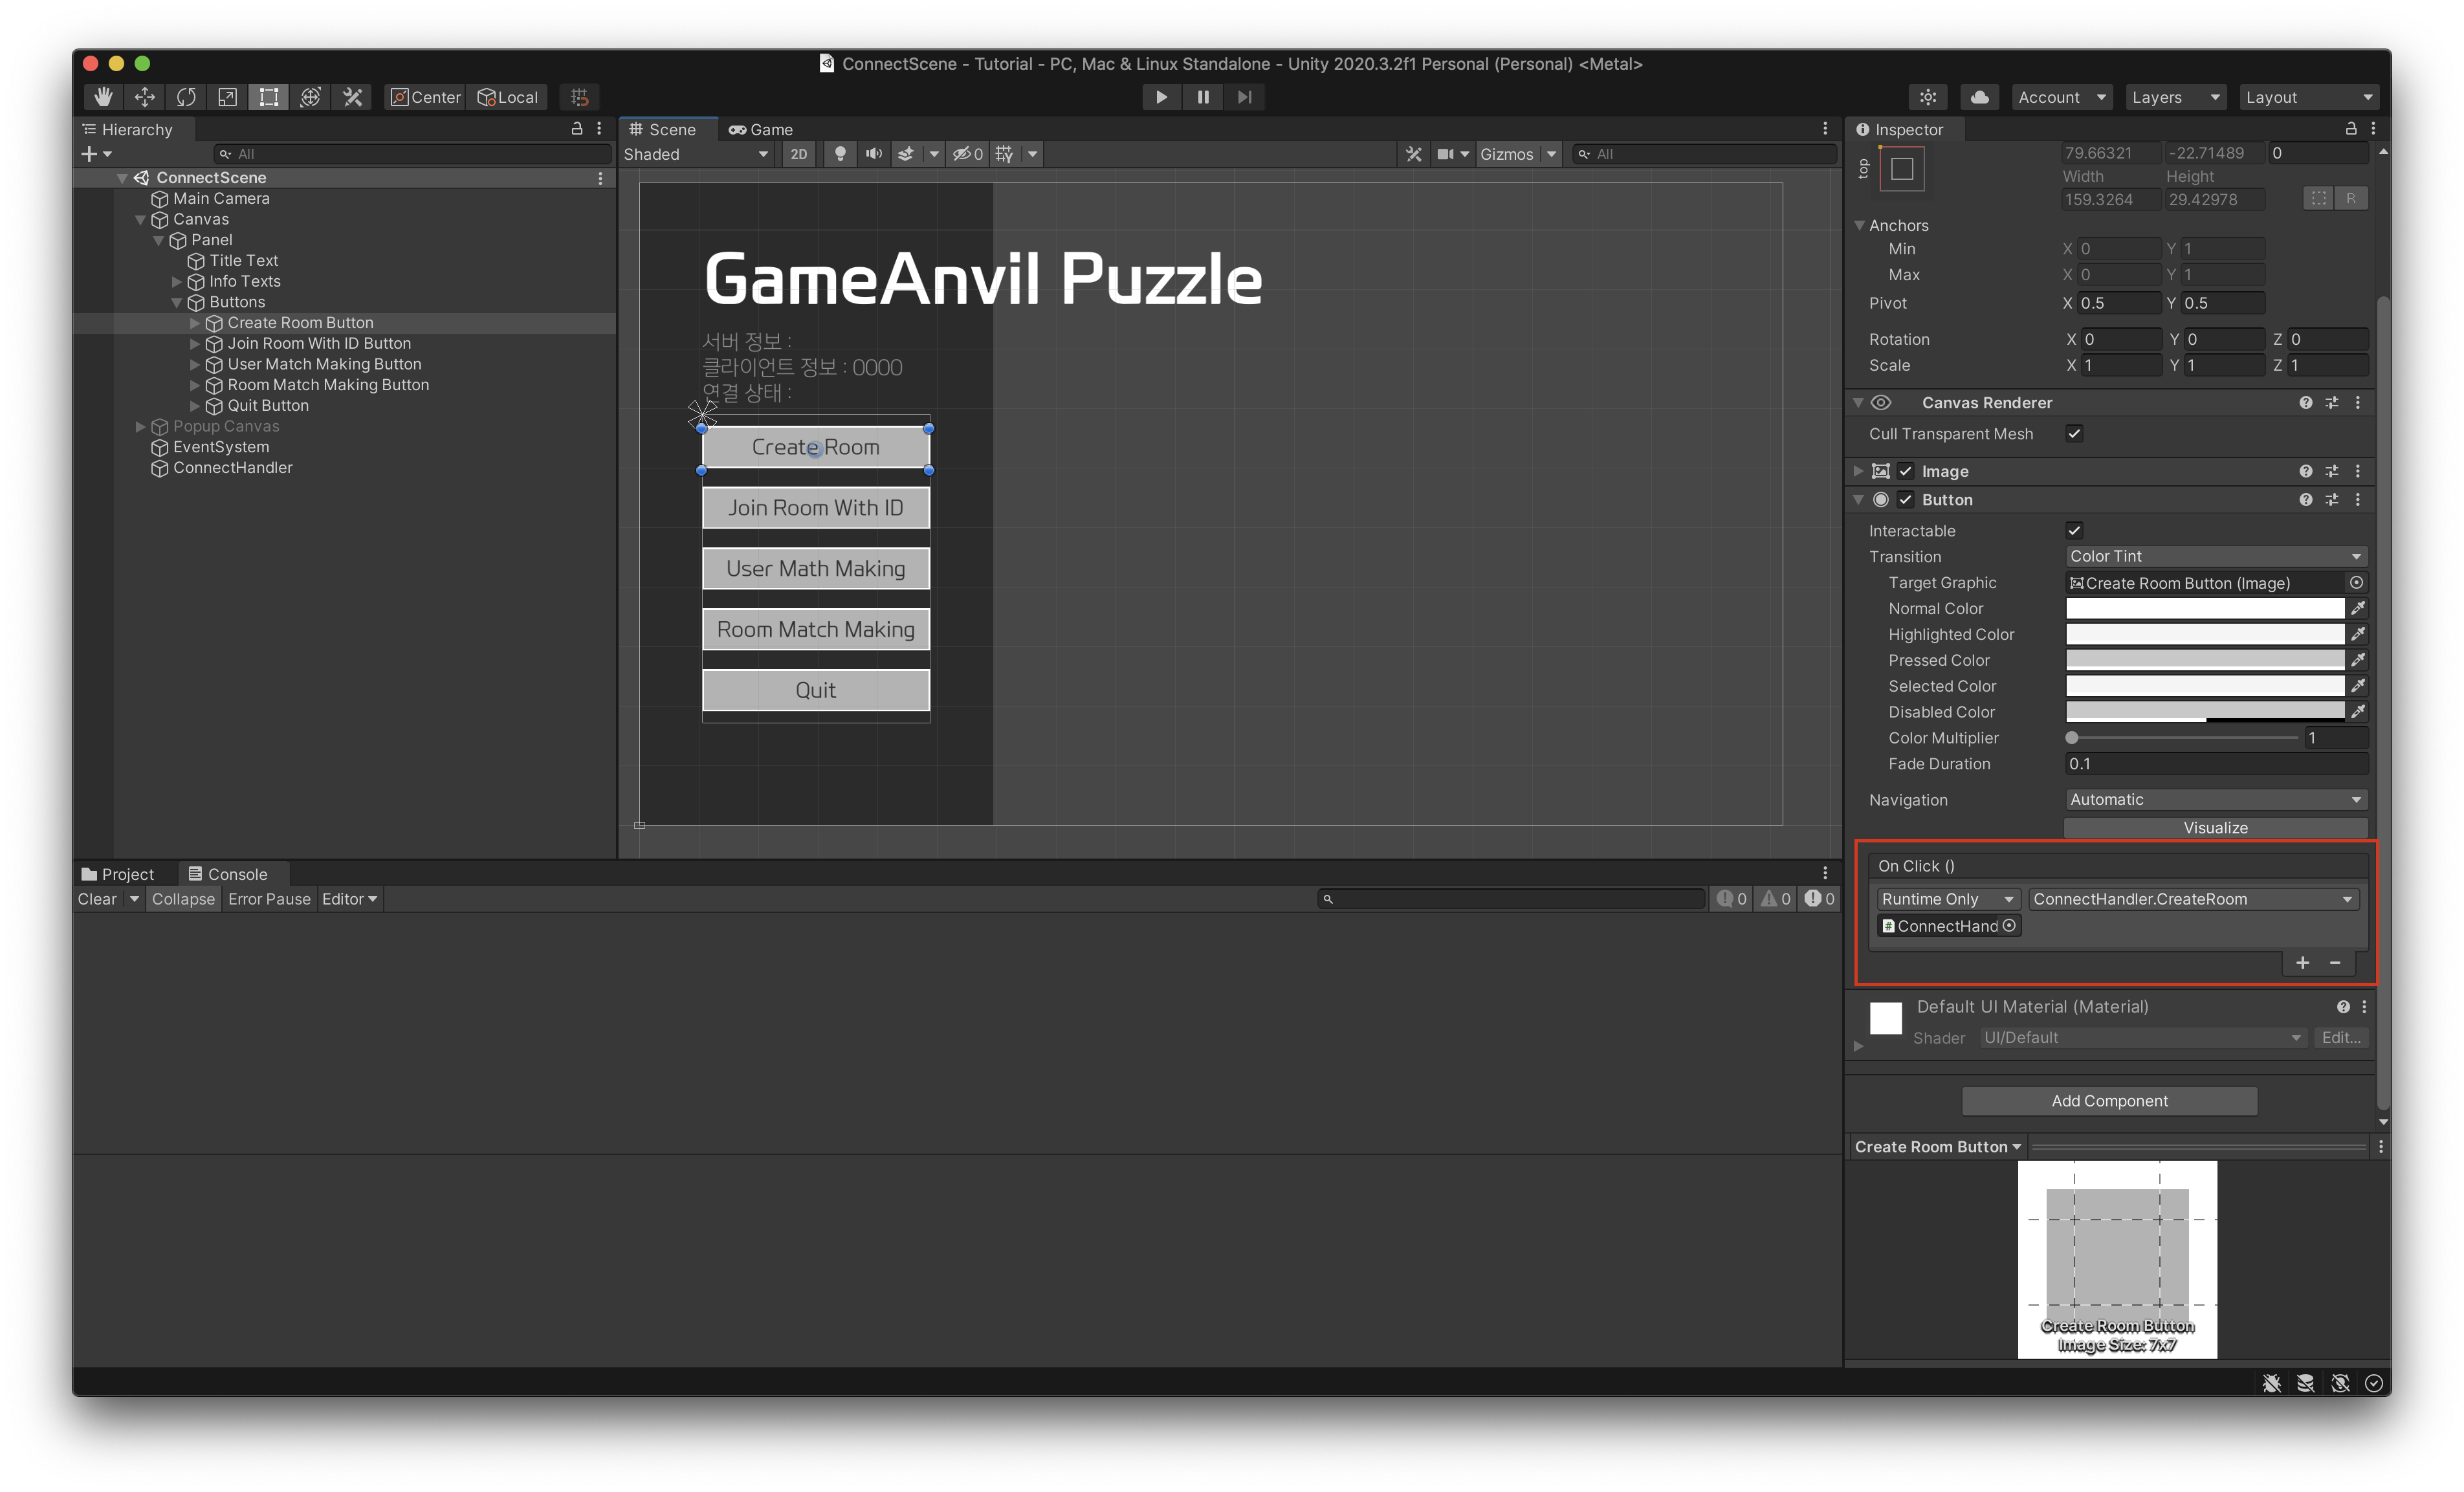
여기까지 완료했다면 클라이언트를 통해 방을 생성하는 기능을 구현한 것입니다. 실제로 실행해 보기 전에 방 참가 기능까지 구현한 뒤 테스트해 보겠습니다. 이번에는 ConnectHandler에 방 참가 코드를 추가합니다.
userAgent.JoinRoom 메서드의 첫 번째 인자가 서버 개발에서 사용한 사전 정의된 RoomType 문자열과 일치하는지 확인합니다. 콜백을 통해 방 참가 요청에 대한 서버측의 응답을 확인하고 방 참가에 성공했다면 방 생성과 동일한 동작을 하도록 작성합니다. 메서드 작성이 완료되었다면, Join Room 버튼의 OnClick 이벤트와 연결합니다.
private void Update() {
    connector.Update();

    if (popupCanvas && popupCanvas.activeInHierarchy && Input.GetKeyDown(KeyCode.Return)){
        JoinRoom();
    }
}

public void JoinRoom(){
    if (!string.IsNullOrEmpty(roomIdInput.text)){
        connector.GetUserAgent("BASIC_SERVICE", 1).JoinRoom("BASIC_ROOM", int.Parse(roomIdInput.text), null, (UserAgent userAgent, ResultCodeJoinRoom resultCode, int roomId, string roomName, Payload payload)=>{
            Debug.Log(resultCode);
            if ( resultCode == ResultCodeJoinRoom.JOIN_ROOM_SUCCESS){
                this.roomId = roomId;

                SceneManager.LoadScene("GameScene");
            }
        });
    }
}
이제 GameScene으로 이동해서 방 참가 후에 어떤 동작을 할 것인지 구현해 보겠습니다. 우선 GameManager 코드를 아래와 같이 수정해서 룸 아이디를 게임상에서 표시할 수 있도록 만듭니다.
public class GameManager : MonoBehaviour
{
    [Header("Object References")]
    public Text roomIdText;

    public Text ChatLogText;
    public Text ChatInputText;

    private ConnectHandler connectHandler;

    void Start(){
        connectHandler = GameObject.Find("ConnectHandler").GetComponent<ConnectHandler>();

        roomIdText.text = "PuzzleRoom:" + connectHandler.roomId;
    }
}
이제 클라이언트에 서버 접속, 인증, 로그인 기능뿐만 아니라 방 참가와 생성 기능까지 모두 구현되었습니다.
Room 생성 및 참가 테스트
Unity 프로젝트의 상단 도구 모음 바에서 File > Build Setting을 선택합니다. 아래와 같이 필요한 씬들을 빌드할 씬 목록에 차례대로 추가합니다. 만약 씬 순서가 잘못되었다면 리스트상의 항목을 드래그하여 Connect 씬이 맨 위로 오도록 순서를 알맞게 조정합니다.
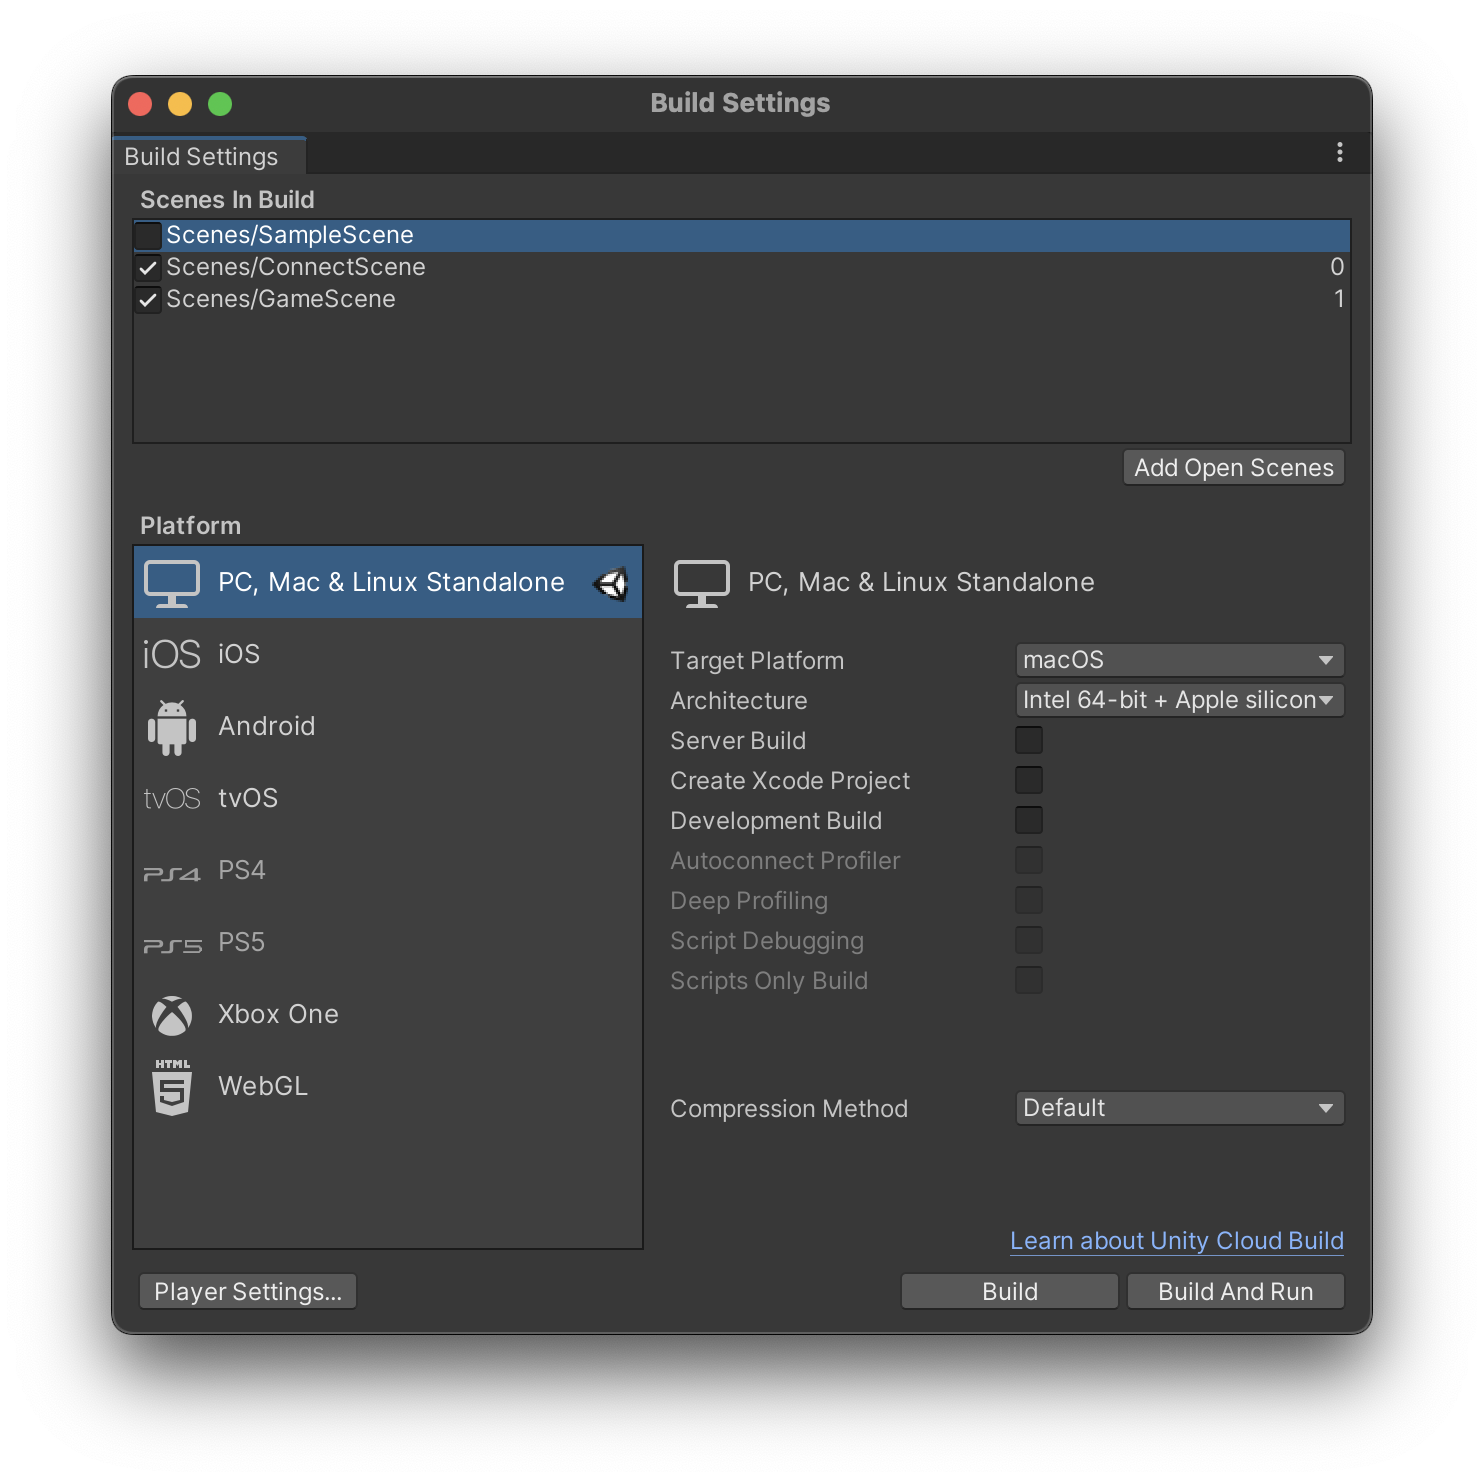
Unity에서 cmd+b 또는 ctrl+b로 빌드 후 플레이합니다. 새로운 윈도우가 열리면서 Connect 씬이 로드됩니다. 연결과 인증, 로그인 과정이 완료된 것을 확인합니다. 만약 중간 과정에서 실패 로그가 남는다면, 실패 코드를 통해서 원인을 알 수 있습니다. 만약 그것으로 부족하다면 서버의 로그를 확인해서 원인을 분석해 보아야 합니다. 로그인까지 성공했다면 Create Room 버튼을 눌러서 방 생성을 요청합니다. 씬이 이동되고 생성된 방의 아이디가 함께 출력됩니다. 방 아이디는 다음의 예제 이미지와 다를 수 있습니다.
그 상태로 Unity 플레이모드를 실행한 후 로그인까지 완료되는 것을 확인합니다. 그리고 Join Room 버튼을 클릭한 후 앞서 생성한 방의 RoomId를 직접 입력해서 방에 참가하도록 합니다. 방 참가에 성공한다면 게임 씬으로 이동되고, 두 게임 화면에서 동일한 방 아이디를 가지고 있는 것을 확인할 수 있을 것입니다. 테스트 화면은 아래와 비슷하게 나타나면 성공입니다.
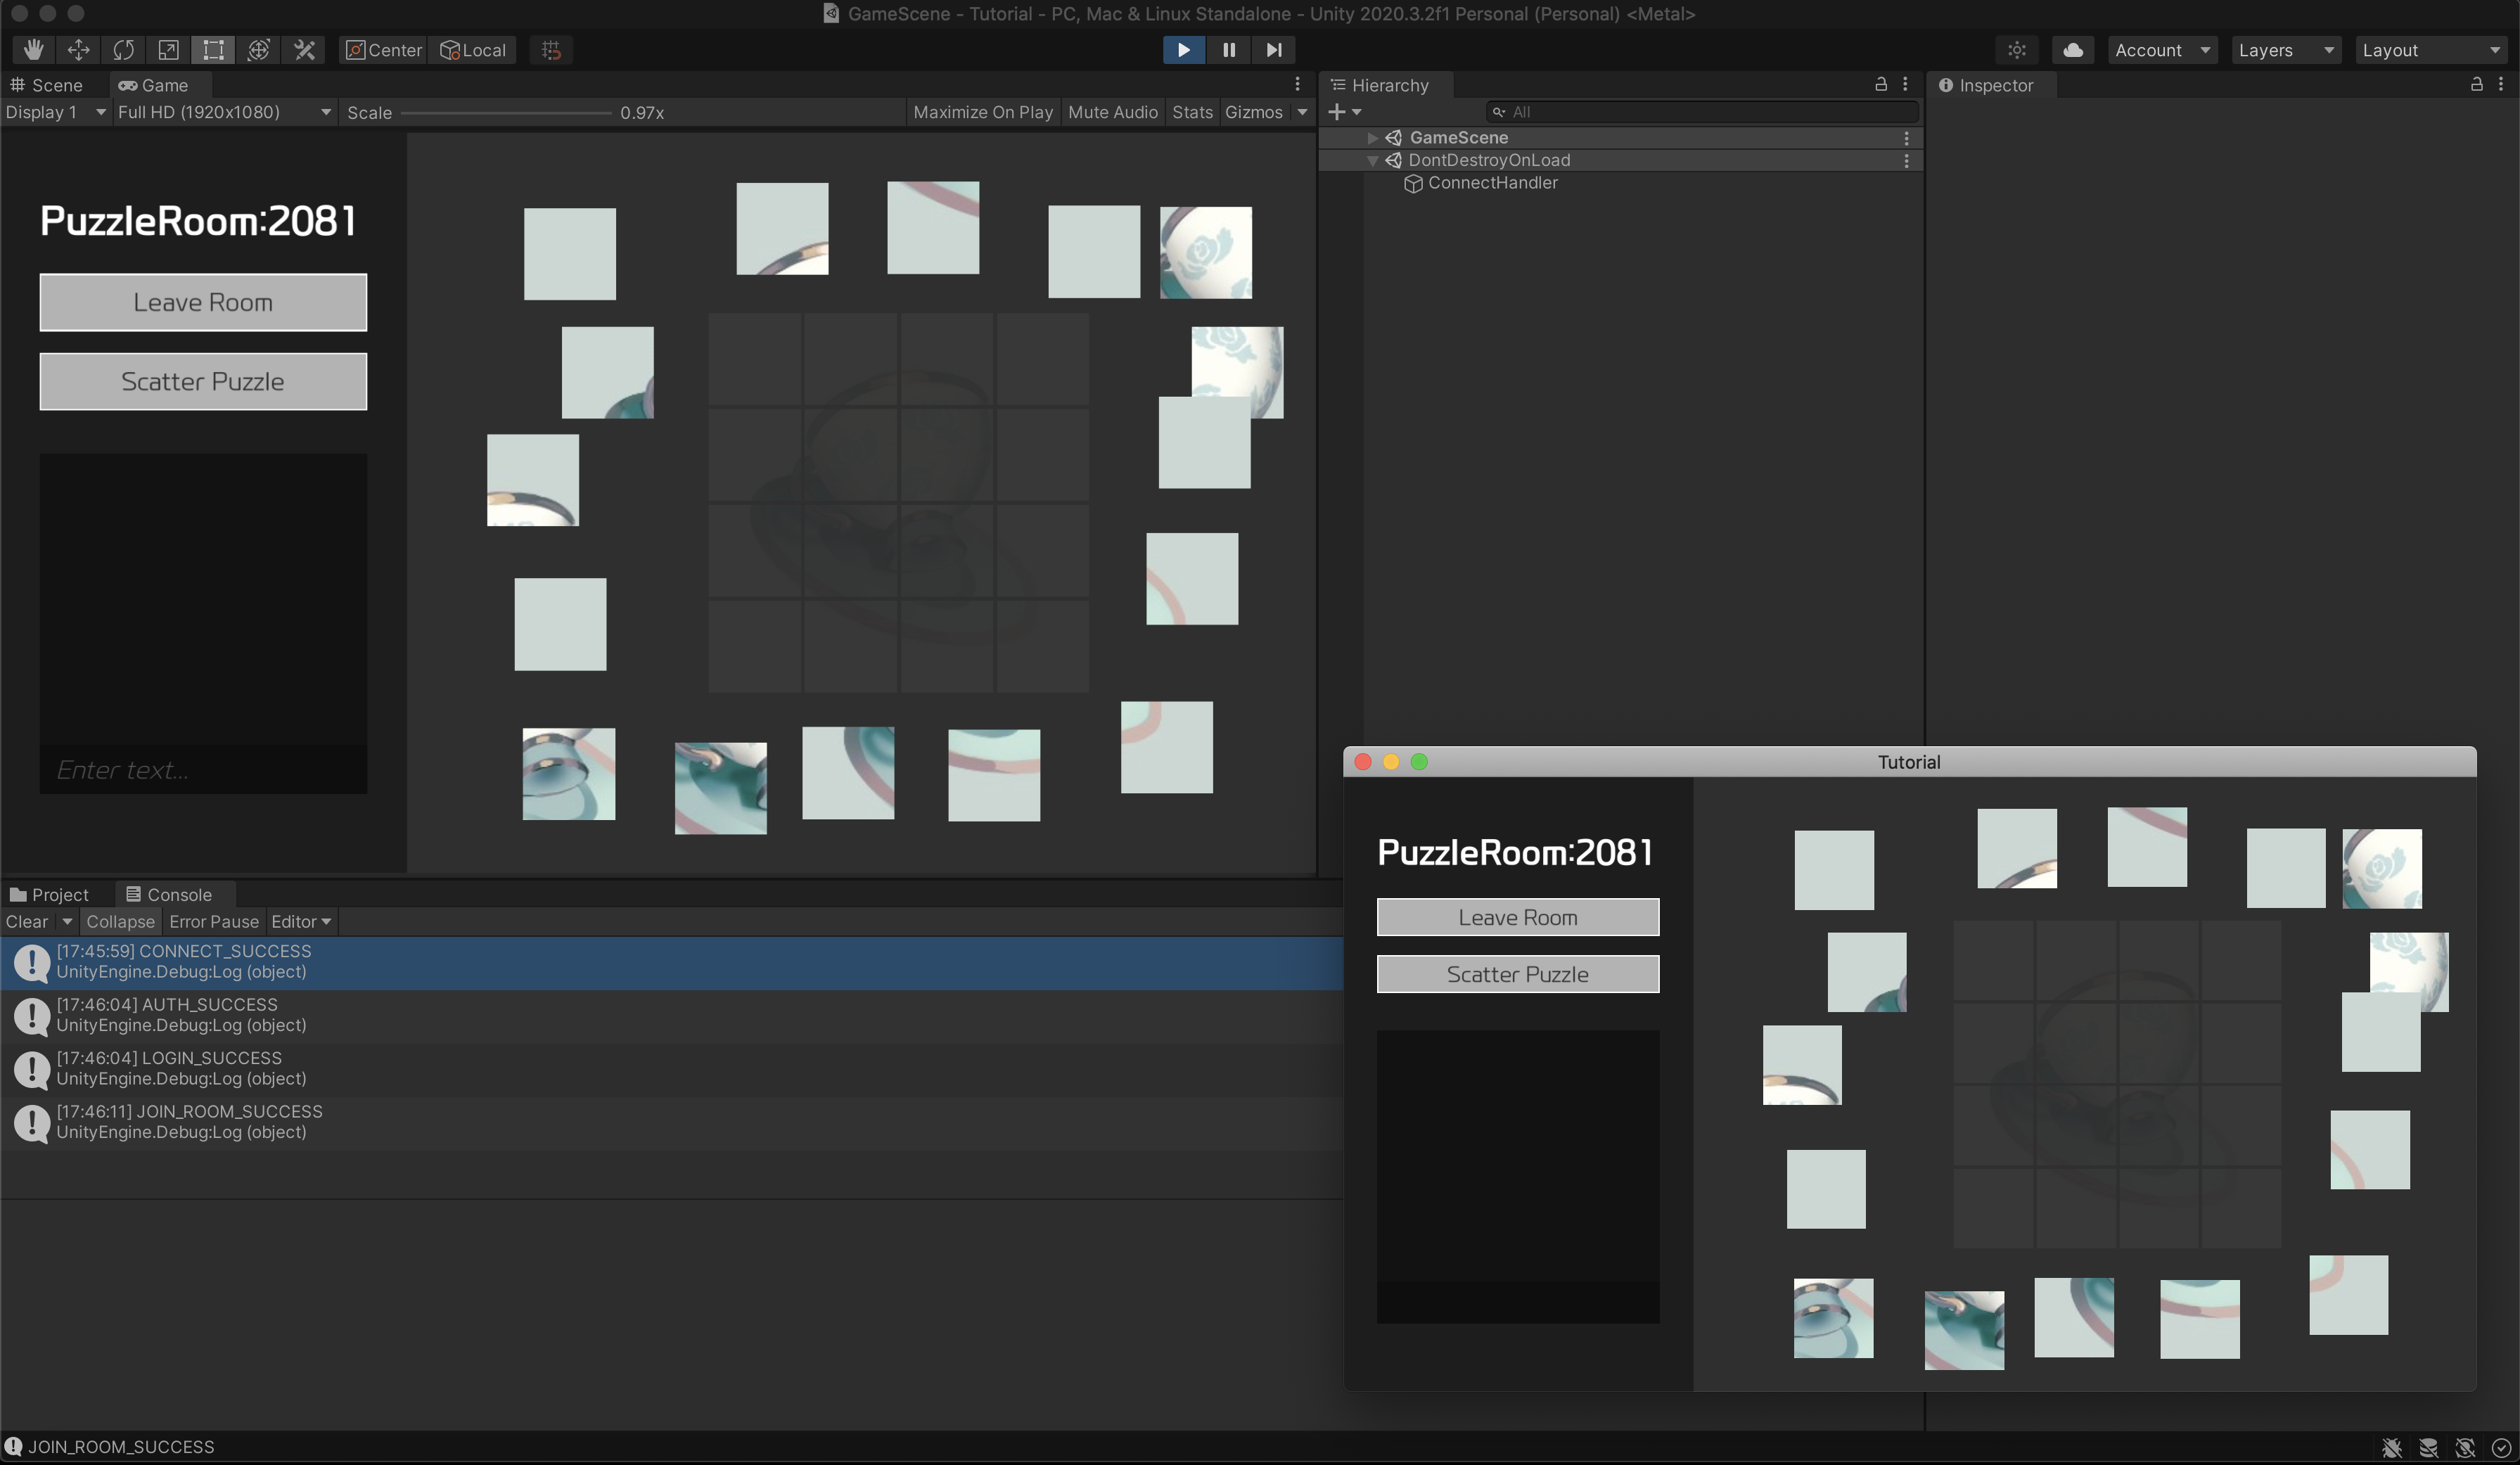
먄약 제대로 진행되지 않는다면 아래 사항을 다시 확인하십시오. - 서버 구현 수정 후 서버 프로세스를 재시작하였는가? - 서비스명은 GameAnvilConfig.json에 설정한 것과 동일하게 서버/클라이언트에 구현되었는가?
인게임 채팅 구현
이제 클라이언트 간에 서버를 통해 통신할 수 있는 환경이 구성되었습니다. 여기에서는 클라이언트에서 생성한 데이터를 원격의 클라이언트가 받아볼 수 있는 간단한 예제를 구현해 보겠습니다. 예제 프로젝트 내부에 미리 구현된 프로토콜을 이용해 채팅 기록을 주고받는 방법을 알아봅니다. 이 예제 한정으로 통신 데이터를 클라이언트로부터 서버로 전송할 때는 MessageRequest 클래스를 사용합니다. 서버로부터 클라이언트로 통신 데이터를 전송할 때는 MessageResponse또는 MessageBroadcast 클래스를 사용합니다.
(프로젝트 템플릿을 사용해서 직접 프로젝트를 생성한 경우 Message 클래스들을 이용할 수 없습니다. 튜토리얼용으로 만들어진 프로젝트를 다운로드해 내부의 BasicProtocol.java가 프로젝트에 포함될 수 있도록 설정하십시오. 또한 부트스트랩 시에 프로토콜을 등록하는 과정도 필요합니다. 서버 측의 프로토콜 관련 설정은 미리 준비된 튜토리얼용 프로젝트에 미리 완료되어 있으므로 튜토리얼을 그대로 따라했다면 진행하지 않아도 됩니다.)
클라이언트 측 전송 구현
먼저 클라이언트에서 서버 방향으로 메시지를 보내는 코드를 작성해 보겠습니다. 일단 로그인한 유저로 서버에 연결되면 유저 에이전트를 통해 서버의 기능을 활용할 수 있습니다. 여기에서는 유저 에이전트의 Send 기능을 활용해 방에 패킷을 전송합니다. 메시지 전송을 위해서는 전송할 내용을 담은 패킷을 인자로 넘겨 주어야 합니다.
Unity 프로젝트의 GameManager 스크립트에 메시지 전송 스크립트를 추가합니다. SendMessage 메서드가 호출되면 화면상의 입력 필드에 사용자가 입력한 메시지와 자신의 유저 아이디를 담은 패킷을 userAgent를 통해 서버로 전송합니다. 그리고 Enter 키를 누를 때마다 SendMessage 메서드가 실행되도록 Update 함수에 구현을 추가합니다. 아래의 예제 코드는 SendMessage 메서드의 구현을 보여줍니다.
using System.Collections;
using System.Collections.Generic;
using UnityEngine;
using UnityEngine.UI;
using GameAnvil;
using GameAnvil.Defines;
using GameAnvil.Connection;
using GameAnvil.Connection.Defines;
using Protocol;


public class GameManager : MonoBehaviour
{
    [Header("Object References")]
    public Text roomIdText;

    public Text ChatLogText;
    public Text ChatInputText;

    private ConnectHandler connectHandler;

    void Start(){
        connectHandler = GameObject.Find("ConnectHandler").GetComponent<ConnectHandler>();

        roomIdText.text = "PuzzleRoom:" + connectHandler.roomId;
    }

    void Update(){
         if ( Input.GetKeyDown(KeyCode.Return) && !string.IsNullOrEmpty(ChatInputText.text)){
                SendMessage();
         }
    }

    public void SendMessage(){
        MessageRequest messageRequest = new MessageRequest();
        messageRequest.Message = "\n[" + connectHandler.accountId +  "]:" + ChatInputText.text;
        ConnectHandler.GetInstance().GetConnector().GetUserAgent("BASIC_SERVICE", 1).Send(new Packet(messageRequest));
        ChatInputText.text = string.Empty;
    }
}
이렇게 하면 클라이언트에서 서버 방향으로 패킷을 전송하는 기능이 구현되었습니다. 하지만 지금은 패킷을 서버로 보낸다고 해도 서버에서는 아무런 응답이 없을 것입니다. 그 이유는 서버 측에서 해당 패킷을 받았을 때 내용을 어떻게 분석하고 어떤 동작을 할지 정의해 주지 않았기 때문입니다. 다음 챕터에서는 서버 측 구현을 다루겠습니다.
서버 측 응답 구현
여기에서는 게임 유저가 전송한 메시지를 서버가 받아 방 안의 유저들에게 전송해 주는 기능을 작성합니다. 클라이언트가 전송한 메시지를 서버의 게임 룸에서 처리하기 위해서는 핸들러를 사용합니다. 핸들러란, 특정 프로토콜을 처리하기 위한 코드 묶음을 의미합니다. 핸들러는 프로토콜 종류에 따라서 여러 개가 될 수 있고, 방에 핸들러를 여러 개 등록할 수 있습니다. 따라서 방은 복수의 프로토콜을 처리 가능합니다.
서버 프로젝트로 이동하여 BasicRoom 클래스를 다시 확인합니다. 앞서 BaseRoom 클래스를 상속 받은 BasicRoom 클래스에서 RoomMessageDispatcher를 생성했습니다. 패킷 디스패처는 메시지를 수신하였을 때 메시지가 적절한(프로그래머가 의도한) 핸들러를 찾아 실행하도록 하는 역할을 합니다. 이번에 작성하는 수신 메시지에 대한 핸들러도 바로 이 패킷 디스패처에 등록됩니다.
핸들러도 클래스 생성을 통해 생성됩니다. 새로운 클래스 파일을 BasicHandler라는 이름으로 생성합니다. 그리고 RoomPacketHandler를 상속하도록 한 뒤, execute 메서드를 오버라이딩합니다. 이후 패킷 디스패처에 등록하면 MessageRequest가 수신되었을 때 이 메서드 안의 내용이 실행됩니다.
import co.paralleluniverse.fibers.SuspendExecution;
import com.nhn.gameanvil.node.game.RoomMessageHandler;
import org.slf4j.Logger;
import protocol.BasicProtocol;

import static org.slf4j.LoggerFactory.getLogger;

public class BasicHandler implements RoomMessageHandler<BasicRoom, BasicUser, BasicProtocol.MessageRequest> {
    private static final Logger logger = getLogger(BasicHandler.class);

    @Override
    public void execute(BasicRoom room, BasicUser requester, BasicProtocol.MessageRequest request) throws SuspendExecution {

    }
}
메서드 내부를 구현하기 전에, BasicRoom 클래스에 핸들러에서 사용한 broadcast 메서드를 구현합니다. 방의 모든 유저에게 메서드로 들어온 패킷을 복제해서 보내는 역할을 하는 메서드입니다. 그리고 MessageRequest가 수신되면 앞서 생성한 핸들러가 실행되도록 등록하기 위해서 registerMsg 메서드를 통해 프로토콜의 디스크립터와 핸들러 클래스를 등록합니다. 이때, 메시지 핸들러 등록은 반드시 static 블럭 내에 구현해야 합니다.
public class BasicRoom extends BaseRoom<BasicUser> {
    private static RoomMessageDispatcher<BasicRoom, BasicUser> dispatcher = new RoomMessageDispatcher<>();
    private Map<Integer, BaseUser> users = new HashMap<>();

    static {
        dispatcher.registerMsg(BasicProtocol.MessageRequest.class, BasicHandler.class); // 처리할 메시지에 대한 핸들러 등록
    }

    @Override
    public final RoomMessageDispatcher<BasicRoom, BasicUser> getMessageDispatcher() {
        return dispatcher;
    }

    ...생략...

    public void broadcast(com.google.protobuf.GeneratedMessageV3 message) {
        users.values().stream().forEach(user -> user.send(message));
    }

}
실행될 내용, 즉, execute 메서드 내부 구현은 아래와 같이 작성합니다. 아래의 핸들러 예제 구현에서는 수신한 메시지에 대해 송신자에게 응답 메시지를 전송함과 더불어 방 전체 유저에게 방 단위 브로드캐스트용 메시지를 추가로 송신합니다. 이때, 클라이언트는 방 단위 브로드캐스트 메시지를 기준으로 게임을 동기화하도록 구현되어 있습니다.
import co.paralleluniverse.fibers.SuspendExecution;
import com.nhn.gameanvil.node.game.RoomMessageHandler;
import org.slf4j.Logger;
import protocol.BasicProtocol;

import static org.slf4j.LoggerFactory.getLogger;

public class BasicHandler implements RoomMessageHandler<BasicRoom, BasicUser, BasicProtocol.MessageRequest> {
    private static final Logger logger = getLogger(BasicHandler.class);

    @Override
    public void execute(BasicRoom room, BasicUser requester, BasicProtocol.MessageRequest request) throws SuspendExecution {
        BasicProtocol.MessageResponse response = BasicProtocol.MessageResponse.newBuilder().setMessage(request.getMessage()).build();
        BasicProtocol.MessageBroadcast broadcast = BasicProtocol.MessageBroadcast.newBuilder().setMessage(request.getMessage()).build();

        requester.reply(response); // 송신자에게 응답
        room.broadcast(broadcast); // 방 전체 유저에게 메시지를 전송
    }
}
위 코드에서는 먼저 수신한 패킷의 스트림을 파싱하여 MessageRequest 객체를 만듭니다. 이후 MessageRequest 객체의 Message 값을 이용하여 MessageResponse, MessageBroadcast 객체를 각각 새로 생성합니다. MessageResponse 타입의 객체는 패킷을 룸으로 전송한 유저 객체에게 전송합니다. MesageBroadcast 객체는 room을 통해 방 내부의 모든 유저에게 전송합니다.
이렇게 해서 클라이언트가 송신한 패킷을 서버가 수신하고, 약간의 처리를 한 뒤 다시 되돌려주는 기능이 서버에 추가되었습니다. 이때 클라이언트 또한 서버에서 송신한 패킷을 어떻게 처리할지 지정해야 합니다.
클라이언트 측 수신 구현
클라이언트에서도 서버 측의 패킷을 처리하기 위해 미리 핸들러를 등록해야 합니다. 그렇지 않으면 패킷을 받았을 때 처리 방법을 알 수 없는 프로토콜이라고 판단해서 내용을 버리게 됩니다. 서버에서 보내는 내용을 수신했을 때 이것을 감지하고 내용을 처리하려면 서버에서 보내는 패킷의 프로토콜 타입의 핸들러를 등록하면 됩니다. 즉, MessageBroadcast 타입의 메시지를 처리하는 핸들러 등록 코드를 작성해서 등록합니다.
다시 Unity 프로젝트로 이동해 GameManager의 Start 메서드에 구현을 추가합니다. 우선 프로토콜 매니저를 이용해 서버와 클라이언트 간에 합의된 프로토콜을 등록합니다. 여기에서는 0번으로 BasicProtocol을 등록하였습니다. 번호에 대해서는 이후 이어지는 내용에서 설명합니다.
이후 유저 에이전트를 통해 리스너를 등록합니다. 메서드 타입으로는 프로토콜의 타입을 사용합니다. 서버에서 보내주기로 설정한 프로토콜은 MessageBroadcast이므로 이것을 사용하면 됩니다. 핸들러 구현은 수신한 메시지를 화면에 준비된 텍스트에 그대로 출력하는 간단한 로직으로 작성합니다. 바로 채팅의 가장 기본적인 기능입니다.
using System.Collections;
using System.Collections.Generic;
using UnityEngine;
using UnityEngine.UI;
using GameAnvil;
using GameAnvil.Defines;
using GameAnvil.Connection;
using GameAnvil.Connection.Defines;
using Protocol;

public class GameManager : MonoBehaviour
{
    [Header("Object References")]
    public Text roomIdText;

    public Text ChatLogText;
    public Text ChatInputText;

    private ConnectHandler connectHandler;

    void Start(){
        connectHandler = GameObject.Find("ConnectHandler").GetComponent<ConnectHandler>();

        roomIdText.text = "PuzzleRoom:" + connectHandler.roomId;

        ProtocolManager.GetInstance().RegisterProtocol(BasicProtocolReflection.Descriptor);
        connectHandler.GetInstance().GetConnector().GetUserAgent("BASIC_SERVICE", 1).AddListener<MessageBroadcast>((sendUserAgent, messageBroadcast) => {
            ChatLogText.text += messageBroadcast.Message;
        });
    }

        ...생략...
}
메시지 전달 확인
서버 수정 후 새로 실행했는지 확인하고, Unity에서 cmd+b 또는 ctrl+b로 빌드 후 플레이합니다. 빌드된 게임에서 방을 생성하고 서버측 로그를 확인합니다. 그 상태로 Unity 에디터에서 플레이모드로 진입한 후 앞서 생성한 방의 RoomId를 입력하여 해당 방에 참가합니다.
임의의 게임 프로세스에서 입력란에 텍스트를 입력한 뒤 엔터를 누릅니다. 그러면 다른 게임 프로세스에서도 동일한 텍스트가 나타날 것입니다.
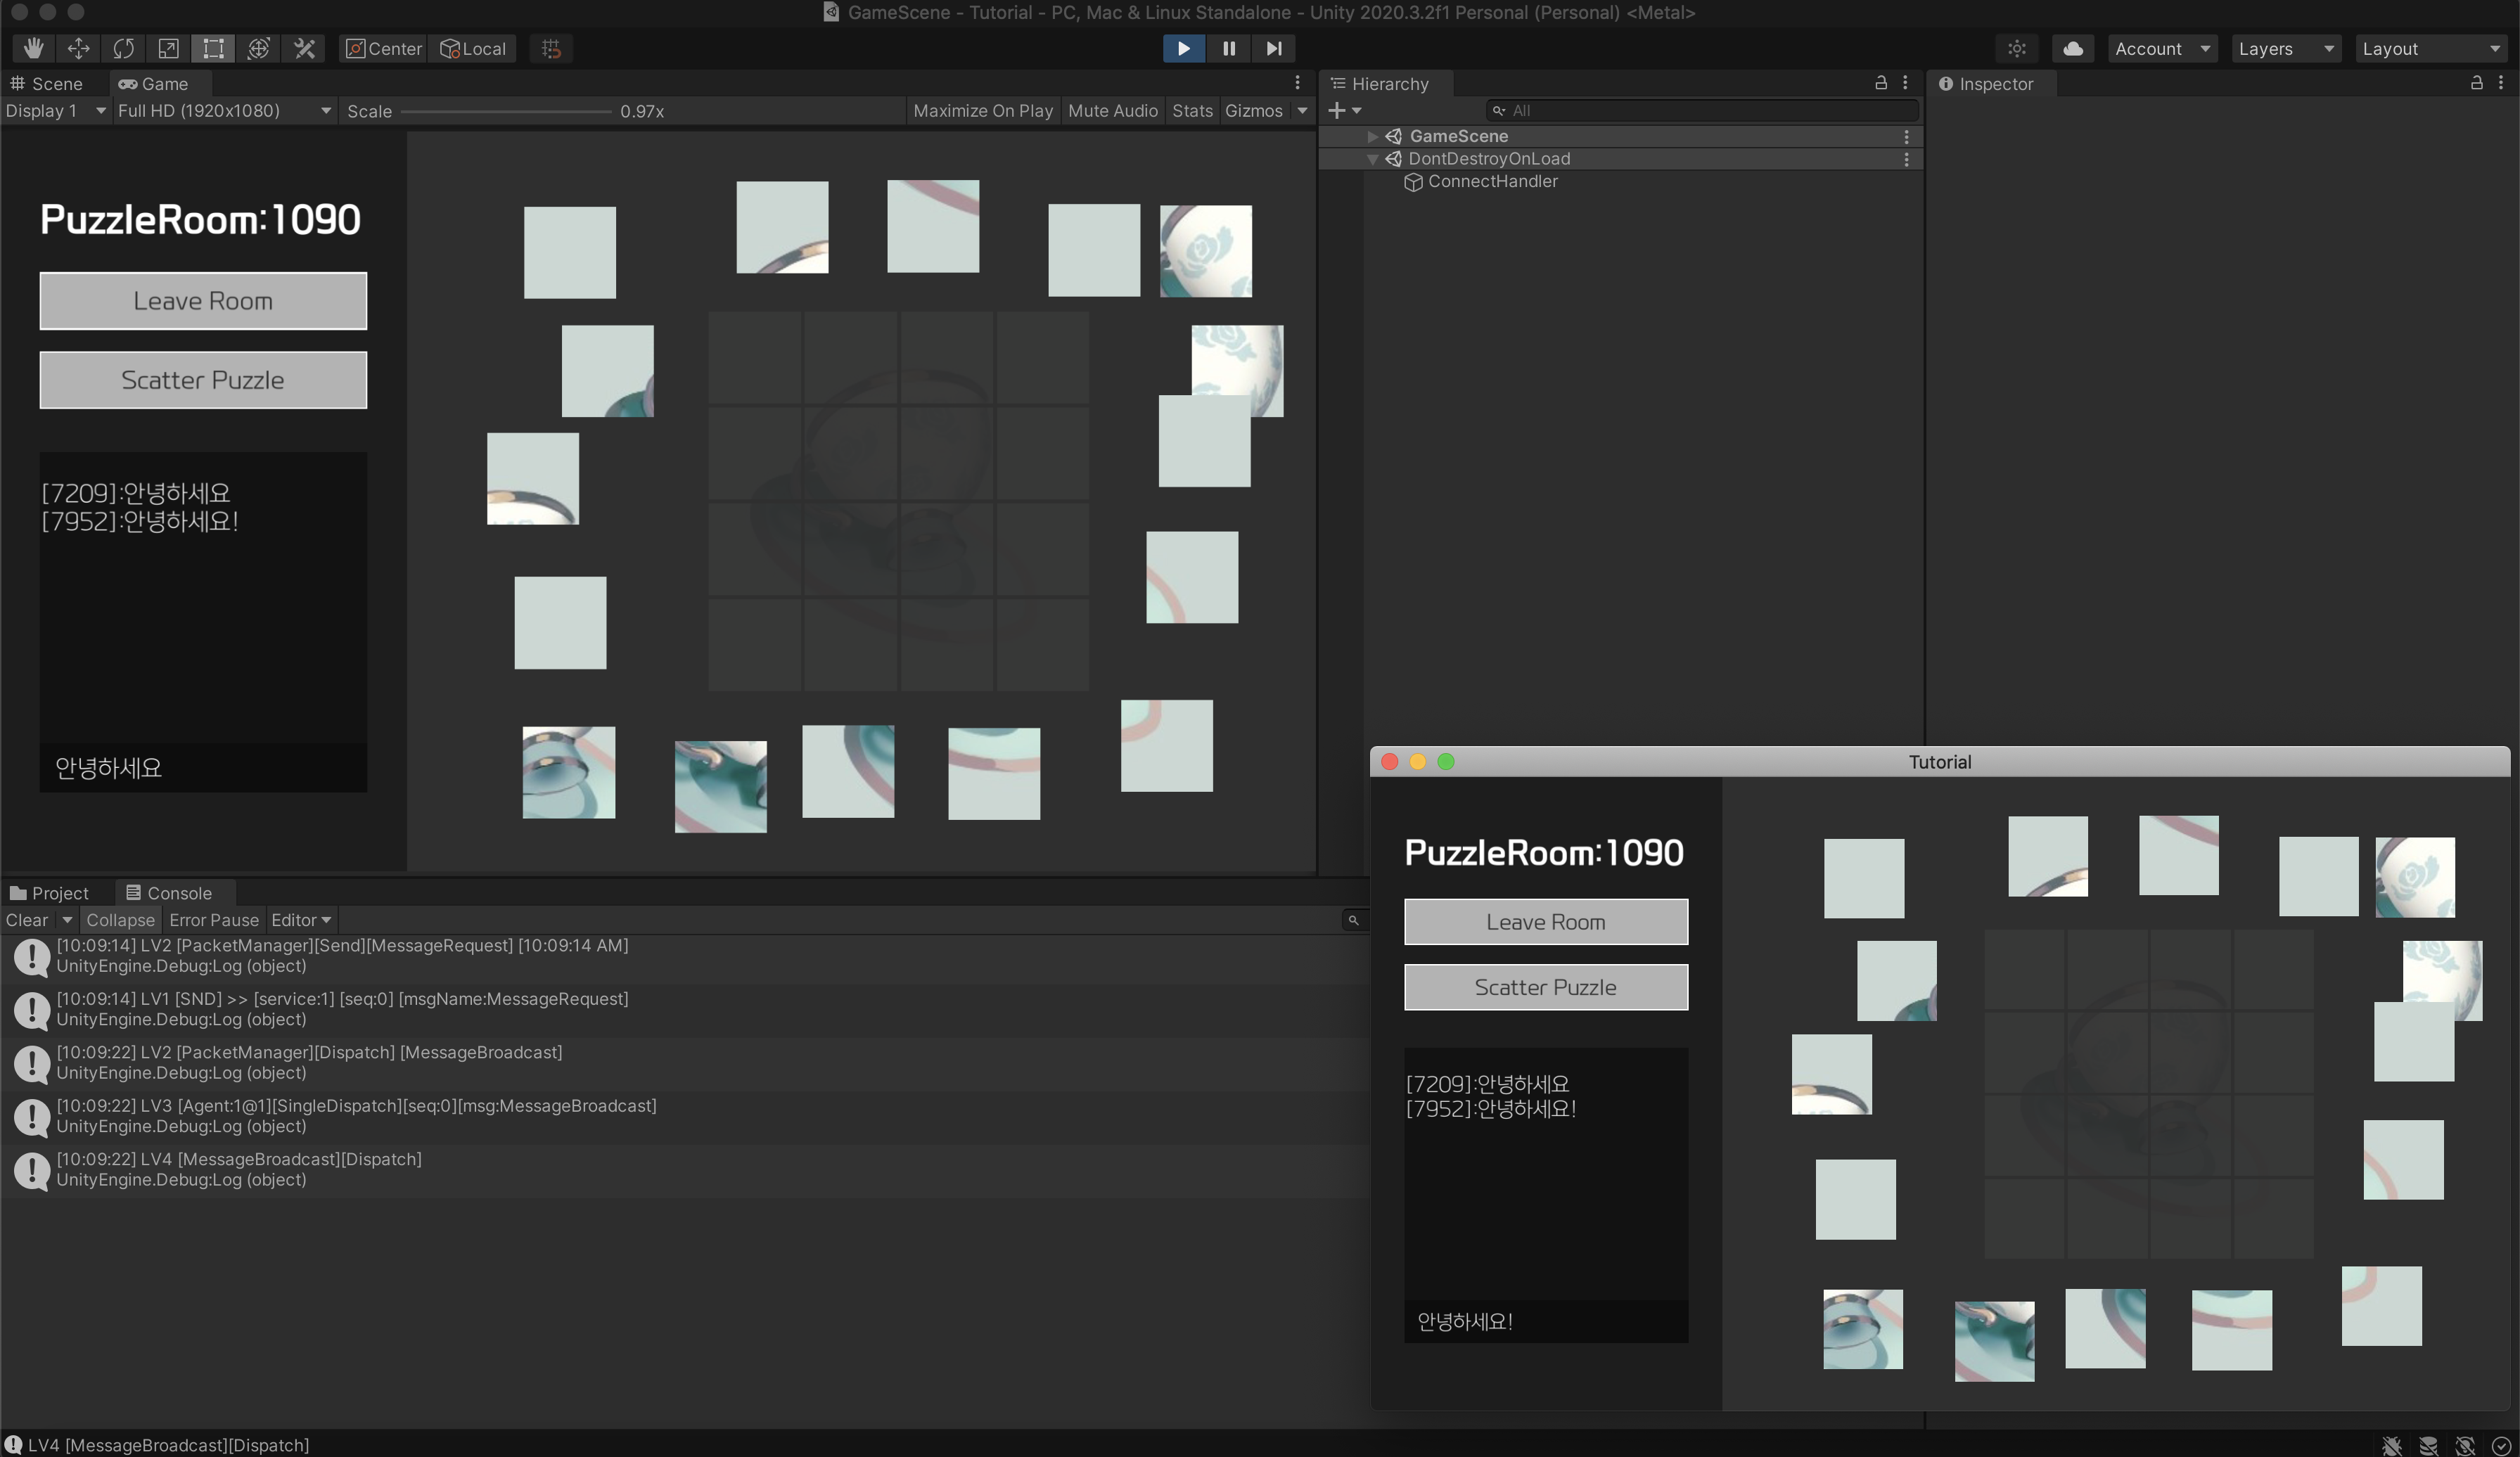
간단한 채팅 서버 구현을 통해서 메시지 처리 과정을 학습했습니다. 다음에는 좀 더 실용적인 예제의 구현 과정을 살펴보겠습니다.
퍼즐 게임 구현
게임 씬에는 싱글 플레이가 가능한 퍼즐 게임이 미리 구현되어 있습니다. 플레이 모드로 진입하여 퍼즐 조각을 드래그해 알맞은 위치 근처에 놓으면 격자상의 정확한 위치로 보정됩니다. 이번 챕터에서는 이 게임을 멀티플레이어 게임으로 만들어 보겠습니다.
같은 방 안의 유저들 간 주고받는 메시지는 MessageRequest, MessageResponse, MessageBroadcast 외에 그 어떤 타입의 값도 모두 표현할 수 있습니다. 이번 챕터에서는 직접 프로토콜을 정의하고 서버와 클라이언트에 등록하는 방법을 살펴보겠습니다.
메시지는 미리 정의한 프로토콜에 기반하여 정의되기만 하면 서버와 클라이언트 간에 송수신이 가능합니다. XML, json 등 여러 가지 표현 수단이 있겠지만 GameAnvil은 Google Protocol Buffers를 사용합니다. 이는 속도와 안정성 측면에서 가장 좋은 솔루션 중 하나입니다.
Google Protocol Buffers를 이용한 메시지 직렬화/역직렬화
프로토콜 버퍼를 사용하려면 먼저 메시지를 어떻게 정의할 것인지 명세를 작성해야 합니다. 예를 들면 MessageRequet의 명세에는 단일 문자열을 포함시킵니다. 그 후 프로토콜 명세를 컴파일해 원하는 언어의 파일로 변환합니다. 이후에는 MessageRequest를 사용했던 방식과 비슷하게 패킷의 메시지 프로토콜로 사용할 수 있습니다.
퍼즐 위치 동기화를 위한 메시지 프로토콜을 작성을 시작하겠습니다. 서버 프로젝트의 src/main/proto 경로에 Puzzle.proto 파일을 추가한 후 아래와 같이 프로토콜 명세를 작성합니다.
syntax="proto3";

package protocol;

message PuzzlePosition
{
    int32 Index = 1;
    int32 PositionX = 2;
    int32 PositionY = 3;
    bool OnEndDrag = 4;
}
PuzzlePosition 프로토콜은 퍼즐 조각의 최신 위치를 나타내기 위해서 각 퍼즐 조각의 고유 번호 정보(Index)와 퍼즐의 위치 정보(PositionX와 PositionY)로 구성합니다. 이제 프로토콜 정의는 끝났습니다. 다음은 이러한 프로토콜 정의를 각 개발 언어에 맞는 클래스로 컴파일하겠습니다.
protoc 실행 파일은 프로젝트 최상위 경로에 있습니다. 해당 프로젝트로 이동하고 다음 명령줄을 이용하여 Java와 C#을 위한 컴파일을 수행합니다. 명령줄을 실행했을 때, 아무런 결과 메시지가 뜨지 않는다면 성공한 것입니다.
./protoc ./src/main/proto/Puzzle.proto --java_out=./src/main/java --csharp_out=./
이제 src/main/java 경로에 새롭게 Puzzle.java 클래스가 생성된 것을 확인할 수 있습니다.
C# 클래스 파일은 파인더와 파일 탐색기 등의 프로그램을 이용해서 Unity 프로젝트의 Asset/Protocol 경로로 이동합니다.
퍼즐 위치 동기화를 위한 메시지 프로토콜 작성이 끝났습니다.
프로토콜 등록
프로토콜을 정의하고 컴파일까지 무사히 마쳤다면 서버와 클라이언트 양쪽에 해당 프로토콜 클래스를 등록해야 합니다. 참고로 채팅 프로토콜(MessageRequest 등)의 경우 기본적으로 템플릿에 등록되어 있기 때문에 추가로 등록할 필요가 없었습니다. 하지만 추가로 구현한 Puzzle 프로토콜은 직접 등록해야 합니다. GameAnvil 서버의 Main 메서드에서 아래와 같이 프로토콜을 등록합니다.
public class Main {

    public static void main(String[] args) {
        GameAnvilServer server = GameAnvilServer.getInstance();

        server.addProtoBufClass(BasicProtocol.class);
        server.addProtoBufClass(Puzzle.class);

        server.run();
    }

}
Unity 프로젝트는 ConnectHandler Start 메서드에 아래와 같이 프로토콜을 추가합니다. 이때, 서버와 같은 인덱스인 1로 등록합니다.
using Protocol;

public class ConnectHandler : MonoBehaviour {
    void Start()
    {
        // 프로토콜 등록
        ProtocolManager.GetInstance().RegisterProtocol(PuzzleReflection.Descriptor);
    }

    ...생략...
}
클라이언트 측 전송 구현
이제 게임을 위한 프로토콜 정의 및 등록까지 모두 마쳤습니다. 지금부터는 이러한 프로토콜에 기반한 메시지를 실제로 전송하는 기능을 구현합니다. 우선 클라이언트 측에서 데이터를 전송하는 부분을 먼저 구현합니다. 퍼즐 조각을 드래그하는 동안 그 위치를 서버로 전송해 보겠습니다.
Unity 프로젝트로 이동해 Puzzle.cs 파일을 열고 아래와 같이 코드를 추가합니다. 드래그되는 동안 퍼즐의 고유한 위치 정보를 담은 메시지 객체를 생성합니다. 그리고 userAgent를 통해 서버로 전송합니다. 메시지의 프로토콜만 다를 뿐 앞서 실습한 MessageRequest와 동일한 방식임을 알 수 있습니다.
using System.Collections;
using System.Collections.Generic;
using UnityEngine;
using UnityEngine.EventSystems;
using UnityEngine.UI;
using Protocol;
using GameAnvil;
using GameAnvil.Defines;
using GameAnvil.Connection;
using GameAnvil.Connection.Defines;
using GameAnvil.User;

public class Puzzle : MonoBehaviour, IBeginDragHandler, IDragHandler, IEndDragHandler
{
    public int index;

    public Transform puzzleHolder;
    public float tolerance;


    private ConnectHandler connectHandler;

    void Start(){
        connectHandler = GameObject.Find("ConnectHandler").GetComponent<ConnectHandler>();
    }

    public void OnBeginDrag(PointerEventData eventData)
    {
        transform.position = eventData.position;
    }

    public void OnDrag(PointerEventData eventData)
    {
        transform.position = eventData.position;
        SendPuzzlePosition(transform.position, false);
    }

    public void OnEndDrag(PointerEventData eventData)
    {
        FixPosition();
        SendPuzzlePosition(transform.position, true);
    }

    public void FixPosition(){
        if (Vector2.Distance(transform.position, puzzleHolder.position) < tolerance){
            transform.position = puzzleHolder.position;
        }
    }

    public void SendPuzzlePosition(Vector2 puzzlePosition, bool onEndDrag){
        PuzzlePosition position = new PuzzlePosition();
        position.Index = index;
        position.PositionX = (int)puzzlePosition.x;
        position.PositionY = (int)puzzlePosition.y;
        position.OnEndDrag = onEndDrag;

        ConnectHandler.GetInstance().GetConnector().GetUserAgent("BASIC_SERVICE", 1).Send(position);
    }
}
서버 측 응답 구현
클라이언트 측에서는 지속적으로 퍼즐의 위치를 서버에 보내게 되었습니다. 이제 퍼즐의 위치를 서버에서 어떻게 처리할지 작성해야 합니다. MessageRequest를 가공하여 MessageResponse, MessageBroadcast로 유저에게 되돌려주었던 것과 같이 퍼즐 위치를 다시 게임 룸의 모든 유저에게 되돌려주도록 구현해 보겠습니다.
서버 프로젝트로 돌아와서 PuzzlePositionHandler.java 클래스 파일을 생성합니다. 그리고 받은 패킷을 그대로 방 안의 모든 유저들에게 전달하도록 broadcast 메서드를 사용합니다.
import co.paralleluniverse.fibers.SuspendExecution;
import com.nhn.gameanvil.node.game.RoomMessageHandler;
import protocol.Puzzle;

public class PuzzlePositionHandler implements RoomMessageHandler<BasicRoom, BasicUser, Puzzle.PuzzlePosition> {

    @Override
    public void execute(BasicRoom room, BasicUser user, Puzzle.PuzzlePosition position) throws SuspendExecution {
        room.broadcast(position);
    }
}
앞서 구현한 핸들러를 BasicRoom의 RoomDispacher에 등록하도록 합니다. 핸들러 클래스 파일을 작성했더라도 RoomDispatcher에 등록하지 않으면 메시지가 도착했을 때 해당 핸들러가 실행될 수 없습니다. 이제 BasicRoom은 BasicProtocol 외에도 PuzzlePosition 프로토콜을 처리할 수 있게 되었습니다.
public class BasicRoom extends BaseRoom<BasicUser> {
    private static final Logger logger = getLogger(BasicRoom.class);
    private static RoomMessageDispatcher<BasicRoom, BasicUser> dispatcher = new RoomMessageDispatcher<>();
    private Map<Integer, BaseUser> users = new HashMap<>();

    static {
        dispatcher.registerMsg(BasicProtocol.MessageRequest.class, BasicHandler.class);
        dispatcher.registerMsg(Puzzle.PuzzlePosition.class, PuzzlePositionHandler.class);
    }

    ...생략...

}
클라이언트 측 수신 구현
앞서 서버에서 송신한 MessageBroadcast를 처리하기 위해 미리 핸들러를 등록해야 했습니다. 이번에도 마찬가지로 퍼즐 위치를 처리하는 핸들러를 만들기 위해 GameManager의 Start 메서드에 PuzzlePosition 메시지를 처리하는 핸들러 등록 코드를 작성합니다. 이 핸들러는 메시지를 수신하면 퍼즐 객체를 찾아서 서버에서 받은 위치로 이동시킵니다.
public class GameManager : MonoBehaviour{

    void Start()
    {
        connectHandler = GameObject.Find("ConnectHandler").GetComponent<ConnectHandler>();

        roomIdText.text = "PuzzleRoom:" + connectHandler.roomId;

        ProtocolManager.GetInstance().RegisterProtocol(0, BasicProtocolReflection.Descriptor);

        // 채팅 메시지 리스너
        ConnectHandler.GetInstance().GetConnector().GetUserAgent("BASIC_SERVICE", 1).AddListener<MessageBroadcast>((sendUserAgent, messageBroadcast) => {
            ChatLogText.text += messageBroadcast.Message;
        });
        // 퍼즐 위치 리스너
        ConnectHandler.GetInstance().GetConnector().GetUserAgent("BASIC_SERVICE", 1).AddListener<PuzzlePosition>((sendUserAgent, puzzlePosition) => {
            Puzzle puzzle = GameObject.Find("Puzzle " + puzzlePosition.Index).GetComponent<Puzzle>();
            puzzle.transform.position = new Vector2(puzzlePosition.PositionX, puzzlePosition.PositionY);

            if (puzzlePosition.OnEndDrag)
            {
                puzzle.FixPosition();
            }
        });
    }
    ... 생략 ...
}
퍼즐 위치 동기화 확인
Unity에서 cmd+b 또는 ctrl+b로 빌드 후 플레이합니다. 빌드된 게임에서 방을 생성한 뒤 Unity 플레이 모드를 실행하고 생성된 방의 RoomId를 입력해서 방에 참가합니다. 이제 퍼즐 조각을 드래그해 위치를 이동하면 해당 퍼즐 조각의 위치가 동기화되어 원격 클라이언트에 반영되는 것을 확인할 수 있습니다.
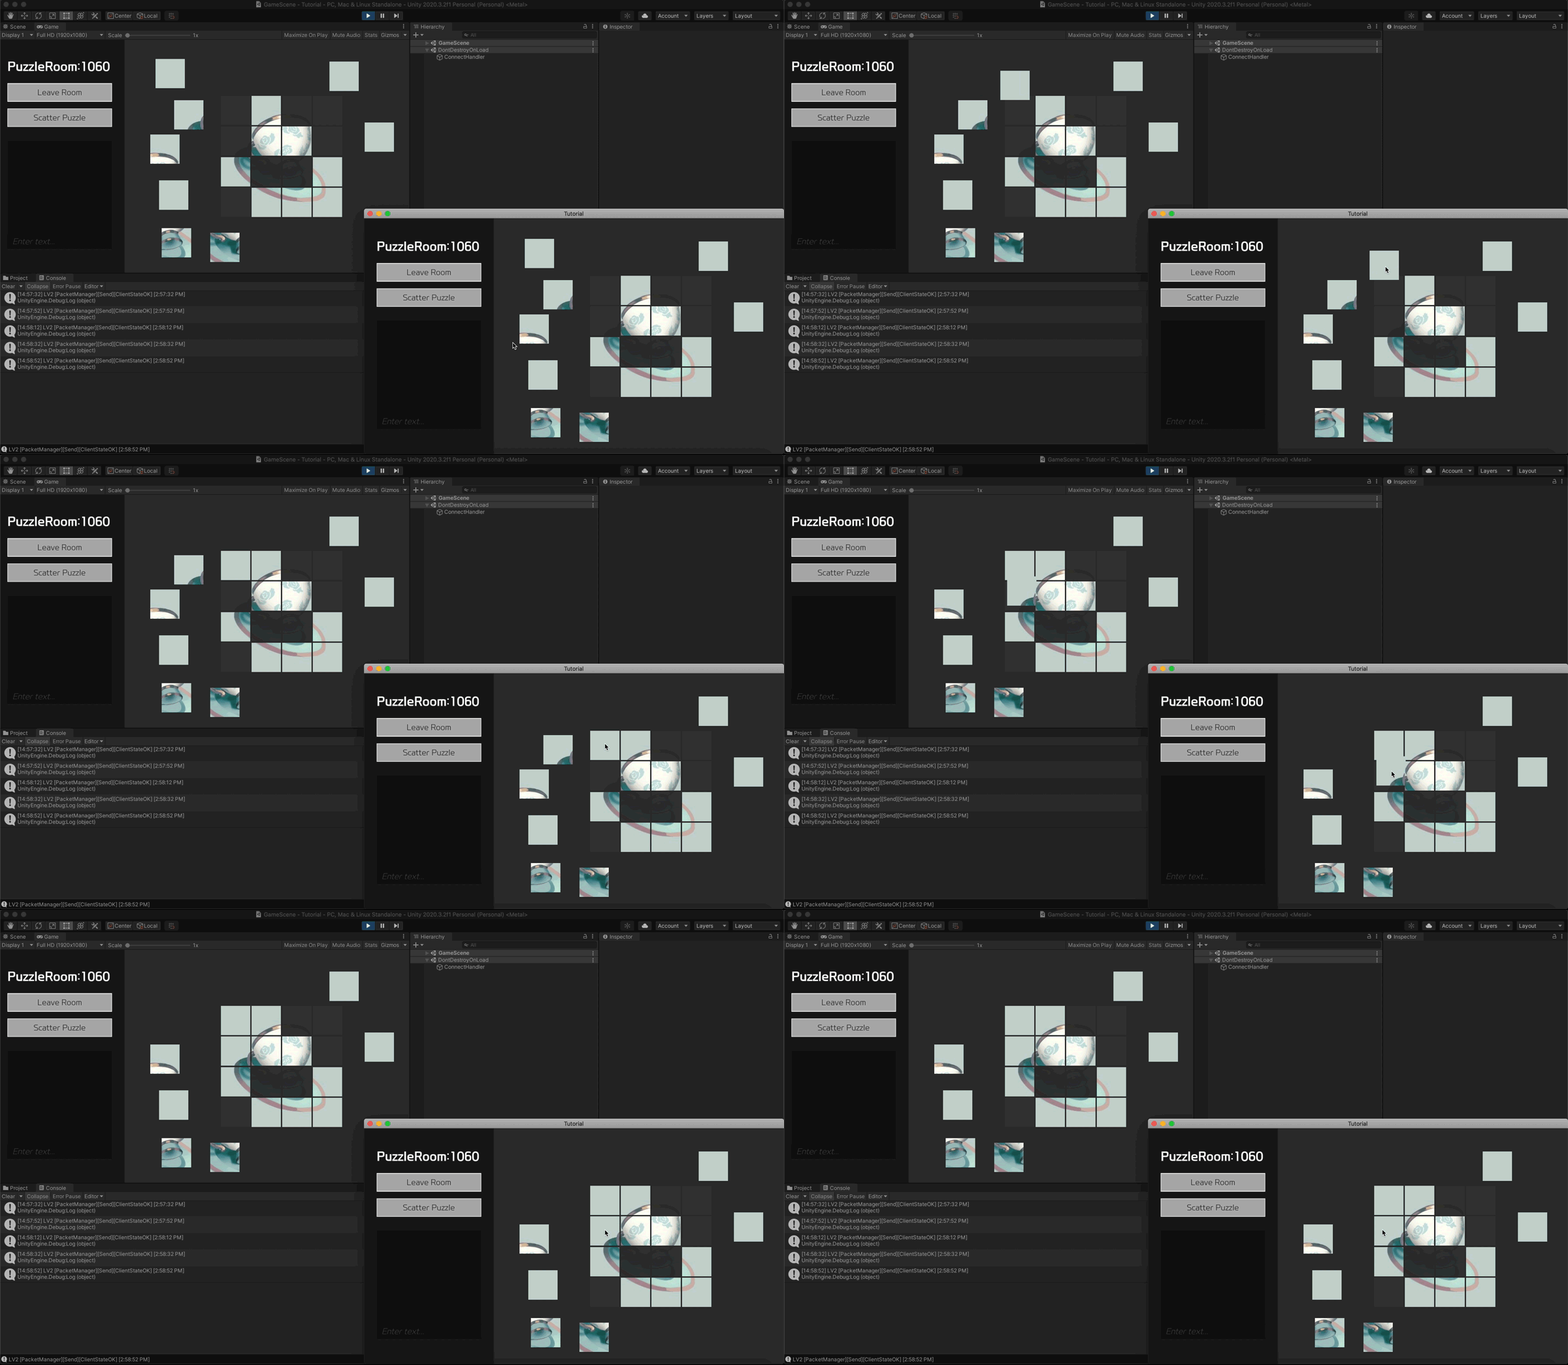
중입 유저 처리하기
게임 중 임의의 퍼즐 조각 위치가 변경된 후에 새로운 유저가 방에 입장할 경우를 생각해 봅시다. 이때, 기존 유저와 신규 유저 사이의 퍼즐 상태는 서로 다릅니다. 새롭게 들어온 유저는 초기의 퍼즐 상태를 가지고 있으므로 기존 유저와 퍼즐 상태를 동기화해 주어야 합니다. 이를 해결하기 위해서 서버 측 로직을 수정해 주겠습니다. 이제 서버는 퍼즐의 위치 정보를 모두 보관하고, 새로운 유저가 입장하면 해당 정보를 이용하여 동기화하도록 로직을 수정합니다.
BasicRoom에 puzzlePositions 맵을 추가합니다. 이 맵은 각 퍼즐 조각별 위치 정보를 관리합니다.
public class BasicRoom extends BaseRoom<BasicUser> {

    private static final RoomMessageDispatcher<BasicRoom, BasicUser> dispatcher = new RoomMessageDispatcher<>();

    private Map<Integer, BaseUser> users = new HashMap<>();
    public Map<Integer, Puzzle.PuzzlePosition> puzzlePositions = new HashMap<>();

    ...생략...

}
이제 PuzzlePositionHandler 코드를 수정해서 퍼즐 위치를 각 방에 저장하도록 합니다.
import co.paralleluniverse.fibers.SuspendExecution;
import com.nhn.gameanvil.node.game.RoomMessageHandler;
import protocol.Puzzle;

public class PuzzlePositionHandler implements RoomMessageHandler<BasicRoom, BasicUser, Puzzle.PuzzlePosition> {

    @Override
    public void execute(BasicRoom room, BasicUser user, Puzzle.PuzzlePosition position) throws SuspendExecution {
        room.puzzlePositions.put(position.getIndex(), position); // 맵에 위치 정보를 저장
        room.broadcast(position);
    }
}
새로운 유저가 방에 들어올 때 저중해 둔 퍼즐 위치 정보를 받을 수 있도록 BasicRoom의 onJoinRoom을 수정해 서버에 저장해 둔 퍼즐의 위치 정보를 전송하도록 합니다.
public class BasicRoom extends BaseRoom {
    @Override
    public boolean onJoinRoom(BasicUser basicUser, Payload inPayload, Payload outPayload) throws SuspendExecution {
        users.put(user.getUserId(), user);
        puzzlePositions.values().stream().forEach(this::broadcast); // 퍼즐 위치 동기화
        return true;
    }
}
이렇게 수정한 뒤 다시 테스트해 봅니다. 클라이언트 하나에서 먼저 퍼즐 위치를 수정한 뒤 다른 클라이언트에서 게임 방에 참여해 퍼즐 위치가 정상적으로 동기화되는지 확인합니다. 의도와 다르게 여전히 동작하지 않는 것을 확인할 수 있습니다.
이는 onJoinRoom 호출 이후에 클라이언트에서 씬 이동이 일어나기 때문입니다. 즉, 리스너 등록이 채 완료되기 전에 동기화 메시지가 전달되어 문제가 생긴 것입니다. 이 문제를 해결하기 위해서는 클라이언트에서 씬 이동이 끝나고 리스너 등록까지 마친 이후에 퍼즐의 위치 정보를 동기화해야합니다.
이 문제는 당장 해결하지 않고 이후 내용에서 다루겠습니다. 이러한 문제는 바로 다음에 설명할 퍼즐 섞기에서도 여실히 드러납니다. 그러므로 퍼즐 섞기부터 살펴본 후, 이를 해결하기 위해 수정한 내용을 다시 다루도록 합니다.
퍼즐 섞기 구현
퍼즐 위치를 랜덤으로 섞는 로직을 구현해 보겠습니다. 클라이언트에서 퍼즐 위치 섞기를 요청하면 서버에서 퍼즐을 섞은 후 새로운 위치를 결정합니다. 그리고 변경된 위치 정보를 다시 클라이언트로 되돌려주는 것이 기본 아이디어입니다.
프로토콜 등록
우선 퍼즐 섞기 요청을 하기 위한 프로토콜을 제작해 보겠습니다. 서버 프로젝트로 이동하여 Puzzle.proto 파일에 프로토콜 명세를 추가합니다. 이 프로토콜은 특별히 클라이언트에서 서버로 보낼 정보가 없으므로 필드가 하나도 없습니다. 이 또한 프로토콜로서 충분히 유의미합니다.
syntax="proto3";

package protocol;

message PuzzlePosition
{
    int32 Index = 1;
    int32 PositionX = 2;
    int32 PositionY = 3;
    bool OnEndDrag = 4;
}

message ScatterPuzzle { } // 퍼즐 섞기 요청 프로토콜
프로토콜 버퍼 파일을 수정하면 컴파일도 다시 해 주어야 합니다.
./protoc ./src/main/proto/Puzzle.proto --java_out=./src/main/java --csharp_out=./
생성된 C# 클래스를 다시 파인더나 파일 탐색기 등의 프로그램을 이용해 Unity 프로젝트의 Asset/Protocol 폴더로 옮깁니다. 이때 서버는 출력 경로 덕분에 새롭게 컴파일된 클래스로 자동 대체되므로 따로 작업해 줄 필요가 없습니다.
클라이언트 측 구현
유니티 프로젝트로 이동하여 GameManager.cs에 아래와 같이 섞기 요청을 위한 코드를 작성합니다. Scatter 메서드가 호출되면 유저 에이전트를 통해 새로운 ScatterPuzzle 타입의 메시지가 게임 룸으로 전송됩니다.
public class GameManager : Monobehaviour {
    public void Scatter() {
            ConnectHandler.GetInstance().GetConnector().GetUserAgent("BASIC_SERVICE", 1).Send(new ScatterPuzzle());
    }
}
Hierarchy 패널의 Scatter Puzzle Button을 클릭합니다. Inspector의 Button 컴포넌트에서 OnClick 리스너에 항목을 추가한 뒤 GameManager 컴포넌트를 드래그해 등록하고, 드롭다운에서 Scatter 메서드를 선택합니다.
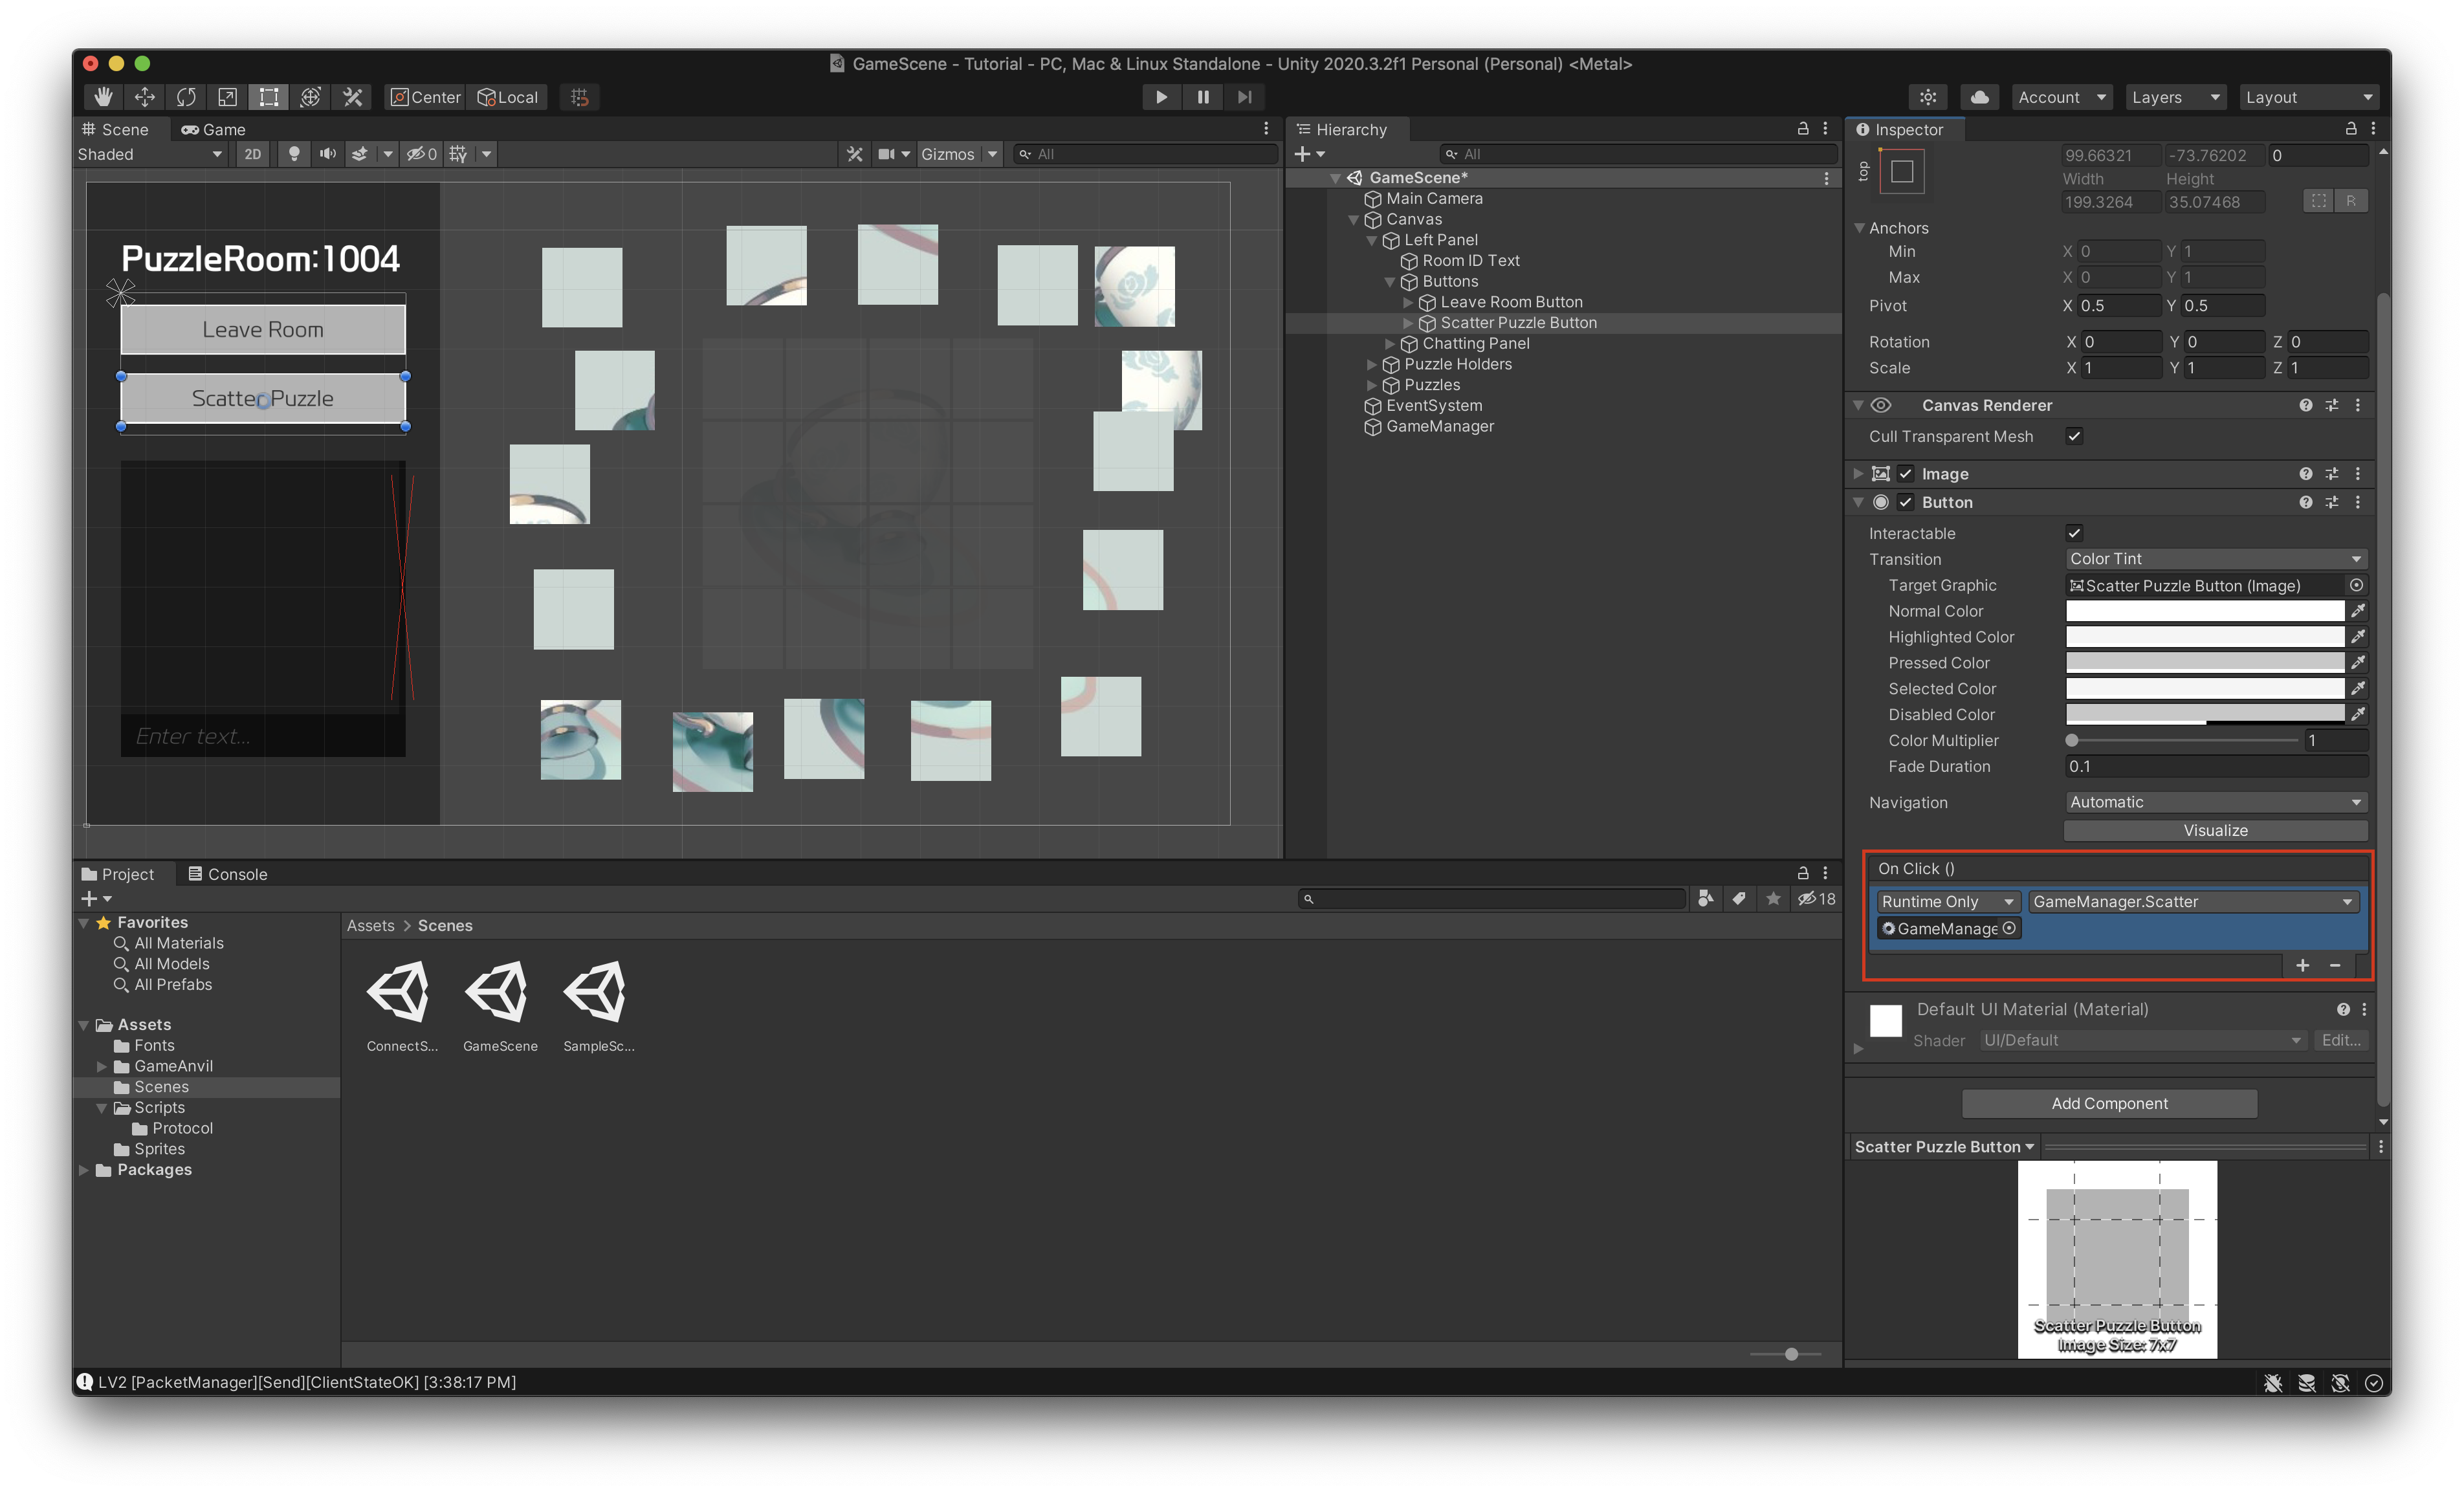
서버 측 구현
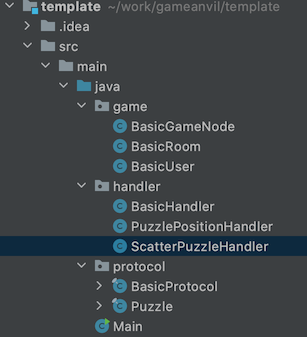
섞기 요청이 들어왔을 때의 처리는 앞서 사용한 방식대로 핸들러를 이용합니다. 새 자바 파일을 생성하고 핸들러 ScatterPuzzleHandler를 작성합니다. 16개 각 퍼즐의 위치를 랜덤하게 설정한 후 PuzzlePositon 타입의 메시지를 송신합니다. 또한 서버의 puzzlePositions 맵도 새로운 위치 정보로 갱신합니다.
import co.paralleluniverse.fibers.SuspendExecution;
import com.nhn.gameanvil.node.game.RoomMessageHandler;
import org.slf4j.Logger;
import protocol.Puzzle;

import java.util.Collections;
import java.util.HashMap;
import java.util.List;
import java.util.stream.Collectors;
import java.util.stream.IntStream;
import java.util.stream.Stream;

import static org.slf4j.LoggerFactory.getLogger;

public class ScatterPuzzleHandler implements RoomMessageHandler<BasicRoom, BasicUser, Puzzle.ScatterPuzzle> {
    private static final Logger logger = getLogger(ScatterPuzzleHandler.class);
    private static final int mapSize = 400;

    private class Point {
        public int x;
        public int y;

        public Point(int x, int y) {
            this.x = x;
            this.y = y;
        }
    }

    @Override
    public void execute(BasicRoom room, BasicUser user, Puzzle.ScatterPuzzle scatterPuzzle) throws SuspendExecution {
        room.puzzlePositions = new HashMap<>();

        List<Point> random = IntStream.rangeClosed(-4, 4).boxed()
            .map(i -> new Point(i * mapSize / 4, i%2==0 ? mapSize : -mapSize))
            .collect(Collectors.toList());
        random = Stream.concat(random.stream(), random.stream().map(p -> new Point(p.y, p.x))).collect(Collectors.toList());
        Collections.shuffle(random);

        for (int i = 0; i < 16; i++) {
            Point point = random.get(i);
            int x = 1300 + point.x;
            int y = 550 + point.y;

            Puzzle.PuzzlePosition puzzlePosition = Puzzle.PuzzlePosition.newBuilder().setIndex(i).setPositionX(x).setPositionY(y).build();

            room.puzzlePositions.put(i, puzzlePosition);

            room.broadcast(puzzlePosition);
        }
    }
}
이렇게 구현한 핸들러를 Room에 등록해 줍니다.
public class BasicRoom extends BaseRoom<BasicUser> {
    private static final Logger logger = getLogger(BasicRoom.class);
    private static final RoomMessageDispatcher<BasicRoom, BasicUser> dispatcher = new RoomMessageDispatcher<>();

    private Map<Integer, BaseUser> users = new HashMap<>();
    public Map<Integer, Puzzle.PuzzlePosition> puzzlePositions = new HashMap<>();


    static {
        dispatcher.registerMsg(BasicProtocol.MessageRequest.class, BasicHandler.class); // 처리할 메시지에 대한 핸들러 등록
        dispatcher.registerMsg(Puzzle.PuzzlePosition.class, PuzzlePositionHandler.class);
        dispatcher.registerMsg(Puzzle.ScatterPuzzle.class, ScatterPuzzleHandler.class);
    }
    ...생략...
}
이제 클라이언트 측의 전송 기능과 서버 측의 응답 기능이 모두 완성되었습니다.
퍼즐 섞기 기능 확인
Unity 에디터에서 플레이 모드로 진입합니다. Scatter Puzzle 버튼을 클릭하여 퍼즐 섞기 기능이 잘 작동하는지 확인합니다.
더 나은 중입 유저 처리
앞에서 중입 유저를 처리하는 과정에서 동기화 문제가 발생했습니다. 그 원인은 유저가 방에 입장하는 시점을 퍼즐 조각의 위치 동기화 시점으로 적합하다고 생각했기 때문입니다. 하지만 우리가 구현 중인 퍼즐 게임은 유저가 방에 입장하는 시점에 씬 이동이 발생합니다.
그러므로 우리는 리스너 등록과 onJoinRoom 콜백 호출의 두 가지 시점으로 나누어서 생각해야 합니다. 이는 게임 클라이언트의 구현에 따라 문제가 없을 수도 있고, 문제가 될 수도 있습니다. onJoinRoom 콜백 호출 이후 씬 이동이 시작되기 때문에 씬 이동이 완료된 직후에 클라이언트가 직접 서버로 퍼즐 위치 동기화를 요청하고자 합니다.
프로토콜 등록
서버 프로젝트로 이동하여, 퍼즐 위치 동기화를 요청하기 위한 프로토콜을 Puzzle.proto에 추가합니다.
syntax="proto3";

package protocol;

message PuzzlePosition
{
    int32 Index = 1;
    int32 PositionX = 2;
    int32 PositionY = 3;
    bool OnEndDrag = 4;
}

message ScatterPuzzle {}

message PuzzlePositionReq {}
프로토콜을 다시 컴파일한 후 생성된 C# 클래스를 Unity 프로젝트로 옮깁니다.
클라이언트 측 구현
씬 이동 직후 서버에 퍼즐 위치를 요청하도록 하기 위해서는 씬 이동 직후 실행되는 Start 함수를 수정해야 합니다. GameManager의 Start 메서드에 다음과 같이 새로 만든 PuzzlePositionReq 프로토콜 메시지를 전송하는 코드를 추가합니다.
public class GameManager : MonoBehaviour
{
    void Start(){
        ...생략...

        ConnectHandler.GetInstance().GetConnector().GetUserAgent("BASIC_SERVICE", 1).Send(new PuzzlePositionReq());
    }

    ...생략...
}
서버 측 구현
onJoinRoom에 잘못 구현했던 퍼즐 위치 송신 코드를, 제대로 된 위치로 옮겨와 PuzzlePositionReqHandler에 새롭게 작성합니다.
import co.paralleluniverse.fibers.SuspendExecution;
import com.nhn.gameanvil.node.game.RoomMessageHandler;
import protocol.Puzzle;

public class PuzzlePositionReqHandler implements RoomMessageHandler<BasicRoom, BasicUser, Puzzle.PuzzlePositionReq> {
    @Override
    public void execute(BasicRoom room, BasicUser user, Puzzle.PuzzlePositionReq req) throws SuspendExecution {
        room.puzzlePositions.values().stream().forEach(room::broadcast);
    }
}
그리고 작성한 핸들러를 BasicRoom에 등록합니다.
public class BasicRoom extends BaseRoom<BasicUser> {

    static {
        dispatcher.registerMsg(BasicProtocol.MessageRequest.class, BasicHandler.class); // 처리할 메시지에 대한 핸들러 등록
        dispatcher.registerMsg(Puzzle.PuzzlePosition.class, PuzzlePositionHandler.class);
        dispatcher.registerMsg(Puzzle.ScatterPuzzle.class, ScatterPuzzleHandler.class);
        dispatcher.registerMsg(Puzzle.PuzzlePositionReq.class, PuzzlePositionReqHandler.class);
    }

    ...생략...

}
중입 유저 처리 확인
Unity에서 cmd+b 또는 ctrl+b로 빌드 후 플레이합니다. 이제 빌드된 게임에서 방을 생성하고 퍼즐 섞기를 실행합니다. 그 상태에서 Unity 에디터의 플레이 모드로 진입하여 이 방에 참가한 후 퍼즐 위치가 동기화되는 것을 확인합니다.
유저 매치메이킹 구현
서버 측 구현
유저 매치 메이킹은 유저들의 매치 메이킹 요청을 한데 모아 적절한 기준에 맞춰 비슷한 수준의 유저들끼리 서로 같은 방에서 게임을 시작할 수 있게 합니다. 승점이나 점수 등 다양한 요소를 사용자가 직접 구현해 유저들을 적절하게 구분하고 매칭할 수 있습니다. 여기에서는 유저 2명을 하나의 게임으로 매칭해 주는 로직을 구현합니다.
UserMatchInfo 클래스를 생성합니다. 파일명은 BasicUserMatchInfo로 합니다.
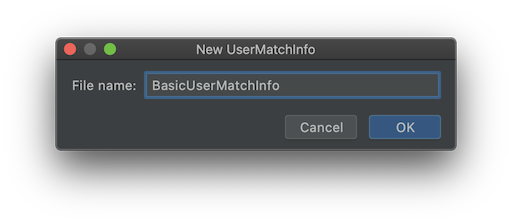
이 클래스에는 매칭에 사용될 유저의 정보를 담게 됩니다. 매치 메이킹에 사용될 요소가 있다면 여기에 추가하면 됩니다. 이번 예제에서는 별다른 요소를 추가하지 않고, 필수적으로 구현해야 하는 메서드만을 작성해서 사용하겠습니다. 한 가지 주의할 점은 getId() 메서드가 반드시 요청한 유저의 아이디를 반환하게 구현하도록 합니다. 그리고 파티 매치메이킹 기능은 사용하지 않으므로 0을 반환하도록 설정합니다.
import com.nhn.gameanvil.annotation.RoomType;
import com.nhn.gameanvil.annotation.ServiceName;
import com.nhn.gameanvil.node.match.BaseUserMatchInfo;

import java.io.Serializable;

@ServiceName("BASIC_SERVICE")
@RoomType("BASIC_ROOM")
public class BasicUserMatchInfo extends BaseUserMatchInfo implements Serializable {

    private int id;

    public BasicUserMatchInfo(int id) {
        this.id = id;
    }

    @Override
    public int getId() {
        return id;
    }

    @Override
    public int getPartySize() {
        return 0;
    }
}
이러한 UserMatchInfo는 클라이언트가 유저 매치 메이킹을 요청할 때 서버의 게임 유저에서 onMatchUser 콜백을 구현하는 과정에서 생성한 후 사용합니다. GameAnvil은 기본적인 유저 매치 메이커를 제공합니다. 아래의 onMatchUser는 이러한 엔진의 기본 유저 매치 메이킹을 matchUser API를 통해 사용하고 있습니다.
import co.paralleluniverse.fibers.SuspendExecution;
import com.nhn.gameanvil.exceptions.NodeNotFoundException;
import match.BasicUserMatchInfo;
import org.slf4j.Logger;

import java.util.concurrent.TimeoutException;

import static org.slf4j.LoggerFactory.getLogger;

@ServiceName("BASIC_SERVICE")
@UserType("BASIC_USER")
public class BasicUser extends BaseUser {
    private static final Logger logger = getLogger(BasicUser.class);

    @Override
    public boolean onMatchUser(String roomType, String matchingGroup, Payload payload, Payload outPayload) throws SuspendExecution {
   try {
            BasicUserMatchInfo term = new BasicUserMatchInfo(getUserId());
            return matchUser(matchingGroup, roomType, term); // 유저 매치 메이킹 요청
        } catch (Exception e) {
            logger.error("BasicUser::onMatchUser()", e);
        }
        return false;
    }
}
유저 매치 메이킹을 사용하기 위한 기본적인 준비가 되었으면 이제 실제 매치 메이킹을 수행하는 매치 메이커를 작성합니다. 아래와 같이 BasicUserMatchMaker 클래스를 추가합니다.
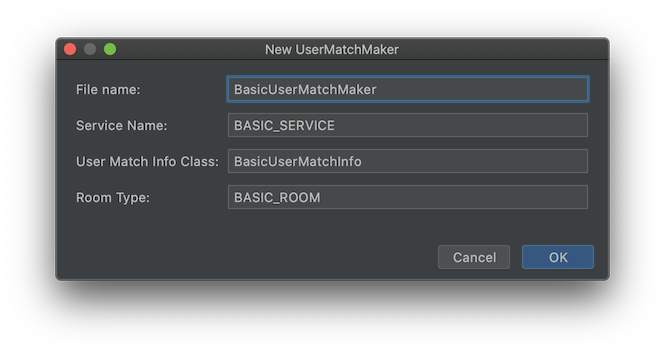
생성자에서는 부모 클래스의 생성자를 호출하면서 인자로 매치 인원수와 매치 신청 유효 시간을 전달합니다. 유효 시간이 지나면 해당 매치 요청은 자동으로 취소됩니다. 그리고 실제 매치 메이킹을 수행하는 match 메서드는 엔진에 의해 1초에 한 번씩 호출됩니다.
getMatchRequests는 인자로 매칭을 위한 최소 인원수를 받아 현재 매칭 풀 전체를 조회하여 최적의 매칭을 가능한 만큼 만들어 냅니다 . 즉, 매칭 요청이 많이 쌓여 있다면 getMatchRequests에 의해 한 번에 100개 또는 1,000개의 매칭도 만들어질 수 있습니다. 이때, 매칭이 성공하면 매칭된 유저들의 UserMatchInfo 목록을 반환합니다. 이 목록을 엔진에서 제공하는 matchSingles API에 전달하면 해당 목록 안의 유저들에 대한 방 생성 및 이동이 알아서 진행됩니다.
만일 매칭에 충분한 요청이 쌓이지 않았거나, 조건에 맞는 대상이 없을 경우에는 null을 반환합니다. 이 경우에는 다음 1초 후의 match 호출에서 다시 동일한 매칭 검색이 수행됩니다.
import com.nhn.gameanvil.annotation.RoomType;
import com.nhn.gameanvil.annotation.ServiceName;
import com.nhn.gameanvil.node.match.BaseUserMatchMaker;
import org.slf4j.Logger;

import java.util.List;

import static org.slf4j.LoggerFactory.getLogger;

@ServiceName("BASIC_SERVICE")
@RoomType("BASIC_ROOM")
public class BasicUserMatchMaker extends BaseUserMatchMaker<BasicUserMatchInfo> {
    private static final Logger logger = getLogger(BasicUserMatchMaker.class);
    private static final int NUM_USER = 2;
    private static final int TIMEOUT = 10000;

    public BasicUserMatchMaker() {
        super(NUM_USER, TIMEOUT);
    }

    @Override
    public void onMatch() {
        List<BasicUserMatchInfo> matchRequests = getMatchRequests(2);

        if (matchRequests == null) {
            return;
        }

        matchSingles(matchRequests);
    }

    @Override
    public boolean onRefill(BasicUserMatchInfo roomInfo) {
        return false;
    }
}
클라이언트 측 구현
매치 메이킹 로직은 모두 서버에 구현되어 있기 때문에 클라이언트에서는 매치 메이킹이 필요한 시점에 요청을 보내기만 하면 됩니다. ConnectHandler에 UserMatchMaking 메서드를 추가합니다. 그리고 매치 메이킹이 끝난 시점에 씬을 이동하도록 하는 핸들러를 추가합니다.
public class ConnectHandler : MonoBehaviour
{
    ...생략...

    void Start () {

        ...생략...

            connector.GetUserAgent("BASIC_SERVICE", 1).onMatchUserDoneListeners += (UserAgent userAgent, ResultCodeMatchUserDone resultCode, bool created, int roomId, Payload payload) =>{
            this.roomId = roomId;
            SceneManager.LoadScene("GameScene");
        };
    }

    ...생략...

    public void UserMatchMaking(){
            connector.GetUserAgent("BASIC_SERVICE", 1).MatchUserStart("BASIC_ROOM", "BASIC_MATCHING_GROUP",(UserAgent userAgent, ResultCodeMatchUserStart resultCode, Payload payload) =>{
            Debug.Log(resultCode);
        });
    }
}
씬에서 User Match Making 버튼의 OnClick 리스너에 ConnectHandler 컴포넌트를 드래그해서 등록하고, 드롭다운에서 UserMatchMaking 메서드를 선택합니다.
유저 매치 메이킹 테스트
Unity에서 cmd+b 또는 ctrl+b로 빌드 후 플레이합니다. 그 상태로 Unity 에디터에서 플레이 모드에 진입합니다. 양측에서 모두 User Match Making 버튼을 눌러 매칭이 성사되고 동일한 방 번호로 묶이게 되는 것을 확인합니다.
룸 매치 메이킹 구현
룸 매치 메이킹은 매치 메이커가 관리하는 방들 중에서 유저의 요구 사항에 가장 적합한 방으로 자동 입장시킬 수 있는 기능입니다. 즉, 유저 매치 메이킹이 유저와 유저를 매칭시켜주는 기능이라면, 룸 매치 메이킹은 유저와 방을 매칭시켜주는 기능입니다. 이때, 구현 방식에 따라서 다양한 조건으로 유저를 방에 매칭할 수 있습니다. 여기에서는 아직 정원이 차지 않은 방 중에 인원이 가장 적은 방으로 입장하는 매치 메이킹을 구현합니다.
우선 매치 메이킹을 실제로 수행하는 클래스가 필요합니다. 그리고 룸 매치 메이커에서 방을 관리하기 위한 정보를 담는 인스턴스가 각 방마다 하나씩 있어야 합니다. 마지막으로 유저가 매치 메이킹을 신청할 때마다 유저의 요구 사항을 담은 신청서 인스턴스가 필요합니다. 이렇게 세 개의 새로운 클래스를 작성해 보겠습니다.
추가로 기존 로직을 일부 수정합니다. 룸 매치 메이킹은 모든 방이 아닌 룸 매치 메이킹 대상으로 신청한 방들만을 대상으로 수행됩니다. 따라서 방 생성 시점에 룸 매치 메이킹을 대상으로 신청하는 코드를 추가합니다.
서버 측 구현
우선 매치 메이킹 요청을 나타낼 클래스를 구현합니다. BasicRoomMatchForm 클래스를 생성합니다.
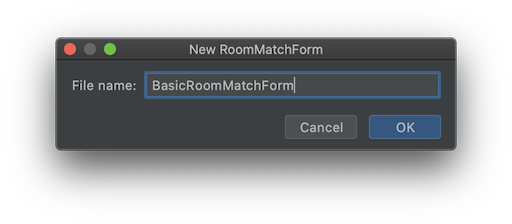
유저가 매치 메이킹 요청을 할 때마다 BasicRoomMatchForm 객체가 생성되어 사용됩니다. 생성자에서 부모 생성자로 전달하는 "BASIC_MATCHING_USER_CATEGORY"는 이 문서에서는 신경쓰지 않아도 됩니다.
import com.nhn.gameanvil.node.match.BaseRoomMatchForm;
import java.io.Serializable;

public class BasicRoomMatchForm extends BaseRoomMatchForm implements Serializable {
    public BasicRoomMatchForm() {
        super("BASIC_MATCHING_USER_CATEGORY");
    }
}
다음은 매칭 대상이 되는 방의 정보를 표현하는 클래스를 구현합니다. 다음과 같이 BasicRoomMatchInfo 클래스를 생성합니다.
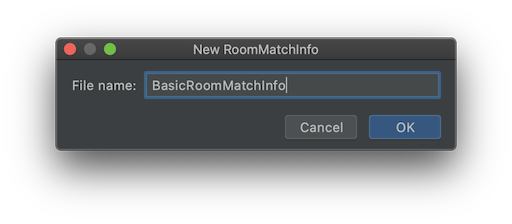
이때, 방의 최대 정원은 static 필드에 지정된 4명입니다. 이러한 최대 정원과 유저 타입을 반드시 상속 받은 BaseRoomMatchInfo의 생성자에 인자로 전달해야 합니다.
import com.nhn.gameanvil.annotation.RoomType;
import com.nhn.gameanvil.annotation.ServiceName;
import com.nhn.gameanvil.node.match.BaseRoomMatchInfo;

import java.io.Serializable;

@ServiceName("BASIC_SERVICE")
@RoomType("BASIC_ROOM")
public class BasicRoomMatchInfo extends BaseRoomMatchInfo implements Serializable {
    private static final int MAX_USER = 4;

    public BasicRoomMatchInfo(int roomId) {
        super(roomId, "BASIC_USER", MAX_USER);
    }
}
다음으로 실제로 룸 매치 메이킹을 처리할 룸 매치 메이커를 생성합니다.
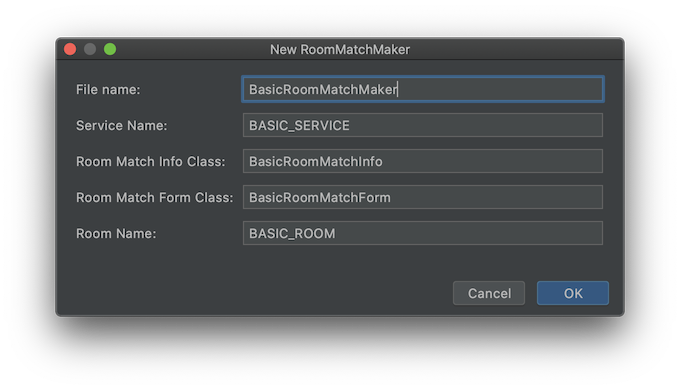
다음과 같이 BasicRoomMatchMaker를 작성합니다.
import com.nhn.gameanvil.annotation.RoomType;
import com.nhn.gameanvil.annotation.ServiceName;
import com.nhn.gameanvil.node.game.data.RoomMatchResultCode;
import com.nhn.gameanvil.node.match.BaseRoomMatchMaker;

@ServiceName("BASIC_SERVICE")
@RoomType("BASIC_ROOM")
public class BasicRoomMatchMaker extends BaseRoomMatchMaker<BasicRoomMatchForm, BasicRoomMatchInfo> {
    @Override
    public RoomMatchResultCode onPreMatch(BasicRoomMatchForm basicRoomMatchForm, Object... objects) {
        return RoomMatchResultCode.SUCCESS;
    }

    @Override
    public boolean canMatch(BasicRoomMatchForm basicRoomMatchForm, BasicRoomMatchInfo basicRoomMatchInfo, Object... objects) {
        return true;
    }

    @Override
    public void onPostMatch(BasicRoomMatchForm basicRoomMatchForm, BasicRoomMatchInfo basicRoomMatchInfo, Object... objects) {

    }

    @Override
    public int compare(BasicRoomMatchInfo o1, BasicRoomMatchInfo o2) {
        int o1UserCount = getUserCount(o1.getRoomId());
        int o2UserCount = getUserCount(o2.getRoomId());
        if (o1UserCount > o2UserCount) {
            return -1;
        } else if (o1UserCount < o2UserCount) {
            return 1;
        } else {
            return 0;
        }
    }

    @Override
    public void onIncreaseUserCount(int roomId, String matchingUserCategory, int currentUserCount) {

    }

    @Override
    public void onDecreaseUserCount(int roomId, String matchingUserCategory, int currentUserCount) {

    }
}
compare 메서드는 매칭 풀에 들어 있는 방을 정렬하는 조건을 구현합니다. 예제는 인원수에 따라 방을 정렬하도록 구현했습니다.
이제 룸 매치 메이킹을 위한 준비가 거의 끝났습니다. 클라이언트가 룸 매치 요청을 보내면 서버의 BasicUser는 onMatchRoom 콜백이 호출됩니다. 이 콜백에서 앞서 살펴본 BasicRoomMatchForm 객체를 생성한 뒤 matchRoom API에 인자로 전달하여 호출합니다. 즉, 클라이언트가 보낸 룸 매칭 요청을 여기에서 매치 메이커로 전달했습니다.
import co.paralleluniverse.fibers.SuspendExecution;
import com.nhn.gameanvil.exceptions.NodeNotFoundException;
import match.BasicUserMatchInfo;
import org.slf4j.Logger;

import java.util.concurrent.TimeoutException;

import static org.slf4j.LoggerFactory.getLogger;

@ServiceName("BASIC_SERVICE")
@UserType("BASIC_USER")
public class BasicUser extends BaseUser {

    @Override
    public final RoomMatchResult onMatchRoom(final String roomType, final String matchingGroup, final String matchingUserCategory, final Payload payload) throws SuspendExecution {
        BasicRoomMatchForm gameRoomMatchForm = new BasicRoomMatchForm();

        try {
            return matchRoom(matchingGroup, roomType, gameRoomMatchForm); // 매치 메이커로 요청 전달
        } catch (Exception e) {
            logger.error("BasicUser::onMatchRoom()", e);
        }
        return RoomMatchResult.FAILED;
    }
}
방이 생성된 시점에 룸 매치 메이킹 대상으로 만들기 위해서 BasicRoom의 onCreateRoom 콜백에서 아래와 같이 registerRoomMatch API를 호출합니다.
public class BasicRoom extends BaseRoom<BasicUser> {
    ...생략...

    @Override
    public boolean onCreateRoom(BasicUser user, Payload inPayload, Payload outPayload) throws SuspendExecution {
        users.put(user.getUserId(), user);

        BasicRoomMatchInfo gameRoomMatchInfo = new BasicRoomMatchInfo(getId());
        try {
            registerRoomMatch(gameRoomMatchInfo, "BASIC_MATCHING_USER_CATEGORY", user.getUserId()); // 방을 룸 매치 메이킹 대상으로 등록
        } catch (Exception e) {
            logger.error("BasicRoom::onCreateRoom():registerRoomMatch", e);
        }

        logger.debug("onCreateRoom(userId:{})", user);
        return true;
    }

}
또한 방 정보가 변동될 때마다 룸 매치 메이킹 정보도 갱신되어야 합니다. 참고로 방의 인원수 변동은 룸 매치 메이커가 자동으로 동기화합니다. 그러므로 인원수를 제외한 추가 정보에 대한 갱신만 수행하면 됩니다.
다음은 onJoinRoom 콜백을 수정해 방에 유저가 참여할 때 매치 메이킹 정보를 갱신하는 코드입니다.
public class BasicRoom extends BaseRoom<BasicUser> {
    ...생략...

    @Override
    public boolean onJoinRoom(BasicUser user, Payload inPayload, Payload outPayload) throws SuspendExecution {
        users.put(user.getUserId(), user);

        BasicRoomMatchInfo gameRoomMatchInfo = new BasicRoomMatchInfo(getId());
        try {
            updateRoomMatch(gameRoomMatchInfo);
        } catch (Exception e) {
            logger.error("BasicRoom::onCreateRoom():registerRoomMatch", e);
        }

        logger.debug("onJoinRoom(userId:{})", user);
        return true;
    }
}
클라이언트 구현
유저 매치 메이킹과 마찬가지로 클라이언트는 매치 메이킹이 필요한 시점에 요청을 보내기만 하면 됩니다. ConnectHandler에 RoomMatchMaking 메서드를 추가합니다.
public class ConnectHandler : MonoBehaviour {
    public void RoomMatchMaking(){
            connector.GetUserAgent("BASIC_SERVICE", 1).MatchRoom("BASIC_ROOM", "BASIC_MATCHING_GROUP", "BASIC_MATCHING_USER_CATEGORY", true,
            (UserAgent userAgent, ResultCodeMatchRoom resultCode, int integer, int roomId, string roomName, bool created, Payload payload) =>{
            Debug.Log(resultCode);
            if (resultCode == ResultCodeMatchRoom.MATCH_ROOM_SUCCESS){
                this.roomId = roomId;

                SceneManager.LoadScene("GameScene");
            }
        });
    }
}
씬에서 Room Match Making 버튼의 OnClick 리스너에 ConnectHandler 컴포넌트를 드래그해 등록하고, 드롭다운 메뉴에서 RoomMatchMaking 메서드를 선택합니다.
매칭 그룹이 있는 방을 만들기 위해 방 생성 코드를 수정합니다. 이때, 매칭 그룹은 매치 메이킹 대상 방을 논리적으로 나누기 위해 서버와 클라이언트 사이에 사전 정의한 임의의 문자열입니다. 여기에서는 BASIC_MATCHING_GROUP이라는 문자열을 사용합니다.
public class ConnectHandler : MonoBehaviour {
    public void CreateRoom(){
            connector.GetUserAgent("BASIC_SERVICE", 1).CreateRoom("", "BASIC_ROOM", "BASIC_MATCHING_GROUP", null (UserAgent ua, ResultCodeCreateRoom resultCode, int roomId, string roomName, Payload payload) => {
            Debug.Log(resultCode);
            if (resultCode == ResultCodeCreateRoom.CREATE_ROOM_SUCCESS){
                this.roomId = roomId;

                SceneManager.LoadScene("GameScene");
            }
        });
    }
}
룸 매치 메이킹 테스트
Unity에서 cmd+b 또는 ctrl+b로 빌드 후 플레이 상태에서 방을 생성합니다. 그 상태로 Unity 에디터에서 플레이 모드로 진입합니다. 플레이 모드에서 Room Match Making 버튼을 눌러 빌드 모드에서 생성한 방으로 이동하는지 확인합니다.
Room 떠나기 구현
마지막으로 방을 떠나는 기능 구현을 위해 Unity 클라이언트의 GameManager에 아래 메서드를 추가합니다.
public void LeaveRoom() {
        ConnectHandler.GetInstance().GetConnector().GetUserAgent("BASIC_SERVICE", 1).LeaveRoom((userAgent, resultCode, force, roomId, payload) =>{
        if(resultCode == ResultCodeLeaveRoom.LEAVE_ROOM_SUCCESS){
            Destroy(connectHandler.gameObject);
                SceneManager.LoadScene("ConnectScene");
            }
    });
}
씬에서 Leave Room 버튼의 OnClick 리스너에 GameManager 컴포넌트를 드래그해 등록하고, 드롭다운 메뉴에서 LeaveRoom 메서드를 선택합니다.
프로젝트 마무리
이상 GameAnvil과 Unity를 이용해 실시간 멀티플레이가 가능한 퍼즐 게임을 구현해 보았습니다. 그 과정에서 GameAnvil의 핵심 기능 다수를 사용하였습니다. 하지만 GameAnvil은 이 튜토리얼에 포함되지 않은 더욱 풍성하고 다양한 기능들을 지원합니다. 이러한 기능들에 대해서는 이어지는 문서를 참고하십시오. 또한 함께 제공되는 레퍼런스 샘플 프로젝트와 JavaDoc도 GameAnvil을 이해하는 데 많은 도움이 될 것입니다.
Table of Contents
- Game > GameAnvil > 심화 튜토리얼
- GameAnvil로 게임 서버 쉽게 만들기
- 프로젝트 구성
- GameAnvil 프로젝트 구성
- Unity 프로젝트 구성
- 서버 구동 및 연결
- GameAnvil 서버 구동
- 커넥트 핸들러 작성
- 서버 연결 코드 추가
- 서버 연결 확인
- Room 및 User 생성
- 서버 작업
- 접속 인증
- 접속 인증 코드 추가
- 접속 인증 확인
- 로그인
- 로그인 코드 추가
- 로그인 확인
- 방 생성 및 참가
- 클라이언트 작업
- Room 생성 및 참가 테스트
- 인게임 채팅 구현
- 클라이언트 측 전송 구현
- 서버 측 응답 구현
- 클라이언트 측 수신 구현
- 메시지 전달 확인
- 퍼즐 게임 구현
- Google Protocol Buffers를 이용한 메시지 직렬화/역직렬화
- 프로토콜 등록
- 클라이언트 측 전송 구현
- 서버 측 응답 구현
- 클라이언트 측 수신 구현
- 퍼즐 위치 동기화 확인
- 중입 유저 처리하기
- 퍼즐 섞기 구현
- 프로토콜 등록
- 클라이언트 측 구현
- 서버 측 구현
- 퍼즐 섞기 기능 확인
- 더 나은 중입 유저 처리
- 프로토콜 등록
- 클라이언트 측 구현
- 서버 측 구현
- 중입 유저 처리 확인
- 유저 매치메이킹 구현
- 서버 측 구현
- 클라이언트 측 구현
- 유저 매치 메이킹 테스트
- 룸 매치 메이킹 구현
- 서버 측 구현
- 클라이언트 구현
- 룸 매치 메이킹 테스트
- Room 떠나기 구현
- 프로젝트 마무리