Game > GameAnvil > Unity 기초 개발 가이드 > 동기화
동기화
GameAnvilConnector에서는 게임 오브젝트의 생성/파괴, Transform, Animation, Rigidbody2D, Rigidbody 속성을 간편하게 동기화할 수 있는 기능을 제공합니다.
동기화할 게임 오브젝트에 각각 Sync, TransformSync, AnimatorSync, Rigidbody2DSync, RigidbodySync 컴포넌트를 붙이기만 하면 해당 속성이 동기화됩니다.
동기화 컴포넌트를 사용할 게임 오브젝트에는 Sync 컴포넌트도 반드시 함께 추가해야 합니다. 각 동기화 컴포넌트를 추가할 때 필요한 컴포넌트가 없을 경우 자동으로 추가됩니다.
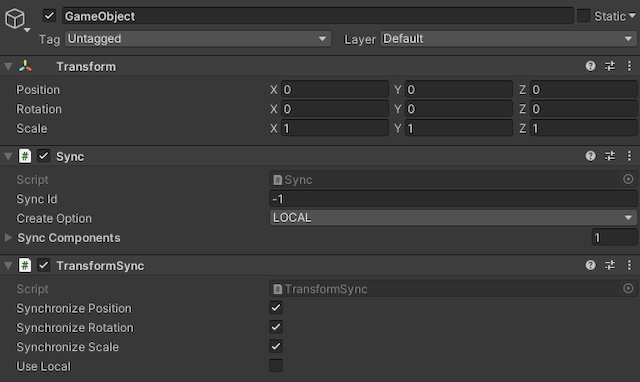
한 클라이언트에서 특정 속성을 변화시키면 동기화 요청 패킷이 전송되고, 서버에서 이를 같은 방에 속한 모든 유저에게 브로드캐스트하여 다른 클라이언트에서 동기화될 수 있도록 합니다.
SyncController
동기화 기능을 사용하려는 씬에 SyncController가 존재해야 합니다. 동기화 게임오브젝트를 생성하고 파괴하는 Instantiate(), Destroy() 함수를 포함하여 동기화 기능 동작에 핵심적인 역할을 합니다.
SyncController 생성
GameObject를 생성하고 SyncController 컴포넌트를 추가합니다. Add Component > GameAnvil > SyncController를 선택해 컴포넌트로 추가할 수 있습니다.
또는 Unity Hierarchy에서 마우스 오른쪽 버튼을 클릭한 뒤 GameAnvil > SyncController를 선택해 바로 생성할 수도 있습니다.
게임 오브젝트 생성/파괴 동기화, Sync
게임 오브젝트 생성/파괴를 동기화할 게임 오브젝트에 Sync 컴포넌트를 추가하면 같은 방에 있는 유저들이 서로 생성한 게임 오브젝트의 생성/파괴가 동기화됩니다. Add Component > GameAnvil > GameAnvil Sync > Sync를 선택해 컴포넌트로 추가할 수 있습니다.
Sync Id
유저별로 고유한 동기화 키가 부여되고, 게임 오브젝트마다 오브젝트 아이디가 부여되며 이 둘을 조합하여 생성한 동기화 아이디로 모든 유저별 동기화 게임오브젝트가 구분됩니다.
Sync.SyncId로 동기화 게임오브젝트의 동기화 아이디를 얻을 수 있습니다.
Create Option
동기화 게임 오브젝트가 생성된 방식을 나타냅니다. 클라이언트에서 직접 생성한 게임오브젝트의 경우 LOCAL로 표시하고, 다른 클라이언트에서 생성한 게임오브젝트가 생성 동기화에 의해 자신의 씬에서도 만들어지는 경우에는 REMOTE로 표시됩니다.
게임 오브젝트 생성 동기화
Sync 컴포넌트를 추가한 게임 오브젝트를 prefab으로 만든 뒤 Unity의 Assets/Resources 폴더 하위에 저장합니다. 방에 입장한 뒤 SyncController의 Instantiate()를 통해 원하는 시점에 해당 prefab을 생성합니다.
방에 입장한 상태에서만 생성/파괴가 동기화되는 게임 오브젝트를 생성할 수 있습니다.
/// <summary>
/// 동기화 게임 오브젝트를 생성한다.
/// </summary>
/// <param name="prefabName">생성하려는 prefab의 이름. 해당 prefab은 Assets/Resources 폴더 하위에 존재해야 한다.</param>
/// <param name="v">prefab을 생성할 position</param>
/// <param name="r">prefab의 rotation</param>
/// <returns></returns>
public GameObject Instantiate(string prefabName, Vector3 v, Quaternion r);
방에 중입한 경우 게임 오브젝트 생성 동기화
| 옵션 | 설명 |
|---|---|
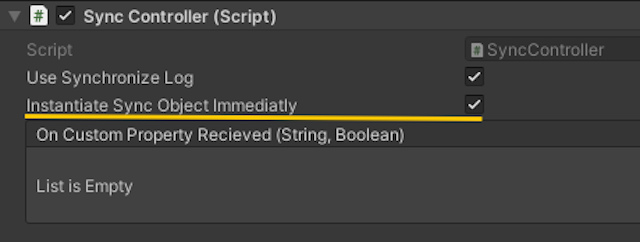
| InstantiateSyncObjectImmediatly | 방에 입장한 뒤 바로 동기화 진행 여부를 설정한다. true면 유저가 방에 입장한 뒤 바로 동기화를 진행하며, false면 직접 동기화 함수를 호출해야 한다. |
방에 중입한 경우 유저 입장 시 호출되는 콜백에서 SyncController.roomSyncStart()가 호출되면서 서버로부터 받아온 기존 방의 동기화 데이터를 이용해 게임 오브젝트를 생성하고 동기화합니다.
하지만 방에 입장한 직후에 바로 동기화를 하고 싶지 않은 경우에는 SyncController의 InstantiateSyncObjectImmediatly 옵션을 false로 설정하고, 원하는 시점에 SyncController.InstantiateSyncObject()를 호출하면 됩니다.
게임 오브젝트 파괴 동기화
Sync 컴포넌트가 붙은 게임 오브젝트가 삭제되면 onDestroy() 함수에서 파괴 동기화가 처리되어서 다른 유저의 씬에서도 해당 게임오브젝트가 사라집니다.
현재 스펙에서는 유저가 방에 입장하고 동기화 게임 오브젝트들을 생성한 뒤 씬을 이동하면 게임 오브젝트들이 모두 파괴되고, 이를 동기화하면서 서버에 저장된 데이터도 삭제됩니다.
따라서 다른 씬으로 이동했다가 다시 원래 씬으로 돌아왔을 때 생성했던 동기화 게임오브젝트들이 없어져 있을 수 있습니다. 그리고 한 쪽 클라이언트에서 씬 이동을 하면서 동기화 게임오브젝트가 모두 파괴되면, 파괴 동기화에 의해 다른 쪽 클라이언트에서도 게임오브젝트들이 파괴될 수 있습니다. 이에 유념해서 씬 이동을 해야 합니다. 이는 다음 스펙에서 개선될 예정입니다.
Transform 동기화, TransformSync
Transform 동기화를 원하는 게임 오브젝트에 TransformSync 컴포넌트를 추가하면 동기화 게임 오브젝트의 Transform이 동기화됩니다. Add Component > GameAnvil > GameAnvil Sync > TransformSync를 선택해 컴포넌트로 추가할 수 있습니다. Sync 컴포넌트가 자동으로 함께 추가됩니다.
TransformSync 컴포넌트를 붙인 게임 오브젝트를 prefab으로 만든 뒤 Unity의 Assets/Resources 폴더 하위에 저장합니다.
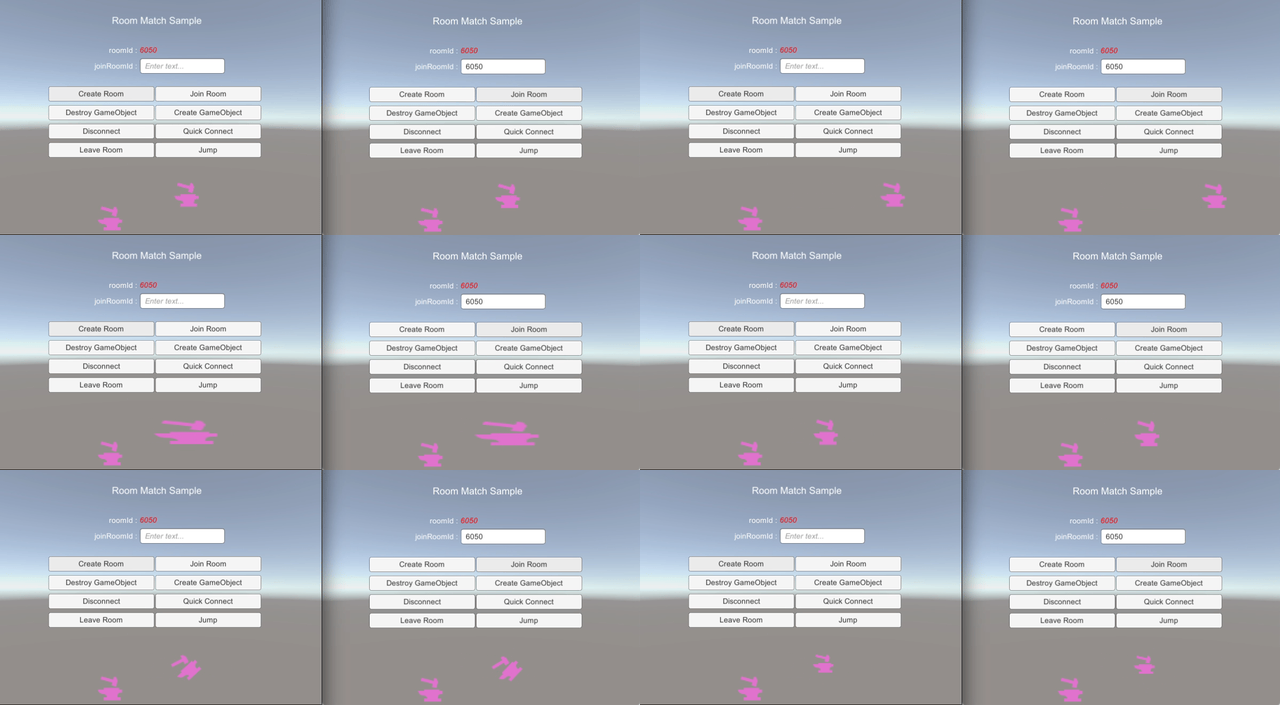
방에 입장해서 SyncController의 Instantiate()를 통해서 해당 prefab을 생성한 다음 Transform을 변화시켰을 때, 다른 클라이언트에서도 모두 변화된 Transform으로 동기화되는 것을 확인할 수 있습니다.
Transform 동기화 옵션
Transform 중 동기화할 속성을 옵션에 따라 선택할 수 있습니다.

| 옵션 | 설명 |
|---|---|
| Synchronize Position | Position 속성 동기화 여부를 설정합니다. true면 Position 값을 동기화하고, false면 Position 값을 동기화하지 않습니다. |
| Synchronize Rotation | Rotation 속성 동기화 여부를 설정합니다. true면 Rotation 값을 동기화하고, false면 Rotation 값을 동기화하지 않습니다. |
| Synchronize Scale | Scale 속성 동기화 여부를 설정합니다. true면 Scale 값을 동기화하고, false면 Scale 값을 동기화하지 않습니다. |
| Use Local | localPosition 및 localRotation을 사용해야 하는지 여부를 설정합니다. Scale은 이 설정을 무시하고 항상 localScale을 사용하여 lossyScale 관련 문제를 방지합니다. |
Animation 동기화, AnimatorSync
Animation 동기화를 원하는 게임 오브젝트에 AnimatorSync 컴포넌트를 붙이고, Animator의 파라미터 값을 바꿔서 Animation State를 변경시키면 해당 변경 사항이 다른 클라이언트에서도 동기화됩니다. Add Component > GameAnvil > GameAnvil Sync > AnimatorSync를 선택해 컴포넌트로 추가할 수 있습니다. Sync, Animator 컴포넌트가 자동으로 함께 추가됩니다.
AnimatorSync 컴포넌트를 추가한 게임 오브젝트를 prefab으로 만든 뒤 Unity의 Assets/Resources 폴더 하위에 저장합니다.
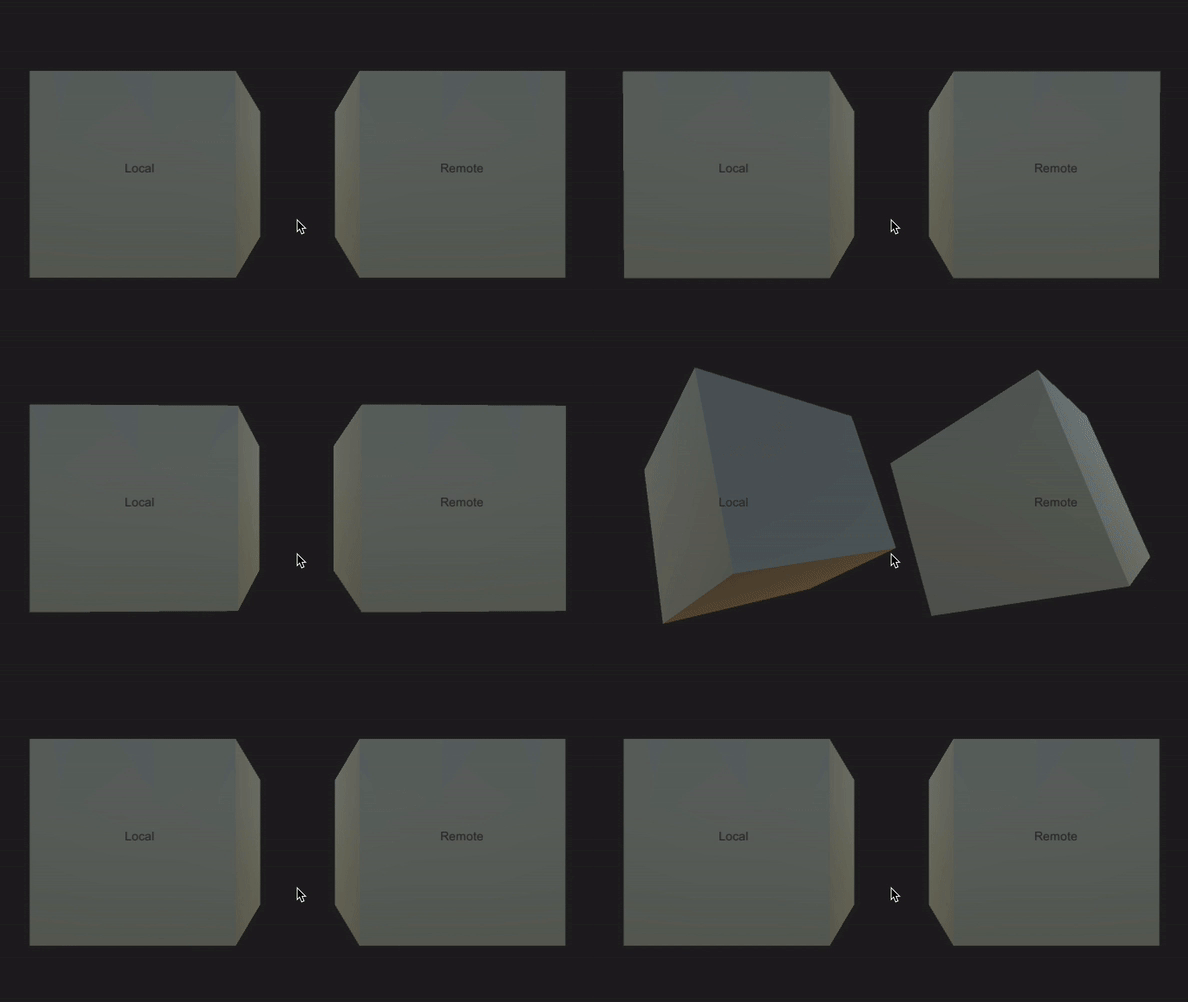
방에 입장해서 SyncController의 Instantiate()를 통해서 해당 prefab을 생성한 다음 Animation을 변화시켰을 때, 다른 클라이언트에서도 모두 변화된 Animation으로 동기화되는 것을 확인할 수 있습니다.
Rigidbody2D 동기화, Rigidbody2DSync
Rigidbody2D 동기화를 원하는 게임 오브젝트에 Rigidbody2DSync 컴포넌트를 붙이면 동기화 게임오브젝트의 Rigidbody2D가 동기화됩니다. Add Component > GameAnvil > GameAnvil Sync > Rigidbody2DSync를 선택해 컴포넌트로 추가할 수 있습니다. Sync, TransformSync, Rigidbody2D 컴포넌트가 자동으로 함께 추가됩니다.
Rigidbody2DSync 컴포넌트를 붙인 게임 오브젝트를 prefab으로 만든 뒤 Unity의 Assets/Resources 폴더 하위에 저장합니다.
방에 입장해서 SyncController의 Instantiate()를 통해서 해당 prefab을 생성한 다음 Rigidbody2D를 변화시켰을 때 다른 클라이언트에서도 모두 변화된 Rigidbody2D로 동기화되는 것을 확인할 수 있습니다.

Rigidbody2D 동기화 옵션
Rigidbody2D 중 동기화할 속성을 옵션에 따라 선택할 수 있습니다.

| 옵션 | 설명 |
|---|---|
| Synchronize Velocity | Velocity 속성 동기화 여부를 설정합니다. true면 Velocity 값을 동기화하고, false면 Velocity 값을 동기화하지 않습니다. |
| Synchronize Angular Velocity | Angular Velocity 속성 동기화 여부를 설정합니다. true면 Angular Velocity 값을 동기화하고, false면 Angular Velocity 값을 동기화하지 않습니다. |
| Teleport Enabled | Teleport 허용 여부를 설정합니다. |
| Teleport if distance greater than | 거리가 설정한 기준 이상으로 차이가 나면 Rigidbody2D의 Position에 동기화할 위치 값을 적용한 다음, Velocity 값을 이용해서 동기화합니다. |
| Teleport if angle greater than | 각도가 설정한 기준 이상으로 차이가 나면 Rigidbody2D의 Rotation에 동기화할 각도 값을 적용한 다음, Angular Velocity 값을 이용해서 동기화합니다. |
Rigidbody 동기화, RigidbodySync
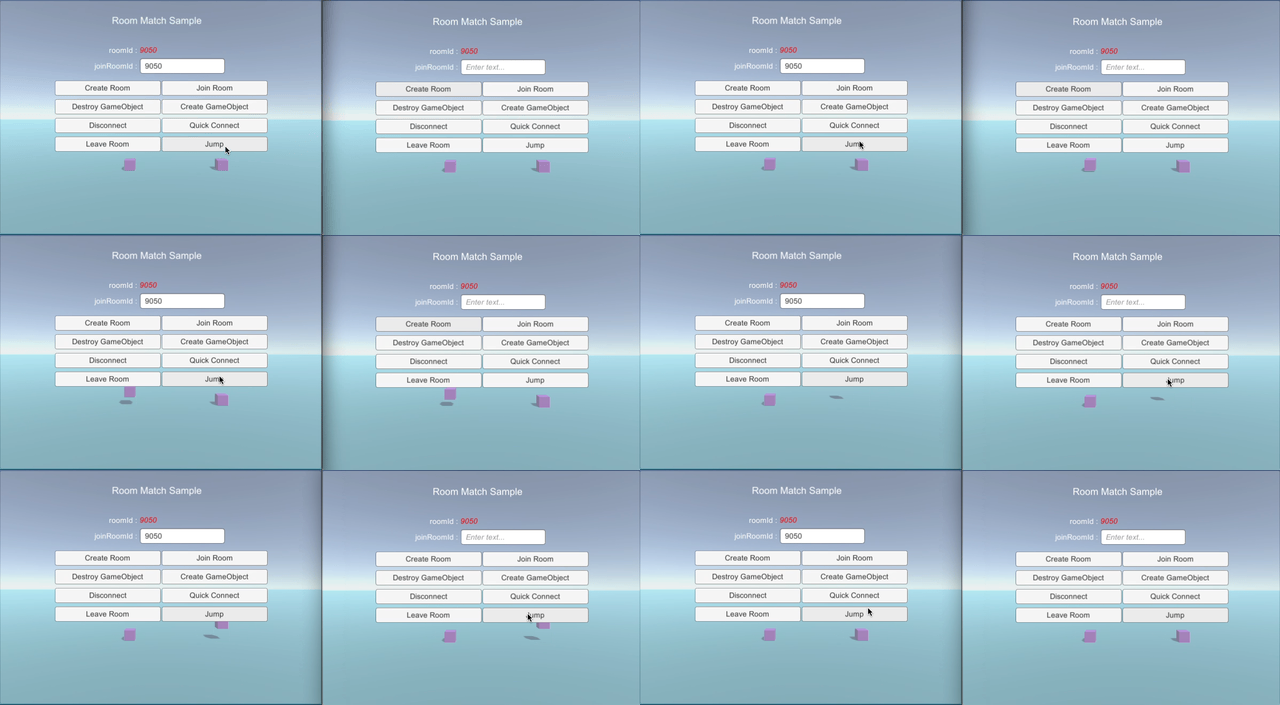
Rigidbody 동기화를 원하는 게임 오브젝트에 RigidbodySync 컴포넌트를 추가하면 동기화 게임 오브젝트의 Rigidbody가 동기화됩니다. Add Component > GameAnvil > GameAnvil Sync > RigidbodySync를 선택해 컴포넌트로 추가할 수 있습니다. Sync, TransformSync, Rigidbody 컴포넌트가 자동으로 함께 추가됩니다.
RigidbodySync 컴포넌트를 붙인 게임 오브젝트를 prefab으로 만든 뒤 Unity의 Assets/Resources 폴더 하위에 저장합니다.
방에 입장해서 SyncController의 Instantiate()를 통해서 해당 prefab을 생성한 다음 Rigidbody를 변화시켰을 때 다른 클라이언트에서도 모두 변화된 Rigidbody로 동기화되는 것을 확인할 수 있습니다.
Rigidbody 동기화 옵션
Rigidbody 중 동기화할 속성을 옵션에 따라 선택할 수 있습니다.

| 옵션 | 설명 |
|---|---|
| Synchronize Velocity | Velocity 속성 동기화 여부를 설정합니다. true면 Velocity 값을 동기화하고, false면 Velocity 값을 동기화하지 않습니다. |
| Synchronize Angular Velocity | Angular Velocity 속성 동기화 여부를 설정합니다. true면 Angular Velocity 값을 동기화하고, false면 Angular Velocity 값을 동기화하지 않습니다. |
| Teleport Enabled | Teleport 허용 여부를 설정합니다. |
| Teleport if distance greater than | 거리가 설정한 기준 이상으로 차이가 나면 Rigidbody의 Position에 동기화할 위치 값을 적용한 다음, Velocity 값을 이용해서 동기화합니다. |
| Teleport if angle greater than | 각도가 설정한 기준 이상으로 차이가 나면 Rigidbody의 Rotation에 동기화할 각도 값을 적용한 다음, Angular Velocity 값을 이용해서 동기화합니다. |
사용자 정의 값 동기화
int, float, bool, string 타입의 사용자 정의 값을 동기화하는 기능을 제공합니다.
사용자 정의 값 추가 또는 변경
SyncController.SetCustomProperty\<T>()로 사용자 정의 값을 추가 또는 변경할 수 있습니다. 함수 호출 시 사용자 정의 값의 타입을 지정해줍니다. 사용자 정의 값을 구분하기 위한 키를 string 타입의 매개변수로 전달합니다. 서버에서는 해당 사용자 정의 값 데이터를 저장하고, 같은 방의 모든 유저에게 브로드캐스트하여 동기화할 수 있도록 합니다.
/// <summary>
/// 사용자 정의 값을 추가합니다.
/// </summary>
/// <typeparam name="T">사용자 정의 값 타입</typeparam>
/// <param name="key">사용자 정의 값 구분용 키</param>
/// <param name="value">사용자 정의 값</param>
public static void SetCustomProperty<T>(string key, T value);
사용 예시를 살펴보겠습니다.
SyncController.SetCustomProperty<float>("custom_key", 0.9f);
사용자 정의 값이 최신 상태인지 확인 후 변경
SyncController.SetCustomPropertyCAS\<T>()를 호출하면 매개변수로 받은 사용자 정의 값 구분용 키, 변경하려는 사용자 정의 값과 더불어 기존에 클라이언트에 저장되어 있던 사용자 정의 값을 함께 패킷에 담아서 서버로 전송합니다.
그러면 서버에서는 기존에 클라이언트에 저장되어 있던 사용자 정의 값과 서버에 저장되어 있는 데이터에서 구분용 키로 얻어온 사용자 정의 값을 비교합니다.
만약 이 둘이 같으면 클라이언트의 사용자 정의 값이 최신 상태로 동기화되어 있었다고 판단하고 변경을 원한 값으로 대체해서 서버에 저장한 다음, 다른 유저에게도 브로드캐스트하여 동기화될 수 있도록 합니다.
만약 클라이언트와 서버에 각각 저장되어 있던 사용자 정의 값이 다른 경우 해당 요청을 무시합니다.
/// <summary>
/// 사용자 정의 값이 최신 상태인지 확인 후 변경
/// </summary>
/// <typeparam name="T">사용자 정의 값 타입</typeparam>
/// <param name="key">사용자 정의 값 구분용 키</param>
/// <param name="value">사용자 정의 값</param>
public static void SetCustomPropertyCAS<T>(string key, T value);
사용 예시를 살펴보겠습니다.
SyncController.SetCustomPropertyCAS<float>("custom_key", 0.9f);
사용자 정의 값 조회
SyncController.GetCustomProperty\<T>()로 사용자 정의 값을 조회할 수 있습니다. 함수 호출 시 사용자 정의 값의 타입을 지정합니다. 원하는 사용자 정의 값을 찾기 위해서 구분용 키를 string 타입의 매개변수로 전달합니다.
/// <summary>
/// 사용자 정의 값을 조회합니다.
/// </summary>
/// <typeparam name="T">사용자 정의 값 타입</typeparam>
/// <param name="key">사용자 정의 값 구분용 키</param>
/// <returns>사용자 정의 값</returns>
public static T GetCustomProperty<T>(string key);
사용 예시를 살펴보겠습니다.
float custom_value = SyncController.GetCustomProperty<float>("custom_key");
사용자 정의 값 삭제
SyncController.RemoveCustomProperty\<T>()로 사용자 정의 값을 삭제할 수 있습니다. 함수 호출 시 사용자 정의 값의 타입을 지정합니다. 원하는 사용자 정의 값을 찾기 위해서 구분용 키를 string 타입의 매개변수로 전달합니다. 서버에서도 저장했던 사용자 정의 값 데이터를 삭제합니다.
/// <summary>
/// 사용자 정의 값을 삭제합니다.
/// </summary>
/// <param name="key">사용자 정의 값 구분용 키</param>
public static void RemoveCustomProperty(string key)
사용 예시를 살펴보겠습니다.
SyncController.RemoveCustomProperty("custom_key");
Table of Contents
- Game > GameAnvil > Unity 기초 개발 가이드 > 동기화
- 동기화
- SyncController
- SyncController 생성
- 게임 오브젝트 생성/파괴 동기화, Sync
- Sync Id
- Create Option
- 게임 오브젝트 생성 동기화
- 방에 중입한 경우 게임 오브젝트 생성 동기화
- 게임 오브젝트 파괴 동기화
- Transform 동기화, TransformSync
- Transform 동기화 옵션
- Animation 동기화, AnimatorSync
- Rigidbody2D 동기화, Rigidbody2DSync
- Rigidbody2D 동기화 옵션
- Rigidbody 동기화, RigidbodySync
- Rigidbody 동기화 옵션
- 사용자 정의 값 동기화
- 사용자 정의 값 추가 또는 변경
- 사용자 정의 값이 최신 상태인지 확인 후 변경
- 사용자 정의 값 조회
- 사용자 정의 값 삭제