NHN Cloud > Console User Guide
NHN Cloud console serves as a management tool and task window for using NHN Cloud services. This document guides you through the basic setup and use of the NHN Cloud console.
NHN Cloud console provides the following features:
- Manage basic information to use services (organization, project)
- Enable/disable services
- Manage members who use services
- Provide billing information
Quick Guide
This is a quick guide to the basic features provided by the console.
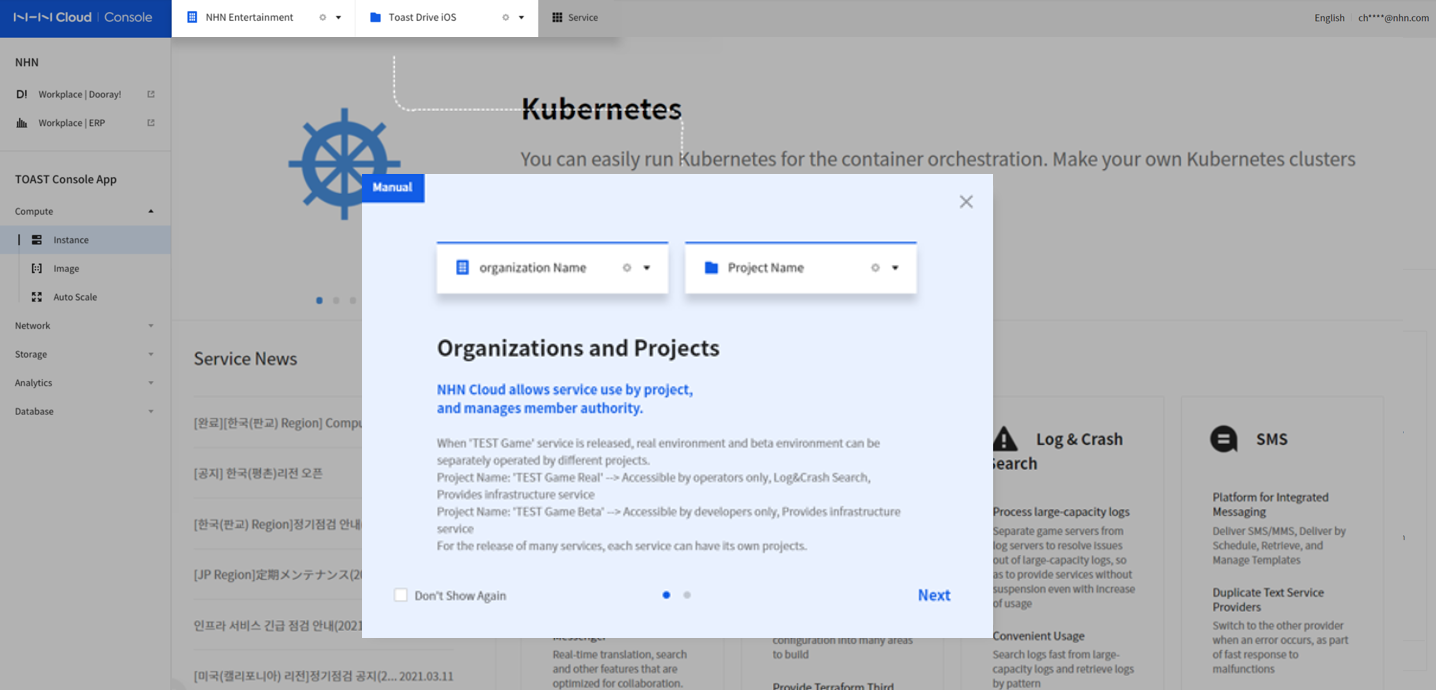
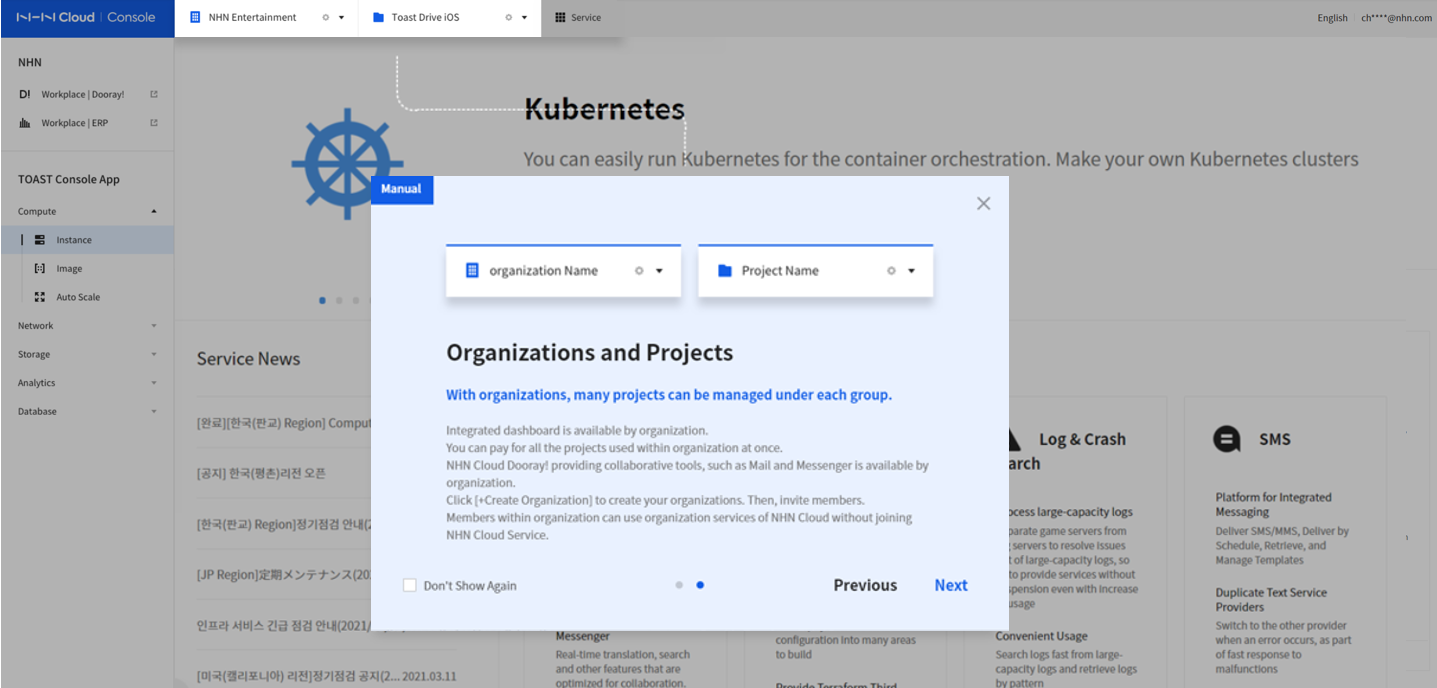
Organization Management
An organization is a group that is created to use and manage NHN Cloud services efficiently. In an organization, users can share and use the same service policy.
Create an Organization
- To use NHN Cloud services, an organization must be created.
- Both personal and business members can create organizations.
- A member who creates an organization automatically becomes the OWNER of the organization.
- To create an organization, a member's payment method must be registered.
- An organization manages organization name and domain information.
- Domain information of an organization must be unique, because it is required for use by services.
Guide to Creating an Organization
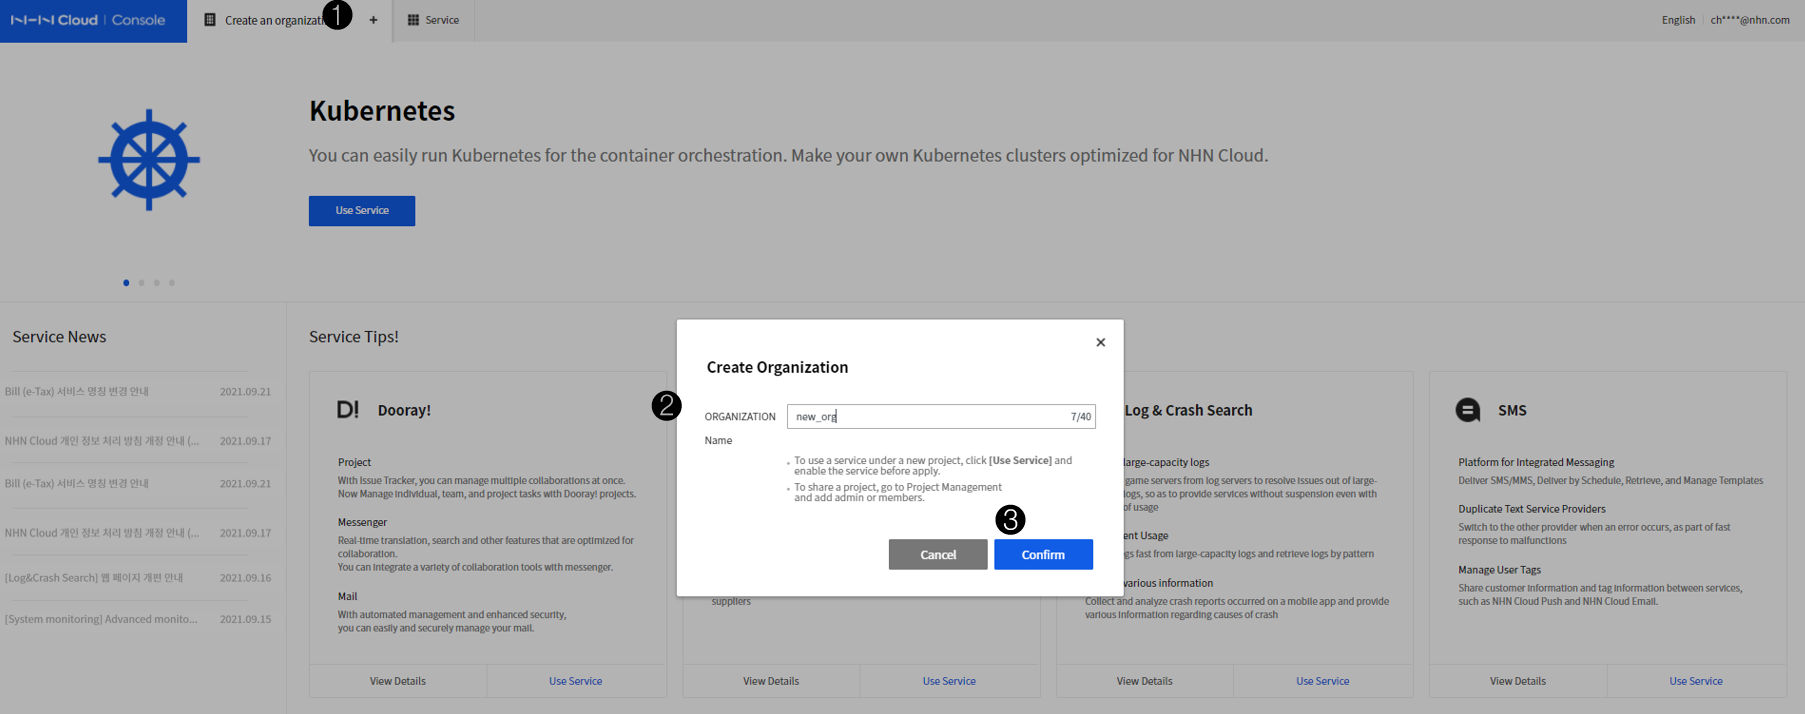

- Go to the console and click the + button next to Create an Organization in the top menu.
- In the Create Organization window, enter a name for your organization. The organization name can include Korean letters, English letters, special characters, and numbers.
- Click the OK button to complete the organization creation.
- The created organization name is displayed in the top menu of the console.
- Click the Settings button to check information of the created organization. Enter your domain information as additional information for your organization. The domain must be set as a unique value in NHN Cloud.
Organization Services
Once the organization is created, you can select services. Services that can be enabled for each organization include the following:
- Dooray!
- ERP
- Groupware
- Contact Center
- IDC
- CloudTrail
- Resource Watcher
Delete an Organization
- An organization can be deleted only by the OWNER of the organization.
- To delete an organization, all the services being used must be deleted.
- When an organization is deleted, all information of the organization is deleted and cannot be restored.
Organization Governance Setting
You can set and manage policies for stable and efficient use of NHN Cloud services. Set up a common organization policy for security compliance such as login and personal information, so that the members within the organization can comply with the policy.
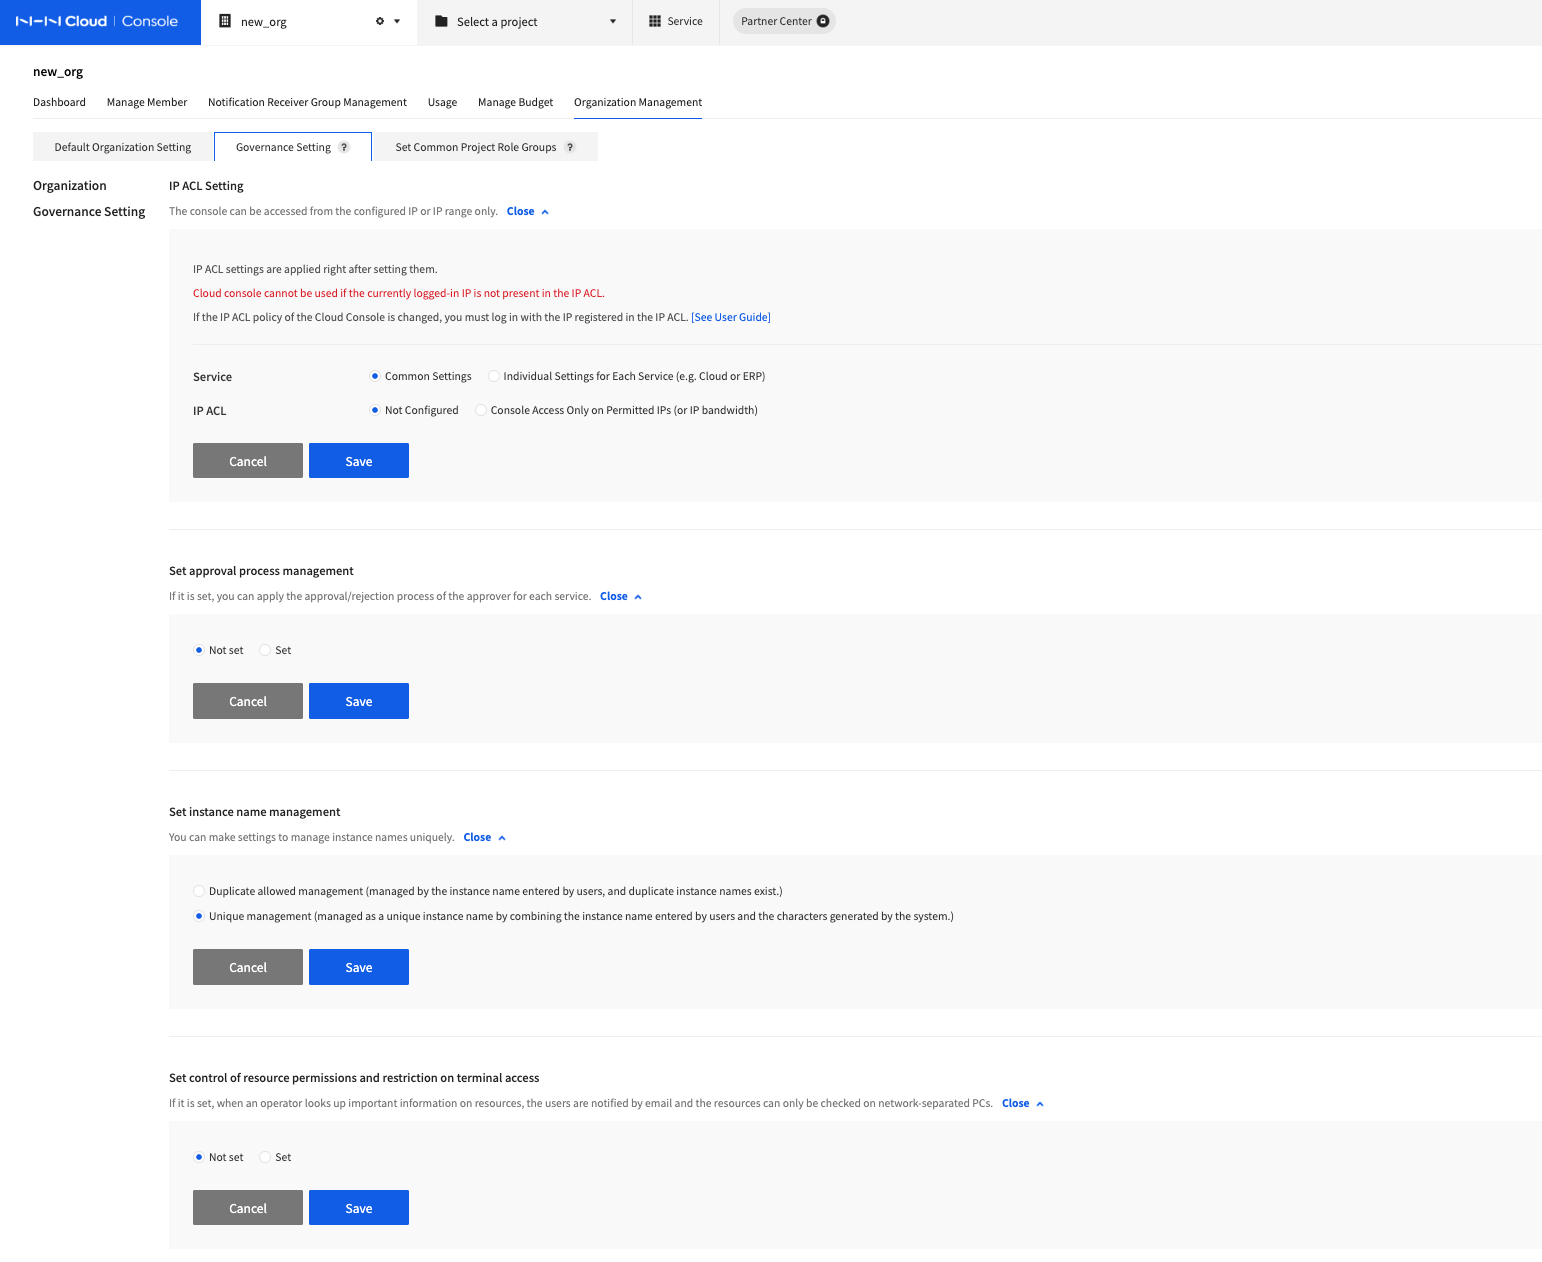
IP ACL Setting
When IP ACL is set, the console can be accessed from the allowed IPs (or IP range) only. For Dooray! services, IP ACL can be set on the service's console screen.
- Go to the console and access the Organization Management page of the organization you want to set up.
- Select Governance Setting from the submenu.
- You can set and manage IP ACL under Set IP ACL in the Organization Governance Setting.
- Service setting
- Common Settings: IP ACL can be set globally for all services.
- Individual Settings for Each Service: IP ACL can be set for each service (Cloud, Online Contact, etc.).
- IP ACL
- Not Configured: The console can be accessed from any IPs (or IP range).
- Console Access Only from Allowed IPs (or IP range): The console can be accessed only from the IPs (or IP range) you entered. Enter the IP or IP range to allow access.
- Service setting
Set approval process management
If you need an approval process when using a service, a feature to establish an approval process of the approver is provided for each service.
- You can select Not Set (Default) in Set approval process management.
- If you select Set in Set approval process management, you can use the approval process provided by each service.
- Services that provide an approval process
- Secure Key Manager
Set instance name management
When using the instance service, you can set instance name management rules.
- When selecting Duplicate allowed management, the instance name is managed as the name entered by the user, and duplicate instance names are allowed.
- When selecting Unique management, the instance name is managed as a unique instance name by combining the name entered by the user and the characters generated by the system.
Set control of resource permissions and restriction on terminal access
When an operator looks up important information on resources, the users are notified by email and the resources can only be checked on network-separated PCs.
- You can select Not Set (Default) in Set control of resource permissions and restriction on terminal access.
- If you select Set in Set control of resource permissions and restriction on terminal access, the operator is restricted from looking up resources.
IAM Governance Setting
Login Security Setting
- To strengthen the console access security of IAM members, Login Security Setting feature is provided.
-
You can set it globally for all organization services (Cloud, Online Contact, Dooray!, etc.), or set it differently for each service.
-
Go to the console and access the Organization Management page of the organization you want to set up.
- Select Governance Setting from the submenu.
- You can set and manage login security setting in IAM Governance Setting.
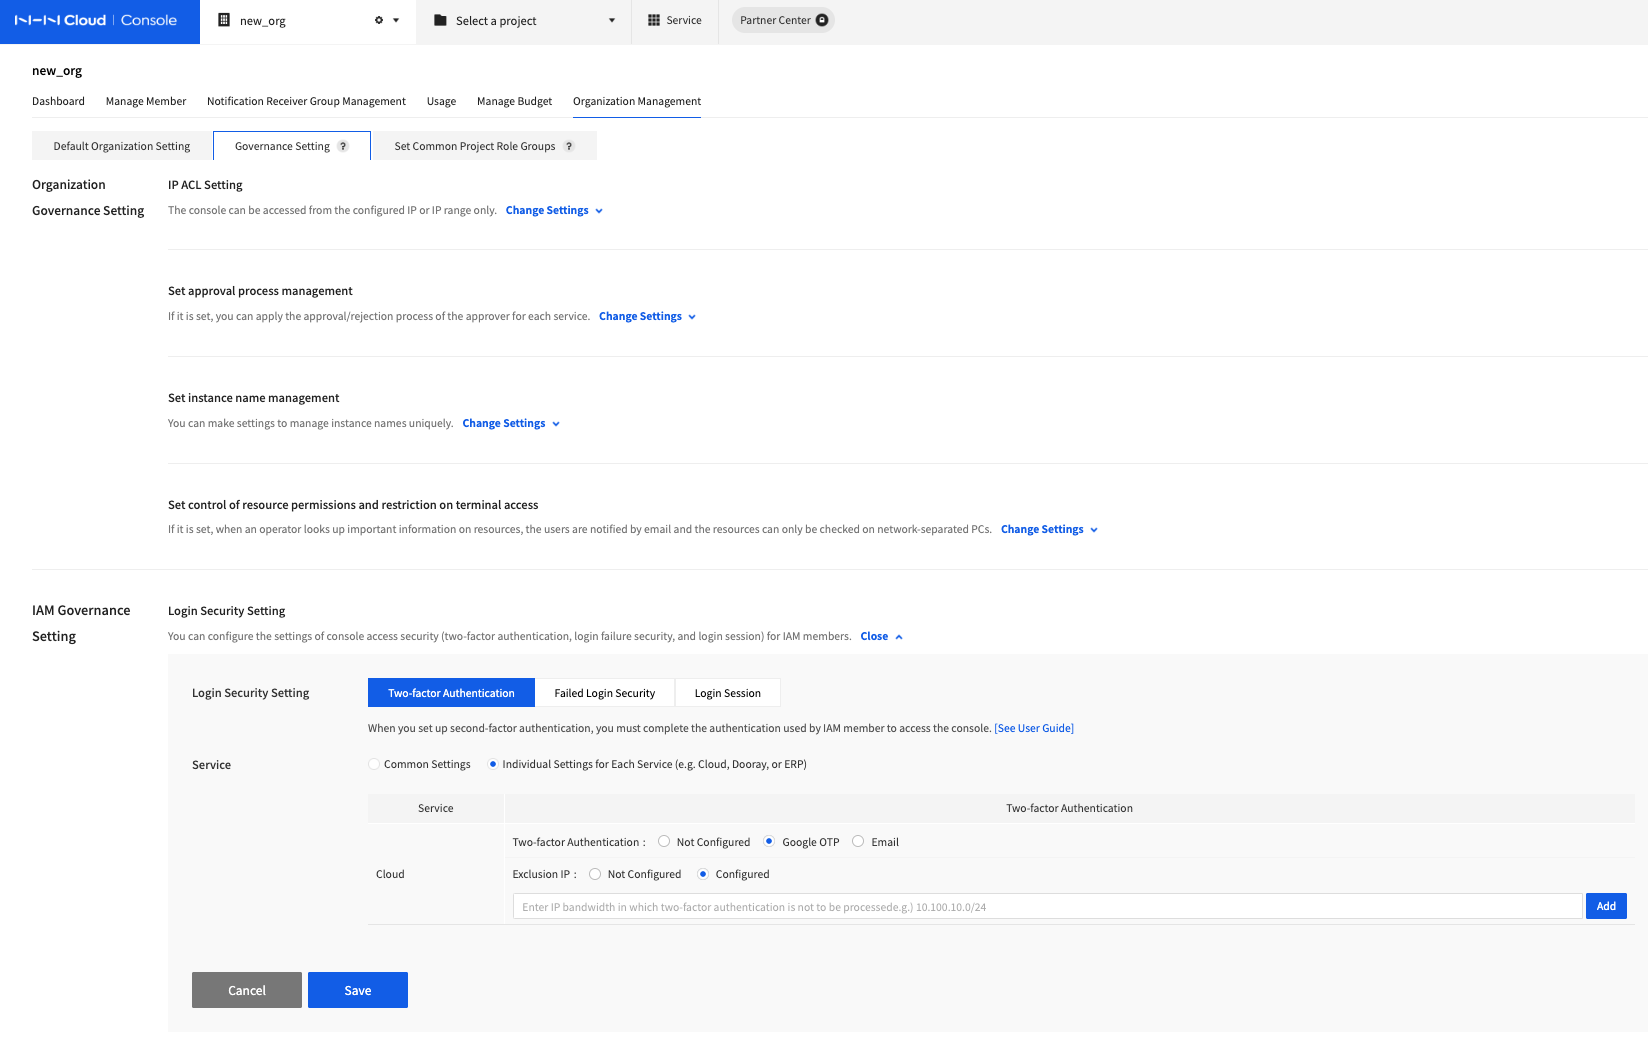
Two-factor Authentication
You can enable two-factor authentication by setting it as a required feature.
- Service setting
- Common Settings: Set the two-factor authentication globally for all organization services.
- Individual Settings for Each Service: You can set two-factor authentication differently for each service (Cloud, Online Contact, Dooray!, etc.).
- Two-factor Authentication setting
- Not Configured: Users can log in by entering their ID and password without two-factor authentication.
- Google OTP: After entering ID and password, users can log in by entering the One Time Password provided by the Google OTP app.
- Email: After entering ID and password, users can log in by clicking the Verify button sent to their email address for authentication.
- Exclusion IP setting
- Not Configured: When logging in, users can log in after two-factor authentication from all IP ranges.
- Configured: Users can log in without two-factor authentication when logging in from the configured IP or IP range.
Security for Failed Logins
You can adjust setting so that users can log in again after a certain period of time when they failed to log in repeatedly.
- Service setting
- Common Setting: Set the two-factor authentication globally for all organization services. (Individual Settings for Each Service is not provided)
- Failure Login Security setting
- Not Configured: Users can continue to try to log in even if login fails.
- Configured: If you enter the desired number of failures and lock time, if users fail to log in for the configured number of times, users will not be able to log in during the entered lock time.
Login Session
Depending on the login session setting, a login session will be maintained or expire automatically. After the login expires, the user must log in again to access the console.
- Service setting
- Common Setting: Set the two-factor authentication globally for all organization services. (Individual Settings for Each Service is not provided)
- Login Session Count
- Set the number of simultaneous logins with the same ID on multiple devices.
- If this is set to 1, users cannot log in with the same ID on other devices such as PC or smartphone at the same time. E.g.) PC - maintain login, Smartphone - automatically logged out
- Login Session Maintenance Time
- Set the amount of time to maintain login without any action such as clicking.
- If a user do not perform any actions such as clicking for a configured period of time, the user will be automatically logged out.
- Setting it too long is not good for security, so please consider setting it to an appropriate value.
Password Policy Settings
- To set passwords for IAM members, the Password Policy Settings is provided.
- The password policy is set the same for all organization services (Cloud, Online Contact, Dooray!, etc.).
- Go to IAM Governance Setting > Password Policy Settings to manage password policies.
- Default Password Policy
- Default password policy is provided as follows.
- Consists of at least 8 digits, including alphabets, numbers, and special characters.
- Case sensitive.
- Unable to use more than four consecutive letters or numbers (for example, 1111, 1234, abcd, etc.).
- Passwords must be changed every 90 days, and after 90 days, you'll be guided to change your password.
- Default password policy is provided as follows.
- User Password Policy
- Provides password policies that allow you to set minimum password length, password strength, password expiration, password reuse limit, and more.
- Minimum Password Length: Set the password minimum length to between 8 and 15 characters. (The maximum length is 15 characters.)
- Password Strength: Set the password strength using a combination of consecutive characters, uppercase, lowercase, numbers, special characters, and more.
- Password Expiration: Choose whether to expire the password, and set the length of time it expires upon setup, and whether it can be extended upon expiration.
- Restrict Password Reuse: Choose whether to restrict password reuse and set the number of reuse limits at setup by choosing between 1 and 3.
- When to Apply Password Policy: Set when the password policy is applied by selecting Apply on Password Change or Apply Immediately .
- If Apply on Password Change is selected, the new policy applies when an IAM member changes the password.
- If Apply Immediately is selected, the policy applies immediately after the password is set, making it the new policy at the time of IAM member login.
- Provides password policies that allow you to set minimum password length, password strength, password expiration, password reuse limit, and more.
- Default Password Policy
Project Common role Group Setting
You can create and manage role groups for common use in projects belonging to your organization. The configured role groups can be used to grant roles in bulk by selecting NHN Cloud members and IAM members in the project's role group management.
- After selecting Organization Setting, click the Project Common role Group Setting menu.
- Select Add role Group to add roles for each service.
- Enter the role group name, description, and add roles for each service.
- The role group name can include Korean letters, English letters, numbers, and special characters, and can contain up to 40 characters.
- Description is a additional description of the role group, and contain up to 100 characters.
- roles can be selected from Detailed Usage roles for Each Service.
- After searching for the service name on the left side, select the role on the right side.
- Check the selected role and add or delete the role.
- You can delete the selected service by clicking the x button next to the service name.
- Click the Add button to add a role group.
- When a role group is added, its name is displayed in the role group list. You can check the detailed role details by selecting the role group name.
- Clicking Add role leads you to the Add role Group screen in Step 3. You can add or delete roles.
Project Management
After creating an organization, you can create a project to use NHN Cloud services. In a project, you can enable project services and use them. Project services are used on a per-project basis and are billed accordingly.
Create a Project
- To create a project, you need to create an organization.
- A member who creates a project has ADMIN role for the project.
- When creating a project, enter the project name and project description.
- After creating a project, you can enable project services and use them.
- After creating a project, if collaboration is required, you can add project members to share the project.
Guide to Creating a Project

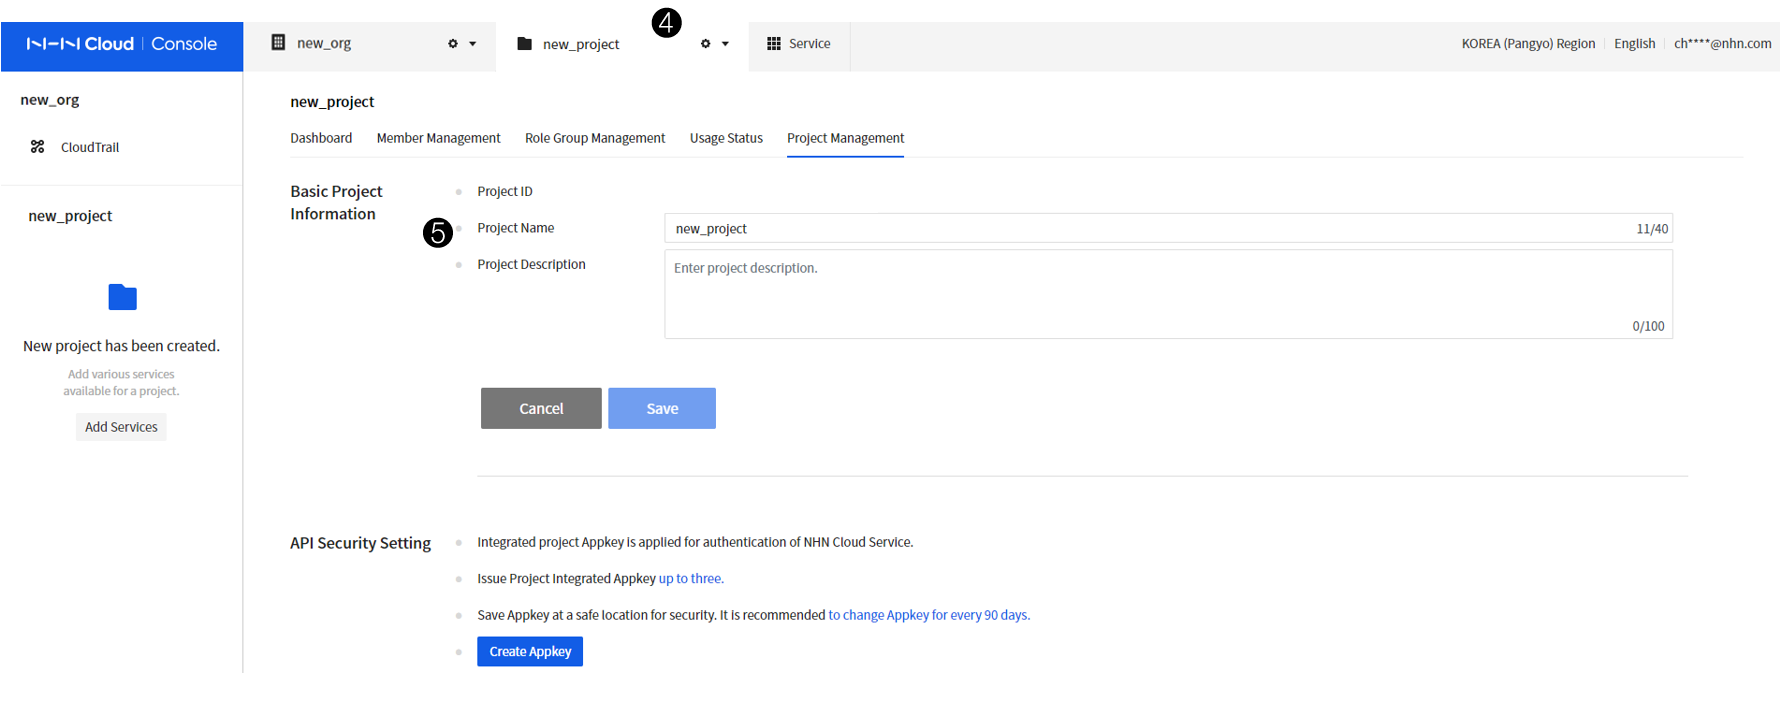
- After an organization is created, a Create New Project button is enabled. Click the Create New Project button to create a project.
- Enter Project Name and Project Description.
- Click Confirm to create a project.
- The project name is displayed on the console menu when the project is created.
- Click the Project Settings button to check project information.
Project Services
Once the project is created, you can select services. Services that can be enabled for each project include the following:
- Compute
- Container
- Network
- Storage
- Database
- Hybrid & Private Cloud
- Game
- Security
- Content Delivery
- Notification
- AI Service
- Machine Learning
- Application Service
- Mobile Service
- Search
- Data & Analytics
- Dev Tools
- Management
- Bill
Guide to Enabling Project Services
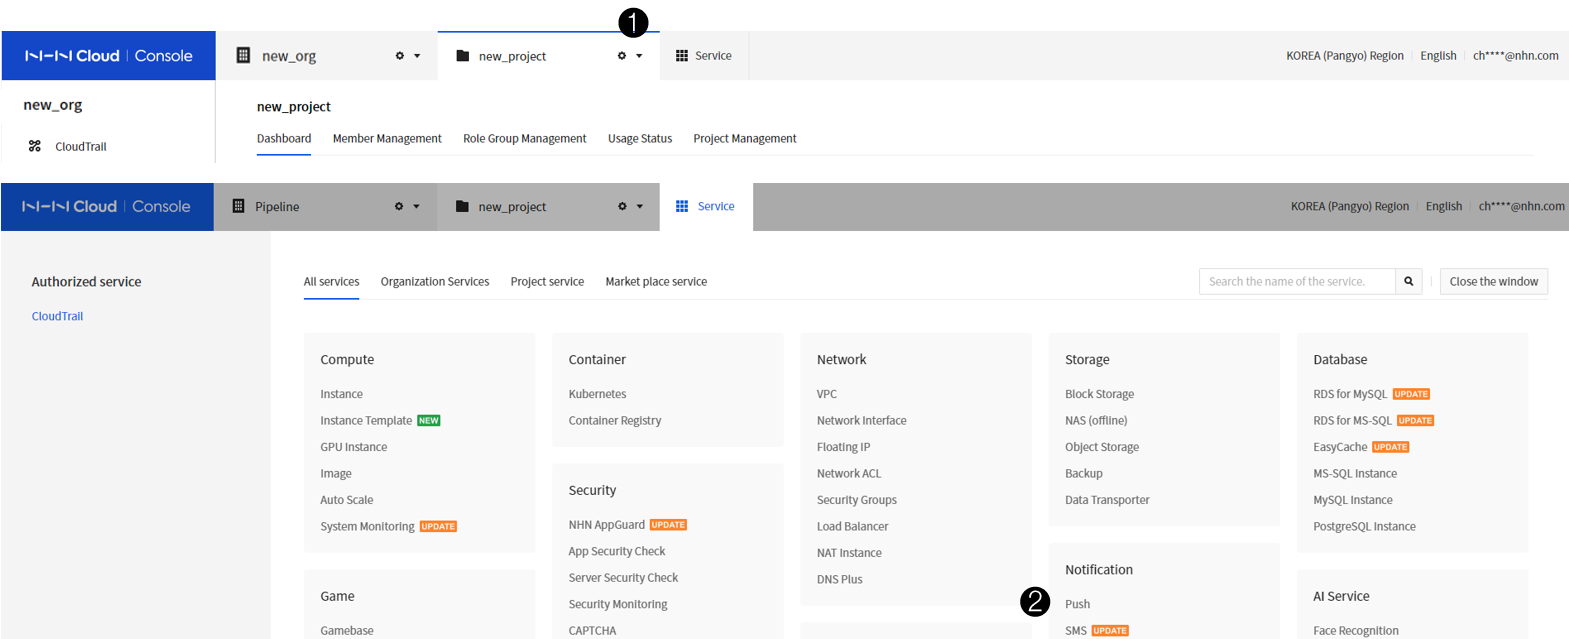

- After creating a project, click the Select Service button to select the service to be used in the project.
- On the Select Service screen, select the service you want to enable. When prompted to enable the service, click Confirm.
- A list of enabled services can be found in the menu on the left side of the console. Click the desired service from the list to display the service page.
Delete a Project
A project can be deleted if there is no service in use in the project. When a project is deleted, all resources of the project are deleted and cannot be restored. You can immediately pay for and delete the usage history for all the resources you have used so far. However, if you delete the project without paying immediately, the bills used so far will be automatically charged on the next billing date.
Member Management
Member management allows you to control per-user authentication (login) and authorization. You can manage members separately in projects and organizations. Members are classified into NHN Cloud members and IAM members.
Policy for NHN Cloud Members and IAM Members
| Classification | NHN Cloud Members | IAM Members |
|---|---|---|
| Definition | - Members for organization management - NHN Cloud members who consent to Terms of Use and hence are responsible and obligated for the service use - The members are valid throughout the whole NHN Cloud services and remain as NHN Cloud members even if their organizations are deleted. |
- Members for the service use - Members who do not consent to the Terms of Use - Members who are valid only within their organizations, and to be disqualified if their organizations are deleted |
| Method of Member Registration | - Owner/Admin of an organization enters NHN Cloud ID for registration | - Owner/Admin of an organization enters unique ID for registration - Register via SSO or API integration |
| Member role | - Manage organizations (Create/Modify organizations / Manage organization members / Manage organization services /Manage billing) - Create projects - Delete projects |
- Use organization services |
| Console Access | - Access NHN Cloud console(https://console.nhncloud.com/) - NHN Cloud > Log in with member ID/password - (optional) Two-factor (email or SMS) authentication |
- IAM console (https://{organization domain}.console.nhncloud.com/) access - Access Dooray! and ERP service with the service domain - Log in with ID/PW set by the organization's OWNER (or ADMIN) - Authenticate with login security set by the organization (two-factor authentication, settings per service) |
Organization Members
- The OWNER of the organization can grant full control of the account and apply for services.
- OWNER can register members and grant management role for each organization.
Organization role of NHN Cloud Members
| Task | Role | OWNER | ADMIN | MEMBER | Billing Viewer | Log Viewer |
|---|---|---|---|---|---|---|
| Manage Organizations | Create Organizations | O | ||||
| Modify Organizations | O | O | ||||
| Delete Organizations | O | |||||
| Manage Members | Register Organization Members | O | O | |||
| Delete Organization Members | O | O | ||||
| Manage Services | Enable Organization Services | O | O | |||
| Disable Organization Services | O | O | ||||
| Manage Billing | Query Bills | O | ||||
| Status of Service Use | O | O | O | |||
| Manage Projects | Create Projects | O | O | O | ||
| Delete Projects | O | O | ||||
| Manage User Action Log | Query User Action Logs | O | O | O |
Organization role of IAM Members
- roles that can be set are different for each organization service (Online Contact, Dooray!, etc.).
- Cloud service roles are as follows.
| Task | Role | ADMIN | MEMBER | Billing Viewer | Log Viewer |
|---|---|---|---|---|---|
| Manage Organizations | Modify Organizations | O | |||
| Manage Members | Register Organization Members | O | |||
| Delete Organization Members | O | ||||
| Manage Services | Enable Organization Services | O | |||
| Disable Organization Services | O | ||||
| Status of Service Use | O | O | |||
| Manage Projects | Create Projects | O | O | ||
| Delete Projects | O | ||||
| Manage User Action Log | Query User Action Logs | O | O |
Project Members
A user can become a member of a project even if the user is not a member of an organization. You can grant multiple required roles to project members.
Project Management roles
| Role | Description |
|---|---|
| ADMIN | Create/Read/Update/Delete for the entire project |
| MARKETPLACE_ADMIN | Marketplace Create, Read, Update, and Delete Services |
| MARKETPLACE_VIEWER | Marketplace Read |
| MEMBER | Create/Read/Update/Delete for all services in the project |
| BILLING VIEWER | Read for usage status |
| PROJECT MANAGEMENT ADMIN | Update for project's basic information Create/Read/Update/Delete for project's integrated Appkey Enable/Disable project services Delete for projects |
| PROJECT MANAGEMENT VIEWER | Read for project's basic information Read for project's integrated Appkey |
| PROJECT MEMBER ADMIN | Create/Read/Update/Delete for project members Create/Read/Update/Delete for project's role groups |
| PROJECT MEMBER VIEWER | Read for project members Read for project's role groups |
| PROJECT NOTICE GROUP MANAGEMENT ADMIN | Create/Read/Update/Delete for project's Notification Receiver Group Management Read for project members Read for project's role groups |
| PROJECT NOTICE GROUP MANAGEMENT VIEWER | Read for project's Notification Receiver Group Management Read for project's role groups |
| PROJECT NOTICE MANAGEMENT ADMIN | Create/Read/Update/Delete for project's Notification Management Read for project members Read for project's role groups |
| PROJECT NOTICE MANAGEMENT VIEWER | Read for project's Notification Management Read for project's role groups |
| PROJECT API SECURITY SETTING ADMIN | Create/Read/Update/Delete for project's API Security Setting |
| PROJECT QUOTA MANAGEMENT ADMIN | Create/Read/Update/Delete for project's Quota Management |
| PROJECT QUOTA MANAGEMENT VIEWER | Read for project's Quota Management |
Permissions by Project Management Feature
| Tab | Available Action by Feature | Project Management ROLE | Service Use ROLE |
|---|---|---|---|
| Dashboard | Read | ADMIN MEMBER PROJECT MANAGEMENT ADMIN PROJECT MANAGEMENT VIEWER MARKETPLACE_ADMIN MARKETPLACE_VIEWER |
Service ADMIN Service PERMISSION Service VIEWER |
| Member Management | Read | ADMIN PROJECT MEMBER ADMIN PROJECT MEMBER VIEWER PROJECT NOTICE GROUP MANAGEMENT ADMIN |
No Permission |
| Create/Update/Delete | ADMIN PROJECT MEMBER ADMIN |
No Permission | |
| Role Group Management | Role Group Read | ADMIN PROJECT MEMBER ADMIN PROJECT MEMBER VIEWER PROJECT NOTICE GROUP MANAGEMENT ADMIN |
No Permission |
| Role Group Create/Update/Delete | ADMIN PROJECT MEMBER ADMIN |
No Permission | |
| Role Group Member Tab Read | ADMIN PROJECT MEMBER ADMIN PROJECT MEMBER VIEWER PROJECT NOTICE GROUP MANAGEMENT ADMIN |
No Permission | |
| Role Group Member Tab Create/Update/Delete | ADMIN PROJECT MEMBER ADMIN |
No Permission | |
| Role Group Role Tab Read | ADMIN PROJECT MEMBER ADMIN PROJECT MEMBER VIEWER PROJECT NOTICE GROUP MANAGEMENT ADMIN |
No Permission | |
| Role Group Role Tab Create/Update/Delete | ADMIN PROJECT MEMBER ADMIN |
No Permission | |
| Notification Receiver Group Management | Read | ADMIN PROJECT MANAGEMENT ADMIN PROJECT MANAGEMENT VIEWER PROJECT NOTICE GROUP MANAGEMENT ADMIN PROJECT NOTICE GROUP MANAGEMENT VIEWER |
No Permission |
| Create/Update/Delete | ADMIN PROJECT MANAGEMENT ADMIN PROJECT NOTICE GROUP MANAGEMENT ADMIN |
No Permission | |
| Notification Management | Read | ADMIN MEMBER PROJECT MANAGEMENT ADMIN PROJECT MANAGEMENT VIEWER PROJECT NOTICE GROUP MANAGEMENT ADMIN PROJECT NOTICE MANAGEMENT ADMIN PROJECT MANAGEMENT VIEWER |
Service ADMIN Service VIEWER |
| Create/Update/Delete | ADMIN MEMBER PROJECT MANAGEMENT ADMIN PROJECT NOTICE MANAGEMENT ADMIN |
Service ADMIN | |
| Usage Status | Read | ADMIN BILLING VIEWER |
No Permission |
| Project Management | Basic Project Information Read | ADMIN MEMBER PROJECT MANAGEMENT ADMIN PROJECT MANAGEMENT VIEWER PROJECT MEMBER ADMIN PROJECT MEMBER VIEWER BILLING VIEWER MARKETPLACE_ADMIN MARKETPLACE_VIEWER PROJECT NOTICE GROUP MANAGEMENT ADMIN PROJECT NOTICE GROUP MANAGEMENT VIEWER PROJECT API SECURITY SETTING ADMIN |
Service PERMISSION |
| Basic Project Information Create/Update/Delete | ADMIN PROJECT MANAGEMENT ADMIN |
No Permission | |
| API Security Setting Read | ADMIN PROJECT MANAGEMENT ADMIN PROJECT MANAGEMENT VIEWER MEMBER PROJECT API SECURITY SETTING ADMIN |
Service PERMISSION | |
| API Security Setting Create/Update/Delete | ADMIN MEMBER PROJECT MANAGEMENT ADMIN PROJECT API SECURITY SETTING ADMIN |
No Permission | |
| Service in Use(Disable) Read | ADMIN MEMBER PROJECT MANAGEMENT ADMIN PROJECT MANAGEMENT VIEWER MARKETPLACE_ADMIN MARKETPLACE_VIEWER |
Service PERMISSION | |
| Service in Use(Disable) Create/Update/Delete | ADMIN PROJECT MANAGEMENT ADMIN(Cannot disable for marketplace service) MARKETPLACE_ADMIN(Cannot disable for project service) |
Service PERMISSION | |
| Delete Project Read | ADMIN MEMBER PROJECT MANAGEMENT ADMIN PROJECT MANAGEMENT VIEWER PROJECT MEMBER ADMIN PROJECT MEMBER VIEWER BILLING VIEWER MARKETPLACE_ADMIN MARKETPLACE_VIEWER |
Service PERMISSION | |
| Delete Project Create/Update/Delete | ADMIN PROJECT MANAGEMENT ADMIN |
No Permission | |
| Quota Management | Read | ADMIN MEMBER PROJECT MANAGEMENT ADMIN PROJECT MANAGEMENT VIEWER PROJECT QUOTA MANAGEMENT ADMIN PROJECT QUOTA MANAGEMENT VIEWER |
Service ADMIN Service VIEWER |
| Request Quota Adjustment | ADMIN MEMBER PROJECT MANAGEMENT ADMIN PROJECT QUOTA MANAGEMENT ADMIN |
Service ADMIN |
Service Use roles
| Service | Role | Description |
|---|---|---|
| Infrastructure | ADMIN | Create/Read/Update/Delete for Infrastructure Service |
| Infrastructure | MEMBER | Read for VPC, Subnet, Network Interface, Routing, Network ACL, Internet Gateway, Peering Gateway, Colocation Gateway, NAT Gateway, VPC Gateway(Site-to-Site VPN), Service Gateway, Security Group, Load Balancer, NHN Kubernetes Service(NKS), NHN Container Service(NCS), Traffic mirroring Services. Create/Read/Update/Delete for Other services |
| Infrastructure | Load Balancer ADMIN | Read for VPC, Subnet, Network Interface, Routing, Network ACL, Internet Gateway, Peering Gateway, Colocation Gateway, NAT Gateway, VPC Gateway(Site-to-Site VPN), Service Gateway, Security Group, NHN Container Service(NCS), Traffic mirroring Services. Create/Read/Update/Delete for Other services |
| Infrastructure | Security Group ADMIN | Read for VPC, Subnet, Network Interface, Routing, Network ACL, Internet Gateway, Peering Gateway, Colocation Gateway, NAT Gateway, VPN Gateway(Site-to-Site VPN), Service Gateway, Load Balancer, NHN Kubernetes Service(NKS), NHN Container Service(NCS), Traffic mirroring Services. Create/Read/Update/Delete for Other services |
| Infrastructure | Routing ADMIN | Read for VPC, Subnet, Network Interface, Network ACL, Internet Gateway, Peering Gateway, Colocation Gateway, NAT Gateway, VPN Gateway(Site-to-Site VPN), Service Gateway, Security Group, Load Balancer, NHN Kubernetes Service(NKS), NHN Container Service(NCS), Traffic mirroring Services. Create, Read, Update, or Delete for the other services. |
| Infrastructure | NAT Gateway ADMIN | Read for VPC, Subnet, Network Interface, Routing, Network ACL, Internet Gateway, Peering Gateway, Colocation Gateway, VPN Gateway(Site-to-Site VPN), Service Gateway, Security Group, Load Balancer, NHN Kubernetes Service(NKS), NHN Container Service(NCS), Traffic mirroring Services. Create, Read, Update, or Delete for the other services. |
| Infrastructure | Service Gateway ADMIN | Read for VPC, Subnet, Network Interface, Routing, Network ACL, Internet Gateway, Peering Gateway, Colocation Gateway, NAT Gateway, VPN Gateway(Site-to-Site VPN), Security Group, Load Balancer, NHN Kubernetes Service(NKS), NHN Container Service(NCS), Traffic mirroring Services. Create, Read, Update, or Delete for the other services. |
| Infrastructure | NCS ADMIN | Read for VPC, Subnet, Network Interface, Routing, Network ACL, Internet Gateway, Peering Gateway, Colocation Gateway, NAT Gateway, VPC Gateway(Site-to-Site VPN), Service Gateway, Security Group, Load Balancer, NHN Kubernetes Service(NKS), Traffic mirroring Services. Create/Read/Update/Delete for Other services |
| Virtual Desktop | ADMIN | Create/Read/Update/Delete for Virtual Desktop Service |
| NHN Container Registry (NCR) | ADMIN | Create/Read/Update/Delete for NHN Container Registry (NCR) Service |
| NHN Container Registry (NCR) | VIEWER | Read for NHN Container Registry (NCR) Service |
| NHN Container Registry (NCR) | IMAGE UPLOADER | Read for NHN Container Registry (NCR), Upload Image, Create Artifact, Create Tag |
| DNS Plus | ADMIN | Create/Read/Update/Delete for DNS Plus Service |
| DNS Plus | VIEWER | Read for DNS Plus Service |
| Object Storage | ADMIN | Create/Read/Update/Delete for Object Storage Service |
| Backup | ADMIN | Create/Read/Update/Delete for Backup Service |
| RDS for MySQL | ADMIN | Create/Read/Update/Delete for RDS for MySQL Service |
| RDS for MySQL | VIEWER | Read for RDS for MySQL Service |
| RDS for MariaDB | ADMIN | Create/Read/Update/Delete for RDS for MariaDB Service |
| RDS for MariaDB | VIEWER | Read for RDS for MariaDB Service |
| RDS for MS-SQL | ADMIN | Create/Read/Update/Delete for RDS for MS-SQL Service |
| EasyCache | ADMIN | Create/Read/Update/Delete for EasyCache Service |
| EasyCache | VIEWER | Read for EasyCache Service Replication Group menu, Read for Monitoring menu |
| Gamebase | ADMIN | Create/Read/Update/Delete for Gamebase Service |
| Gamebase | ANALYTICS VIEWER - ALL | Read for all metrics |
| Gamebase | ANALYTICS VIEWER - EXCLUDING SALES | Read for all metrics except sales |
| Gamebase | ANALYTICS VIEWER - ONLY REAL-TIME | Read for real-time metrics |
| Gamebase | APP ADMIN | Create, Read, Update, Delete for APP menu |
| Gamebase | APP VIEWER | Read for APP menu |
| Gamebase | BAN ADMIN | Create, Read, Update, Delete for Suspended menu |
| Gamebase | BAN VIEWER | Read for Suspended menu |
| Gamebase | COUPON ADMIN | Create, Read, Update, Delete for Coupon menu |
| Gamebase | COUPON VIEWER | Read for Coupon menu |
| Gamebase | CS ADMIN | Create, Read, Update, Delete for Customer Center menu |
| Gamebase | CS INQUIRY SUPPORT | Read, Update for Contact Customer Center menu, Read for member menu |
| Gamebase | IAP ADMIN | Create, Read, Update, Delete for Purchase menu |
| Gamebase | IAP VIEWER | Read for Purchase menu |
| Gamebase | LEADERBOARD ADMIN | Create, Read, Update, Delete for Leaderboard menu |
| Gamebase | LEADERBOARD VIEWER | Read for Leaderboard menu |
| Gamebase | MANAGEMENT ADMIN | Create, Read, Update, Delete for Admin menu |
| Gamebase | MEMBER ADMIN | Create, Read, Update, Delete for Member menu |
| Gamebase | MEMBER VIEWER | Read for Member menu |
| Gamebase | MEMBER FILE DOWNLOAD | Read and Download for menus including Metrics, Sales, Members |
| Gamebase | OPERATION ADMIN | Create, Read, Update, Delete for Operation menu |
| Gamebase | OPERATION VIEWER | Read for Operation menu |
| Gamebase | PUSH ADMIN | Create, Read, Update, Delete for Push menu |
| Gamebase | PUSH VIEWER | Read for Push Menu |
| GameAnvil | ADMIN | GameAnvil Create, Read, Update, and Delete Services |
| GameAnvil | MEMBER | GameAnvil Read Service. Create, Read, Update, or Delete for Monitoring menu |
| GameAnvil | VIEWER | GameAnvil Read Services |
| GameStarter | ADMIN | Create, Read, Update for menus game settings, distribution |
| GameStarter | VIEWER | Read for menus game settings, distribution |
| Leaderboard | ADMIN | Create/Read/Update/Delete for Leaderboard Service |
| Leaderboard | VIEWER | Read for Leaderboard Service |
| Launching | ADMIN | Create/Read/Update/Delete for Launching Service |
| Smart Downloader | ADMIN | Create/Read/Update/Delete for Smart Downloader Service |
| NHN AppGuard | ADMIN | Create/Read/Update/Delete for NHN AppGuard Service |
| Server Security Check | ADMIN | Create/Read/Update/Delete for Server Security Check Service |
| Security Monitoring | ADMIN | Create/Read/Update/Delete for Security Monitoring Service |
| CAPTCHA | ADMIN | Create/Read/Update/Delete or CAPTCHA Service |
| WEB Firewall | ADMIN | Create/Read/Update/Delete for WEB Firewall Service |
| Vaccine | ADMIN | Create/Read/Update/Delete for Vaccine Service |
| Secure Key Manager | ADMIN | Create/Read/Update/Delete for Secure Key Manager Service |
| Secure Key Manager | APPROVAL ADMIN | Approve/deny/query,create/query for approval requests for Secure Key Manager Service |
| Secure Key Manager | APPROVAL MEMBER | Create/query for approval requests for Secure Key Manager Service |
| Secure Key Manager | VIEWER | Read for Secure Key Manager Service |
| Security Compliance | ADMIN | Create/Read/Update/Delete for Security Compliance Service |
| Webshell Threat Detector | ADMIN | Create/Read/Update/Delete for Webshell Threat Detector Service |
| Security Advisor | ADMIN | Create/Read/Update/Delete for Security Advisor Service |
| Security Advisor | VIEWER | Read for Security Advisor Service |
| Network Firewall | ADMIN | Create/Read/Update/Delete for Network Firewall Service |
| Network Firewall | VIEWER | Read for Network Firewall Service |
| CDN | ADMIN | Create/Read/Update/Delete for CDN Service |
| Image Manager | ADMIN | Create/Read/Update/Delete pfor Image Manager Service |
| Push | ADMIN | Create/Read/Update/Delete for Push Service |
| SMS | ADMIN | Create/Read/Update/Delete for SMS Service |
| SMS | SEND ADMIN | Create/Read in Deliver SMS |
| SMS | DELIVERY RESULT ADMIN | Read in Retrieve by SMS Request, Create Download Search Result, Read in Retrieve Bulk SMS Delivery, Create Download Retrieve Result, Read in Retrieve Tagged SMS Delivery, Create Download Retrieve Result |
| SMS | SETTING ADMIN | Create/Read/Update/Delete in Manage Templates, Create/Read/Update/Delete in Preregistration Outgoing Numbers, Read in Retrieve Outgoing Number, Create/Read/Update/Delete in Manage Tags, Create/Read/Update/Delete in Manage UIDs, Create/Read/Update/Delete in Manage Webhooks, Create/Read/Update/Delete in Set 080 Call Rejects, Create/Read/Update/Delete in Delivery Setting, Create/Read/Update/Delete in Statistics Event Key |
| SMS | STATISTICS ADMIN | Read in Statistics, Create Download Search Result |
| RCS Bizmessage | ADMIN | Create/Read/Update/Delete for RCS Bizmessage Service |
| ADMIN | Create/Read/Update/Delete for Email Service | |
| SEND ADMIN | Create/Read in Deliver Mails | |
| DELIVERY RESULT ADMIN | Read in Retrieve by Mail Request, Create Download Search Result, Read in Retrieve Scheduled Mail Delivery, Create Download Search Result, Read in Retrieve Bulk Mail Delivery, Create Download Search Result, Read in Retrieve Tagged Mail Delivery, Create Download Search Result | |
| SETTING ADMIN | Create/Read/Update/Delete in Manage Templates, Create/Read/Update/Delete in Manage Call Rejects, Create/Read/Update/Delete in Manage Mail Domains, Create/Read/Update/Delete in Manage Tags, Create/Read/Update/Delete in Manage UIDs, Create/Read/Update/Delete in Delivery Setting, Create/Read/Update/Delete in Manage Webhooks | |
| STATISTICS ADMIN | Read in Retrieve Statistics, Create Download Search Result | |
| KakaoTalk Bizmessage | ADMIN | Create/Read/Update/Delete for KakaoTalk Bizmessage Service |
| KakaoTalk Bizmessage | SEND ADMIN | (AlimTalk) Create/Read in Send, (FriendTalk)Create/Read in Send |
| KakaoTalk Bizmessage | DELIVERY RESULT ADMIN | (AlimTalk) Read Query Delivery Result in KakaoTalk Bizmessage, Create Download Search Result, (AlimTalk) Read in Query Mass Delivery, Create Download Search Result, (FriendTalk)Read in Query Delivery Result, Create Download Search Result, (FriendTalk)Read in Query Mass Delivery, Create Download Search Result |
| KakaoTalk Bizmessage | SETTING ADMIN | Create/Read/Update/Delete in Manage Senders, (AlimTalk) Create/Read/Update/Delete in Manage Templates, (AlimTalk) Create/Read/Update/Delete in Manage Alternative Delivery, (AlimTalk) Create/Read/Update/Delete in Manage sender profile group, (FriendTalk)Create/Read/Update/Delete in Manage Images, (FriendTalk)Create/Read/Update/Delete in Manage Alternative Delivery |
| KakaoTalk Bizmessage | STATISTICS ADMIN | Read in Statistics, Create Download Search Result |
| Face Recognition | ADMIN | Create/Read/Update/Delete for Face Recognition Service |
| AI Fashion | ADMIN | Create/Read/Update/Delete for AI Fashion Service |
| OCR | ADMIN | Create/Read/Update/Delete for OCR |
| Text to Speech | ADMIN | Create/Read/Update/Delete for Text to Speech |
| Speech to Text | ADMIN | Create/Read/Update/Delete for Speech to Text |
| Pose Estimation | ADMIN | Create/Read/Update/Delete for Pose Estimation |
| AI EasyMaker | ADMIN | Create/Read/Update/Delete for AI EasyMaker |
| Maps | ADMIN | Create/Read/Update/Delete for Maps Service |
| ROLE | ADMIN | Create/Read/Update/Delete for ROLE Service |
| API Gateway | ADMIN | Create/Read/Update/Delete for API Gateway Service |
| RTCS | ADMIN | Create/Read/Update/Delete for RTCS Service |
| ShortURL | ADMIN | Create/Read/Update/Delete for ShortURL Service |
| File-Crafter | ADMIN | Create/Read/Update/Delete for File-Crafter Service |
| IAP | ADMIN | Create/Read/Update/Delete for IAP Service |
| Mobile Device Info | ADMIN | Create/Read/Update/Delete for Mobile Device Info Service |
| Cloud Search | ADMIN | Create/Read/Update/Delete for Cloud Search Service |
| Autocomplete | ADMIN | Create/Read/Update/Delete for AutocompleteService |
| Corporation Search | ADMIN | Create/Read/Update/Delete for Corporation Search Service |
| Word Suggestion | ADMIN | Create/Read/Update/Delete for Word Suggestion Service |
| Log & Crash Search | ADMIN | Create/Read/Update/Delete for Log & Crash Search Service |
| DataFlow | ADMIN | Create/Read/Update/Delete for DataFlow Service |
| DataQuery | ADMIN | Create/Read/Update/Delete for DataQuery Service |
| Pipeline | ADMIN | Create/Read/Update/Delete for Pipeline Service |
| Deploy | ADMIN | Create/Read/Update/Delete for Deploy Service |
| Deploy | VIEWER | Read for Deploy Service |
| Managed | ADMIN | Create/Read/Update/Delete for Managed Service |
| Service Monitoring | ADMIN | Create/Read/Update/Delete for Service Monitoring Service |
| Certificate Manager | ADMIN | Create/Read/Update/Delete for Certificate Manager Service |
| eTax | ADMIN | Create/Read/Update/Delete for eTax Service |
| eTax | VIEWER | Read for eTax Service |
Service PERMISSION Role
Service PERMISSION Role can enable or disable each service.
| Role | Description |
|---|---|
| Service Name PERMISSION | Service Enable, Disable |
Billing Management
You can check the usage fee for NHN Cloud service and make payment. In the View My Info > Manage Billing menu, you can check the bill, expected payment amount, and usage information of the NHN Cloud member who registered a payment method.
The following features are provided along with the billing details of the payment method for the month.
- Immediate Payment: You can pay with the immediate payment feature before automatic payment that occurs on the 8th of every month.
- Sales slip: If you paid by credit card, you can view the sales slip.
- Tax Invoice: If you paid by bank transfer, you can view your tax invoice.
The details displayed on the payment management invoice are as follows.
- Usage Amount: The amount calculated by service usage and unit price
- Discount/Surcharge Amount: Contract discount, manager discount/surcharge, etc.
- VAT: 10% of (Usage Amount - Discount Amount + Surcharge Amount)
- Late Fee
- Korean members: In case of non-payment for the Total Amount of Payment, 2% of the amount
- Japanese members: There is no late fee in accordance with the Japanese Consumer Contract Law.
- Total Amount of Payment: (Usage Amount - Discount Amount + Surcharge Amount) + VAT
Manage Notifications
Manage Notifications is a feature that allows you to set the recipients and notification method (Email, SMS) for each notification sent by NHN Cloud.
- Click Organization > Manage Notifications or Project > Manage Notifications.
-
You can manage the notifications you receive for each of your organizations and projects.
-
Among notifications, find a notification for which you want to change the recipient and go to Modify Receiver > Modify.
- You can find notifications by selecting from the list on the left, or by searching for the notification name, recipient, and more in the top-right search area.
-
To bulk modify recipients of multiple notifications, select the checkboxes of notifications, then click Bulk Modify Receiver at the top of the notification list.
-
Select who should receive notifications and how they should be notified (Email, SMS) by member, notification recipient group, and role.
- Webhook is not supported for the notifications.
- Notification methods differ depending on notifications.
-
When you add a notification receiver group to Recipient, the notification method set for that group must match the notification method supported by each notification in order to receive notifications.
-
Click Save to save your settings.
Table of Contents
- NHN Cloud > Console User Guide
- Quick Guide
- Organization Management
- Create an Organization
- Guide to Creating an Organization
- Organization Services
- Delete an Organization
- Organization Governance Setting
- IAM Governance Setting
- Project Common role Group Setting
- Project Management
- Create a Project
- Guide to Creating a Project
- Project Services
- Guide to Enabling Project Services
- Delete a Project
- Member Management
- Policy for NHN Cloud Members and IAM Members
- Organization Members
- Project Members
- Billing Management
- Manage Notifications