Game > Gamebase > Store Console Guide > Google Console Guide
[Notice] This document covers how to register and link the information of apps released on Google Play to the Gamebase IAP console. For more details on console settings to release apps on Google Play, refer to the Google Play Console guide provided by Google.
Link a Google Cloud Project
- To link information related to apps registered on Google Play, you require a Google Cloud project to be linked with Google Play.
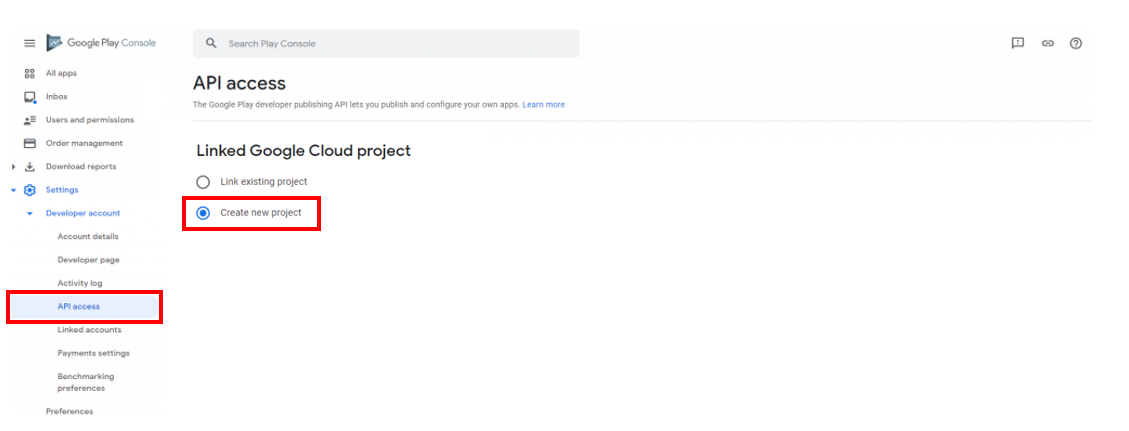
- In Google Play Console, go to Settings > API Access page
- Choose between creating a new Google Cloud project or linking an existing project in order to link Google Play and the Google Cloud project.
- If you already have a linked Google Cloud project, the status of the linked Google Cloud project is displayed.
- You can also link an existing project after creating a project in advance on the Google Cloud Console main page.
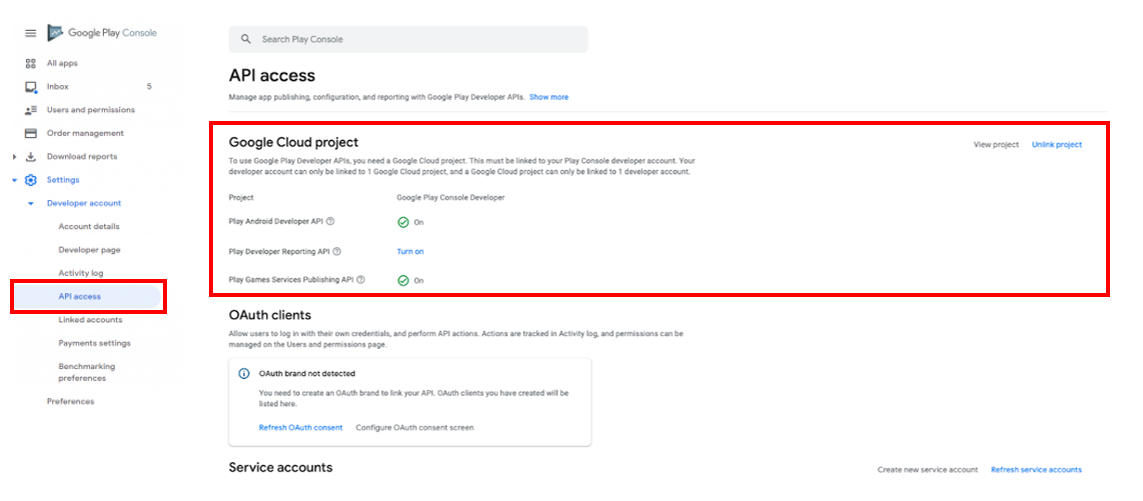
- If the linking between Google Play and the Google Cloud project is successful, the linked Google Cloud project and a list of APIs are displayed on the Settings > API Access page of the Google Play Console.
- If the status of the linked project does not appear as in the following screenshot after completing the settings as described in the guide below, check the linking with Google Cloud first.
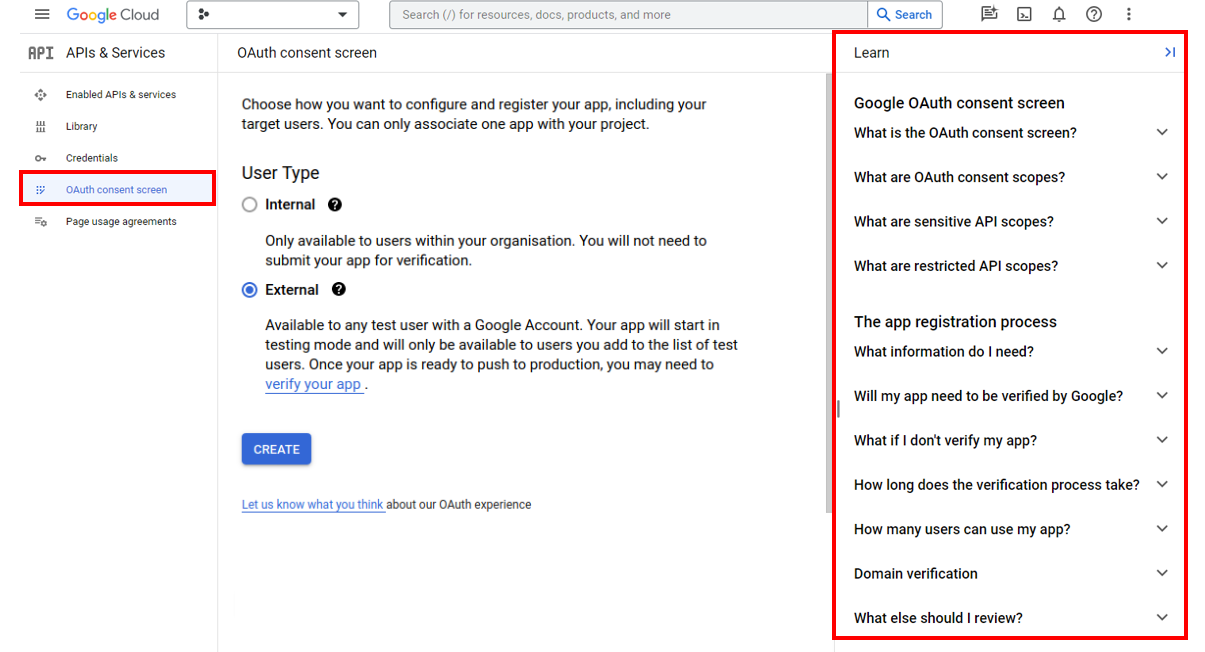
- After creating a new project, you need to configure the OAuth consent screen to set up integrated authentication.
- For more information about configuring the OAuth consent screen, refer to the on-screen guide and the OAuth2 guide provided by Google.
Two Integrated Authentication Methods That Are Provided
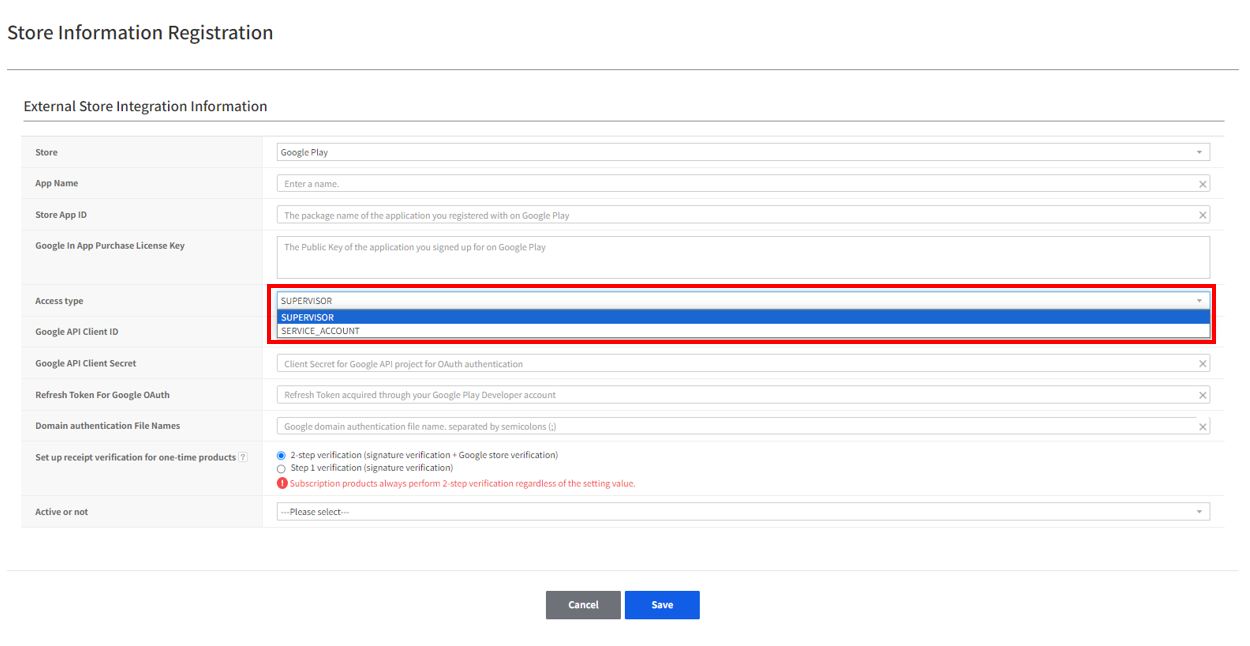
- For Google integration, authentication is required to access Google's Android Developer API.
- NHN Cloud IAP provides two authentication models, and each requires different specific information for authentication.
- In addition to specific information for each model, commonly required information is also required for Google integration and billing confirmation, so you must check the common input information as well.
Store App ID: Refer to Package Name in the Common Input Information sectionGoogle In App Purchase License Key: Refer to InAppPurchase License Public Key, Common Input Information GuideSkip Market Integration Validation: Refer to Skip Market Validation in the Common Input Information section
- Model-specific or commonly required information can be obtained through Google Cloud Platform Console, Google Play Console, and Google Developer Console by following the steps below in the guides provided by Google.
- Google Android Publisher API for verifying billing information of Google Play apps is a required authentication target API for OAuth2.
Supervisor Authentication Model
- This is the model used on behalf of the authentication by Google account that manages the app to be registered in the Google console, and it is the authentication model that has been provided by NHN Cloud IAP as the default.
- In the Google console, multiple apps can be registered and managed in one Google account, and the NHN Cloud IAP setting information of all apps registered under the same account is the same.
-
Follow the steps below to check a total of 3 kinds of information and enter them as the NHN Cloud IAP app information, which will be used for OAuth authentication of the Google account.
-
Input information specific to the NHN Cloud IAP Google supervisor authentication model
Google API Client ID: Refer to Step 4 of the Supervisor Authentication Model sectionGoogle API Client Secret: Refer to Step 4 of the Supervisor Authentication Model sectionRefresh Token For Google Oauth: Refer to Step 6 of the Supervisor Authentication Model section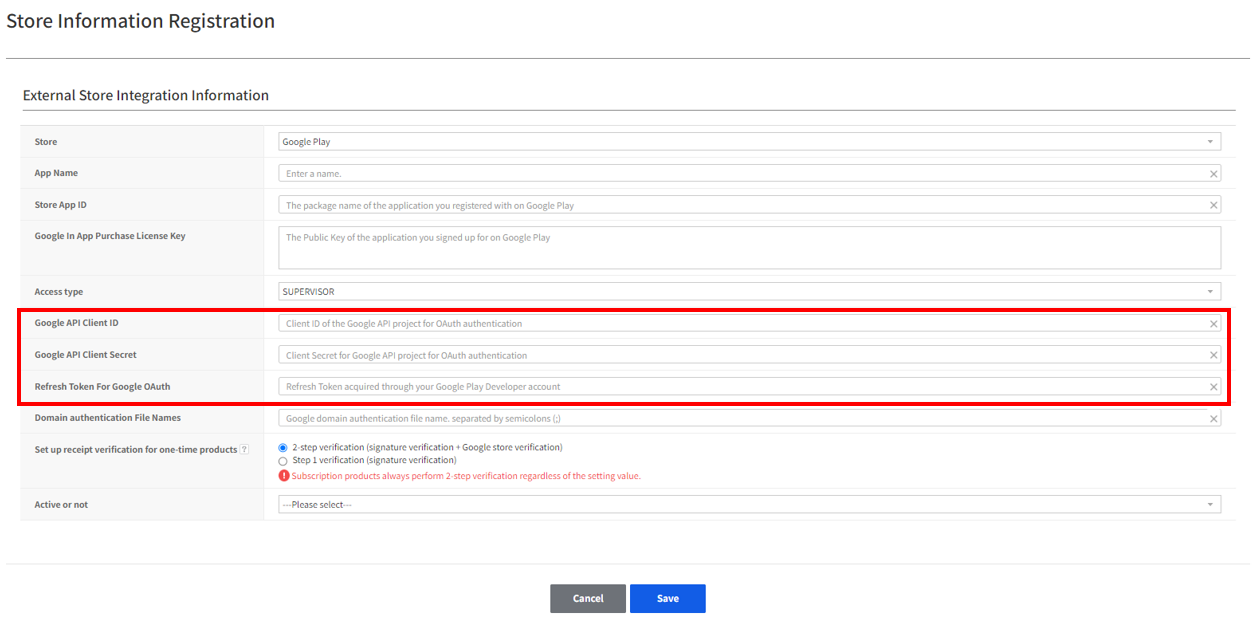
-
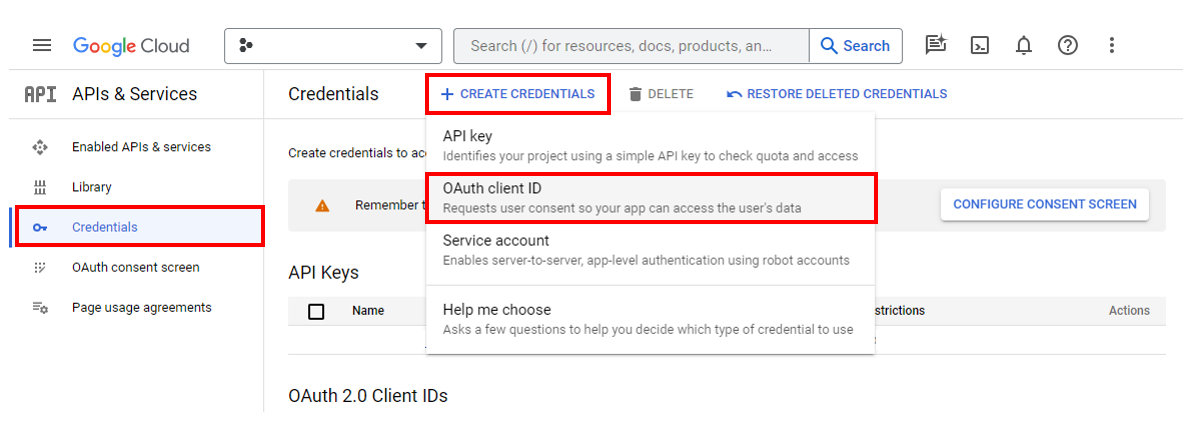
Go to Google Cloud Console APIs & Services Dashboard
- Choose a project to link with your Google Play admin account
- Go to the Credentials menu
- Select Create Credentials > OAuth client ID
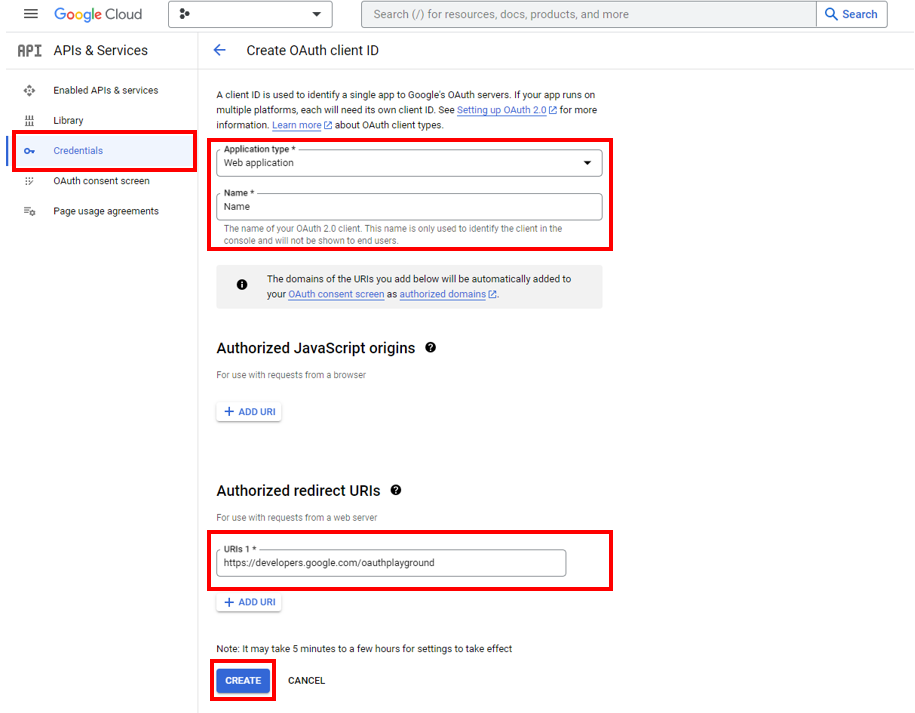
- Enter basic information of the new OAuth client
- Application Type: Set Web Application
- Name: Set an appropriate name for administrators to distinguish it as the one for NHN Cloud IAP
- Authorized JavaScript origins: Skip
- Authorized redirect URI: Add and enter
https://developers.google.com/oauthplayground
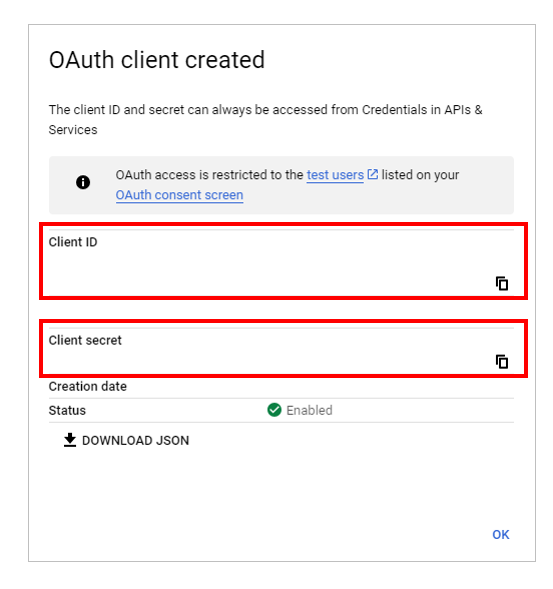
- When a new OAuth Client is created, a pop-up with two types of information about the created OAuth Client is displayed.
- Client ID: Enter it as the value of
Google API Client IDon the NHN Cloud IAP app information setting screen. - Client Secret: Enter it as the value of
Google API Client Secreton the NHN Cloud IAP app information setting screen. - The two types of information above can be checked again on the OAuth Client information screen, and you can also check them on the OAuth Client information JSON download file provided by Google.
- Client ID: Enter it as the value of
- Go to Google OAuth 2 Playground page
- Check the Use your own OAuth credentials checkbox in the OAuth 2.0 Configuration pop-up setting that appears when you press the gear button at the top right of the screen.
- In the OAuth 2.0 Configuration pop-up settings, enter the information obtained in Step 4 in Client ID and Client Secret, respectively.
- In the API permission scope selection screen on the left, select
Google Play Android Developer API.- You can also enter
https://www.googleapis.com/auth/androidpublisherin the scope input box at the bottom of the selection screen on the left.
- You can also enter
- When all setting values are entered and selected, click the Authorize API button at the bottom left.
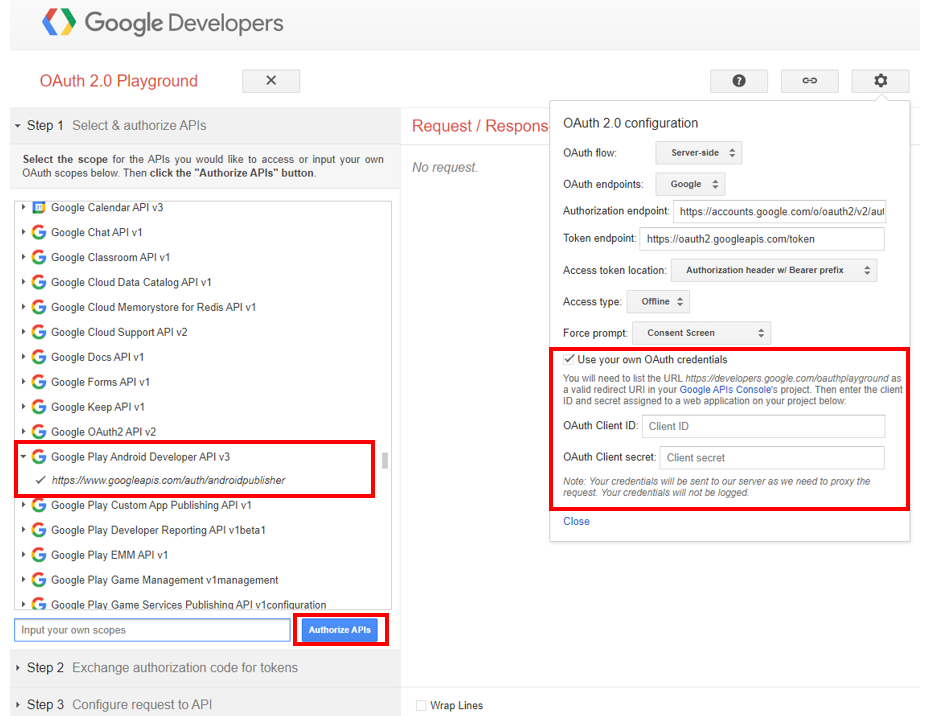
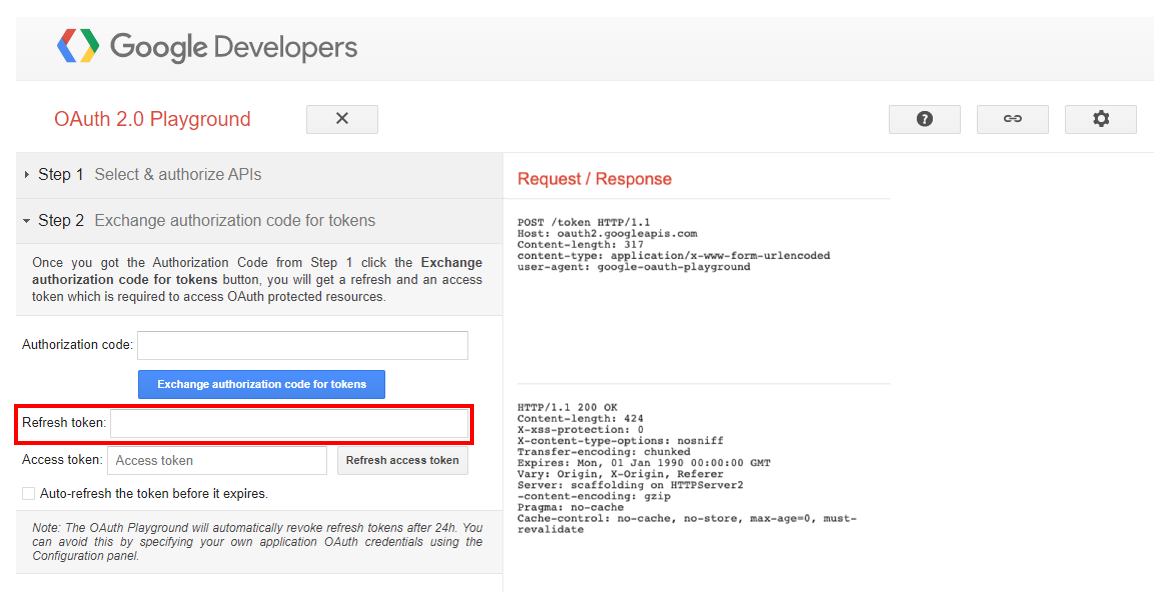
- If you click the Authorize API button, the Google OAuth 2 Playground page changes to Step 2 and additional information is displayed.
- Refresh Token: Enter the
Refresh Token For Google Oauthvalue on the NHN Cloud IAP app information setting screen.
- Refresh Token: Enter the
Service Account Authentication Model
- This is the model used on behalf of the authentication by service accounts in Google with privileges delegated by the supervisor account, and it is a new authentication support model added to NHN Cloud IAP in April 2022.
- Creation and management of service accounts that are delegated permission scopes must be performed by a supervisor (Google's actual managed account) in the Google Console.
- A service account can be delegated a scope of permissions equivalent to that of a supervisor by a supervisor, or be delegated a scope of permissions limited only to a specific app for which a supervisor has permission.
- The configuration strategy for the permission scope of delegation depends on the characteristics intended by the customer.
-
If you feel that the scope of permissions set by the supervisor authentication model is excessive, you can use this authentication model after creating a service account in the Google console. (Google Guide)
-
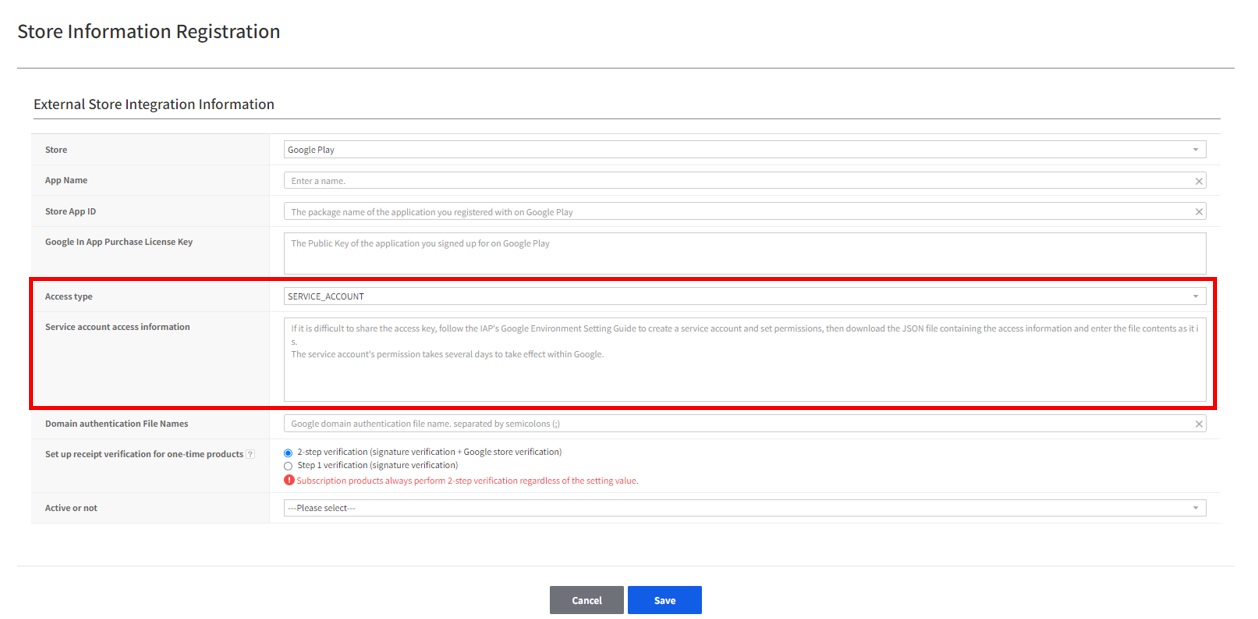
Input information specific to the NHN Cloud IAP service account authentication model
Service Account Integration Information: Refer to Step 5 of the service account authentication model section
-
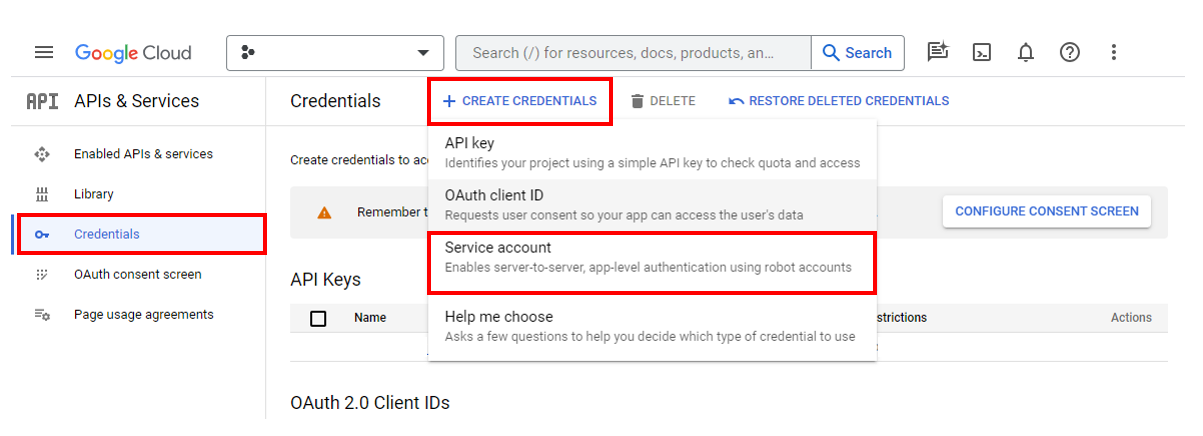
Go to the APIs and Services page on Google Cloud Console
- Choose a project to link with your Google Play admin account
- Go to the Credentials menu
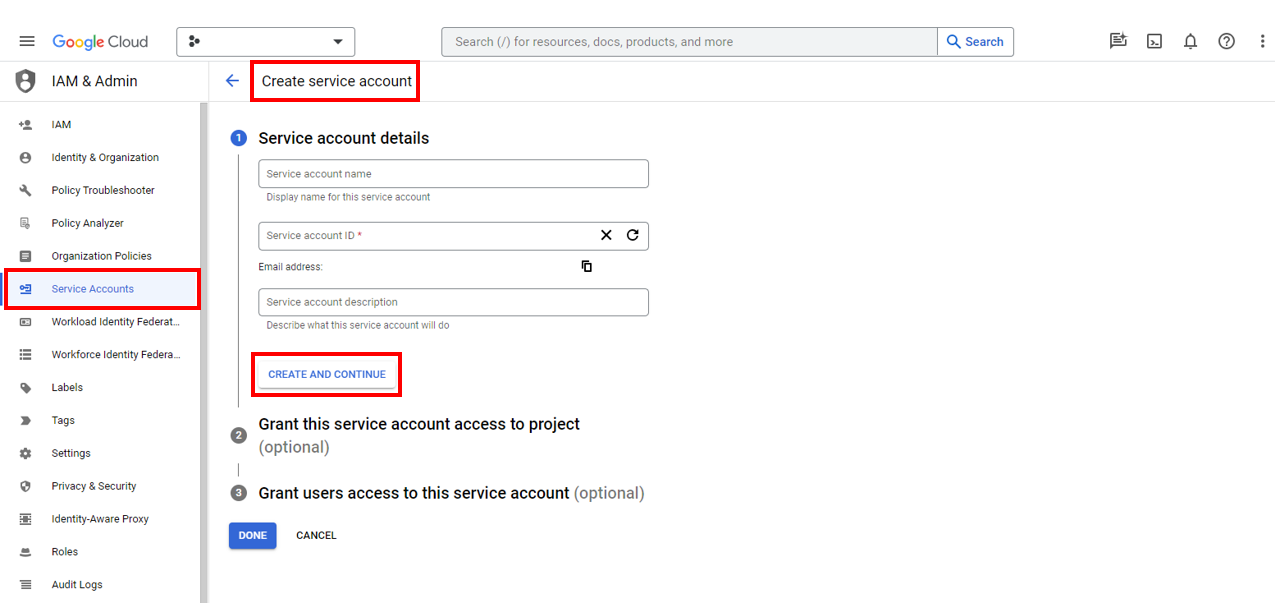
- Select Create Credentials > Service account
- Enter basic information of the new service account
- Enter basic information in an easy-to-manage format and click
Create and Continue. - In Grant access to the service account, choose the role as
Owner. - In Additional options, enter the email of administrator for the service account to create, and that administrator will be given permission to set up the service account.
- If the admin email address does not exist in the Google Cloud Console, an admin invitation email will be sent to the email address you entered.
- Enter basic information in an easy-to-manage format and click
- Delegate permissions to the service account
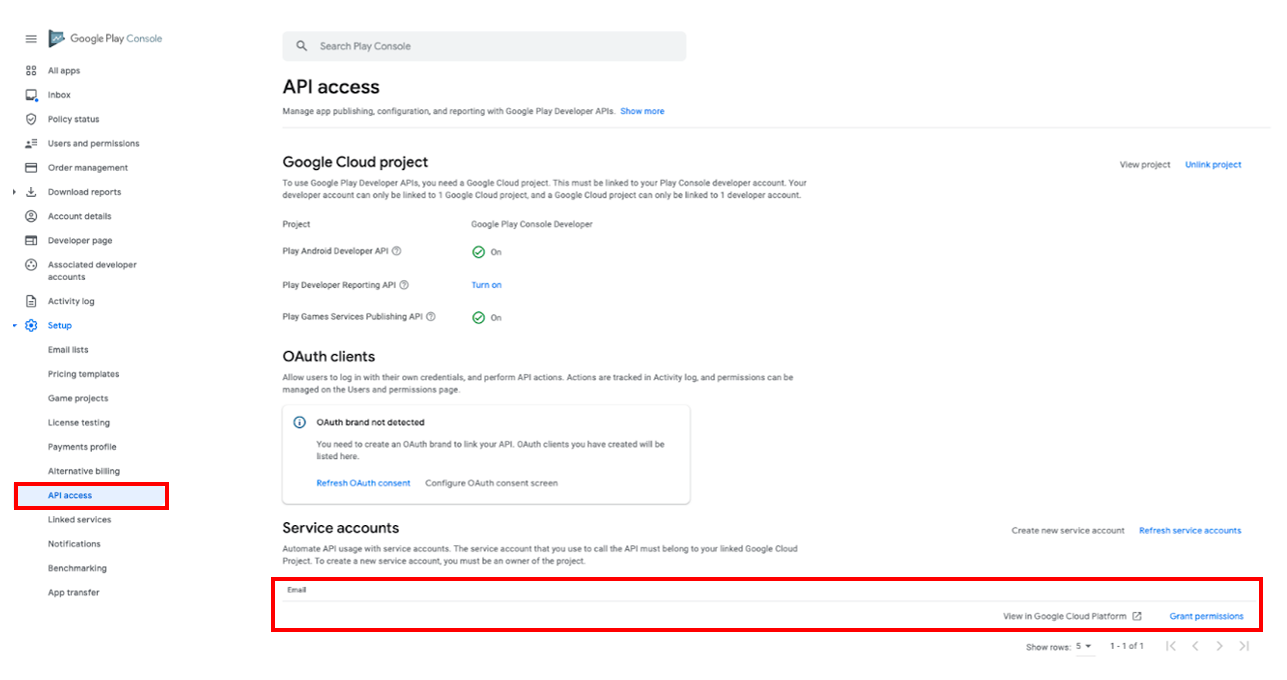
- Go to Google Play Console > API Access menu
- The service account created in the Google Cloud Console is displayed in the list of service accounts at the bottom of the screen. Click the Grant link on the right of the created service account.
- The scope of the permission can be set multiple times for the entire apps or for each app owned by the supervisor account, and the type of permission can be set within the scope.
- The scope can be set according to the customer's intention, but among the types of permissions, the permission to
view app information (read-only),view financial data, andmanage orders and subscriptionsmust be set for delegation. - It may take some time to reflect the delegated permissions. Note that in some cases it may take up to 7 days for the delegated permissions to be reflected.
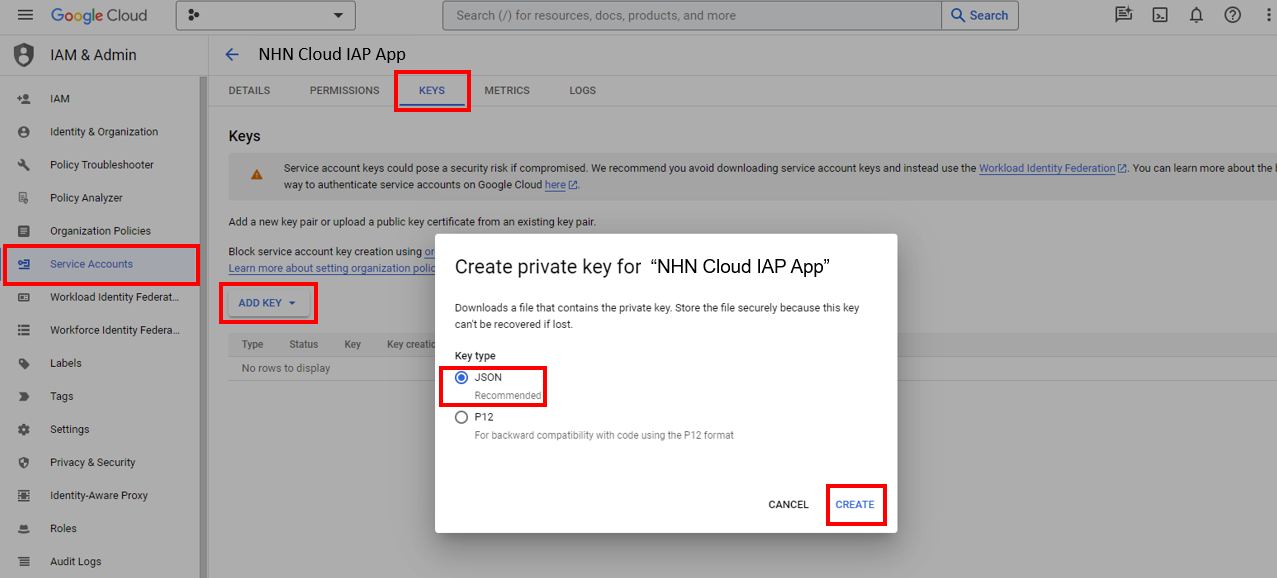
- Go to the details screen of the created Service account among the list of newly created service accounts on the APIs and Services page.
- Go to the Keys tab and select Add Key > Create new key
- In the new pop-up, select
JSONformat and click Create - When the key creation is complete, a JSON-formatted file is automatically downloaded from Google.
- You need to load the file on a plaintext editor such as Windows Notepad, copy the entire content, and then enter it in the
Service Account Integration Informationon the NHN Cloud IAP app information setting screen. - The downloaded file cannot be downloaded again after the first download, so secure the file for entering the information.
- As mentioned in Step 4, if the permission is not reflected internally in Google, an unauthorized registration error may occur, so take your time to try again.
Common Input Information
Package Name
- There is a packageName specified when building an app registered through Google Play Console. This value is used as a unique identifier for your app in Google.
- Enter this value as
Store App IDin NHN Cloud IAP App Settings.
InAppPurchase License Public Key
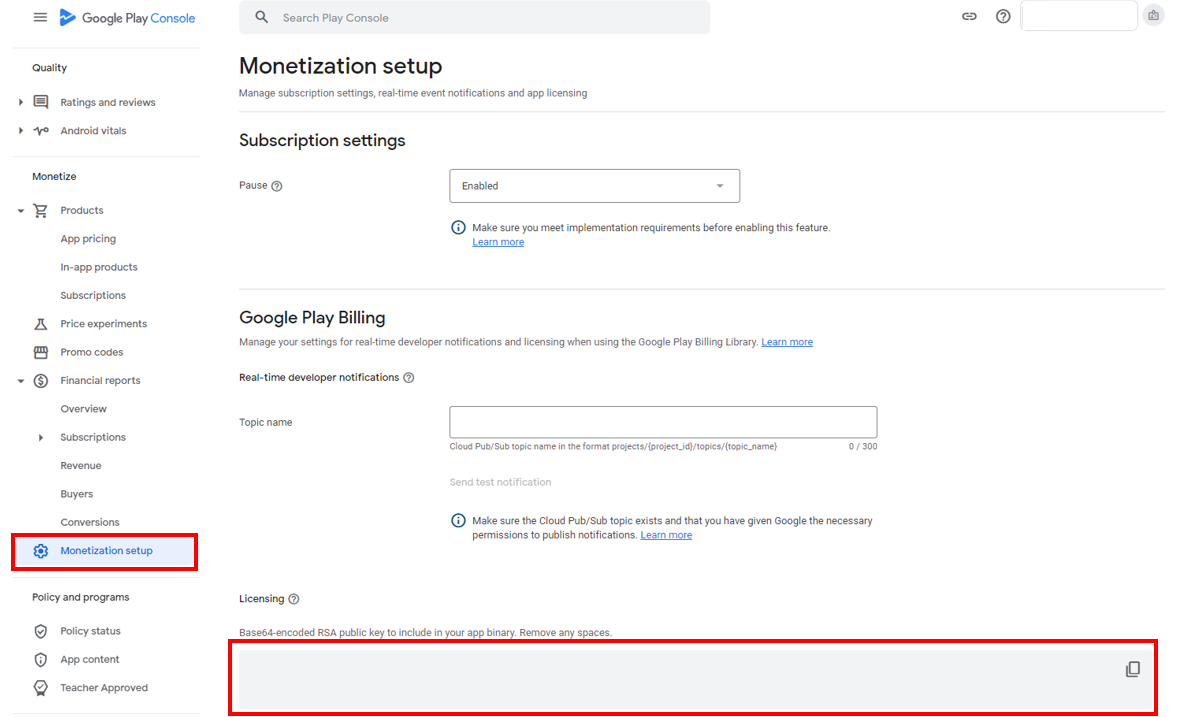
- Enter Google Play Console > Corresponding app dashboard > Monetization menu
- At the bottom of the screen you will see the Base64-encoded license public key. Enter this value as
Google In App Purchase License Keyin NHN Cloud IAP App Settings.
Skip Market Validation
- The validation of Google payment provided by NHN Cloud IAP is divided into two main steps. Set whether to skip Step 2 among those two steps.
- Skipping is not a recommended specification, and a temporary payment authorization status may be retained in response to occasional Google server failures. (default is
NO)- Skipping this step does not indicate that the incoming payment validation request is always processed as a normal payment.
- The skipping option is not applied to the validation of subscription payment.
Google Validation Steps
| Step | Description |
|---|---|
| Step 1 | Check whether the payment information requested for validation is falsified |
| Step 2 | Check and revalidate the payment information requested for validation for up-to-date status on the Google server side |
Set Up Event Propagation of Real-time Subscription Information Within Google's System
- You can set the NHN Cloud IAP server to receive and process real-time status propagation events of subscription purchases provided by Google.
- You need to register your payments profile on Google Cloud Platform (requires a credit card) and change it to enabled.
- If you do not set this propagation event within Google, renewal information for subscription payment will be reflected based on the user's app client launch action, so it is recommended that you set it up if you use subscription payment.
-
In the past, domain validation for the receiving address had to be done through Google Webmaster Tools to receive push notifications of subscription real-time propagation events, but domain validation is currently not required.
-
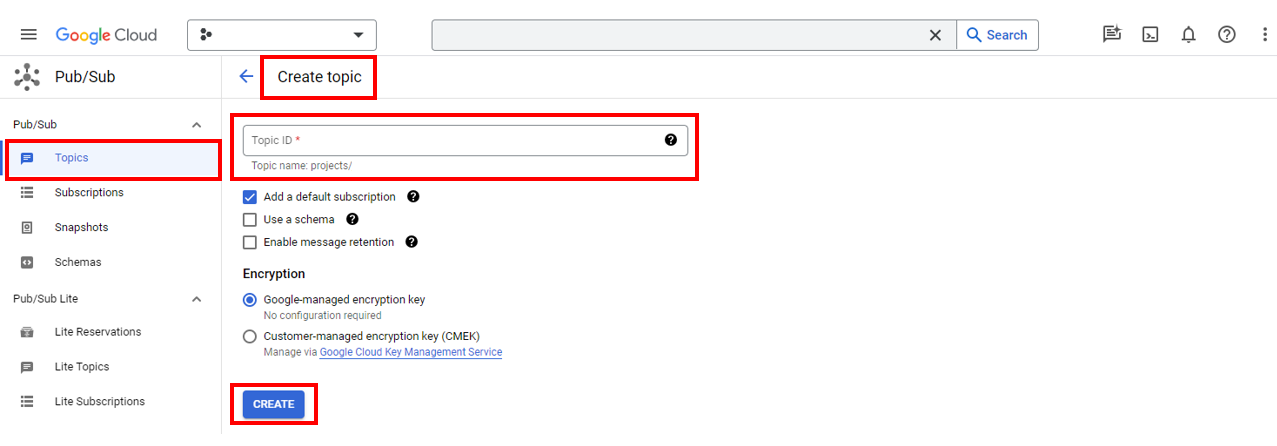
Go to Google Cloud Pub/Sub Console
- Make sure that you properly select the project associated with the Google Play app.
- Create a new topic from the Topic menu.
- The topic ID can be any name that is easy to manage.

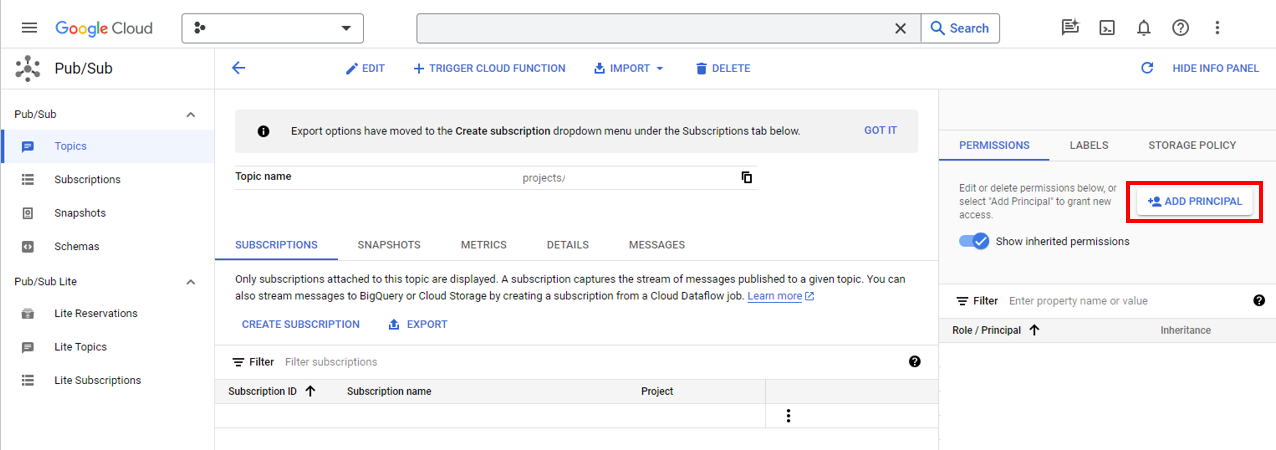
- Add principals to the topic you created.
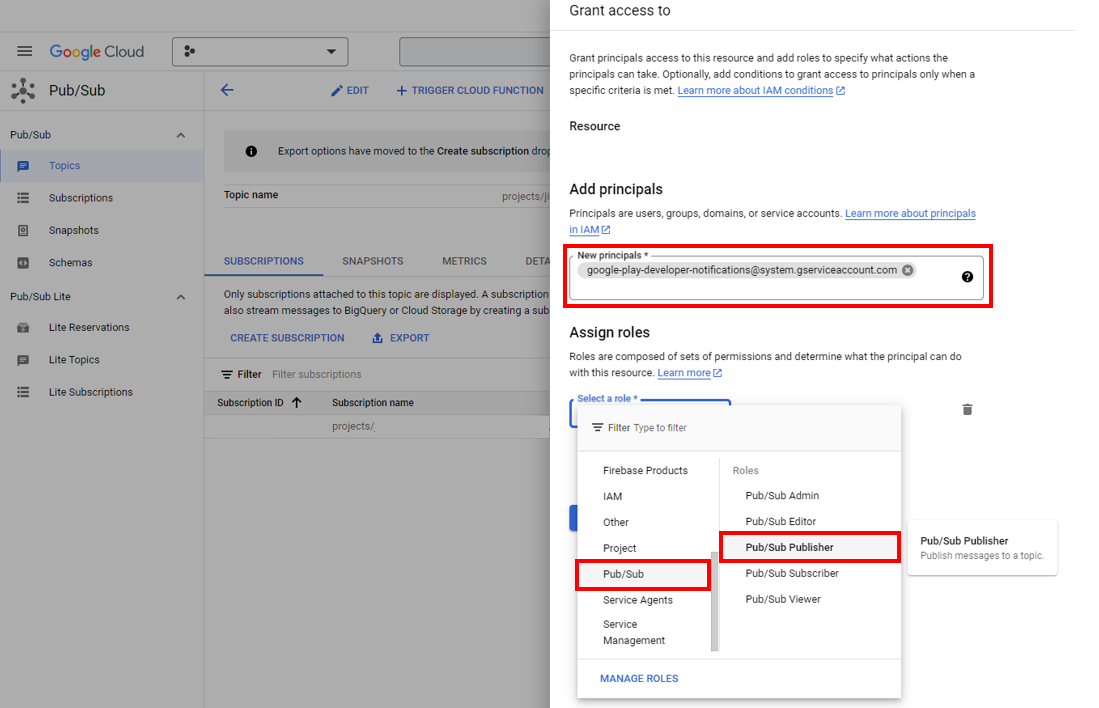
- Enter detailed member information
google-play-developer-notifications@system.gserviceaccount.com - Select the role as
Pub/Sub>Pub/Sub Publisher
- Enter detailed member information
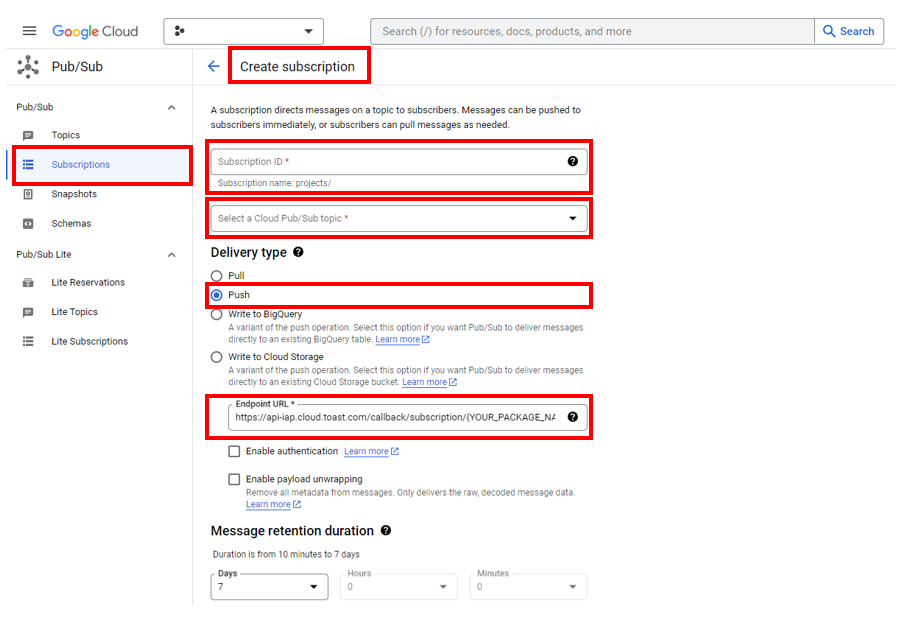
- Go to the Subscriptions menu and create a subscription that will be notified to the IAP server.
- For the subscription ID, enter a value suitable for management.
- Choose a Cloud Pub/Sub topic: Choose the topic you created earlier
- Delivery Type: Select Push
- Enter the endpoint URL:
https://api-iap.cloud.toast.com/callback/subscription/{YOUR_PACKAGE_NAME}/GG - In the
{YOUR_PACKAGE}part, enter the package name used when building the app, which is the same as the value entered as StoreAppID in NHN Cloud App Settings.

- If you are using a Gamebase sandbox environment for testing, you must create subscriptions for sandbox, in Step 3.
- Enter the Gamebase sandbox endpoint URL:
https://sandbox-api-iap.cloud.toast.com/callback/subscription/{YOUR_PACKAGE_NAME}/GG
- Enter the Gamebase sandbox endpoint URL:
- Go to App Dashboard in Google Play Console
- Enter the full name of the topic you created in Step 1 in the Monetization settings > Real-time developer notification topic name on Google Play billing screen
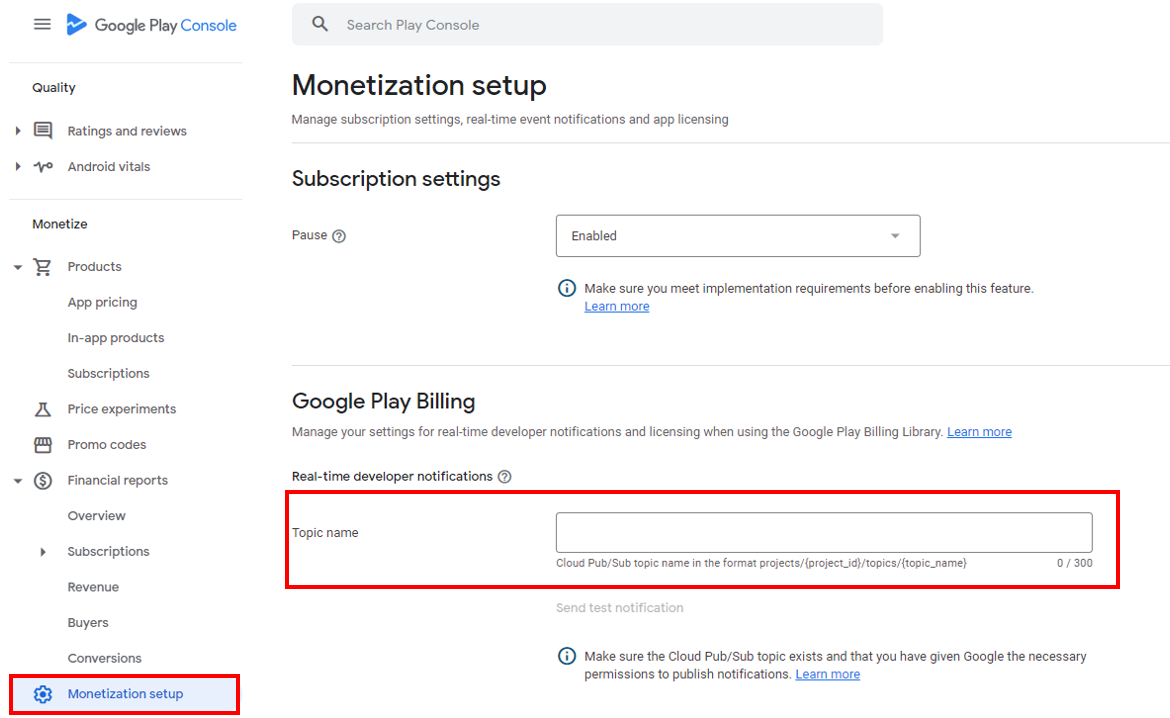
Table of Contents
- Game > Gamebase > Store Console Guide > Google Console Guide
- Link a Google Cloud Project
- Two Integrated Authentication Methods That Are Provided
- Supervisor Authentication Model
- Service Account Authentication Model
- Common Input Information
- Package Name
- InAppPurchase License Public Key
- Skip Market Validation
- Set Up Event Propagation of Real-time Subscription Information Within Google's System