Game > GameAnvil > 기초 튜토리얼
GameAnvil로 멀티플레이어 게임 쉽게 만들기
GameAnvil은 실시간 멀티플레이어 게임 서버 제작 플랫폼입니다. GameAnvil을 사용하면 손쉽게 게임 서버와 클라이언트를 개발하고 운영할 수 있습니다.
이 문서는 GameAnvil의 기본적인 기능을 이용하여 실제 플레이가 가능한 멀티플레이어 동기화 게임을 개발하는 과정을 다룹니다. 서버의 개념과 API를 단순히 나열하는 대신 직접 멀티플레이어 게임 서버 및 샘플 클라이언트를 개발하여 GameAnvil의 기본 개념과 프로젝트 구성 및 구현 방법을 자연스럽게 습득할 수 있도록 하였습니다.
GameAnvil은 서버 엔진뿐만 아니라, 클라이언트를 서버에 연결하는 데에 도움을 주는 커넥터도 제공합니다. 서버와 클라이언트가 상호 작용하는 모습을 볼 수 있는 샘플을 완성해 나가면서 GameAnvil을 사용하여 게임을 개발하는 전체적인 흐름에 익숙해질 수 있습니다.
실습 환경 준비 - 서버 프로젝트
멀티플레이어 게임을 만들기 위해서는, 클라이언트와 대응하는 서버 프로그램이 필요합니다. 게임 서버를 구축한 후, 이어서 클라이언트를 구현하는 방식으로 튜토리얼이 진행됩니다.
이 예제에서는 클라이언트 프로그램 제작에 유니티와 GameAnvil 커넥터를 사용하고, 서버 프로그램 제작에 앞서 소개한 서버 엔진 GameAnvil을 사용합니다. 먼저 GameAnvil을 이용한 서버 프로그램 프로젝트를 생성해 보겠습니다.
아래 단계를 진행하면 만들어지는 최종 서버 샘플 프로젝트는 아래 링크에서 다운로드할 수 있습니다. 초기 템플릿에서 여러 단계를 거쳐 서버 기능을 구현하면 어떤 구조가 되는지 미리 확인하려면 해당 프로젝트를 내려받아 참고할 수 있습니다.
프로젝트 구성
이번 챕터에서는 개발을 시작하기 위해서 초기 설정을 완료하는 것을 목표로 합니다. 실제 프로세스를 실행해서 서버를 구동하는 것은 다음 챕터에서 다룹니다.
예제에서는 서버 프로젝트 IDE를 JetBrain사의 IntelliJ로 사용합니다. 예제에서 사용한 IntelliJ의 버전은 IDEA Ultimate 2023.1.2입니다. 만약 라이선스를 구입하지 않은 경우 IntelliJ IDEA Community Edition을 사용해도 무방합니다. 다른 버전의 IntelliJ를 사용해도 문제 없이 동작할 것으로 예상되나, 모든 경우를 테스트해 본 것이 아니므로 샘플 실행 버전과 동일한 관경에서 진행할 것을 권장합니다.
프로젝트에 GameAnvil을 적용하려면 Maven 저장소에 GameAnvil 라이브러리를 내려받고 GameAnvil을 구동하는 데 필수인 설정 파일을 작성해야 합니다. 마지막으로 약간의 보일러 플레이트 코드를 작성하면 개발 초기 설정이 완료됩니다.
GameAnvil에서는 이와 같은 일련의 과정을 대신해 주는 IntelliJ 템플릿을 제공하여 보다 간단하게 초기 작업을 완료할 수 있습니다. 다음 링크에서 IntelliJ용 프로젝트 파일 템플릿을 다운로드할 수 있습니다. 다운로드한 템플릿은 압축을 풀지 않도록 합니다.
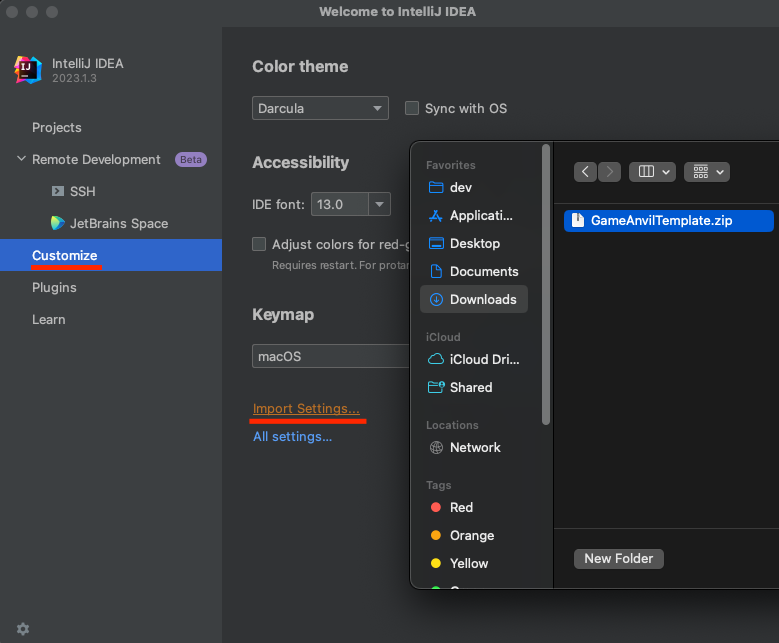
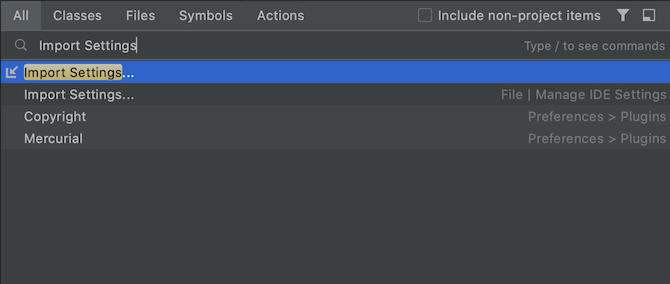
다운로드한 템플릿을 적용하기 위해 IntelliJ를 실행합니다. Welcome to InteliJ IDEA 화면 좌측 메뉴에서 Customize를 선택한 뒤 Import Settings... 를 클릭합니다. 또는 전체 검색창에서 Import Settings... 를 검색합니다.
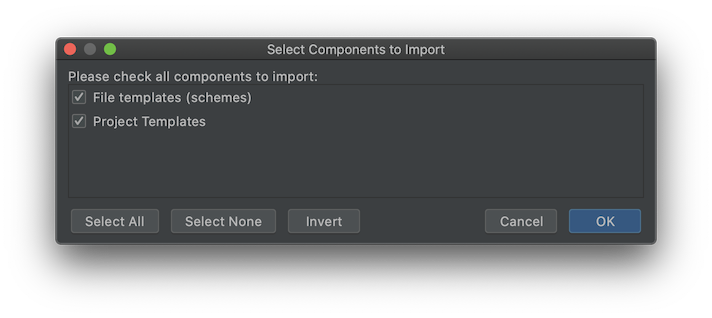
파인더 또는 파일 탐색기 창에서 템플릿을 다운로드한 경로로 이동해 압축 파일을 선택합니다. Select Components to Import 창이 열리면 File templates 항목과 Project Templates 항목을 모두 체크해 선택합니다. OK를 클릭한 뒤 Import and Restart를 클릭하면 IntelliJ가 다시 시작되고, 템플릿 적용이 완료됩니다.
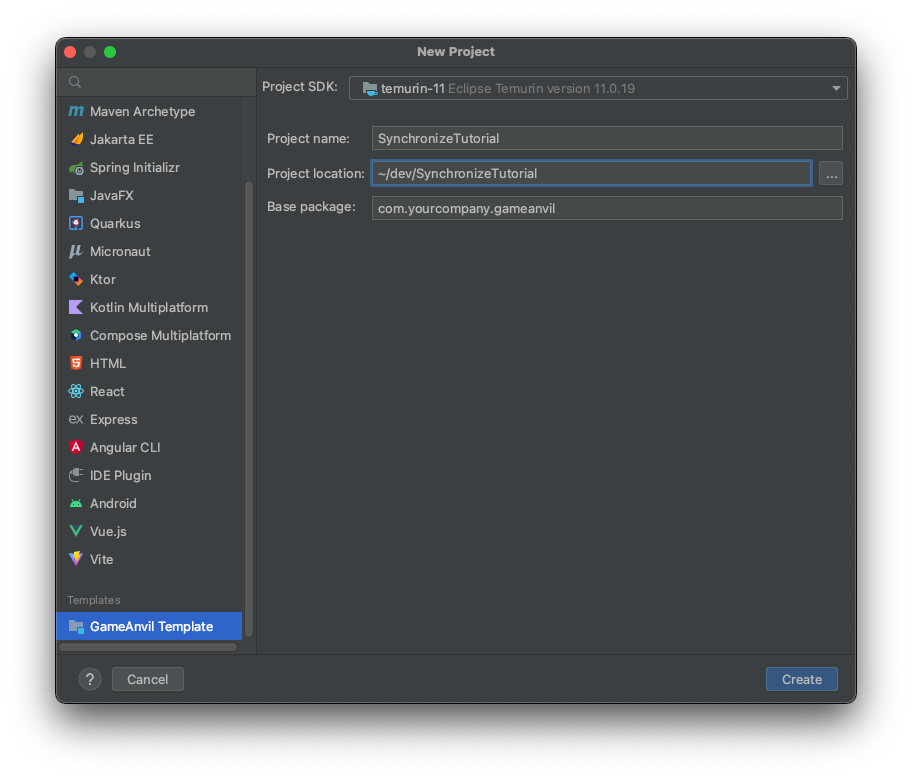
IntelliJ 오른쪽 상단의 버튼 그룹에서 New Project를 클릭한 뒤 왼쪽 목록을 스크롤하여 하단의 Templates에 있는 GameAnvil Template을 선택합니다. 프로젝트 이름을 SynchronizeTutorial로 설정합니다. 이름에 공백이 있어서는 안 됩니다. 프로젝트 위치와 베이스 패키지 이름을 확인한 뒤 프로젝트를 생성합니다.
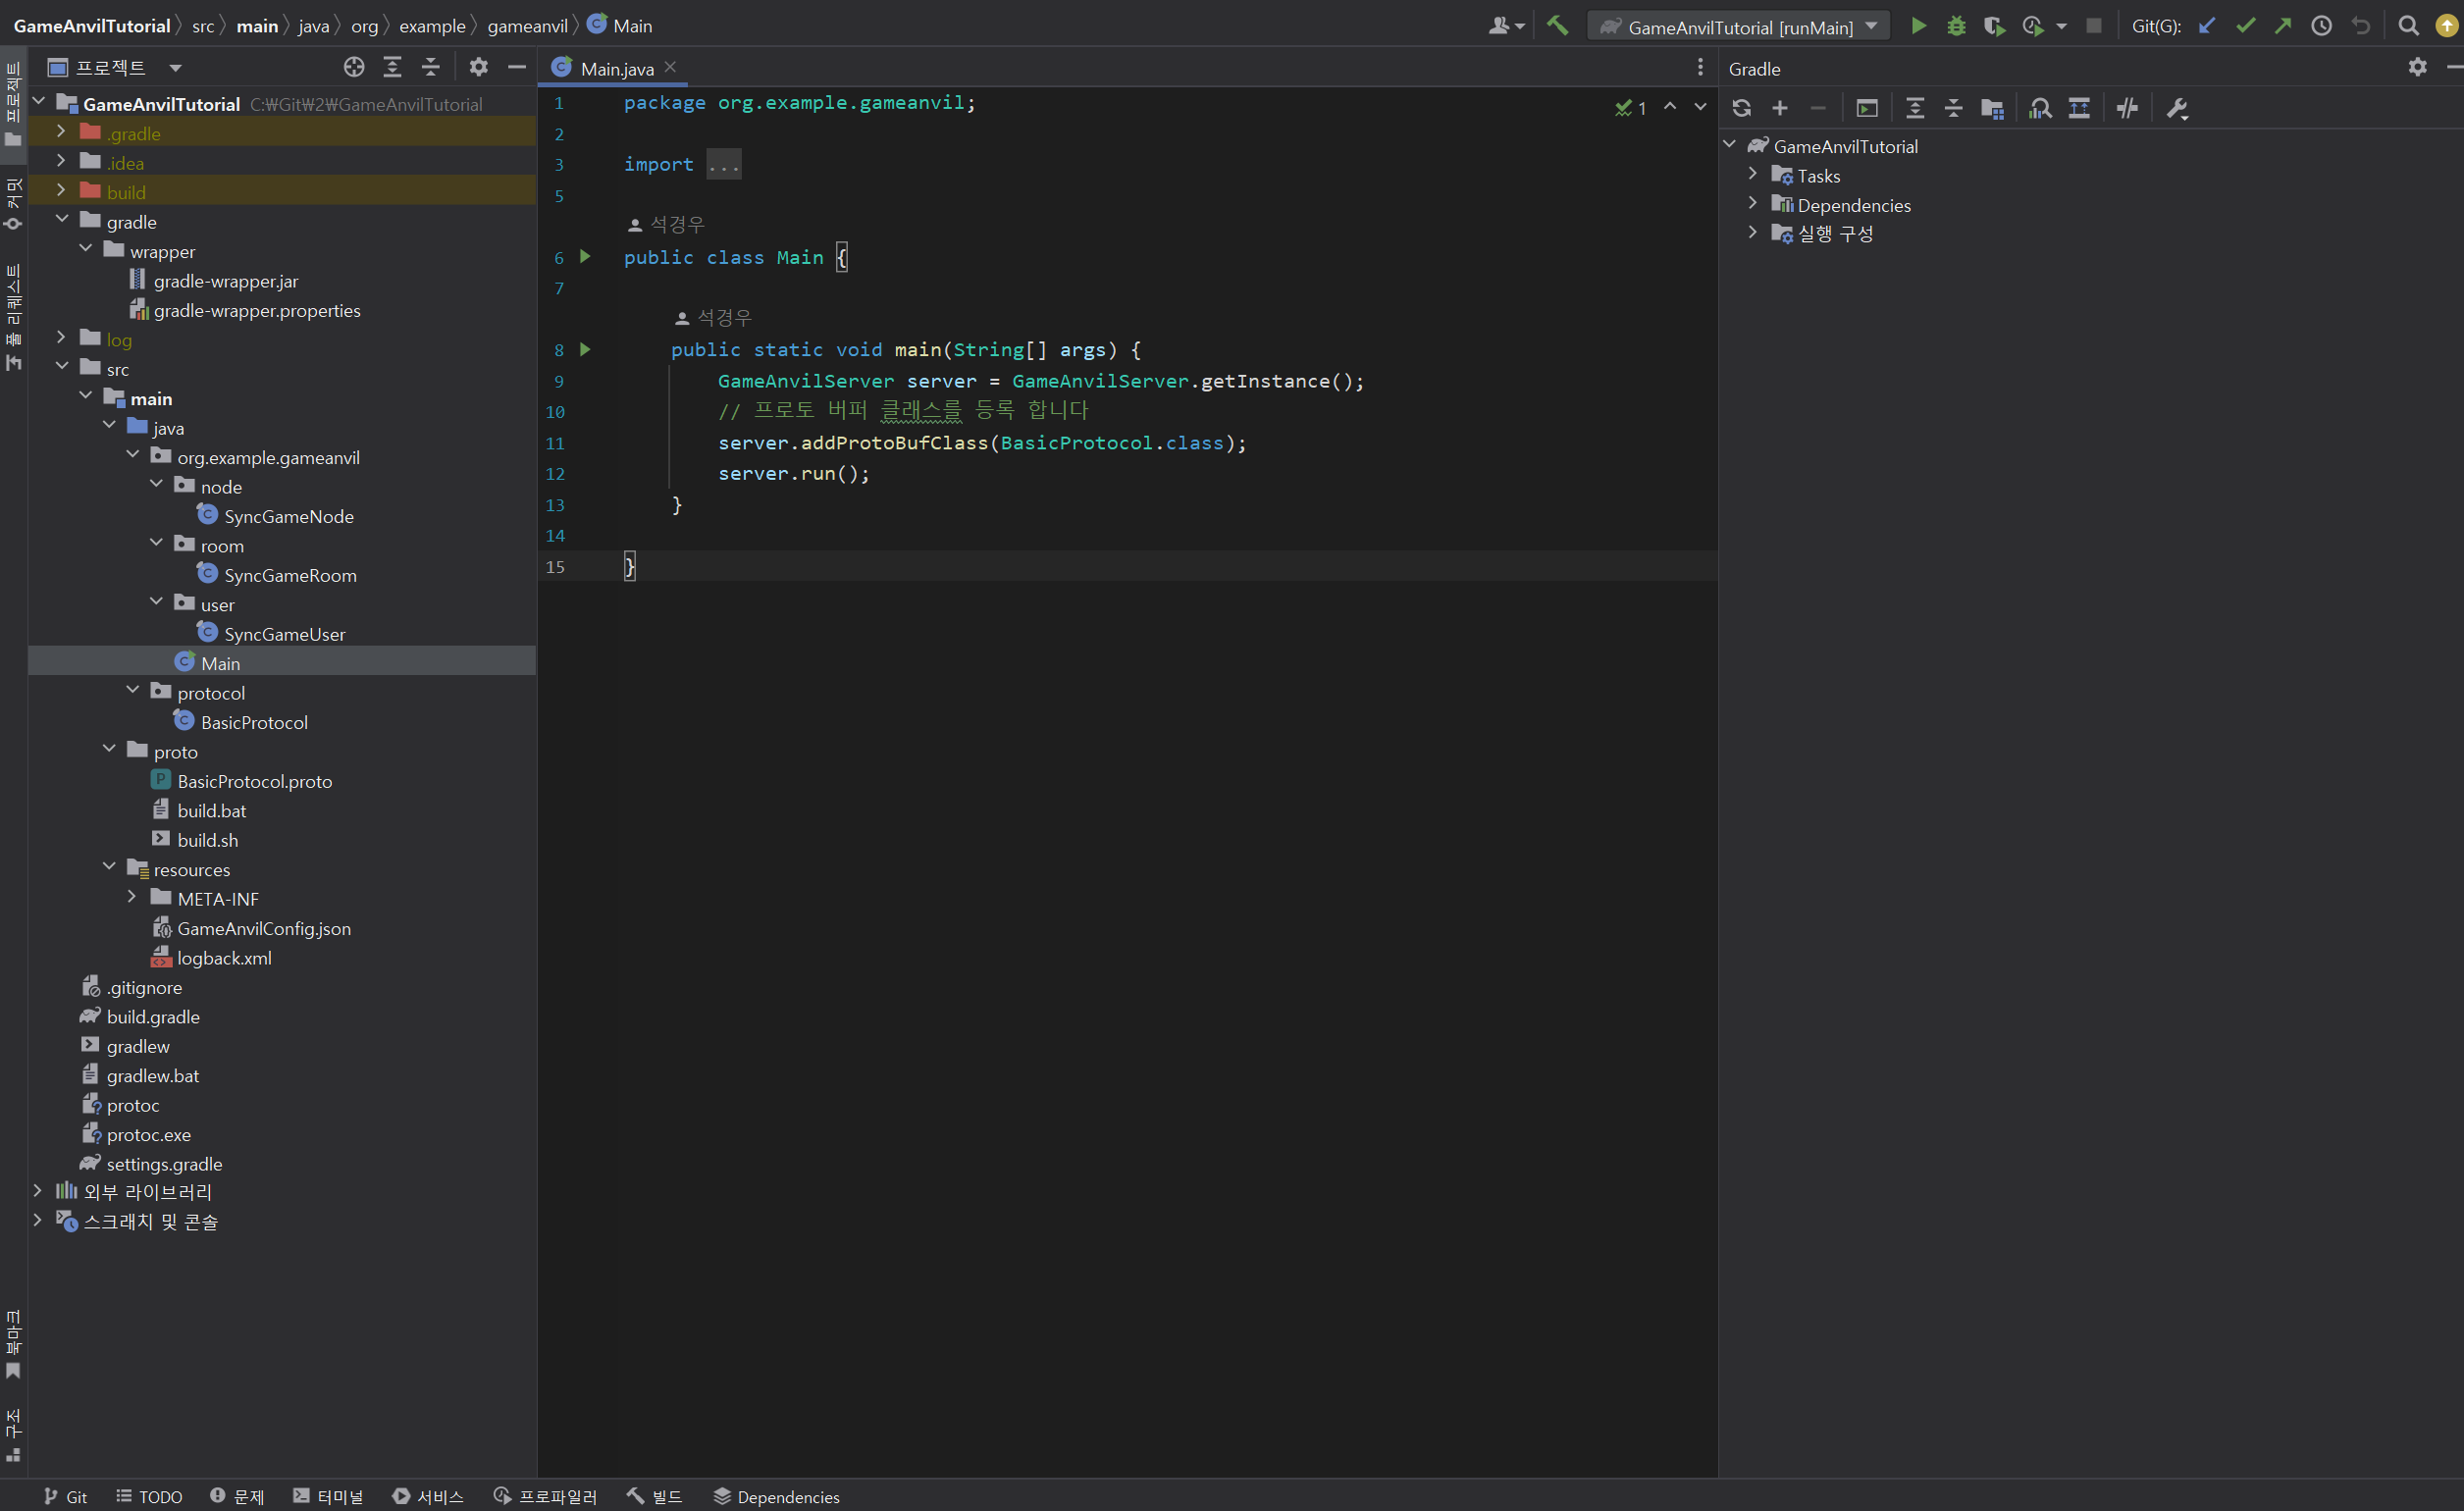
이제 IntelliJ에 서버 프로젝트 골격이 구성되었습니다. Project 패널을 보면 코드와 설정 파일들이 생성된 것을 확인할 수 있습니다.
- Main: 프로그램의 진입점 Main 함수를 포함하는 클래스입니다.
- protocol 패키지: java로 컴파일된 프로토콜 버퍼 파일을 포함하는 패키지입니다.
- proto 패키지: Google Protobuf 라이브러리를 이용해 작성된 프로토콜 파일입니다.
- build.sh / build.bat: 프로토콜 파일을 java로 컴파일하여 프로토콜 버퍼 파일을 생성하는 실행 파일입니다.
- GameAnvilConfig.json: GameAnvil 구동에 필요한 서버 설정 정보를 기록한 파일입니다. 서버 구현에 맞게 수정할 수 있습니다.
- logback.xml: Java 프로젝트에서 로깅을 구성하는 데 사용되는 파일입니다. Logback 프레임워크의 설정 파일로서, 로깅 시스템의 동작 방식과 로그의 형식, 저장 위치 등을 지정합니다. 이 파일을 사용하여 로깅 수준, 로그 형식, 로그 파일의 경로 및 이름, 로그 롤링 정책 등을 설정할 수 있습니다.
GameAnvil 서버 설정 파일 수정
프로젝트 패널의 resources 패키지 하위에서 찾아볼 수 있는 GameAnvilConfig.json 파일을 통해 GameAnvil 서버 설정을 변경할 수 있습니다.
- common: 서버 전반적인 설정을 다루는 부분
- location: 로케이션 노드 관련 설정을 다루는 부분
- match: 매치 노드 관련 설정을 다루는 부분
- gateway: 게이트웨이 노드 관련 설정을 다루는 부분
- game: 게임 노드 관련 설정을 다루는 부분
템플릿을 통해 프로젝트를 구성하였기 때문에 GameAnvilConfig.json 파일에 서버 동작에 필요한 기본 설정 정보가 세팅되어 있는 것을 확인할 수 있습니다. 이 예제에서 주의 깊게 보아야 할 부분은 크게 세 가지입니다.
- game의 nodeCnt 값
- game의 serviceName 값
- game의 channelIDs 값
게임 노드는 필요로 하는 양에 따라, 또는 서버 성능에 따라서 여러 개의 VM으로 구성하여 실행할 수 있습니다. 게임 노드를 몇 개를 실행시킬 것인지에 대한 설정을 하면 서버 실행 시에 자동으로 설정 파일을 읽어서 정해진 개수의 노드를 띄우도록 되어 있습니다. 템플릿 설정에는 게임 노드를 한 개 띄우도록 세팅되어 있고, 이대로 사용하시면 됩니다. 추가 수정할 부분은 game 부분의 serviceName과 channelIDs입니다.
GameAnvilConfig.json 파일의 game 쪽 마지막 부분을 보면, Todo로 표시된 부분이 있습니다. 이곳을 수정하여 서비스명과 채널 정보를 설정해 보겠습니다.
  "game": [
    {
      "nodeCnt": 1,
      "serviceId": 1,
      "serviceName": "Todo - Input My Service Name",
      "channelIDs": ["ToDo - Input My ChannelName","ToDo - Input My ChannelName"], // 노드마다 부여할 채널 ID. (유니크하지 않아도 됨. ""는 채널 사용하지 않음을 의미)
      "userTimeout": 5000 // 클라이언트의 접속 끊김 이후 유저 객체를 서버에서 제거하지 않고 얼마동안 관리할지 설정
    }
  ]
서비스에 대해
서비스란 하나의 서버가 여러 개의 게임을 제공할 때 각 게임 서비스를 구분 지어서 부르는 이름입니다. 서비스명은 특정 서비스를 나타내는 서버와 클라이언트 간 약속된 문자열입니다. 이후 과정에서 서비스명을 입력할 때 사용하게 되므로 기억해 두어야 합니다.
여기에서는 Sync라는 이름을 가진 서비스를 사용합니다. game 부분의 serviceName에 아래와 같이 내용을 수정합니다.
"serviceName" : "Sync",
채널에 대해
채널은 단일 서버군을 논리적으로 나눌 수 있는 방법 중 하나입니다. 예제에서 채널을 사용하지 않으므로 이 문서에서는 자세한 설명을 생략하겠습니다. 채널을 사용하지 않으므로 game 부분의 channelIDs에 아래와 같이 내용을 수정합니다.
"channelIDs" : [""],
이렇게 작성 완료한 GameAnvil 서버 설정 파일의 내용은 아래와 같습니다.
"game": [
    {
      "nodeCnt": 1,
      "serviceId": 1,
      "serviceName": "Sync",
      "channelIDs": [""], // 노드마다 부여할 채널 ID. (유니크하지 않아도 됨. ""는 채널 사용하지 않음을 의미)
      "userTimeout": 5000 // 클라이언트의 접속 끊김 이후 유저 객체를 서버에서 제거하지 않고 얼마동안 관리할지 설정
    }
  ]
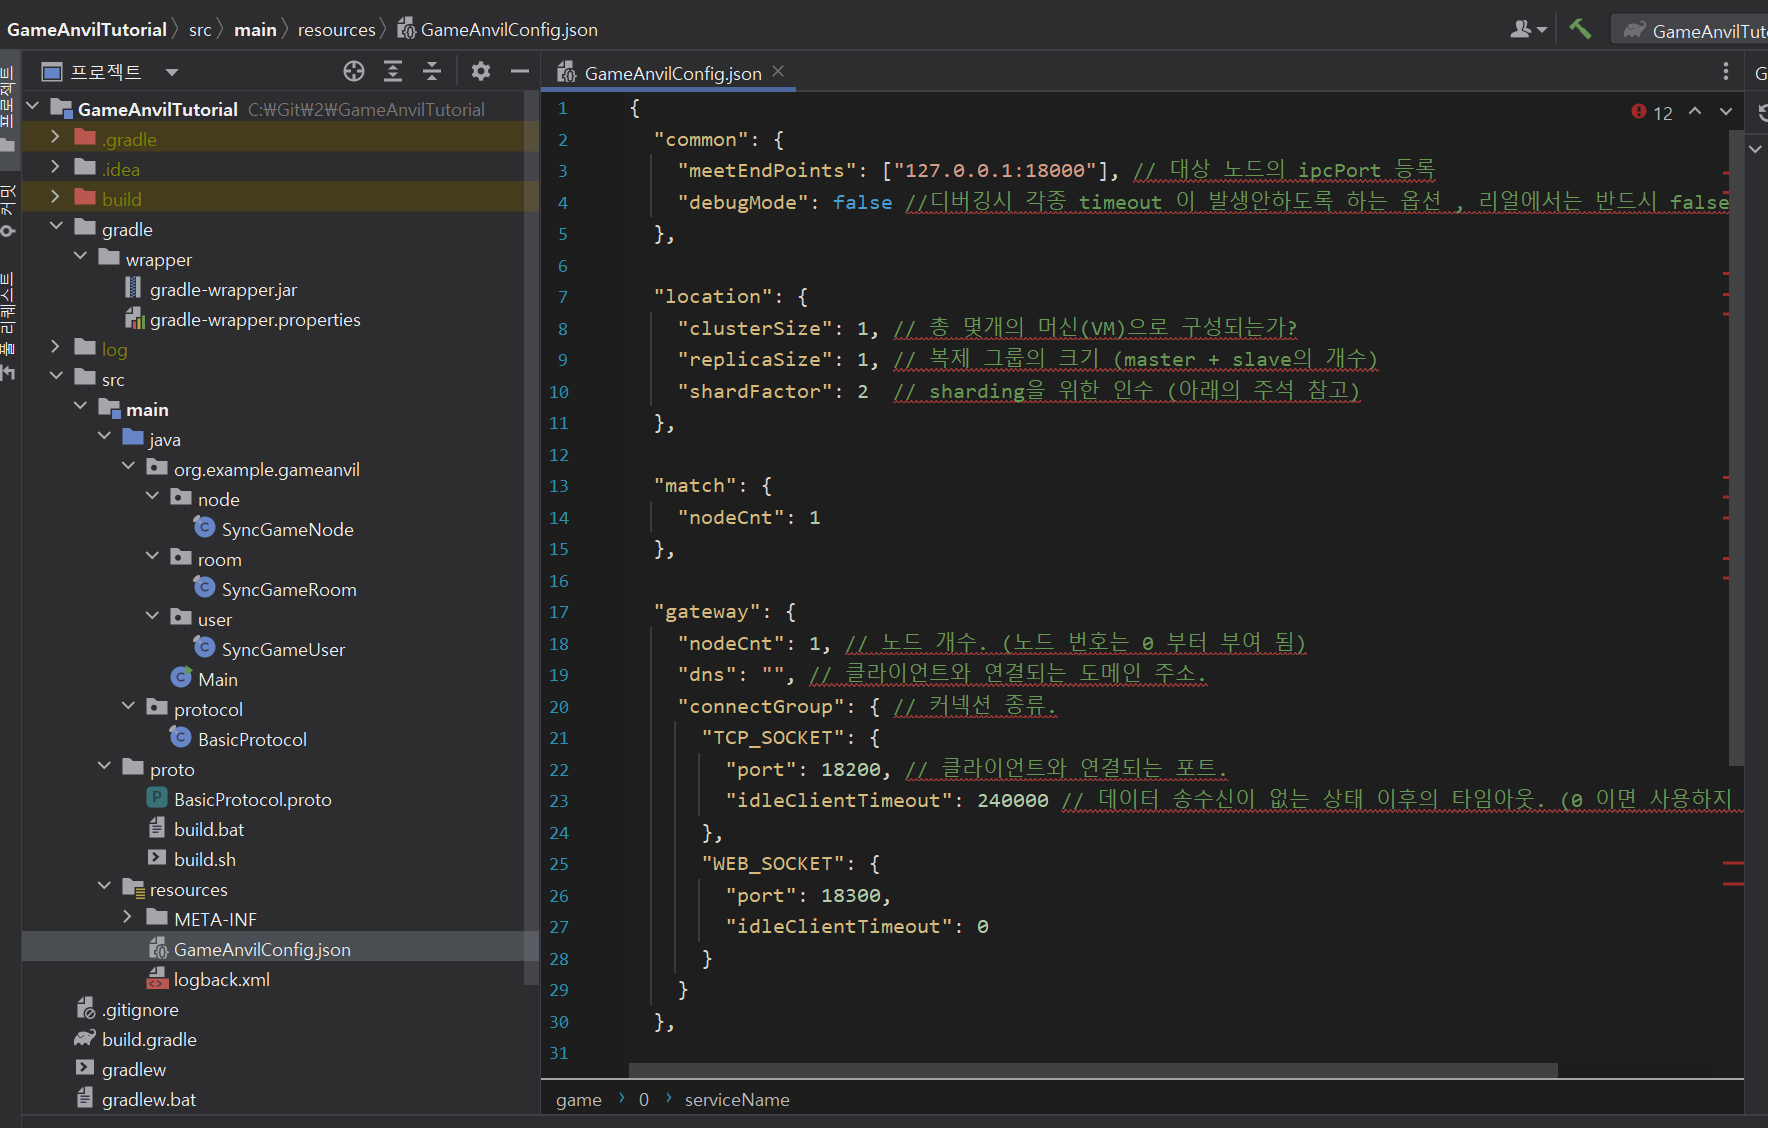
참고로 gateway 설정을 보면 TCP_SOCKET 커넥션은 18200 포트를 사용하는 것으로 설정되어 있는 것을 확인할 수 있습니다. 이는 클라이언트와 연결되는 포트로, 이후 클라이언트 프로젝트에서 서버 접속 정보를 기입하는 부분에서 이 포트 번호를 사용하게 됩니다.
GameAnvil 서버 구동
Java 버전 설정
GameAnvil은 Java 8 버전과 11 버전을 지원합니다. 버전에 따라 일부 설정 방법이 다를 수 있으며, 여기에서는 Java 11 버전을 사용하였습니다.
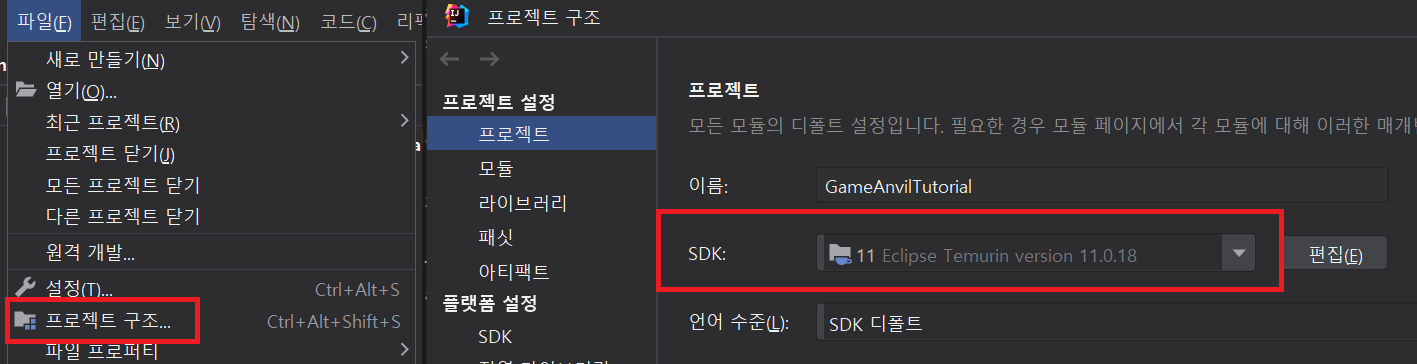
먼저 jdk 설정을 확인하겠습니다. 좌상단 메뉴에서 File > Project Structure를 선택하여 Project Structure 창을 엽니다. 맥 사용자의 경우 Command + ; 단축키를 사용할 수 있습니다.
Project 탭에서 SDK 설정을 확인합니다. 만약 설정된 SDK가 없다면 Add SDK > Download JDK를 통해서 원하는 버전의 JDK를 다운로드해 설정합니다. Language level은 SDK default로 설정합니다. 다음으로 Modules 탭에서 Language level을 Project default로 설정합니다.
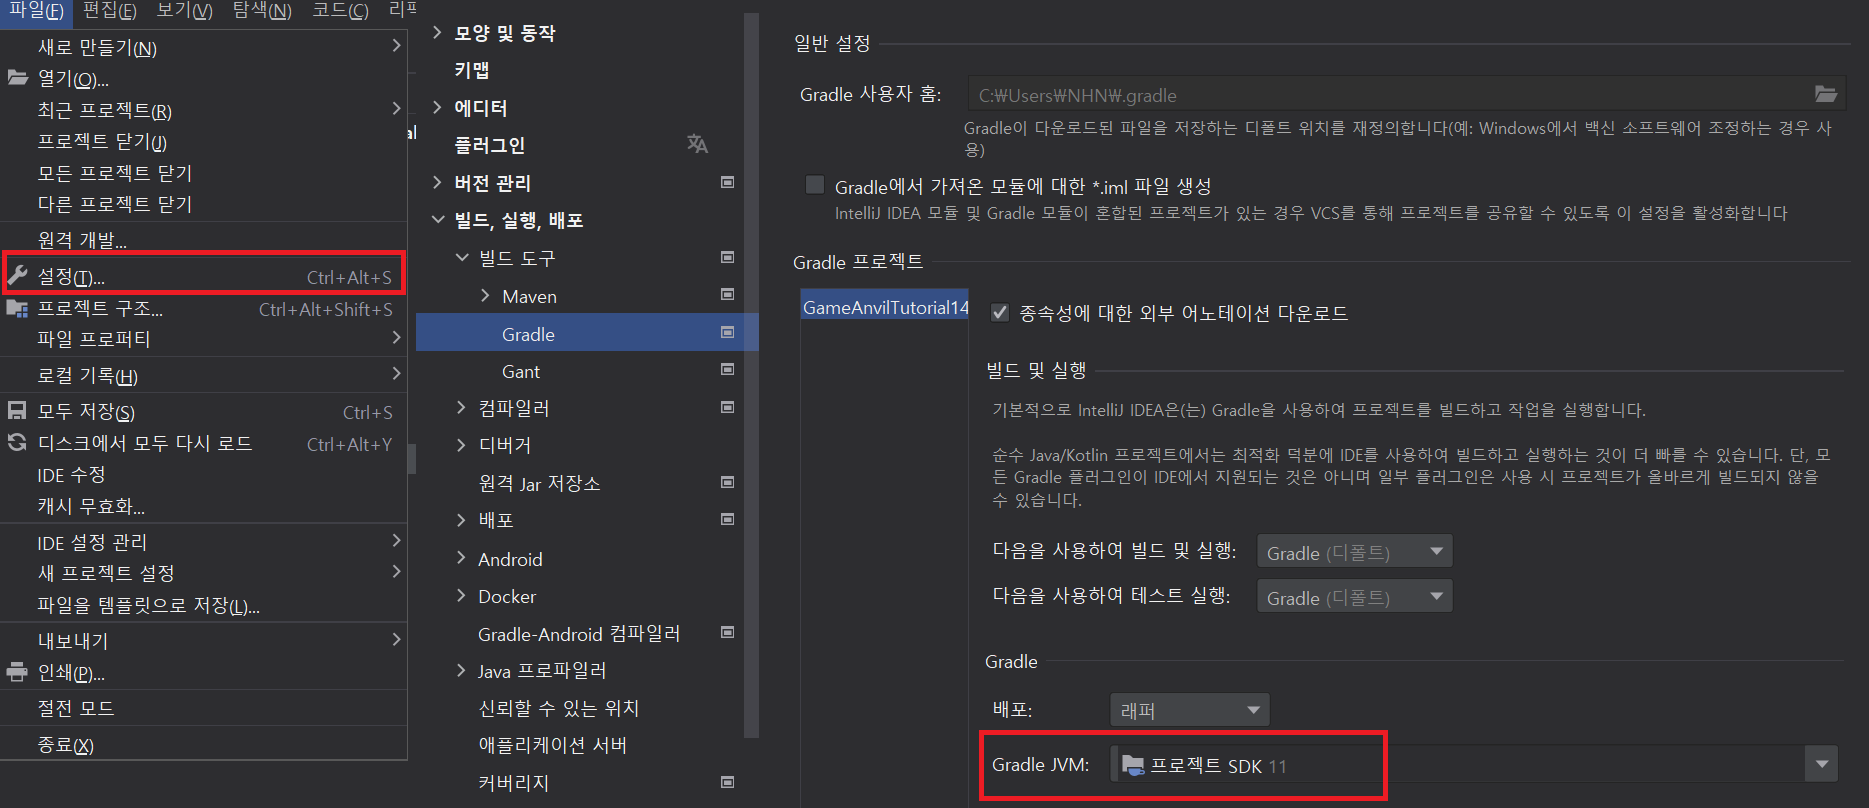
설정 메뉴에서 gradle에서 사용하는 JVM을 확인합니다. 프로젝트 SDK와 동일한 gradle 버전으로 설정합니다.
서버 구동
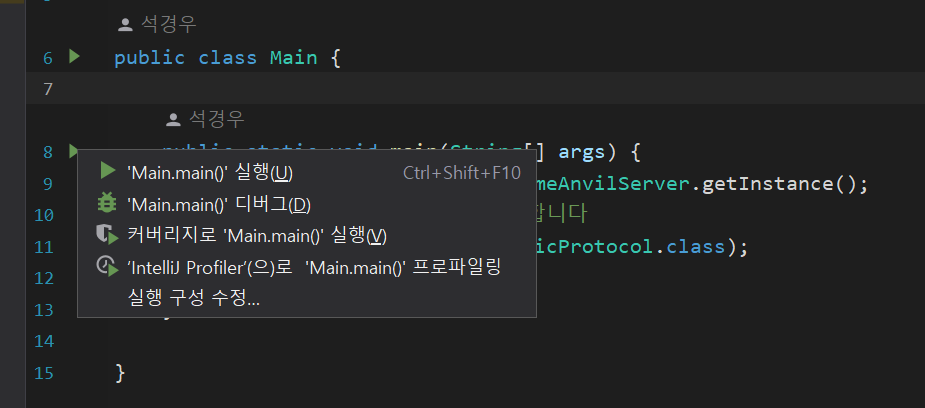
실행 설정이 완료되면 Main 클래스의 main() 함수 좌측의 초록색 삼각형 아이콘을 클릭하여 Main.main() 실행을 선택합니다. 이렇게 한 번 실행한 이후에는 IntelliJ 우측 상단의 초록색 삼각형 Run 아이콘을 클릭해도 서버가 실행됩니다.
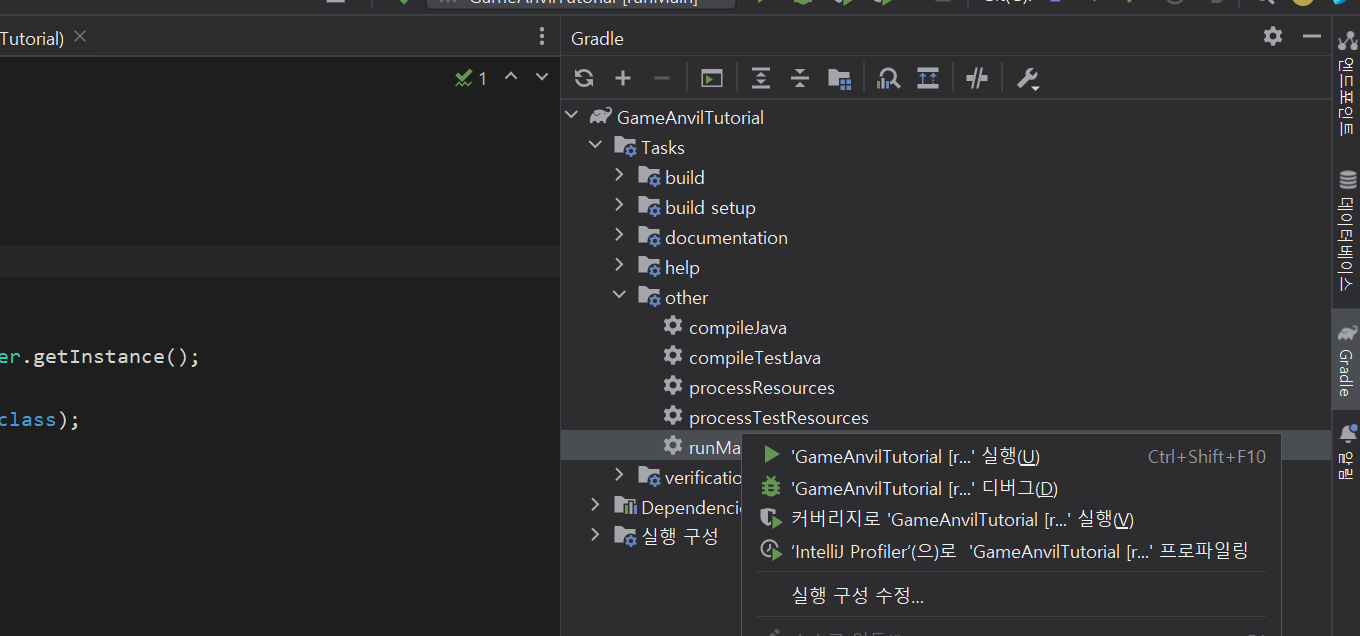
build.gradle에는 편의를 위한 JVM 옵션이 미리 설정되어 있습니다. 이러한 설정을 활용하여 서버를 실행시키려면 IntelliJ의 Gradle 창에서 Task > others > runMain을 우클릭 후 GameAnvilTutorial 실행을 클릭합니다.
서버가 정상적으로 구동되면 서버 구동 상태 관련 로그들이 다수 출력됩니다.
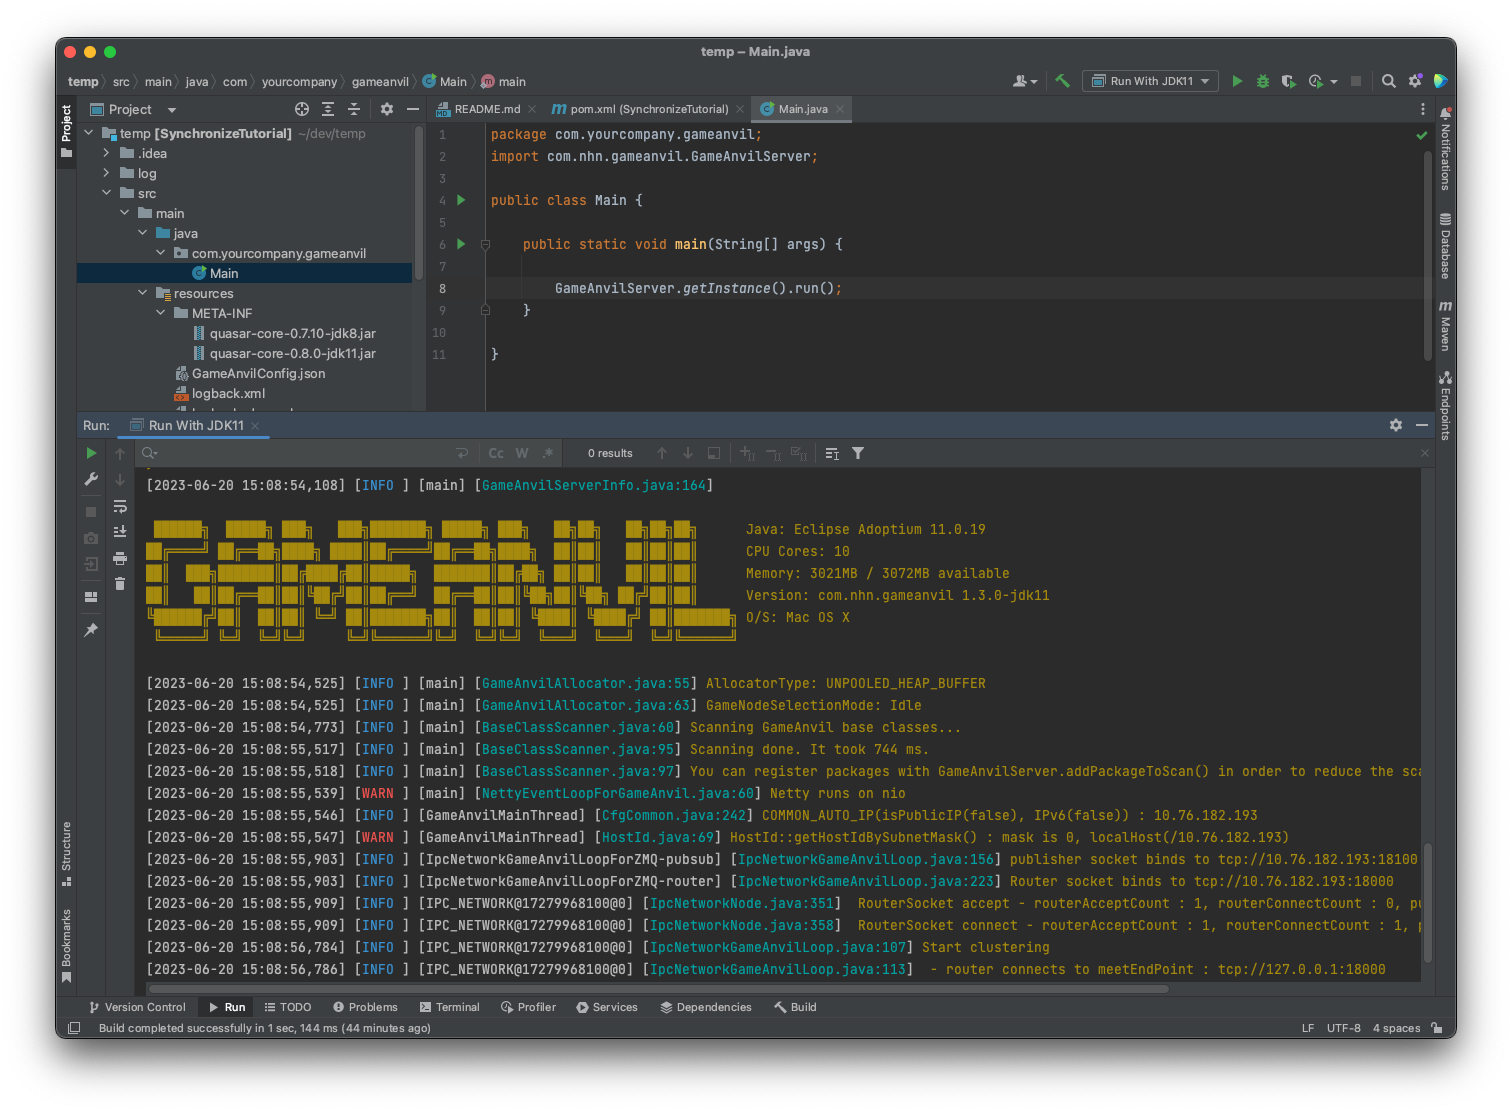
GameAnvil 서버는 여러 개의 노드들로 구성되어 있습니다. 이 노드들은 서버가 수행할 기능을 여러 개의 역할로 분담합니다. 아직은 서버 초기 구동만 확인했을 뿐, 노드나 다른 서버 구동을 위한 코드 작성을 하지 않았기 때문에 완전히 준비된 상태는 아닙니다.
각각의 노드는 코드를 실행하기 위해 준비하는데 시간이 필요하며, 각 노드가 준비 완료되면 onReady 로그를 출력합니다. 클라이언트가 서버로 접속하는데 직접적인 역할을 수행하는 노드는 게이트웨이 노드입니다. 게이트웨이 노드가 준비되어 GatewayNode의 onReady 로그가 출력 되었다면 GameAnvil 서버는 언제든 접속이 가능한 상태가 된 것입니다.
다음 챕터에서는 GameAnvil의 여러 노드 중, 샘플 게임 동작을 위해 필요한 BasicGameNode를 구현해 보겠습니다.
GameAnvil 서버 기능 구현
게임 노드 구현
GameAnvil은 Base- 접두사를 붙인 여러 노드 클래스를 제공합니다. 기본적인 노드의 기능은 엔진 내부에 이미 구현되어 있고, 사용자는 이 Base 클래스들을 상속받아서 다양한 콜백 기능을 사용할 수 있습니다. 이번 예제에서는 BaseGameNode 클래스를 상속 받은 게임 노드 클래스를 만들어 사용해 보려고 합니다.
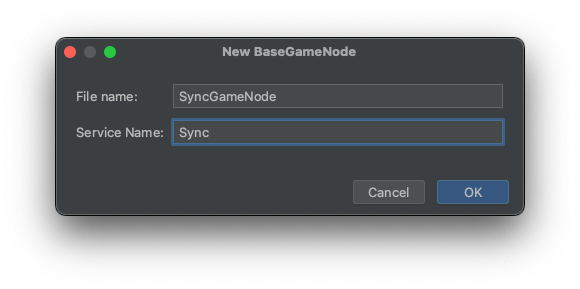
프로젝트 패널에서 Main 클래스가 위치한 경로를 마우스 오른쪽 버튼으로 클릭한 뒤 New > Package를 선택해 node라는 이름의 새로운 패키지를 생성합니다. 그리고 node 패키지를 다시 마우스 오른쪽 버튼으로 클릭한 뒤 New > BaseGameNode를 선택합니다. 파일 생성 대화 상자가 열리면 File name에 SyncGameNode, Service Name에 Sync를 입력한 뒤 OK를 클릭합니다.
이 기능은 앞서 템플릿을 설치할 때 File templates(schemes)를 함께 적용해 주었기 때문에 사용할 수 있습니다. New > BaseGameNode 항목이 보이지 않을 경우 New > Java Class를 선택해서 빈 클래스를 생성합니다.
자동으로 작성된 코드는 아래와 같습니다.
import co.paralleluniverse.fibers.SuspendExecution;
import com.nhn.gameanvil.annotation.ServiceName;
import com.nhn.gameanvil.node.game.BaseGameNode;
import com.nhn.gameanvil.node.game.data.BaseChannelRoomInfo;
import com.nhn.gameanvil.node.game.data.BaseChannelUserInfo;
import com.nhn.gameanvil.node.game.data.ChannelUpdateType;
import com.nhn.gameanvil.packet.Payload;
import com.nhn.gameanvil.packet.message.MessageDispatcher;

@ServiceName("Sync")
public final class SyncGameNode extends BaseGameNode {

    private static final MessageDispatcher<SyncGameNode> messageDispatcher = new MessageDispatcher<>();

    static {
        // messageDispatcher.registerMsg();
    }

    @Override
    public MessageDispatcher<SyncGameNode> getMessageDispatcher() {
        return messageDispatcher;
    }

    @Override
    public void onInit() throws SuspendExecution {

    }

    @Override
    public void onPrepare() throws SuspendExecution {

    }

    @Override
    public void onReady() throws SuspendExecution {

    }

    @Override
    public void onPause(Payload payload) throws SuspendExecution {

    }

    @Override
    public void onResume(Payload payload) throws SuspendExecution {

    }

    @Override
    public void onShutdown() throws SuspendExecution {

    }

    @Override
    public boolean onNonStopPatchSrcStart() throws SuspendExecution {
        return false;
    }

    @Override
    public boolean onNonStopPatchSrcEnd() throws SuspendExecution {
        return false;
    }

    @Override
    public boolean canNonStopPatchSrcEnd() throws SuspendExecution {
        return false;
    }

    @Override
    public boolean onNonStopPatchDstStart() throws SuspendExecution {
        return false;
    }

    @Override
    public boolean onNonStopPatchDstEnd() throws SuspendExecution {
        return false;
    }

    @Override
    public boolean canNonStopPatchDstEnd() throws SuspendExecution {
        return false;
    }

    @Override
    public void onChannelUserInfoUpdate(ChannelUpdateType channelUpdateType, BaseChannelUserInfo baseChannelUserInfo, int userId, String accountId) throws SuspendExecution {

    }

    @Override
    public void onChannelRoomInfoUpdate(ChannelUpdateType channelUpdateType, BaseChannelRoomInfo baseChannelRoomInfo, int userId) throws SuspendExecution {

    }

    @Override
    public void onChannelInfo(Payload outPayload) throws SuspendExecution {

    }
}
노드에 대해
모든 노드는 무언가 처리를 시작할 수 있는 루프가 시작되었는지에 따라서 상태를 가집니다. 아래는 노드가 가질 수 있는 상태 중 일부입니다.
- INIT
- PREPARE
- READY
- SHUTDOWN
노드는 INIT 상태부터 시작하여 기재된 순서대로 상태를 바꾸어 가면서 READY 상태에 도달합니다. READY 상태는 노드가 주어진 작업을 처리하고 수행할 수 있는 상태임을 나타냅니다.
자동 생성된 코드에는 각 노드의 상태에 후크된 콜백을 오버라이딩 하는 코드가 포함되어 있습니다. 예를 들면, onInit() 메서드에 특정 로직을 작성하면 노드가 초기화(Init)를 시작하기 바로 직전 단계에서 해당 콜백이 삽입되어 호출됩니다.
GameAnvil은 대부분의 코드가 미리 준비되어 있기 때문에 이 단계에서 더 작성할 코드는 없습니다. 생성한 그대로 게임 노드를 사용하면 됩니다.
유저 타입에 대해
각 게임 노드에서 방에 참여해 패킷을 주고받는 주체가 유저인데, 각 유저 구현을 구분하는 약속된 문자열입니다.
GameAnvil에서 제공되는 방 기반의 구현을 사용하기 위해서는 위에서 구현한 노드 외에 게임 유저와 게임 룸 클래스가 필요합니다. 클래스 상속과 애너테이션 부착만으로 쉽게 구현하는 방법을 설명하겠습니다.
게임 유저 구현
클라이언트가 서버에 로그인하게 되면 서버에서는 해당 클라이언트 정보를 게임 유저라는 객체로 만들어 메모리에 저장하고 유지합니다. 게임 유저가 어떤 정보를 표현할지는 사용자가 필요에 따라 자유롭게 구현이 가능합니다. 게임 유저의 구현 또한 클래스의 상속과 콜백 오버라이딩을 통해 일관성 있게 구현할 수 있습니다.
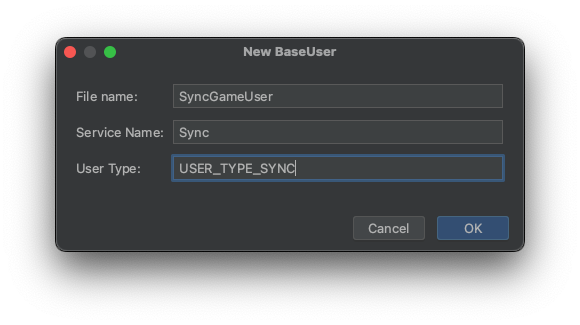
프로젝트 패널에서 Main 클래스가 위치한 경로를 마우스 오른쪽 버튼으로 클릭한 뒤 New > Package를 선택해 user라는 이름의 새로운 패키지를 생성합니다. 그리고 user 패키지를 다시 마우스 오른쪽 버튼으로 클릭한 뒤 New > BaseUser를 선택합니다. 파일 생성 대화 상자가 열리면 File name에 SyncGameUser, Service Name에 Sync, UserType에 USER_TYPE_SYNC를 입력한 뒤 OK를 클릭합니다.
유저 타입은 각 유저 구현을 구분하는 서버와 클라이언트 간 약속된 문자열이고, 이후 클라이언트 프로젝트 구현 시 유저 타입을 사용해야 하므로 기억해 둡니다.
자동으로 생성된 코드는 아래와 같습니다.
import co.paralleluniverse.fibers.SuspendExecution;
import com.nhn.gameanvil.annotation.ServiceName;
import com.nhn.gameanvil.annotation.UserType;
import com.nhn.gameanvil.node.game.BaseUser;
import com.nhn.gameanvil.node.game.data.RoomMatchResult;
import com.nhn.gameanvil.packet.Payload;
import com.nhn.gameanvil.packet.message.MessageDispatcher;
import com.nhn.gameanvil.serializer.TransferPack;

@ServiceName("Sync")
@UserType("USER_TYPE_SYNC")
public final class SyncGameUser extends BaseUser {

    private static final MessageDispatcher<SyncGameUser> messageDispatcher = new MessageDispatcher<>();

    static {
        // messageDispatcher.registerMsg();
    }

    @Override
    public MessageDispatcher<SyncGameUser> getMessageDispatcher() {
        return messageDispatcher;
    }

    @Override
    public boolean onLogin(Payload payload, Payload sessionPayload, Payload outPayload) throws SuspendExecution {
        boolean isSuccess = true;
        return isSuccess;
    }

    @Override
    public void onPostLogin() throws SuspendExecution {

    }

    @Override
    public boolean onLoginByOtherDevice(String newDeviceId, Payload outPayloadForKickUser) throws SuspendExecution {
        return true;
    }

    @Override
    public boolean onLoginByOtherUserType(String userType, Payload outPayload) throws SuspendExecution {
        return true;
    }

    @Override
    public void onLoginByOtherConnection(Payload outPayload) throws SuspendExecution {

    }

    @Override
    public boolean onReLogin(Payload payload, final Payload sessionPayload, Payload outPayload) throws SuspendExecution {
        boolean isSuccess = true;
        return isSuccess;
    }

    @Override
    public void onDisconnect() throws SuspendExecution {
    }


    @Override
    public void onPause() throws SuspendExecution {

    }

    @Override
    public void onResume() throws SuspendExecution {

    }

    @Override
    public void onLogout(Payload payload, Payload outPayload) throws SuspendExecution {

    }

    @Override
    public boolean canLogout() throws SuspendExecution {
        boolean canLogout = true;
        return canLogout;
    }

    @Override
    public void onPostLeaveRoom() throws SuspendExecution {

    }

    @Override
    public RoomMatchResult onMatchRoom(String roomType, String matchingGroup, String matchingUserCategory, Payload payload) throws SuspendExecution {
        return null;
    }

    @Override
    public boolean onMatchUser(String roomType, String matchingGroup, Payload payload, Payload outPayload) throws SuspendExecution {
        return false;
    }

    @Override
    public boolean canTransfer() throws SuspendExecution {
        return true;
    }

    @Override
    public void onTransferOut(TransferPack transferPack) throws SuspendExecution {

    }

    @Override
    public void onTransferIn(TransferPack transferPack) throws SuspendExecution {

    }

    @Override
    public void onPostTransferIn() throws SuspendExecution {

    }

    @Override
    public boolean onCheckMoveOutChannel(String destinationChannelId, Payload payload, Payload errorPayload) throws SuspendExecution {
        boolean canMoveOut = false;
        return canMoveOut;
    }

    @Override
    public void onMoveOutChannel(String destinationChannelId, Payload outPayload) throws SuspendExecution {
    }

    @Override
    public void onPostMoveOutChannel() throws SuspendExecution {
    }

    @Override
    public void onMoveInChannel(String sourceChannelId, Payload payload, Payload outPayload) throws SuspendExecution {
    }

    @Override
    public void onPostMoveInChannel() throws SuspendExecution {

    }
}
게임 유저는 클라이언트가 서버에 로그인 요청을 함으로써 생성됩니다. 서버에서는 클라이언트에서 전송된 페이로드 등을 통해서 로그인 허용 여부를 결정해서 반환값으로 내보낼 수 있습니다. 주요 로직만 엔진 사용자가 작성하고, 로그인 성공이나 실패 처리는 엔진에서 담당합니다.
이 튜토리얼에서는 특별한 검증 과정 없이 로그인을 허용하도록 하기 위해서, onLogin 함수에서 항상 true를 반환하도록 하였습니다. 이렇게 하면 클라이언트에서 로그인 요청을 하였을 때 항상 유저 객체를 생성하고 성공 응답을 주게 됩니다.
게임 룸 구현
성공적으로 게임 유저로서 게임 노드에 접속하게 되면 이제 다른 유저들과 게임 룸을 통해서 패킷을 주고받을 수 있습니다. 게임 룸이란 패킷을 주고받는 유저들을 논리적으로 묶는 그룹입니다. 게임 룸의 구현 또한 클래스 상속과 콜백 오버라이딩을 통해 구현할 수 있습니다.
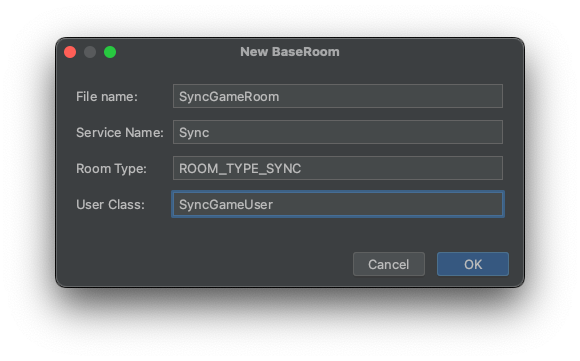
프로젝트 패널에서 Main 클래스가 위치한 경로를 마우스 오른쪽 버튼으로 클릭한 뒤 New > Package를 선택해 room라는 이름의 새로운 패키지를 생성합니다. 그리고 room 패키지를 다시 마우스 오른쪽 버튼으로 클릭한 뒤 New > BaseRoom을 선택합니다. 파일 생성 대화 상자가 열리면 File name에 SyncGameRoom, Service Name에 Sync, Room Type에 ROOM_TYPE_SYNC, User Class에 SyncGameUser를 입력한 뒤 OK를 클릭합니다.
룸 타입은 각 룸 구현을 구분하는 서버와 클라이언트 간 약속된 문자열이고, 이후 클라이언트 프로젝트 구현 시 룸 타입을 입력해야 하는 부분이 있으므로 기억해 둡니다.
자동으로 생성된 코드는 아래와 같습니다.
import co.paralleluniverse.fibers.SuspendExecution;
import com.nhn.gameanvil.annotation.RoomType;
import com.nhn.gameanvil.annotation.ServiceName;
import com.nhn.gameanvil.node.game.BaseRoom;
import com.nhn.gameanvil.node.game.RoomMessageDispatcher;
import com.nhn.gameanvil.packet.Payload;
import com.nhn.gameanvil.serializer.TransferPack;

import java.util.List;

@ServiceName("Sync")
@RoomType("ROOM_TYPE_SYNC")
public final class SyncGameRoom extends BaseRoom<SyncGameUser> {

    private static final RoomMessageDispatcher<SyncGameRoom, SyncGameUser> messageDispatcher = new RoomMessageDispatcher<>();

    static {
        // messageDispatcher.registerMsg();
    }

    @Override
    public RoomMessageDispatcher<SyncGameRoom, SyncGameUser> getMessageDispatcher() {
        return messageDispatcher;
    }

    @Override
    public void onInit() throws SuspendExecution {
    }

    @Override
    public void onDestroy() throws SuspendExecution {
    }

    @Override
    public boolean onCreateRoom(SyncGameUser user, Payload inPayload, Payload outPayload) throws SuspendExecution {
        return true;
    }

    @Override
    public boolean onJoinRoom(SyncGameUser user, Payload inPayload, Payload outPayload) throws SuspendExecution {
        return true;
    }

    @Override
    public boolean onLeaveRoom(SyncGameUser user, Payload inPayload, Payload outPayload) throws SuspendExecution {
        return true;
    }

    @Override
    public void onLeaveRoom(SyncGameUser sampleUser) throws SuspendExecution {

    }

    @Override
    public void onPostLeaveRoom() throws SuspendExecution {

    }

    @Override
    public void onRejoinRoom(SyncGameUser user, Payload outPayload) throws SuspendExecution {

    }

    @Override
    public boolean canTransfer() throws SuspendExecution {
        return true;
    }

    @Override
    public void onTransferOut(TransferPack transferPack) throws SuspendExecution {

    }

    @Override
    public void onTransferIn(List<SyncGameUser> userList, TransferPack transferPack) throws SuspendExecution {
    }

    @Override
    public void onPause() throws SuspendExecution {

    }

    @Override
    public void onResume() throws SuspendExecution {

    }
}
게임 룸은 게임 유저가 서버에 방 생성 요청을 하면 생성됩니다. 클라이언트 측에서는 간단하게 메서드 호출만으로 방을 생성하고 존재하는 방에 입장할 수 있습니다. 유저가 방에 입장하는 시점 또는 방이 생성되는 시점에 커스텀 코드를 삽입하고 싶다면, 적절한 콜백을 오버라이딩 하여 쉽게 코드를 끼워 넣기 할 수 있습니다.
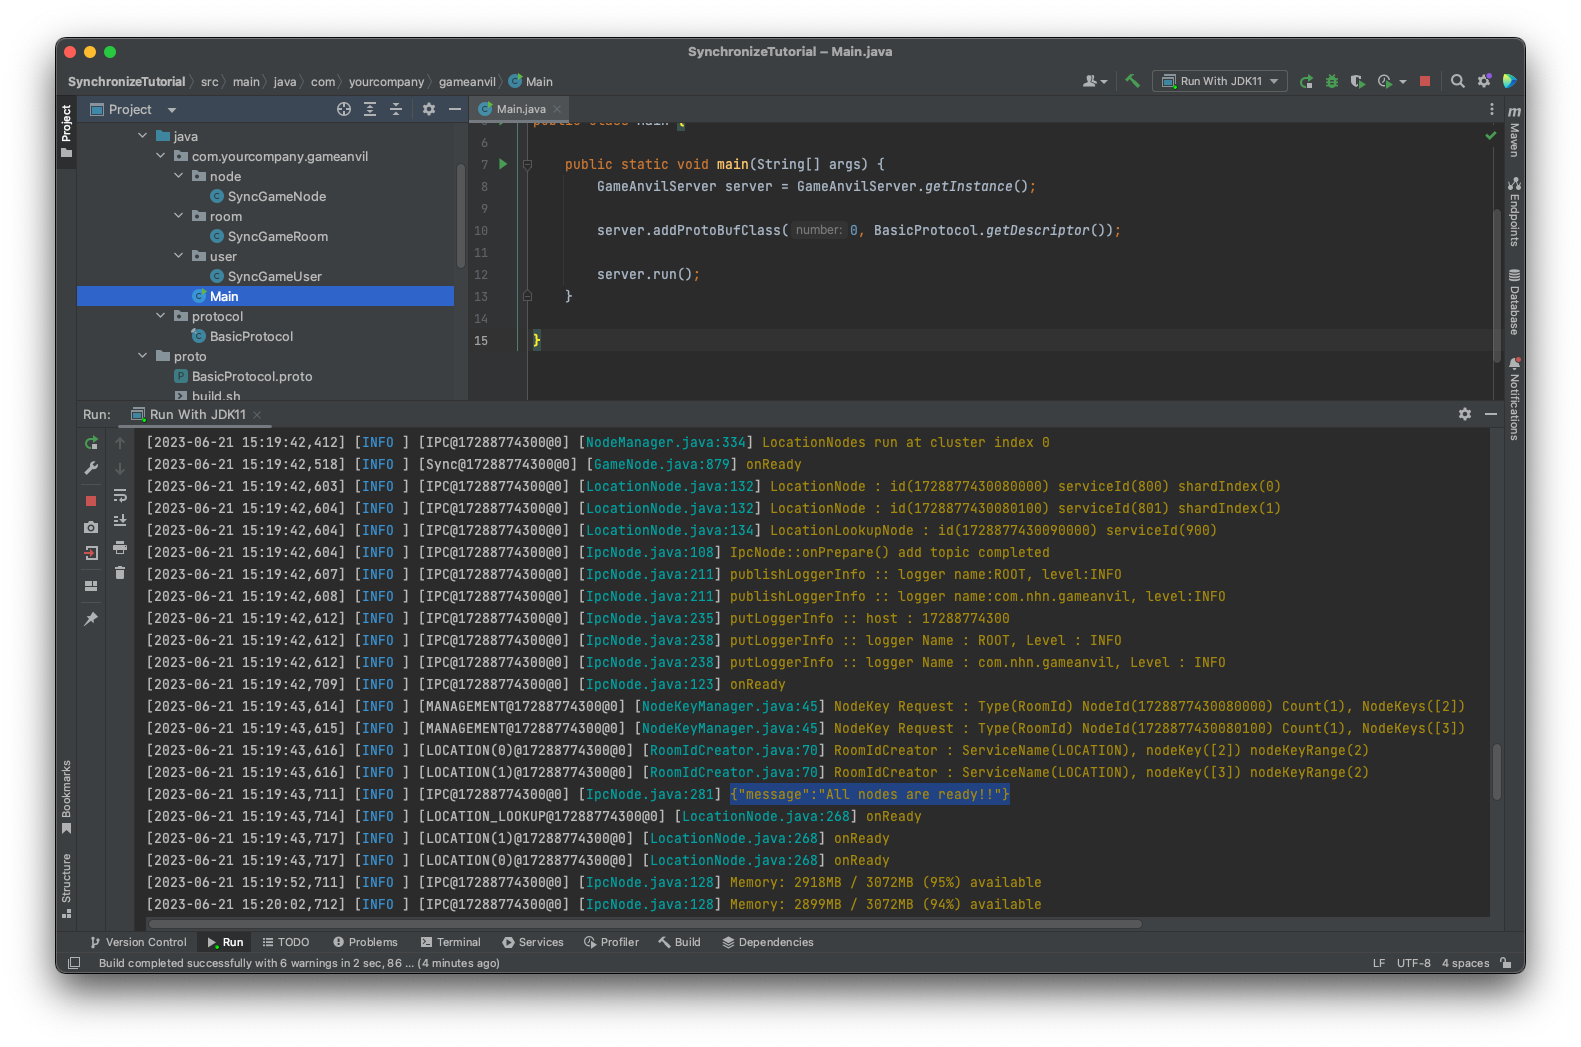
서버 구현을 마무리하며
여기까지 기초 튜토리얼 샘플 실행을 위한 서버 구축이 완료되었습니다. 다시 서버를 실행해 보면, 로그 중에서 {"message":"All nodes are ready!!"}라는 문구를 확인할 수 있습니다. 이 로그가 떴다는 것은 GameAnvil 서버가 정상적으로 실행되었음을 의미합니다.
이제 클라이언트의 요청을 받을 서버가 준비되었습니다. 다음 단계에서는 GameAnvil 커넥터와 유니티 샘플 프로젝트를 활용하여 클라이언트를 구현해 보겠습니다.
실습 환경 준비 - 클라이언트 프로젝트
아래 단계를 진행하며 수정을 완료하게 되는 최종 클라이언트 샘플 프로젝트는 아래 링크를 통해 다운로드할 수 있습니다. 유니티 패키지를 다운로드하여 구성한 초기 유니티 프로젝트에서 여러 단계를 거쳐 클라이언트 기능을 구현하고 나면 결국 어떤 구조가 되는지 미리 확인하고 싶다면 해당 프로젝트를 다운로드해 참고하면 됩니다.
GameAnvilConnector 다운로드
GameAnvil 커넥터 dll 사용을 위해서 아래 파일을 다운로드합니다.
GameAnvil-Connector.unitypackage
Unity Package 다운로드
GameAnvil 커넥터 사용 실습을 위해 아래 링크에서 Unity 패키지를 다운로드합니다.
GameAnvil-Tutorial-Sample.unitypackage
Unity 프로젝트 생성
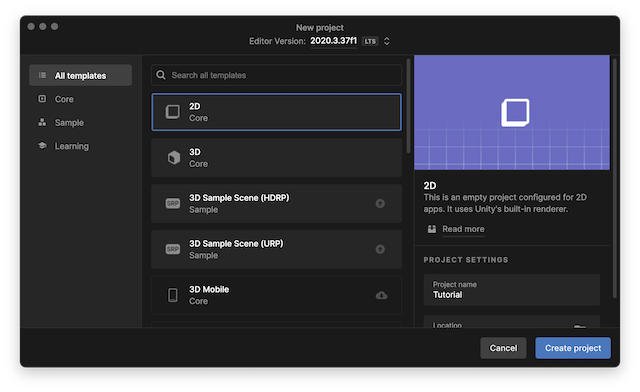
유니티 허브를 실행한 후 우상단의 New Project 버튼을 클릭합니다. 유니티 허브의 버전은 무관합니다.
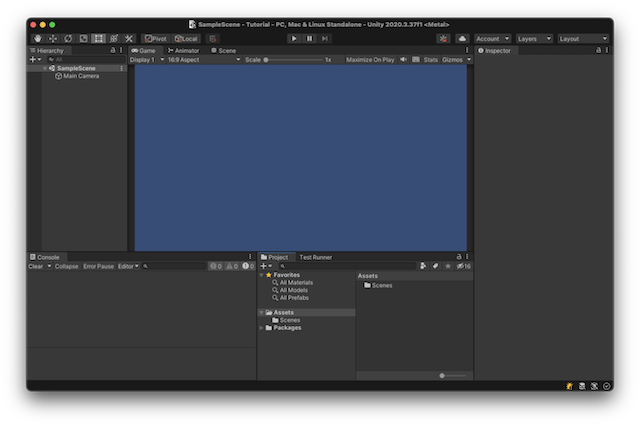
템플릿으로 2D를 선택하고 프로젝트 이름과 저장 위치를 확인한 뒤 Create project를 클릭합니다. 이 예제에서 사용한 Unity 버전은 2020.3.37f1이며, 실습 시 다른 버전을 사용해도 무방하나 모든 경우를 테스트해 본 것이 아니기 때문에 샘플 실행 버전과 동일한 환경에서 진행할 것을 권장합니다.
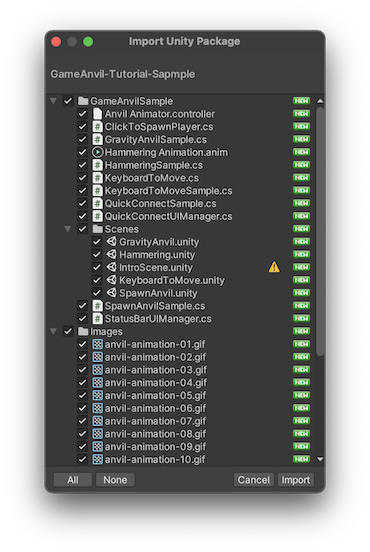
GameAnvilConnector 및 Unity Package 임포트
프로젝트 뷰를 마우스 오른쪽 버튼으로 클릭하고 Import Package > Custom Package... 를 선택한 뒤 파인더나 파일 탐색기가 열리면 이전 단계에서 내려받은 Unity 패키지를 선택합니다. GameAnvilConnector, Tutorial-Sample순으로 Import를 실행합니다.
GameAnvilSample 폴더 안의 Scene 폴더에서 IntroScene을 열어서 아래와 같은 화면을 확인합니다.
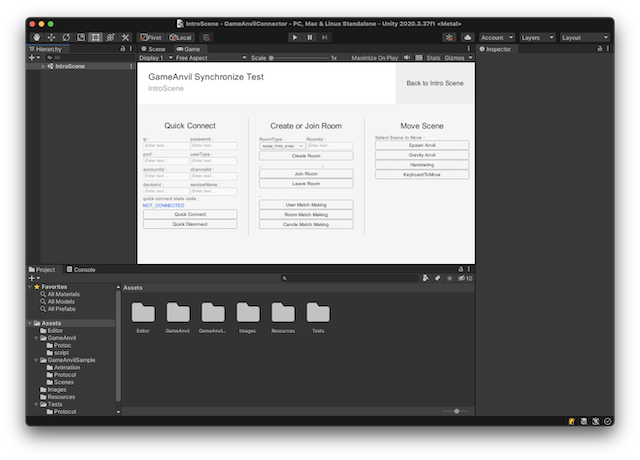
File > Build Settings에서 Add Open Scene을 클릭해 빌드 시 포함되도록 설정합니다.

GameAnvilConnector 추가
Hierarchy 뷰에서 마우스 오른쪽 버튼을 클릭하고 GameAnvil > GameAnvilConnector를 클릭합니다. GameAnvilConnector 게임 오브젝트가 생성되며, GameAnvilConnector 게임 오브젝트의 인스펙터상에서 아래와 같이 설정을 수정할 수 있습니다.
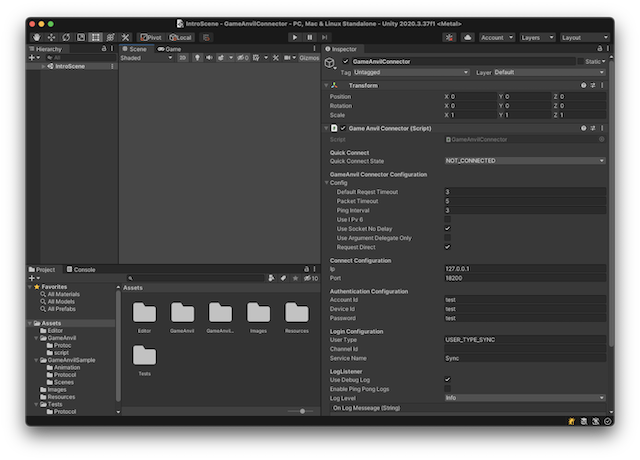
- QuickConnect: 빠른 연결 진행 상태를 표시합니다.
- GameAnvil Connector Configuration: 커넥터 관련 설정 묶음입니다.
- Connect Configuration: 빠른 연결 접속 정보를 수정할 수 있습니다.
- Authentication Configuration: 빠른 연결 인증 정보를 수정할 수 있습니다.
- Login Configuration: 빠른 연결 로그인 정보를 수정할 수 있습니다.
- LogListener: GameAnvil 커넥터 내부에서 발생하는 로그 출력을 관리합니다.
지금은 세부 설정에 대해서 자세히 알고 있지 않아도 괜찮습니다. 튜토리얼을 진행하면서 각 항목에 대한 설명을 확인할 수 있습니다.
빠른 연결
GameAnvil 클라이언트가 GameAnvil 서버에 접속하기 위해서는, Connect, Authentication, Login의 세 단계를 거쳐야 합니다.
- Connect: 서버와 클라이언트 간에 통신할 수 있도록 소켓을 생성하여 연결합니다.
- Auth: 클라이언트가 서버를 통해 데이터를 송수신할 수 있도록 허용할지 여부를 서버에서 결정합니다.
- Login: 서버의 메모리에 클라이언트의 정보를 표현하는 객체, 즉, 게임 유저를 생성합니다.
각 단계는 순차적으로 진행되며, 이전 단계가 정상적으로 완료되지 않으면 다음 단계를 진행할 수 없습니다. 각 단계의 처리 성공 여부는 콜백으로 전달된 파라미터를 통해 값을 얻을 수 있습니다.
여기에서는 Hierarchy 뷰상의 Canvas 게임 오브젝트에 컴포넌트로 추가되어 있는 QuickConnectUIManager 스크립트를 소스 코드 편집기에서 열어 구현을 추가해 가며 각 과정을 직접 실습합니다.

Connect 관련 필드 설정
접속할 서버 정보를 기재합니다. 로컬에서 서버를 직접 띄우는 경우이므로 ip는 127.0.0.1을 사용하겠습니다. port는 게이트웨이 노드의 기본 포트인 18200을 사용하겠습니다. 따로 설정할 필요 없이 GameAnvilConnector의 기본값을 그대로 사용하면 됩니다. ip와 port 정보는 필요한 경우 플레이 모드에서 수정할 수 있도록 유니티의 InputField와 연결하는 코드가 작성되어 있는 것을 확인할 수 있습니다.
void Start()
{
    ipInputField.text = GameAnvilConnector.getInstance().ip;
    portInputField.text = GameAnvilConnector.getInstance().port.ToString();

    ...생략...

    ipInputField.onValueChanged.AddListener(delegate { ipChanged(); });
    portInputField.onValueChanged.AddListener(delegate { portChanged(); });
}

void ipChanged()
{
    GameAnvilConnector.getInstance().ip = ipInputField.text;
}

void portChanged()
{
    if (!int.TryParse(portInputField.text, out GameAnvilConnector.getInstance().port))
    {
        GameAnvilConnector.getInstance().port = 11200;
    }
}
Authentication 관련 필드 설정
인증에 필요한 정보를 기재합니다. 인증에 필요한 정보로는 accountId, deviceId, password의 세 가지가 있습니다. 지금은 인증 단계를 무조건 통과하도록 서버 구현이 되어 있는 상태이기 때문에 어떤 값으로 설정해도 동작에 이상이 없을 것입니다. GameAnvilConnector의 기본 값인 test를 사용하도록 하고, 필요한 경우에는 플레이 모드에서 유니티의 InputField를 통해 입력된 값을 사용할 수 있도록 코드가 작성되어 있는 것을 확인할 수 있습니다.
void Start()
{
    ...생략...

    accountIdInputField.text = GameAnvilConnector.getInstance().accountId;
    deviceIdInputField.text = GameAnvilConnector.getInstance().deviceId;
    passwordInputField.text = GameAnvilConnector.getInstance().password;

    ...생략...

    accountIdInputField.onValueChanged.AddListener(delegate { accountIdChanged(); });
    deviceIdInputField.onValueChanged.AddListener(delegate { deviceIdChanged(); });
    passwordInputField.onValueChanged.AddListener(delegate { passwordChanged(); });

    ...생략...
}

void accountIdChanged()
{
    GameAnvilConnector.getInstance().accountId = accountIdInputField.text;
}

void deviceIdChanged()
{
    GameAnvilConnector.getInstance().deviceId = deviceIdInputField.text;
}

void passwordChanged()
{
    GameAnvilConnector.getInstance().password = passwordInputField.text;
}
Login 관련 필드 설정
로그인에 필요한 정보를 기재합니다. 로그인에 필요한 정보로는 유저 타입, 채널 아이디 그리고 서비스명이 있습니다. 서버 구현 당시에 작성한 유저 타입과 서비스명을 사용해야 합니다. 기본적으로 실행될 때 서버에서 지정해 두었던 값을 적용하도록 작성합니다. 필요한 경우 유니티의 InputField를 통해 값을 수정할 수 있도록 설정되어 있습니다.
void Start()
{
    ...생략...

    userTypeInputField.text = GameAnvilConnector.getInstance().userType;
    channelIdInputField.text = GameAnvilConnector.getInstance().channelId;
    serviceNameInputField.text = GameAnvilConnector.getInstance().serviceName;

    ...생략...

    userTypeInputField.onValueChanged.AddListener(delegate { userTypeChanged(); });
    channelIdInputField.onValueChanged.AddListener(delegate { channelIdChanged(); });
    serviceNameInputField.onValueChanged.AddListener(delegate { serviceNameChanged(); });

    ...생략...
}

void userTypeChanged()
{
    GameAnvilConnector.getInstance().userType = userTypeInputField.text;
}

void channelIdChanged()
{
    GameAnvilConnector.getInstance().channelId = channelIdInputField.text;
}

void serviceNameChanged()
{
    GameAnvilConnector.getInstance().serviceName = serviceNameInputField.text;
}
빠른 연결 요청 API 호출
빠른 연결 요청은 GameAnvilConnector를 통해 아래와 같이 요청할 수 있습니다.
GameAnvilConnector.getInstance().QuickConnect(DelOnQuickConnect);
빠른 연결이 끝나면, 요청시에 전달한 대리자를 통해 결과를 알 수 있습니다.
void DelOnQuickConnect(GameAnvilConnector.ResultCodeQuickConnect resultCode, UserAgent userAgent, GameAnvilConnector.QuickConnectResult quickConnectResult)
{
    Debug.Log(resultCode);
}
버튼을 클릭해서 빠른 연결 요청을 할 수 있도록 QuickConnect 메서드를 아래와 같이 구현합니다. 예제에서는 기본적으로 내용이 작성되어 있으므로 주석 처리만 해제합니다.
public void QuickConnect()
{
    GameAnvilConnector.getInstance().QuickConnect(DelOnQuickConnect);
    state = UIState.QUICK_CONNECTING;
}
빠른 연결이 끝나면 UI 상태를 전환하기 위해서 아래와 같이 DelOnQuickConnect 메서드를 수정합니다. 예제에서는 기본적으로 내용이 작성되어 있으므로 주석 처리만 해제합니다.
void DelOnQuickConnect(GameAnvilConnector.ResultCodeQuickConnect resultCode, UserAgent userAgent, GameAnvilConnector.QuickConnectResult quickConnectResult)
{
    if (quickConnectResult.resultCodeQuickConnect.Equals(GameAnvilConnector.ResultCodeQuickConnect.QUICK_CONNECT_SUCCESS))
    {
        state = UIState.QUICK_CONNECT_COMPLETE;
    }
    else
    {
        state = UIState.QUICK_CONNECT_FAIL;
    }
}
빠른 연결 종료 API 호출
빠른 연결 종료 또한 연결 요청 API와 마찬가지로 아래와 같이 요청할 수 있습니다.
GameAnvilConnector.getInstance().QuickDisconnect();
버튼을 클릭해서 빠른 연결 종료 API를 호출할 수 있도록 QuickDisconnect 메서드를 아래와 같이 구현합니다. 예제에서는 기본적으로 내용이 작성되어 있으므로 주석 처리만 해제합니다.
public void QuickDisconnect()
{
    GameAnvilConnector.getInstance().QuickDisconnect();
    state = UIState.NOT_QUICK_CONNECTED;
}
빠른 연결 진행 상황 출력
빠른 연결 진행 상황은 아래와 같이 읽어올 수 있습니다.
GameAnvilConnector.getInstance().GetQuickConnectState().ToString();
빠른 연결 진행 상황을 항상 알 수 있도록 화면에 표시하는 코드가 아래와 같이 Update 함수에 작성되어 있습니다.
void Update()
{
    quickConnectResultText.text = GameAnvilConnector.getInstance().GetQuickConnectState().ToString();
}
빠른 연결에 사용할 값을 GameAnvilConnector에 직접 입력
서버 구현 단계에서 사용한 서비스 이름이나 유저 타입 문자열 값을 클라이언트에서도 동일하게 사용해야 합니다. GameAnvilConnector의 인스펙터 창에서 Login Configuration에 아래와 같이 User Type과 Service Name을 서버와 동일한 값으로 설정합니다.

빠른 연결 요청/연결 종료 테스트
서버가 실행 중인지 확인한 뒤 Unity 에디터에서 플레이 모드로 진입합니다. Quick Connect를 클릭해 정상적으로 접속이 진행되는 것을 확인합니다.
빠른 연결을 시도하면 빠른 연결 상태창에 아래와 같은 순서로 Connect, Authenticate, Login 과정이 진행될 것입니다.
- NOT_CONNECTED
- CONNECT_IN_PROGRESS
- CONNECT_COMPLETE
- AUTHENTICATE_IN_PROGRESS
- AUTHENTICATE_COMPLETE
- LOGIN_IN_PROGRESS
- LOGIN_COMPLETE
- READY
접속이 완료되었다면, READY 상태로 표시됩니다. 이 상태로 접속 종료 버튼을 눌러 정상적으로 접속 종료가 되는지 확인합니다.
게임 룸 생성 및 입장
게임 룸 생성 요청 API 사용
GameAnvil 커넥터의 룸 생성 요청 API를 호출해서 클라이언트는 쉽게 서버에게 게임 룸 생성을 요청할 수 있습니다. 게임 룸 생성 요청 메서드를 호출할 때 파라미터로 룸 타입을 넘겨야 하는데, 서버와 사전에 합의된 룸 타임 값을 전달하면 됩니다.
GameAnvilConnector.getInstance().getUserAgent().CreateRoom("ROOM_TYPE_SYNC", DelOnCreateRoom);
룸 생성 요청 결과는 함께 전달한 대리자를 통해 받아볼 수 있습니다. 생성된 게임 룸 정보(룸 아이디, 룸 이름 등)도 같이 받아볼 수 있습니다.
public void DelOnCreateRoom(UserAgent userAgent, ResultCodeCreateRoom result, int roomId, string roomName, Payload payload) {
    Debug.Log(result);
}
버튼을 클릭해서 룸 생성 요청하기 위해서 CreateRoom 메서드를 아래와 같이 구현합니다. 드롭다운으로 선택한 룸 타입을 사용할 수 있도록 설정하였습니다. 예제에서는 기본적으로 내용이 작성되어 있으므로 주석 처리만 해제합니다.
public void CreateRoom()
{
    GameAnvilConnector.getInstance().getUserAgent().CreateRoom(roomTypeDropdown.options[roomTypeDropdown.value].text, DelOnCreateRoom);
}
룸 생성 요청 결과를 받는 함수도 아래와 같이 수정하여 UI 상태를 전환할 수 있도록 합니다. 생성된 게임 룸의 아이디를 화면에 표시하도록 설정합니다. 예제에서는 기본적으로 내용이 작성되어 있으므로 주석 처리만 해제합니다.
public void DelOnCreateRoom(UserAgent userAgent, ResultCodeCreateRoom result, int roomId, string roomName, Payload payload) {
    Debug.Log(result);
    if (result.Equals(GameAnvil.Defines.ResultCodeCreateRoom.CREATE_ROOM_SUCCESS)){
        state = UIState.JOIN_ROOM_COMPLETE;
        RoomIdText.text =  roomId.ToString();
    }
    else
    {
        state = UIState.JOIN_ROOM_FAIL;
    }
}
게임 룸 생성 기능 구현이 끝났습니다. 테스트는 잠시 뒤로 미루고, 게임 룸 입장 기능 먼저 구현하겠습니다.
게임 룸 입장 요청 API 사용
서버에 게임 룸이 생성되었다고 가정해 봅시다. 해당 룸에 접속하기 위해서는 GameAnvil 커넥터에서 게임 룸 입장 요청 메서드를 호출하면 됩니다. 이때, 룸 생성 당시 전달 받은 게임 룸 아이디를 전달합니다.
GameAnvilConnector.getInstance().getUserAgent().JoinRoom("ROOM_TYPE_SYNC", {룸 아이디 입력});
현재 방에 유저가 입장 되어 있는지 여부는 아래와 같이 IsJoinedRoom() 메서드로 확인합니다.
GameAnvilConnector.getInstance().getUserAgent().IsJoinedRoom()
버튼 클릭으로 JoinRoom 요청을 할 수 있도록, 기존에 존재하는 JoinRoom 메서드에 아래와 같이 구현을 추가합니다. 룸 아이디는 입력 필드에 입력된 값을 사용하도록 했습니다. 예제에서는 기본적으로 내용이 작성되어 있으므로 주석 처리만 해제합니다.
public void JoinRoom()
{
    int roomId = 0;
    int.TryParse(joinRoomIdInputField.text, out roomId);
    GameAnvilConnector.getInstance().getUserAgent().JoinRoom(roomTypeDropdown.options[roomTypeDropdown.value].text, roomId);
}
이제 게임 룸 생성 기능과 입장 기능이 모두 완성되었습니다.
게임 룸 테스트
Unity 에디터에서 단축키 CMD + b 또는 Ctrl + b를 눌러 빌드합니다. 빌드 결과로 나온 창에서 버튼을 클릭하여 게임 룸이 생성되는 것을 확인합니다. 게임 룸이 생성되면 화면에 게임 룸의 아이디가 표시됩니다.
이후 Unity 에디터에서 플레이 모드로 진입합니다. 이전에 표시된 게임 룸의 아이디를 입력 필드에 입력하고, Join Room을 클릭해 게임 룸에 참여되는지 확인합니다.
동기화 컨트롤러 입문
이제 같은 게임 룸에 접속한 게임 유저 간에는 패킷을 주고받을 수 있습니다. 이 패킷을 통해서 필요한 정보를 클라이언트 프로세스 간에 동기화하도록 코드를 작성할 수 있습니다. 더 간단한 방법으로는 동기화하고 싶은 게임 오브젝트에 동기화 컴포넌트를 부착하는 것만으로도 동기화를 구현할 수 있습니다.
동기화 컨트롤러 추가
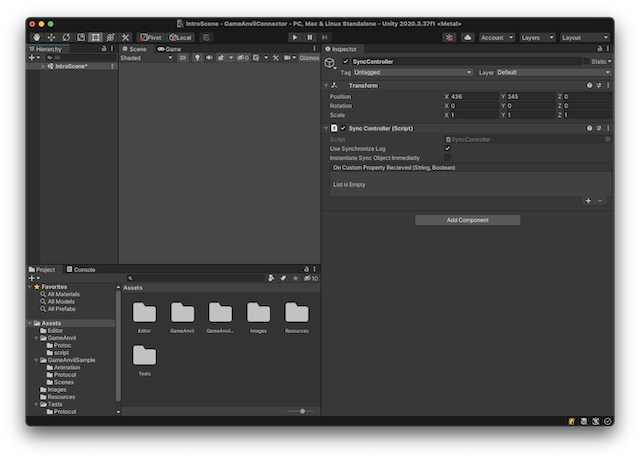
Hierarchy 뷰에서 마우스 오른쪽 버튼을 클릭한 뒤 GameAnvil > SyncController를 선택합니다.
이 예제에서는 씬 이동이 일어나기 때문에, 씬 이동 이후에 수동으로 동기화 객체를 생성하기 위해서 SyncController 오브젝트의 인스펙터상에서 Instantiate Sync Object Immediatly를 체크 해제합니다.
이제 GameAnvil의 모든 동기화 기능을 이용할 수 있습니다. 다음은 가장 단순한 예제를 통해서 동기화 컴포넌트 부착 및 사용법을 살펴보겠습니다.
동기화 오브젝트 작성
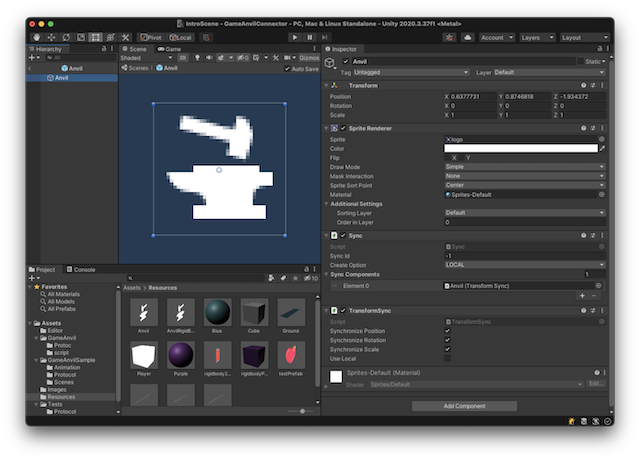
프로젝트 뷰에서 Resources 폴더 내부로 이동한 후 Anvil 프리팹을 더블 클릭하여 프리팹 수정 화면으로 전환합니다. 인스펙터 창에서, AddComponent 버튼을 클릭한 후 GameAnvil > GameAnvil Sync > TransformSync를 클릭합니다. 이렇게 하면 해당 프리팹은 게임 유저 간에 게임오브젝트의 Transform 정보를 동기화할 준비가 완료된 것입니다.
완성한 동기화 게임오브젝트 프리팹을 유니티 플레이 모드에서 사용하려면 SyncController에서 제공하는 게임오브젝트 생성 API를 통해 게임 오브젝트를 생성하여 씬에 추가하면 됩니다. 첫 번째 인자로 프리팹 이름을 전달해야 합니다.
주의할 점은, GameAnvil에서 제공하는 동기화 컴포넌트를 붙인 동기화 게임오브젝트는 유니티에서 기본 제공하는 GameObject.Instantiate() 메서드가 아니라 GameAnvil에서 제공하는 SyncController의 Instantiate API를 사용해야 정상적인 동기화가 이루어질 수 있습니다.
SyncController.Instance.Instantiate("Anvil", new Vector3(0, 0, 0), Quaternion.identity);
게임 씬 작성
구체적 사용 예제를 알아보기 위해 프로젝트 뷰 > GameAnvilSample > Scene 폴더에서 SpawnAnvil 씬을 엽니다. 그리고 File > Build Settings 메뉴에서 Add Open Scene을 클릭해 빌드 시에 포함되도록 설정합니다.
SpawnAnvilSample 게임 오브젝트에 할당된 컴포넌트의 SpawnAnvilSample 스크립트를 수정해서 구현을 추가하겠습니다. 예제에서는 기본적으로 내용이 작성되어 있으므로 주석 처리만 해제합니다.
using System.Collections;
using System.Collections.Generic;
using UnityEngine;
using UnityEngine.SceneManagement;

namespace GameAnvil
{
    public class SpawnAnvilSample : MonoBehaviour
    {
        void Start()
        {
            SyncController.Instance.InstantiateSyncObject();
        }

        void Update()
        {
            if (Input.GetMouseButtonDown(0))
            {
                Vector3 mousePos = Input.mousePosition;
                mousePos.z = Camera.main.nearClipPlane;
                Vector3 worldPosition = Camera.main.ScreenToWorldPoint(mousePos);

                SyncController.Instance.Instantiate("Anvil", worldPosition, Quaternion.identity);
            }

            if (GameAnvilConnector.getInstance() == null || GameAnvilConnector.getInstance().getUserAgent() == null || !GameAnvilConnector.getInstance().getUserAgent().IsJoinedRoom())
            {
                SceneManager.LoadScene("IntroScene");
            }
        }
    }

}
Start 함수에서는 씬 이동 직후 동기화를 시작하기 위해서 InstantiateSyncObject()를 실행합니다.
Update 함수에서는 클릭할 때마다 마우스의 좌표를 얻어와서 전 단계에서 수정한 프리팹을 생성하도록 하였습니다. 연결이 끊긴 경우에 대비해 다시 연결할 수 있게 하기 위해서 본래 씬으로 이동하도록 하였습니다.
동기화 테스트
Unity 에디터에서 CMD + b또는 Ctrl + b 단축키를 눌러서 빌드합니다. 빌드 결과로 나온 창에서 게임 룸을 생성하고, Spawn Anvil 버튼을 눌러 IntroScene에서 SpawnAnvil Scene으로 씬을 이동합니다.
이후 Unity 에디터에서 플레이 모드로 진입합니다. 빌드 결과로 나온 창과 동일한 게임 룸에 접속한 후 Spawn Anvil 버튼을 눌러 IntroScene에서 SpawnAnvil Scene으로 씬을 이동합니다. 이후 화면 아무 곳이나 클릭해서 새로운 동기화 게임오브젝트를 생성합니다. 한 쪽 클라이언트에서 게임 오브젝트를 생성하면, 같은 방에 입장한 다른 클라이언트의 화면에도 동일하게 나타나는 것을 확인합니다.
동기화 컨트롤러 심화
이전 단계에서는 오브젝트 생성 동기화를 확인했습니다. 여기에서는 좀 더 복잡한 예제인 게임 오브젝트의 Rigidbody 동기화를 다룹니다. 이전 예제를 구현했을 때와 동일한 단계를 거쳐 구현을 완료합니다.
동기화 오브젝트 작성
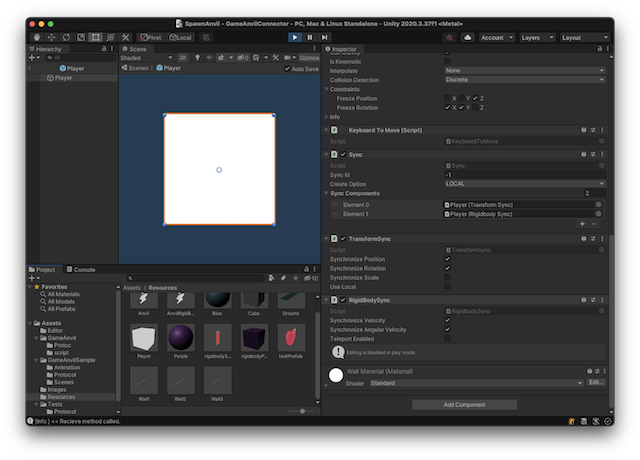
프로젝트 뷰에서 Resources 폴더 내부로 이동한 후 Player 프리팹을 더블 클릭하여 프리팹 수정 화면으로 전환합니다. 인스펙터 창에서 AddComponent를 클릭한 뒤 GameAnvil > GameAnvil Sync > TransformSync를 클릭합니다. 해당 프리팹의 게임 유저 간 게임 오브젝트의 Transform 정보 동기화 준비가 완료됩니다.
프로젝트 뷰에서 Resources > Player를 더블 클릭하여 프리팹 수정 화면으로 전환합니다. 인스펙터 창에서 AddComponent를 클릭한 뒤 GameAnvil > GameAnvil Sync > RigidBodySync를 클릭합니다. 해당 프리팹의 게임 유저 간 게임 오브젝트의 Rigidbody 정보 동기화 준비가 완료됩니다.
게임 씬 작성
프로젝트 뷰에서 GameAnvilSample 폴더 안의 Scene 폴더에서 KeyboardToMove 씬을 엽니다. 그리고 File > Build Settings 메뉴에서 Add Open Scene을 클릭해 빌드 시에 포함되도록 설정합니다.
KeyboardToMoveSample 게임오브젝트에 할당된 컴포넌트의 KeyboardToMoveSample 스크립트를 수정해서 구현을 추가하겠습니다. 예제에서는 기본적으로 내용이 작성되어 있으므로 주석 처리만 해제합니다.
using System.Collections;
using System.Collections.Generic;
using UnityEngine;
using UnityEngine.Animations;
using GameAnvil;
using UnityEngine.SceneManagement;

public class KeyboardToMoveSample : MonoBehaviour
{
    private static KeyboardToMove player;
    private float moveForce = 10;
    public Transform playerPointer;

    // Start is called before the first frame update
    void Start()
    {
        SyncController.Instance.InstantiateSyncObject();
    }

    // Update is called once per frame
    void Update()
    {
        if (GameAnvilConnector.getInstance() == null || GameAnvilConnector.getInstance().getUserAgent() == null || !GameAnvilConnector.getInstance().getUserAgent().IsJoinedRoom())
        {
            SceneManager.LoadScene("IntroScene");
        }

        if (player != null)
        {
            playerPointer.position = player.transform.position;
            player.GetComponent<Rigidbody>().AddForce(Vector3.right * Input.GetAxis("Horizontal") * moveForce, ForceMode.Force);
            player.GetComponent<Rigidbody>().AddForce(Vector3.up * Input.GetAxis("Vertical") * moveForce, ForceMode.Force);
        }
    }

    public static void SpawnPlayer()
    {
        Vector3 mousePos = Input.mousePosition;
        Vector3 worldPosition = Camera.main.ScreenToWorldPoint(mousePos);
        worldPosition.z = 0;

        player = SyncController.Instance.Instantiate("player", worldPosition, Quaternion.identity).GetComponent<KeyboardToMove>();
    }

    public static void SetSelected(KeyboardToMove selected)
    {
        if ( player == selected)
        {
            player = null;
            GameObject.Destroy(selected.gameObject);
        }
        else
        {
            player = selected;
        }
    }
}
Start 함수에서는 씬 이동 직후 동기화를 시작하기 위해서 InstantiateSyncObject()를 실행합니다.
SpawnPlayer 함수는 호출될 때마다 마우스 위치에 새로운 Player 객체를 생성합니다.
Update 함수는 방 입장 및 로그인이 유지되고 있는지 확인하고, 마지막으로 생성한 오브젝트를 키보드로 조종할 수 있도록 합니다. 키 입력에 따라서 강체에 AddForce() 함수를 수행하여 위치를 업데이트하도록 유도합니다.
동기화 테스트
Unity 에디터에서 단축키 CMD + b 또는 Ctrl + b를 눌러 빌드합니다. 빌드 결과로 나온 창에서 게임 룸을 생성하고, KeyboardToMove를 클릭해 IntroScene에서 KeyboardToMove Scene으로 이동합니다.
이후 Unity 에디터에서 플레이 모드로 진입합니다. 빌드 결과로 나온 창과 동일한 게임 룸에 접속한 후 KeyboardToMove를 클릭해 IntroScene에서 KeyboardToMove Scene으로 이동합니다. 이후 화면 아무 곳이나 클릭해 새로운 동기화 게임 오브젝트를 생성한 뒤 키보드로 게임 오브젝트의 위치를 이동시키면, 다른 쪽 클라이언트에서도 이가 반영되는 것을 확인합니다.
튜토리얼 마무리
이 문서에서는 GameAnvil 커넥터의 편의 기능인 간편 연결과 동기화 기능에 대해서 실습을 통해 알아보았습니다. 튜토리얼 초반에서 소개한 것처럼 GameAnvil에는 게임 서버 제작에 필요한 모든 기능이 준비되어 있고, 튜토리얼에서는 그 일부만 가볍게 다루었습니다. 이어지는 문서에서 더 자세한 사용법을 배울 수 있습니다.
Table of Contents
- Game > GameAnvil > 기초 튜토리얼
- GameAnvil로 멀티플레이어 게임 쉽게 만들기
- 실습 환경 준비 - 서버 프로젝트
- 프로젝트 구성
- GameAnvil 서버 설정 파일 수정
- 서비스에 대해
- 채널에 대해
- GameAnvil 서버 구동
- Java 버전 설정
- 서버 구동
- GameAnvil 서버 기능 구현
- 게임 노드 구현
- 노드에 대해
- 유저 타입에 대해
- 게임 유저 구현
- 게임 룸 구현
- 서버 구현을 마무리하며
- 실습 환경 준비 - 클라이언트 프로젝트
- GameAnvilConnector 다운로드
- Unity Package 다운로드
- Unity 프로젝트 생성
- GameAnvilConnector 및 Unity Package 임포트
- GameAnvilConnector 추가
- 빠른 연결
- Connect 관련 필드 설정
- Authentication 관련 필드 설정
- Login 관련 필드 설정
- 빠른 연결 요청 API 호출
- 빠른 연결 종료 API 호출
- 빠른 연결 진행 상황 출력
- 빠른 연결에 사용할 값을 GameAnvilConnector에 직접 입력
- 빠른 연결 요청/연결 종료 테스트
- 게임 룸 생성 및 입장
- 게임 룸 생성 요청 API 사용
- 게임 룸 입장 요청 API 사용
- 게임 룸 테스트
- 동기화 컨트롤러 입문
- 동기화 컨트롤러 추가
- 동기화 오브젝트 작성
- 게임 씬 작성
- 동기화 테스트
- 동기화 컨트롤러 심화
- 동기화 오브젝트 작성
- 게임 씬 작성
- 동기화 테스트
- 튜토리얼 마무리