Network > Load Balancer > Console Guide
Load Balancer Management
Create Load Balancers
You can easily create a load balancer by entering the setting values in the NHN Cloud Load Balancer console.
Load Balancer Information
Enter basic information required for a load balancer as follows:
- Name: Enter the name of the load balancer.
- Description: Enter the description of the load balancer.
- Network (Subnet): Specify the subnet of the VPC with which the load balancer is to be associated.
- Load Balancer Type: Specify the type of the load balancer among Normal, Dedicated, Physical Basic, and Physical Premium.
- Subnet Static Route: Select whether to apply static route settings of the subnet where the load balancer will be located to the load balancer.
[Note] For more information about the load balancer types, see Load Balancer Type.
Register Listeners
Define properties of the traffic to be processed by a load balancer. By default, NHN Cloud Load Balancer has one listener, which can be added or deleted in the details page of the load balancer later.
- Load Balancing Method: Determines how a load balancer distributes traffic. Choose one of ROUND_ROBIN, LEAST_CONNECTIONS, or SOURCE_IP.
- Protocol: Specify the protocol of traffic to be processed by the load balancer. Choose one of TCP, HTTP, HTTPS, or TERMINATED_HTTPS.
- Load Balancer Port: Specify the port for the default listener to receive traffic.
- Instance Port: Specify the port for load balancer members. Inbound traffic to the load balancer port will be delivered to the instance port of a member instance.
[Note] Load balancer port and instance port have a value between 1 and 65535.
[Caution] Load balancer port, instance port, and protocol cannot be changed after a listener is created.
- SSL Certificate: Register a certificate to be used when TERMINATED_HTTPS is selected as the protocol.
[Note] Registering a TERMINATED_HTTPS certificate
When TERMINATED_HTTPS is specified as listener protocol for load balancer, a button to register an SSL certificate is activated.
Files to register are ‘Certificate’ and ‘Private Key’. ‘Private Key’ refers to a private key which is paired with a public key embedded in the server certificate.
The ‘Certificate’ must follow the x.509 PEM format as follows:
-----BEGIN CERTIFICATE-----
(omitted)
-----END CERTIFICATE-----
When you need to register a server certificate and a chain certificate (intermediate certificate) together, you must create and register the server certificate and chain certificate in one file.
To create a single file for certificates, the server certificate must be described at the top of the file and the chain certificates must be described at the bottom of the file. Chain certificates can be described in any order.
If you create one server certificate and two chain certificates into one certificate file, it will have the following format:
 -----BEGIN CERTIFICATE-----
 (Server Certificate, omitted)
 -----END CERTIFICATE-----
 -----BEGIN CERTIFICATE-----
 (Chain Certificate #1, omitted)
 -----END CERTIFICATE-----
 -----BEGIN CERTIFICATE-----
 (Chain Certificate #2, omitted)
 -----END CERTIFICATE-----
‘Private Key’ a key file corresponding to the public key contained in the server certificate. The registered 'private key' works properly only when the password is removed.
You can register files with the PKCS#1 or PKCS#8 PEM format.
 -----BEGIN RSA PRIVATE KEY-----
 (Private Key, omitted)
 -----END RSA PRIVATE KEY-----
, or
 -----BEGIN PRIVATE KEY-----
 (Private Key, omitted)
 -----END PRIVATE KEY-----
Using Certificate Manager
When the listener uses TERMINATED_HTTPS, you can register a certificate in one of the following two methods: using a certificate registered in Certificate Manager or directly registering a certificate.
- By registering a certificate in Certificate Manager and connecting it with the listener, you can receive an email alarm on certificate expiration date.
- No expiration alarms will be sent if the certificate has been directly registered in the listener. Still, you can find the expiration date on the listener page of the console.
[Caution] When a certificate is updated in the Certificate Manager, certificates of any other affected listener must be updated as well. To apply the certificate which is registered in the Certificate Manager to the listener, the password of the 'Private Key' must be removed, and the format must be PKCS#1 or PKCS#8 PEM.
Health Check
The settings for health check are also determined when creating the listener. NHN Cloud's load balancer can define health check behavior per listener. The items required are as follows:
- Health Check Protocol: Determine the protocol to use for health checks. Choose one of TCP, HTTP, or HTTPS.
- Health Check Port: Determine the port of member instance to try health checks.
- HTTP Method: Select the HTTP method to use for health checks. This setting is enabled only when HTTP or HTTPS is selected. Currently supports GET only.
- HTTP Status Code: Enter the HTTP status code to consider as normal for a health check. This setting is enabled only when HTTP or HTTPS is selected. Currently supports GET only.
- URL: Specify the path of the member instance to try health checks. This setting is enabled only when HTTP or HTTPS is selected.
- Health Check Cycle: Enter the cycle of health checks. The unit is seconds and health checks are tried at every specified cycle.
- Maximum Wait Time for Response: Specify the maximum time to wait for a normal response after health checks. The unit is seconds and exceeding the specified wait time is considered a failure.
- Maximum Number of Retries: Specify the maximum number of retry attempts for health checks. If the maximum number of retries is 2 or higher, it is not immediately considered a failure when a normal response to the health check is not received. If it fails repeatedly for the maximum number of retries, the instance is excluded from load balancing.
- Host Header: Enter the field value to use in the host header for health checks. This setting is enabled only when HTTP or HTTPS is selected.
Connect
Specify settings related to the connection.
- Session Persistence: Responses to requests are set to be made at specific instances only, so as to maintain a session. Choose one among No Session Persistence, APP_COOKIE, HTTP_COOKIE, or SOURCE_IP.
- Association Limited: Specify the number of concurrent TCP sessions the default listener will maintain. You can set up to 60,000 for a regular load balancer and up to 480,000 for a dedicated load balancer.
- Keepalive Timeout: Specify the duration of sessions to be maintained between the client and server (in seconds). The load balancer maintains the session for as long as the other party maintains the session. It is recommended to set the keepalive timeout value set in the server here. The default is set to 300 seconds.
- Proxy Protocol: You can have your load balancer support the proxy protocol. You only need to enable this value if you have set the server to use the proxy protocol to find out the IP of the client. This setting is available only when using TCP or HTTPS protocol.
Register Members
Specify the instance to be registered as a member when the load balancer is created. It is possible to register members even after creating the load balancer. You can register as members the VPC with which the load balancer is associated and instances that belong to the peering connection VPC of this VPC. However, if you want to register an instance with a different subnet from the load balancer as a member, you need to register the two subnets in the routing table.
IP Access Control Groups
Specify the IP access control group to apply when the load balancer is created. You can select multiple groups with the same access control type among the IP access control groups. You can change the IP access control group to be applied even after the load balancer is created.
View Load Balancers
After a load balancer is created, you will be returned to the load balancer list page. In the load balancer list page, you can check the basic information of the created load balancers. The items displayed on the list page are as follows:
- Name: Name of the load balancer specified when it is created.
- Type: Load balancer type
- IP Address: A private IP assigned by the VPC associated with the load balancer. From inside the VPC, you can access the load balancer through this IP. To access the load balancer from outside the VPC, you need to associate a floating IP.
- Load Balancer Port/Instance Port: A pair of listeners' port and instance port that belong to a load balancer.
- Protocol: Protocol of listeners that belong to a load balancer.
- IP Access Control Type: Shows the type of IP access control group specified for the load balancer. If an access control group is not specified, nothing is shown. If specified, the type is either 'Allow' or 'Block'.
- Network: Name of the VPC associated with the load balancer and the subnet CIDR.
- Status: Status of load balancer creation. ACTIVE means it has been created normally.
[Note] Provisioning status of a load balancer is determined as one of the following:
Status Description ACTIVE A load balancer has been created and is operating normally PENDING_CREATE Creating a load balancer
If the status does not change to ACTIVE within an hour after creation, contact the administrator.PENDING_UPDATE Modifying load balancer configuration
If the status does not change to ACTIVE within an hour after modifying the configuration, contact the administrator.PENDING_DELETE Deleting a load balancer
If the load balancer does not disappear from the list within an hour after deletion, contact the administrator.ERROR Failed to create a load balancer
Contact the administrator.ERROR_MIGRATE Failed to migrate a load balancer
Contact the administrator.
Modify Load Balancers and Details
Select a load balancer from the list, and a page of details shows up at the bottom, which is composed of the following tabs:
- Details of Load Balancer: Shows detailed information of a load balancer. Name and description of the selected load balancer, and whether to apply subnet static routing can be changed.
- Listener: Check detailed setting of listeners created under a selected load balancer. Add or delete listeners.
- Instance: View the list of instances registered as members to a selected load balancer. Register new instances as members or exclude existing ones.
- Statistics: Statistical information of a selected load balancer is available.
[Note] You cannot change VPC and IP address with which load balancer is associated.
Add Listeners
Listeners can be added by clicking the Add Listener button on the Listener tab in the detail screen of the load balancer. Items required to add listeners are the same as those required by the default listener during creation of the load balancer. When a listener is added, the load balancer port used by previous listeners can no longer be used.
Modify Listeners
To modify the setting of a listener, click Modify.
[Note] You cannot change the listener protocol, load balancer port, and instance port.
Delete Listeners
To delete a listener, click Delete: cannot delete, though, if the load balancer has only one listener.
[Caution] Add/Modify/Delete listeners causes reboot of a load balancer. During the reboot, existing connected sessions are maintained, but new sessions cannot be processed (less than 1 second). Therefore, it is recommended to proceed at a time that does not affect the service.
Add Members
Register a new instance as member of load balancer in the instance tab. Only those instances that belong to VPC with which load balancer is associated can be added.
Disable Members
You can exclude certain instances among member instances from the service temporarily. Select the instances you want to exclude, click the Disable Instance button, and then click Confirm. The usage item of the excluded instance is changed to False and the member instance status is changed to ONLINE .
[Note] The status of a member instance is determined as one of the following:
Status Description ACTIVE A member instance has been connected and is operating normally INACTIVE A health check of the member instance is not being performed ONLINE A member instance has been disabled OFFLINE Failed to connect to a member instance
Contact the administrator.
Delete Members
Instances that are no longer used may be deleted. Click Detach Instance of the instance to exclude, and it is deleted from the member of load balancer. Deletion from load balancer member does not mean its instance is also deleted.
[Caution] Add/Disable/Delete Members causes reboot of a load balancer. During the reboot, existing connected sessions are maintained, but new sessions cannot be processed (less than 1 second). Therefore, it is recommended to proceed at a time that does not affect the service.
Delete Load Balancers
Select the load balancer you want to delete from the load balancer list screen and click the Delete button to delete the load balancer.
IP Access Control Groups
For more details on the features of IP access control, see IP Access Control.
Create IP Access Control Groups
To create an IP access control group, click [Create Access Control Group] and enter the following values:
- Name: Enter the name of the access control group.
- Description: Enter the description of the access control group.
- IP Access Control Type: Select either Block or Allow.
- Add IP Access Control Target: Enter the access control target IP and its description. You can add multiple access control targets at once by clicking the "+" button on the right. To make bulk input easier, you can select [Enter in Mass]. In this case, enter "IP address or CIDR" and "description" on one line. You can enter up to 100 access control targets at one time.
Click [Confirm] and the groups and targets of access control are created.
[Note] Number of groups and targets of IP access control
Up to 10 access control groups can be created for each project. Up to 1,000 access control targets can be created for each project.
Change IP Access Control Groups
You can change the properties of an IP access control group. The properties you can change are name and description. The "IP Access Control Type" property cannot be changed.
Delete IP Access Control Groups
You can delete the selected IP access control groups. When you delete a group, all access control targets belonging to the group are also deleted. When you delete an IP access control group, load balancers using the group will no longer use that policy.
Add IP Access Control Targets
If you select an access control group, the access control target menu appears at the bottom. When a target is added to an access control group, the policy of the added IP or CIDR is reflected in all load balancers using this access control group.
Change IP Access Control Targets
You can change the properties of the access control target. You can only change the description.
Delete IP Access Control Targets
If you select an access control group, the access control target menu appears at the bottom. If you delete a target belonging to an access control group, the policy of the corresponding IP or CIDR is deleted from all load balancers using this access control group.
Apply IP Access Control Groups
Select the load balancer to apply the IP access control group to. Select the group you want to configure for that load balancer and click Confirm. Multiple groups with the same "access control type" can be applied to the load balancer.
Guide to Restarting Load Balancers for Maintenance
NHN Cloud updates software of the load balancer equipment on a regular basis to enhance security and stability of the basic infrastructure services. For maintenance of the load balancer, the load balancer running in the maintenance target equipment must be restarted to be migrated to the load balancer equipment where maintenance has been completed.
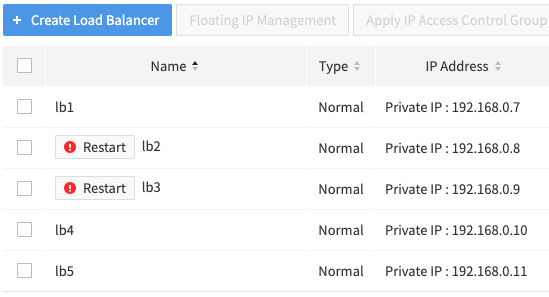
Load balancers that require a restart have ! Restart button displayed next to their names. You can use this button to restart the load balancers.
Go to the project with the load balancer specified as the maintenance target and perform a restart with the following procedure.
- Check the load balancers for maintenance. A load balancer with the ! Restart button next to its name is the maintenance target.
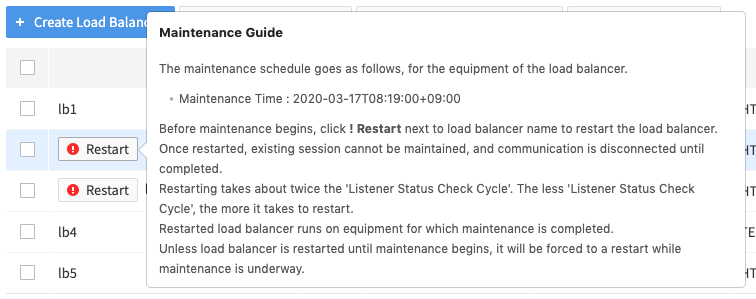
 Hover the mouse cursor over the ! Restart button to find the detailed maintenance schedule. It is recommended to perform maintenance at a time that does not affect service.
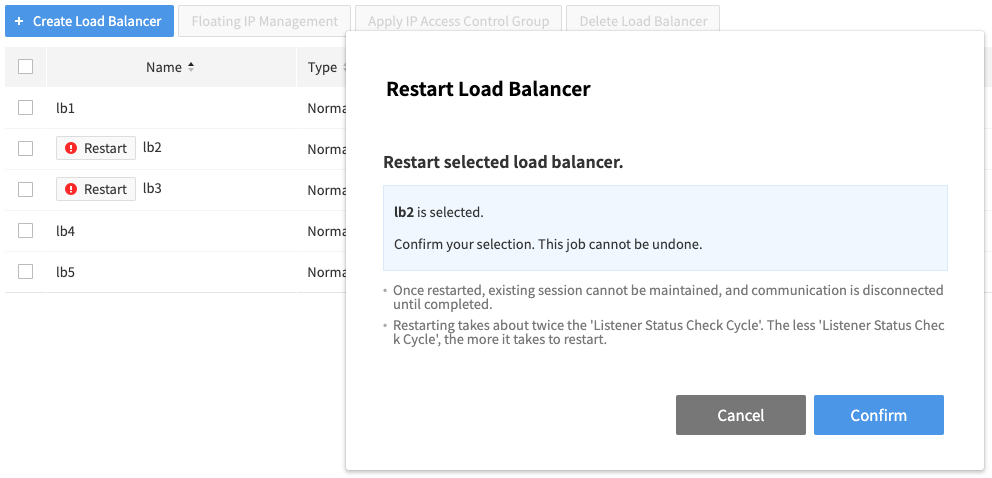
- Select a load balancer for maintenance and click the ! Restart button next to its name.
- When the window asking if you want to restart the load balancer appears, click Confirm.
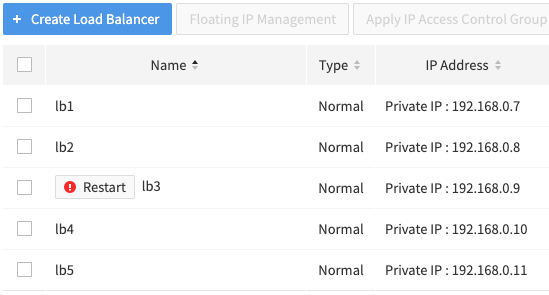
- Wait until the status indicator turns green and the ! Restart button disappears.
If the status indicator does not change or the ! Restart button does not disappear, try 'Refresh'.
The load balancer becomes inoperable while restarting is underway. If the load balancer restart is not completed normally, it is automatically reported to the administrator, and NHN Cloud will contact you separately.
Differences Between Physical Load Balancers and Regular Load Balancers
The differences between the physical load balancer launched online in April, 2021 and the previous load balancer (normal/dedicated) are as follows:
- Physical load balancers are provided only in Pyeongchon Region, Korea.
- Physical load balancers does not allow the association of a floating IP. When creating a physical load balancer, an automatically assigned public IP is used to receive the balancing target traffic. This public IP is displayed as a service IP on the web console.
- Physical Basic load balancers can be created when there are 17 consecutive IPs unused by the subnet. These 17 IPs are assigned to the physical load balancer and displayed as reserved IPs on the web console.
- Physical Premium load balancers can be created when there are 50 consecutive IPs unused by the subnet. These 50 IPs are assigned to the physical load balancer and displayed as reserved IPs on the web console.
- Physical load balancers do not provide the proxy protocol feature.
- Physical load balancers do not provide load balancer statistics.
- Physical load balancers do not provide load balancer IP access control.
Table of Contents
- Network > Load Balancer > Console Guide
- Load Balancer Management
- Create Load Balancers
- View Load Balancers
- Modify Load Balancers and Details
- Delete Load Balancers
- IP Access Control Groups
- Create IP Access Control Groups
- Change IP Access Control Groups
- Delete IP Access Control Groups
- Add IP Access Control Targets
- Change IP Access Control Targets
- Delete IP Access Control Targets
- Apply IP Access Control Groups
- Guide to Restarting Load Balancers for Maintenance
- Differences Between Physical Load Balancers and Regular Load Balancers