Security > NHN AppGuard > Console Guide
NHN AppGuard supports Android, iOS, and Unity environments.
Android
- You can use even more enhanced features by applying the AppGuard Android SDK (optional).
- You can protect apk or aab files built in Android Studio, etc. more conveniently with the web console or CLI (required).
iOS
- You can apply the AppGuard iOS SDK to protect your app (required).
- You can protect your app more conveniently with the web console or CLI from ipa files built in Xcode (optional).
- If you don't protect your app with the web console or CLI, it runs on the Business plan.
- You must perform protection using the web console or CLI to enable features such as integrity verification, signer verification, default policy, obfuscation, and plan selection.
- This protection does not incur additional cost.
Caution
If you need to set up a plan other than the Business plan or change plans, you must perform app protection using the web console or CLI. If you do not want to do app protection, request a consultation to proceed.
Unity
- You can easily protect Android/iOS apps through provided features.
- The Unity SDK includes an Android SDK and an iOS SDK and can be applied through a single interface.
Following diagram shows how to use NHN AppGuard.

Dashboard
When an abusive user is detected, you can check detection status by clicking on the Dashboard tab.
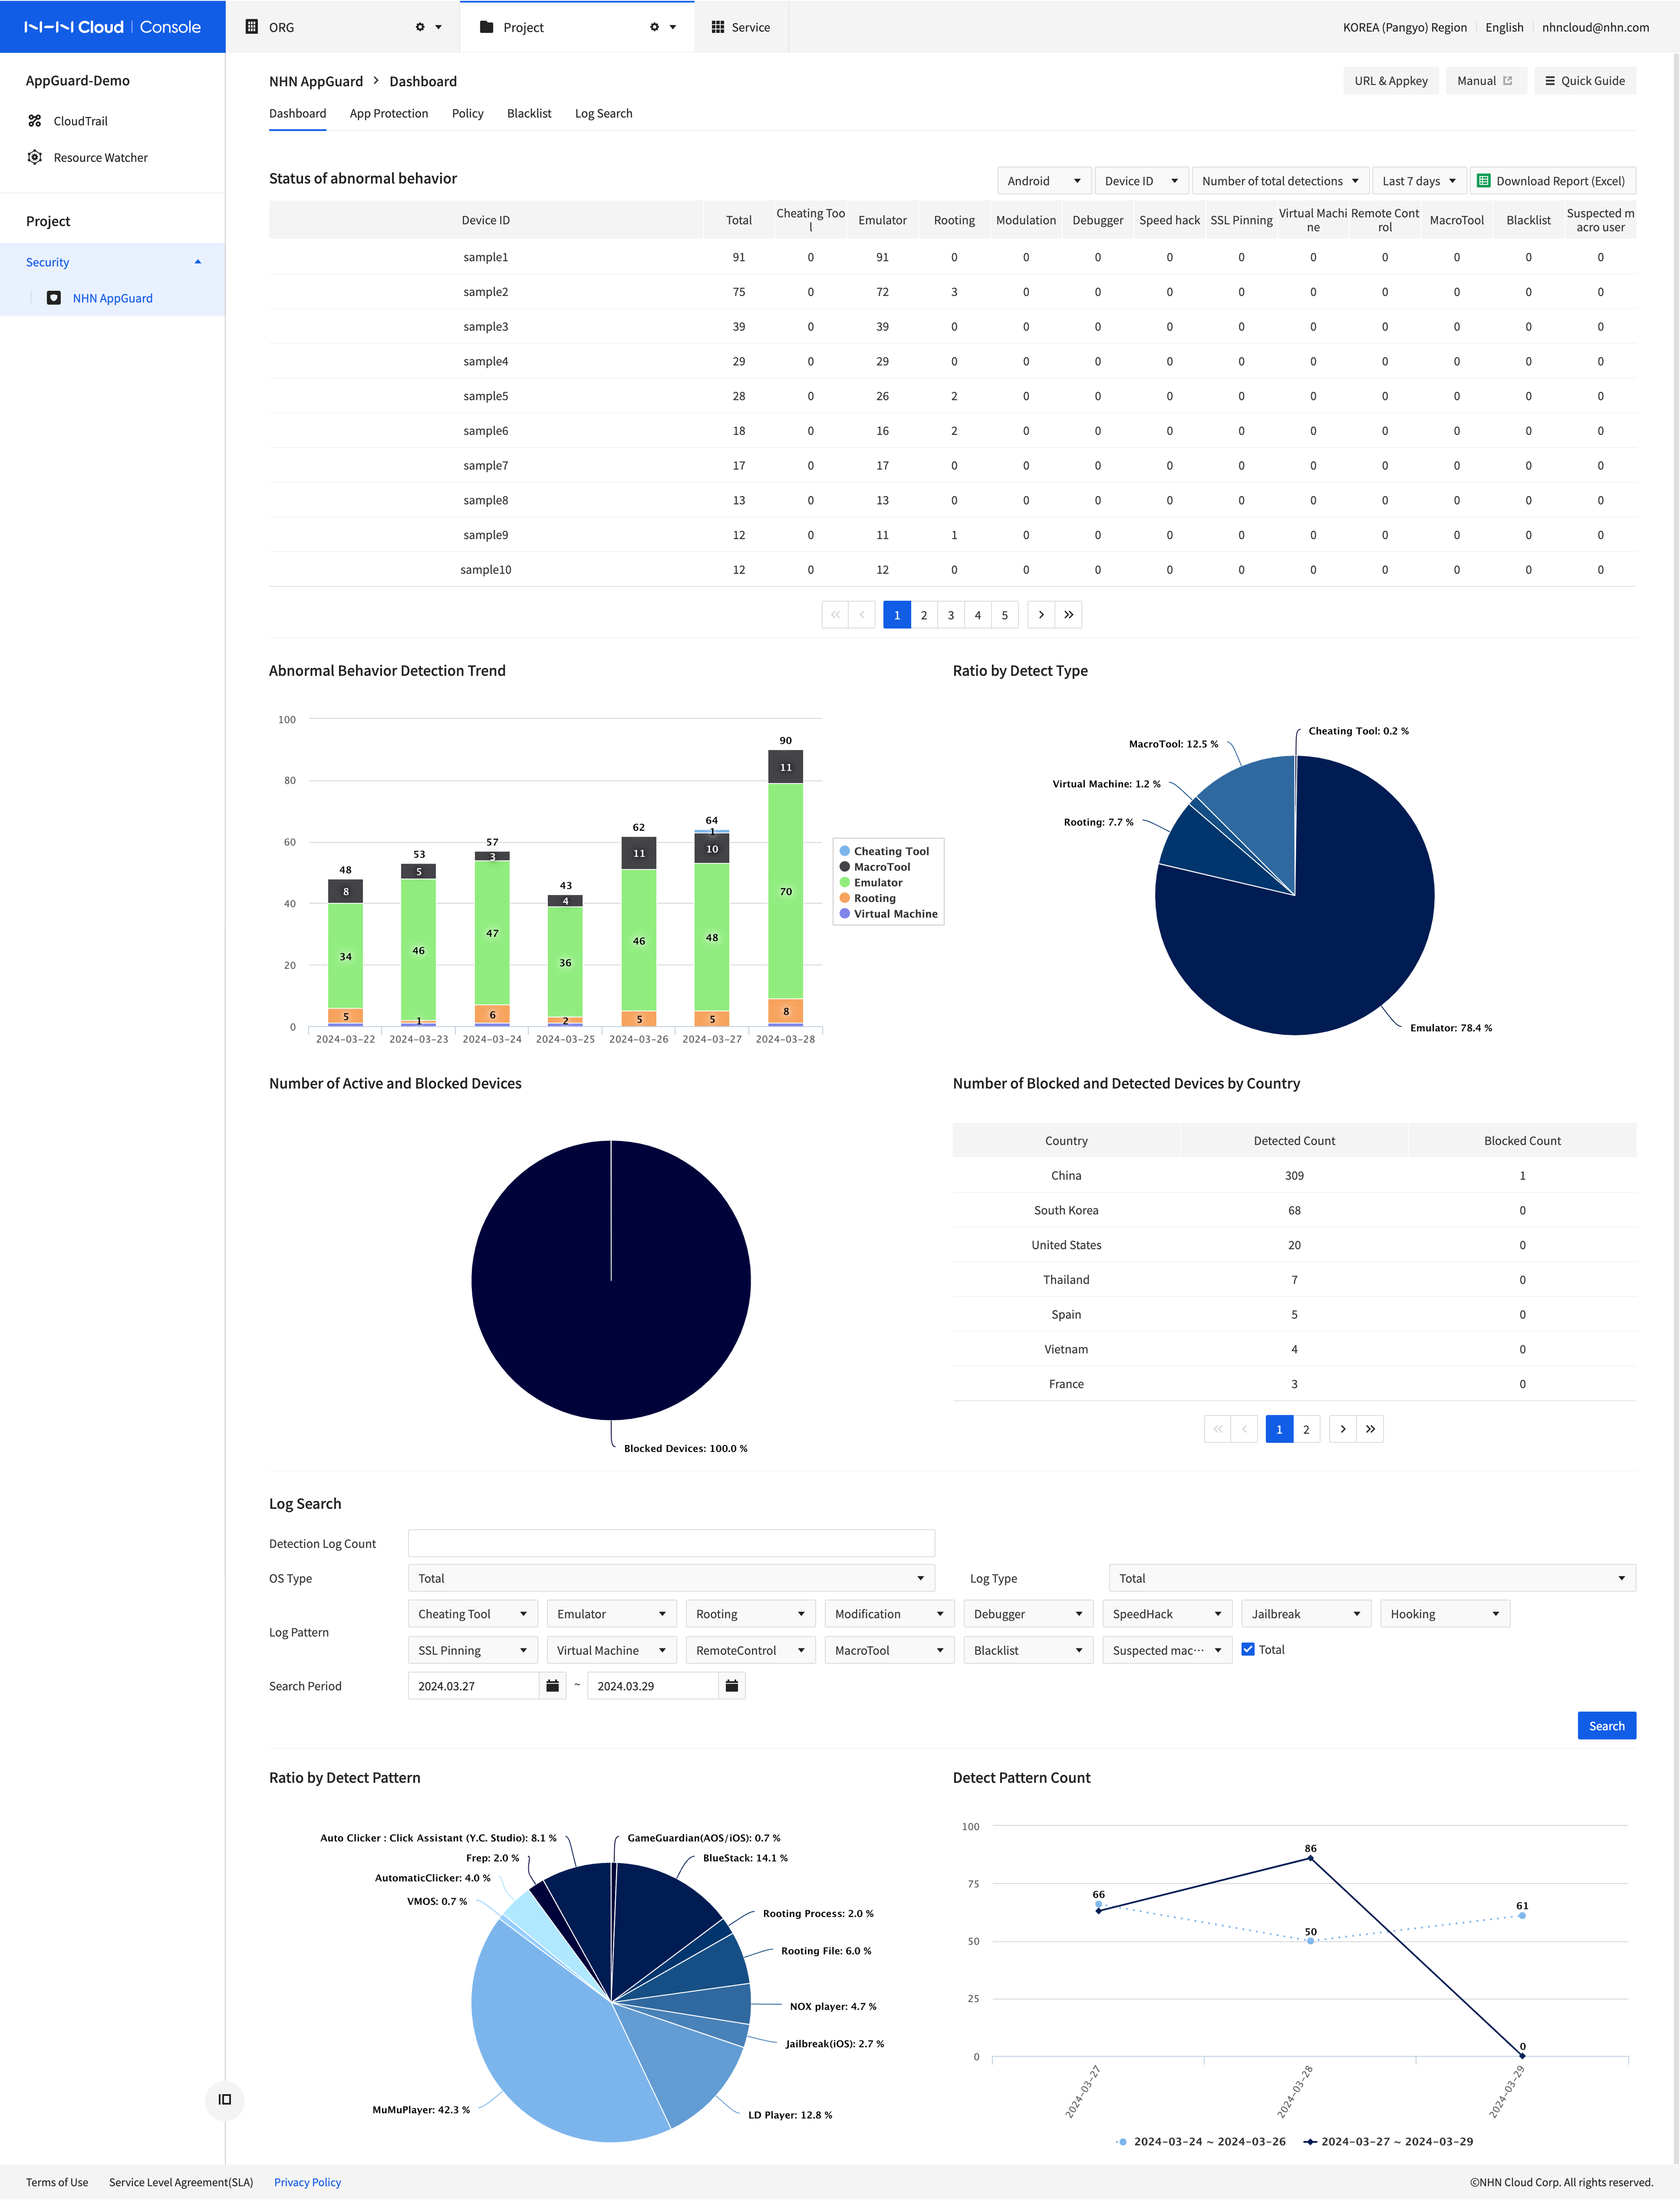
- Status of abnormal behavior can be found among abusive users as detected by NHN AppGuard in the order of trials by log detection pattern or period.
- Click Download Reports (Excel) on top-right of the page to download the detection result of abnormal behavior.
- Dashboard tab shows statistical graphs and the list of abusive users detected by NHN AppGuard.
- For rooting, you may check detection or sanction logs on dashboard, once a day since app is installed.
- You can Search by [User ID], [Device ID], [Detection Log Count], [Log Pattern], and [Search Period].
- Multiple [User ID] and [Device ID] can be added with comma as a delimiter.
- In the statistical detection graph, you can check Detection Distribution by Pattern and Change status of detection logs.
- The Abnormal behavior detection status can also be retrieved in json format with APIs. For more information, see the API guide.
App Protection
Download and Integrate SDKs
Select App Protection and click Download SDK to download SDK by OS.
Then, follow the attached manual to work with SDKs.
Apply to Enable Obfuscation
You can apply for code obfuscation for Android OS by selecting App Protection menu and clicking Enable Obfuscation. Code obfuscation for Android OS requires an additional fee of KRW 1 million per month. For iOS, you can choose whether or not to use code obfuscation when protecting your app, and there is no additional charge.
App Protection Menu
Select App Protection and click + Protect App.
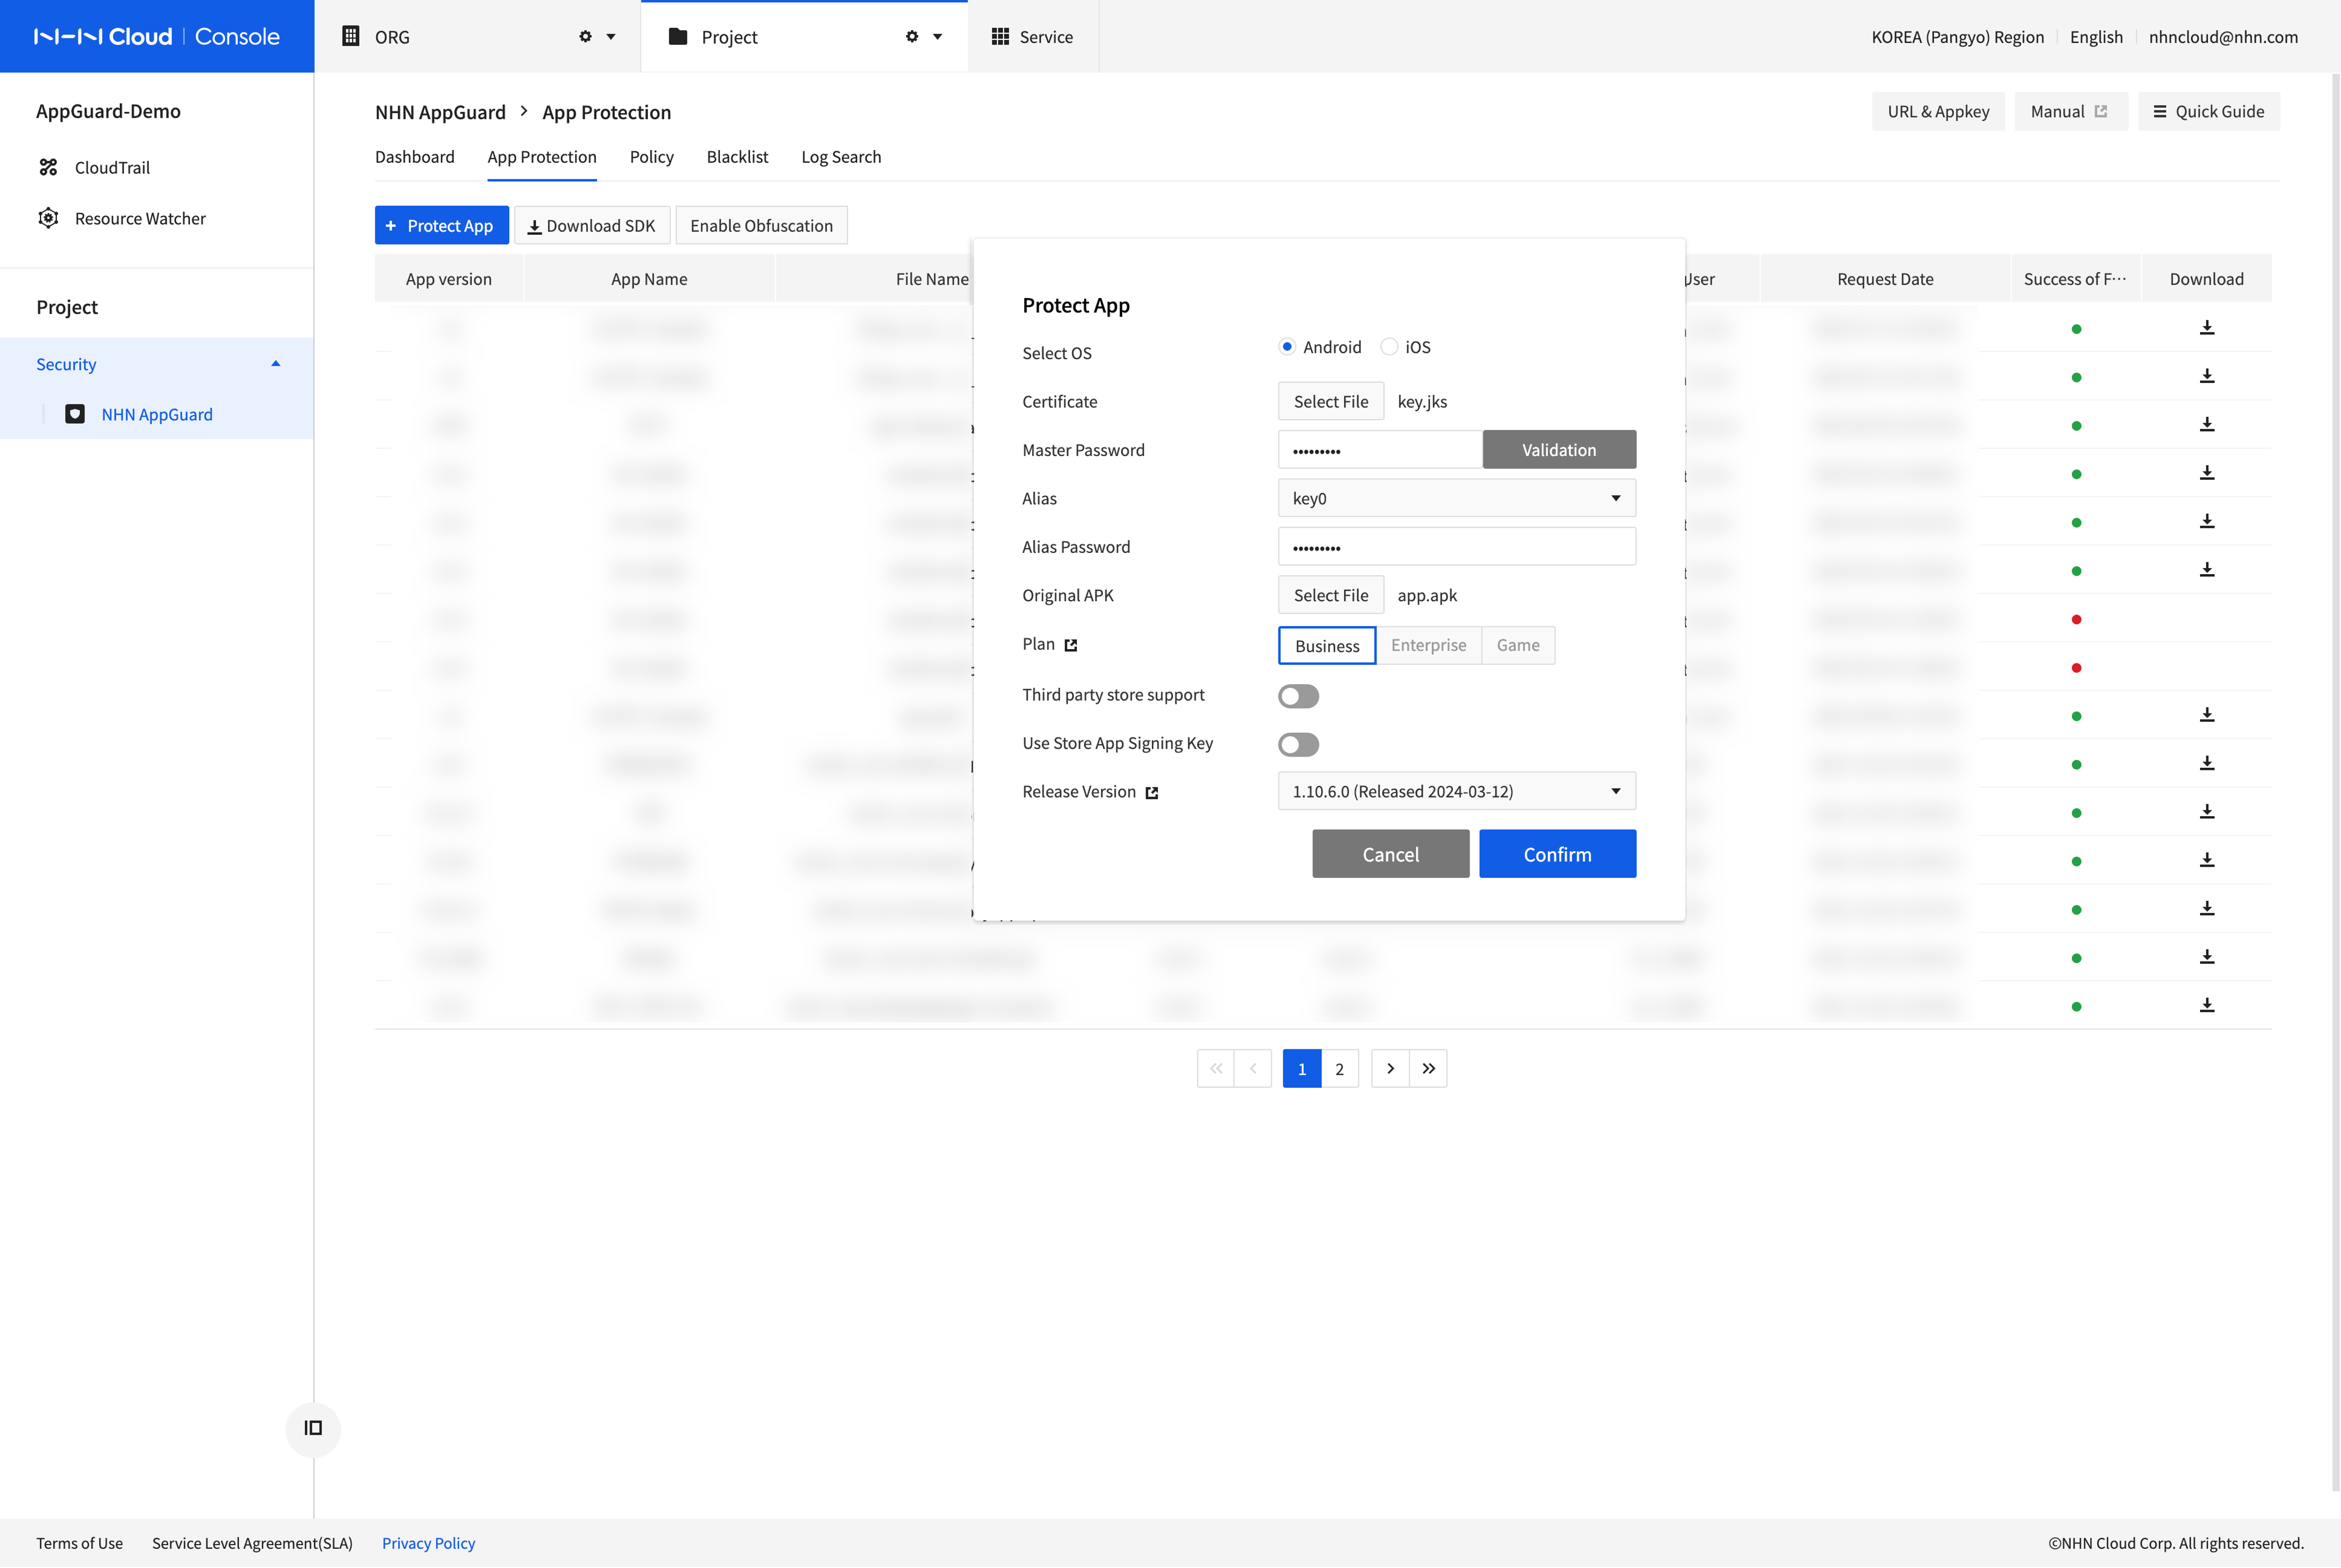
- Choose a [Certificate] KeyStore file.
- Enter [Master Password] and Click [Validation] to check validation of the chosen file.
- This process is required to validate KeyStore and to choose an appropriate Alias.
- When validation fails, be sure to check the status of the certificate file and the master password.
- Select the name of [Alias].
- Enter [Alias Password].
- Choose an [APK]
- Select [Plan].
- Business: Basic level of pattern-oriented and abnormal acts protection on application
- Enterprise: Business + Dynamic analysis defenses, including Zava code (DEX) encryption + memory manipulation detection (recommended for general apps)
- Game: Enterprise + Game engine library static protection + Enhanced dynamic analysis defense security features, including Unity IL2CPP code analysis defense (recommended for game apps)
- See the AppGuard Service Guide for a complete list of features available with each plan.
- Select [Release Versions]
- Click Ok to start Protect App
- When completed, you can download the protected application. Now, you're ready to upload protected apps on each Appstore for deployment.
- Methods of app protection: Console or CLI(Command Line Interface)
Policy
Blocking policy can be set for tampering trials of code, memory or speed, while NHN AppGuard is running, and blocking conditions can set for 'Block by Condition' based on threshold.
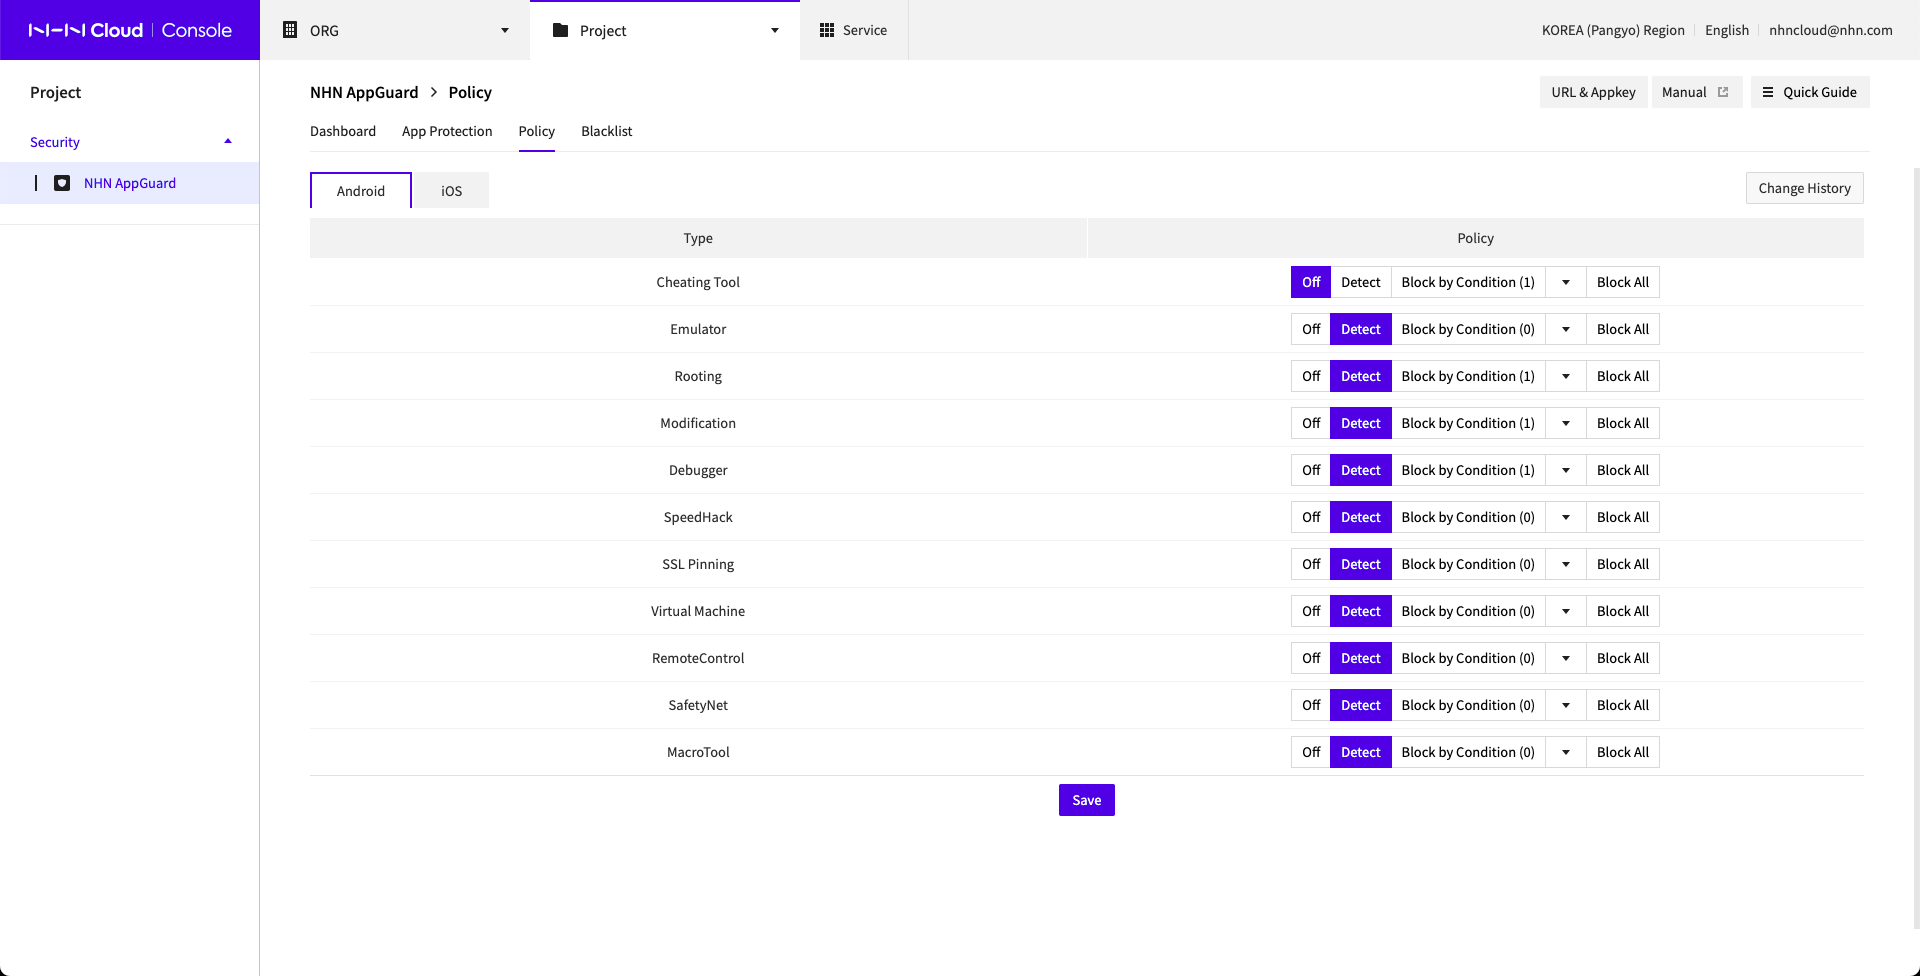
When it is detected by policy set as Block All, guide for NHN AppGuard shows and the app is closed. When the conditions set in Block by Condition are met, the user is blacklisted, and if the user launches the app, the NHN AppGuard guide window appears and the app is ended.
For further details on the policy, please refer to "NHN AppGuard Developer's Guide" document included in the SDK.
Introduction to Block Features
- NHN AppGuard > Policy > Block All
- If set to Block Allin the NHN AppGuard Policy screen, the app will be ended as soon as the behavior is detected.
- Even if the app is shut down due to a policy, you can use the app normally if you relaunch the app without any abnormal behavior.
- If you change the policy to Block All or Detect, it will be applied to the app that has restarted after about a minute.
- NHN AppGuard > Policies > Individual Block
- Only emulators and macro tools can be blocked per individual tool, not all types.
- When set to block in the individual block, the app will be ended upon detection, just like a full block.
- The policy is applied to apps that restart approximately one minute after saving the policy.
- NHN AppGuard > Policy > Block by Condition
- If you set it to Block by Conditionon the NHN AppGuard policy screen, it will blacklist users who meet the condition at 00:00 every day.
- Whether the conditions are met is determined based on detection logs that occurred between 00:00:00 and 23:59:59 in the last day, and each condition works independently by type.
- You can check the blacklist registered as conditional blocking on the NHN AppGuard Blacklist tab.
- Users blocked due to blacklisting registered as conditional blocking are not exposed to the NHN AppGuard dashboard tab.
- Users blacklisted with conditional blocking will not be able to use the app for the block period you set, even if they launch the app without any abnormal behavior.
- If you change a setting or condition with conditional blocking, it will take effect for all users after about 10 minutes.
- Block through NHN AppGuard > Blacklist
- If you blacklist a user on the NHN AppGuard Blacklist screen and the user launches an app, the app will be ended.
- It takes effect when the app is re-launched, starting immediately after blacklisting.
Change History
History can be managed, regarding by who and when policy was changed and saved.
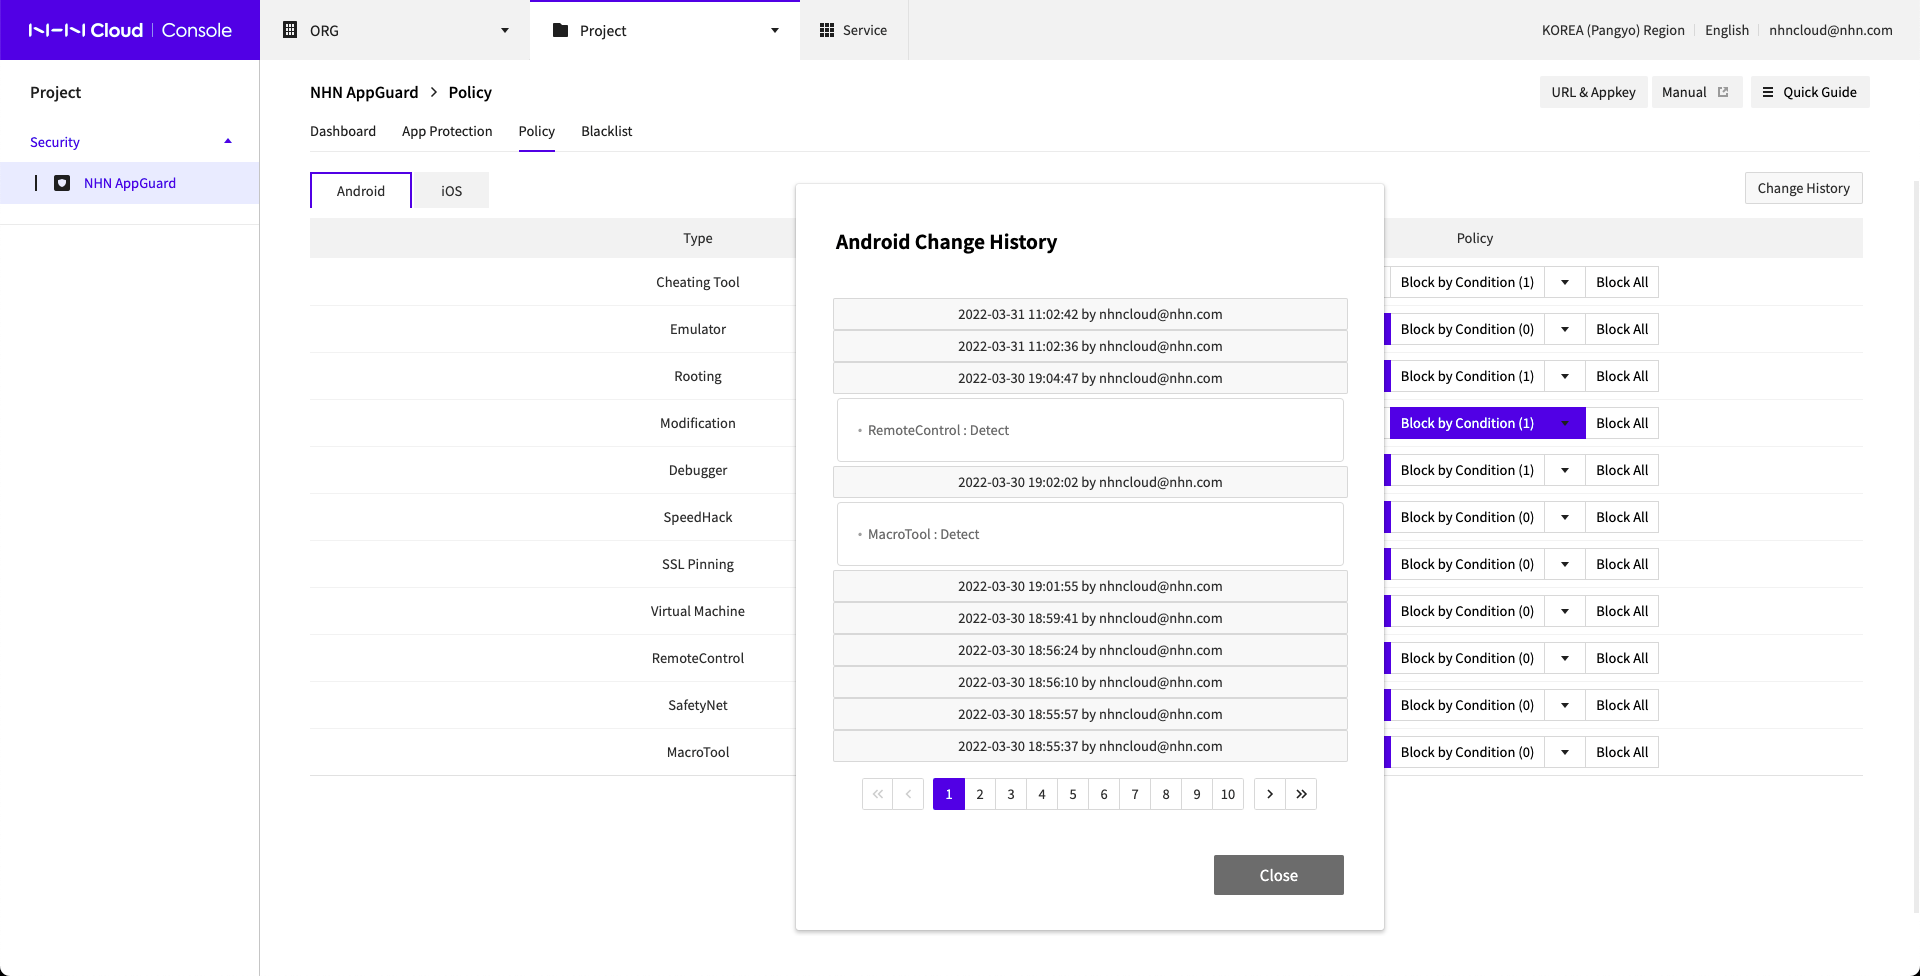
Individual Block
Only emulators and macro tools can be blocked per individual tool, not all types.
- You can disable, detect, and block an individual tool.
- Default Policiesallow you to set policies for unidentified types.
Add Conditions
Select Policy and click Block by Condition by each detection type, and the page shows as follows:
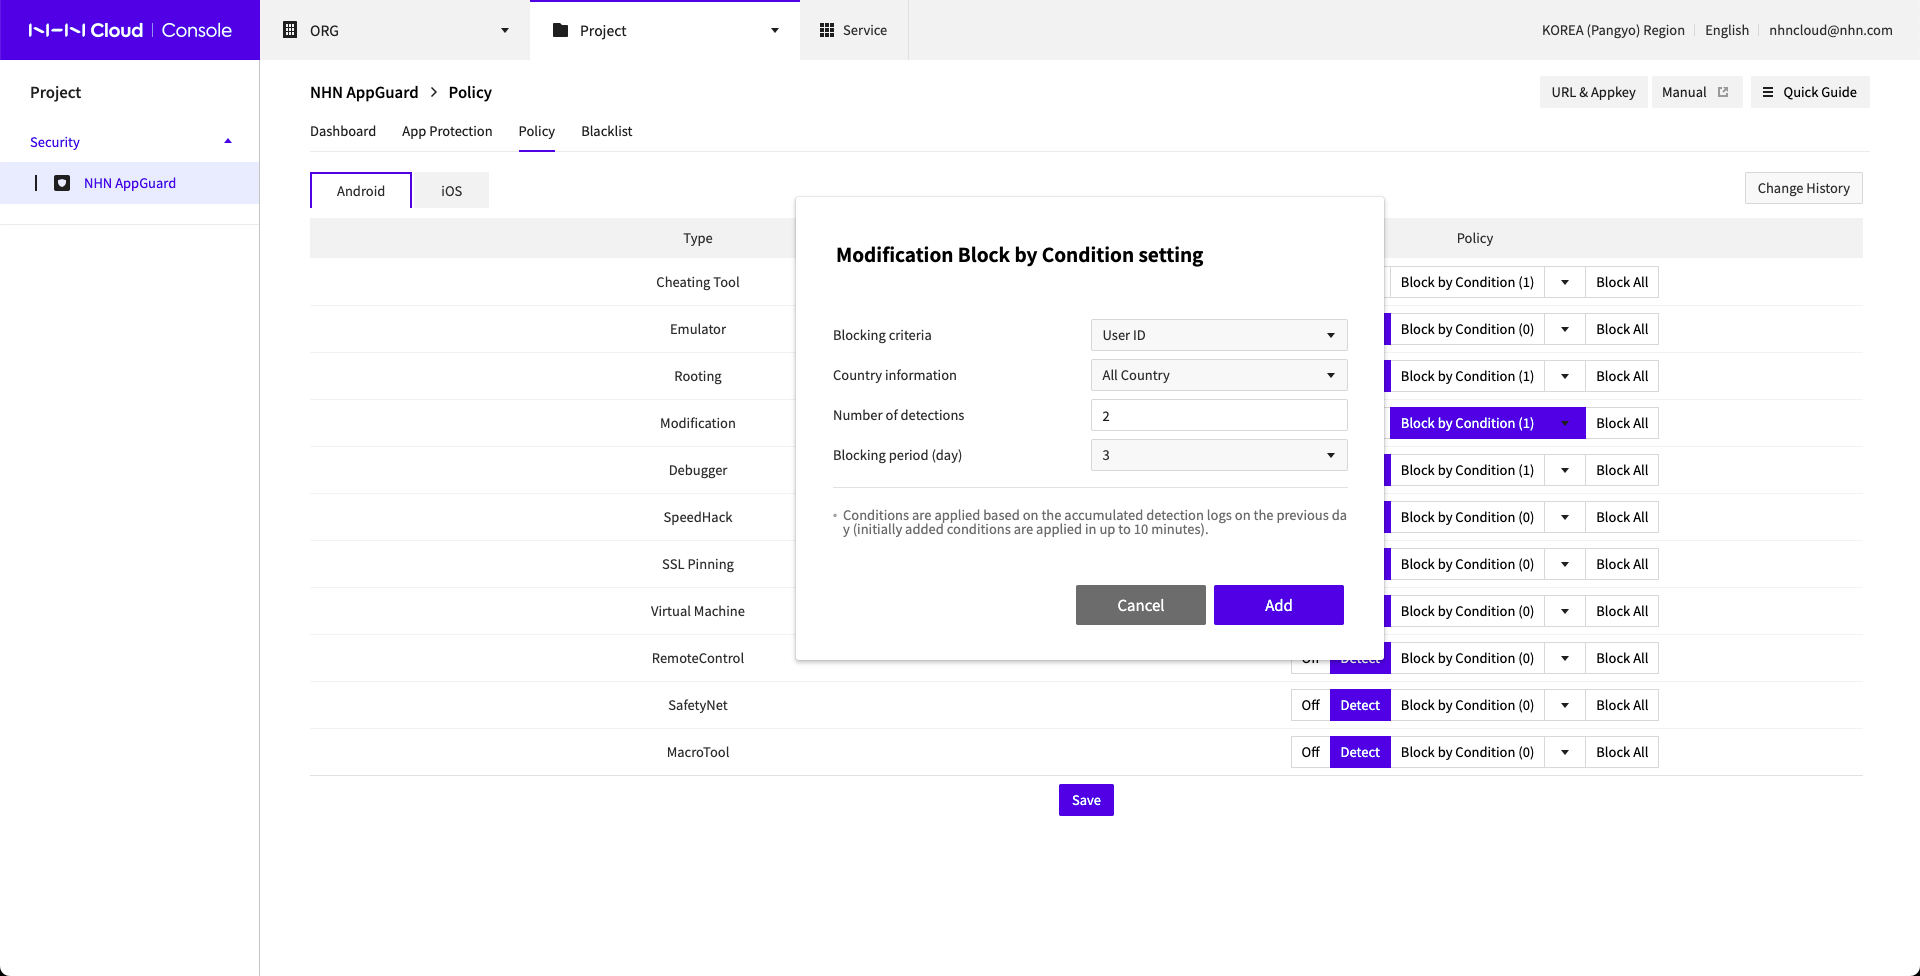
- Select Blocking Criteria.
- Select Country Information.
- Enter Number of Detections.
- For rooting, detection is set one-time.
- Select Blocking Period (day).
- Click Add to add more conditions.
- While Block by Condition is enabled, click Save to apply the conditions.
- Conditions are applied based on detection logs accumulated on the previous day, and it takes up to 10 minutes to apply initially.
- Conditions are newly applied upon detection logs accumulated on the previous day, as of 05 of 00 every day.
Check Conditions
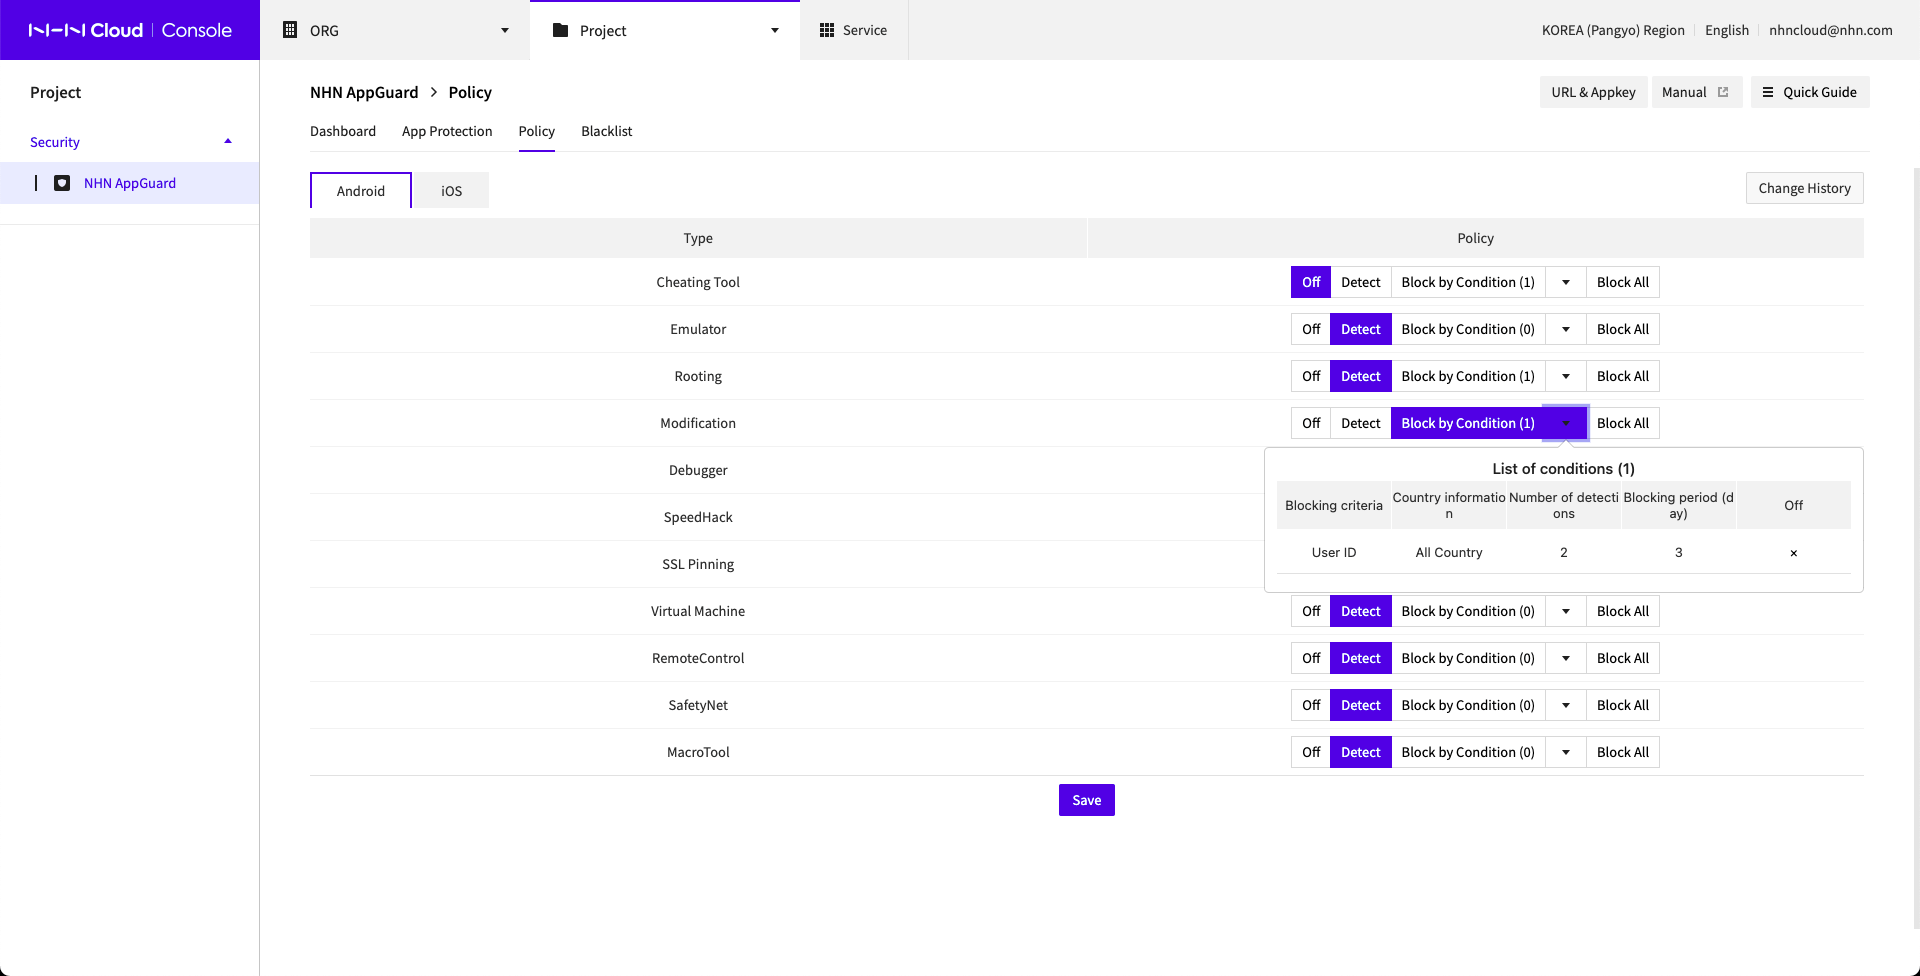
- Click ▼ next to Block by Condition and check added conditions.
Blacklist
By registering user IDs for the integration of device ID and SDK as provided by NHN AppGuard, particular devices and users can be managed under blacklist.
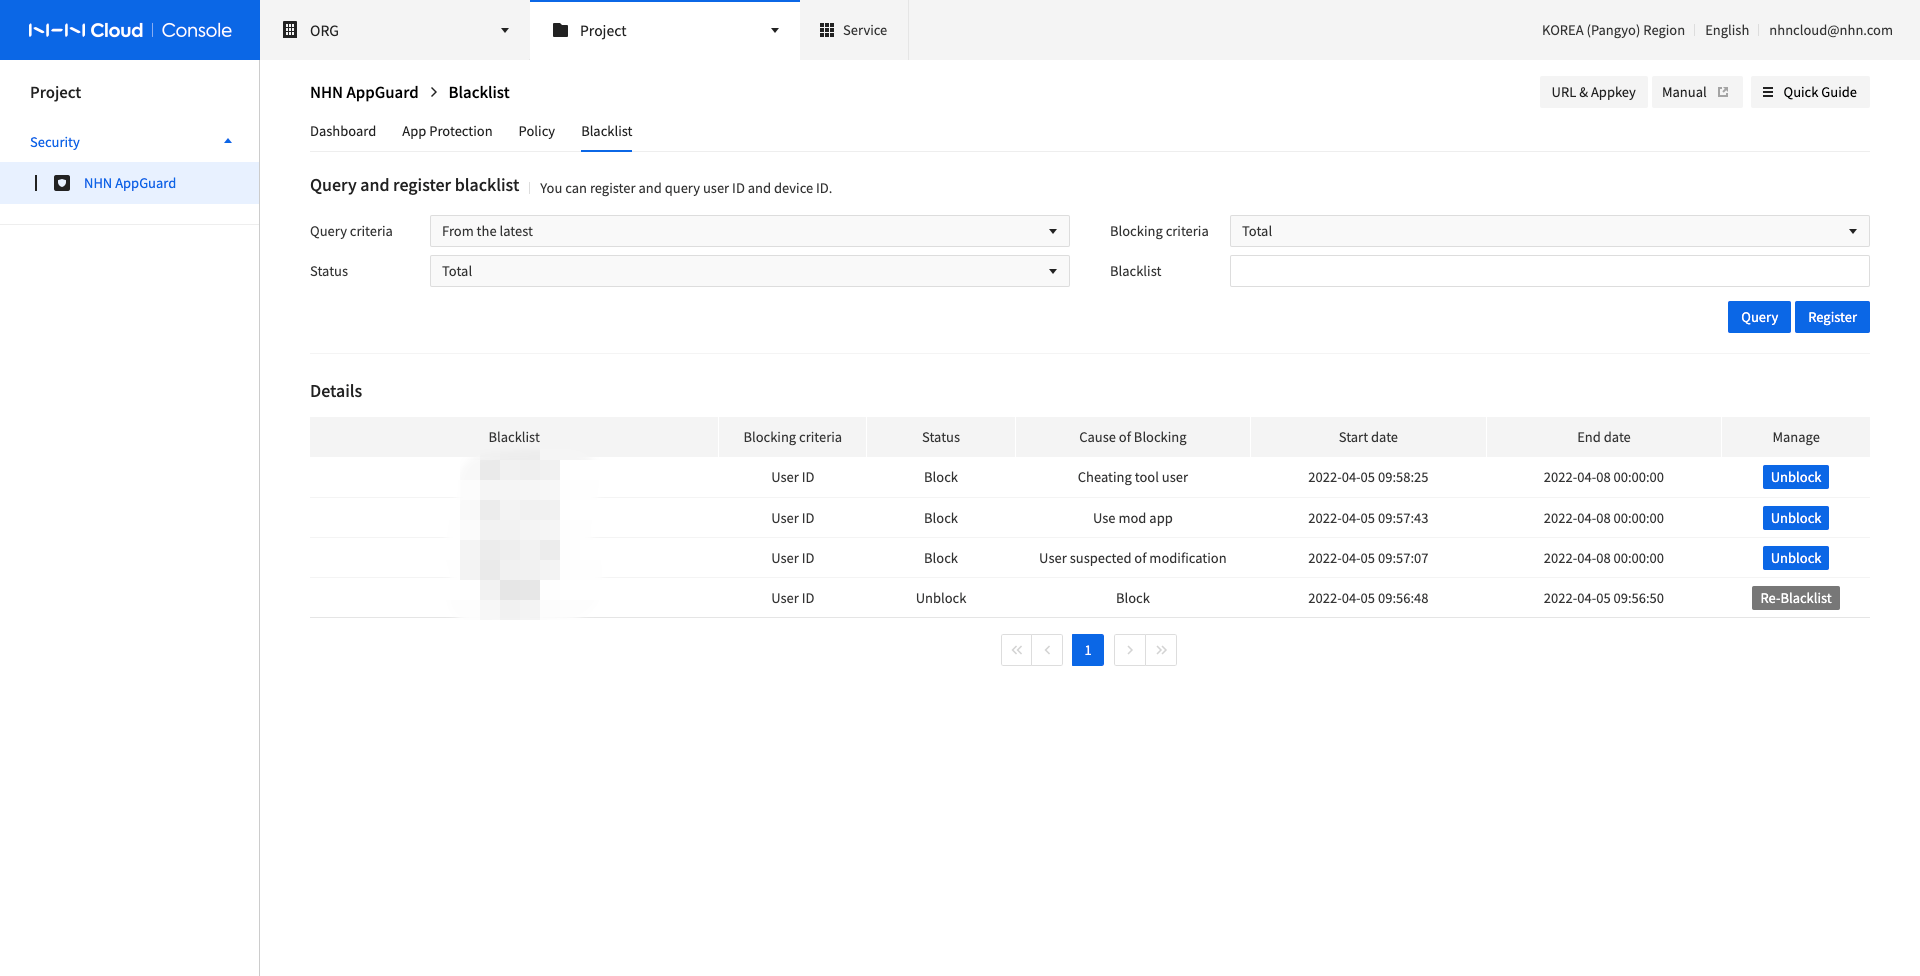
- You can search by block criteria, status, blacklist, start date, expiration date, and block reason.
- The blacklist searches for usernames with the same value as the one you entered.
- The start date and expiration date can be retrieved by selecting the start date and expiration date.
- The block reason is a LIKE search for the reason you entered.
- The blacklist, block criteria, status, reason for block, start date, expiration date, and manage buttons appear.
- You can download the retrieved results by clicking Download (Excel).
Blacklist
Select Blacklist and click Register, and the page shows as follows:
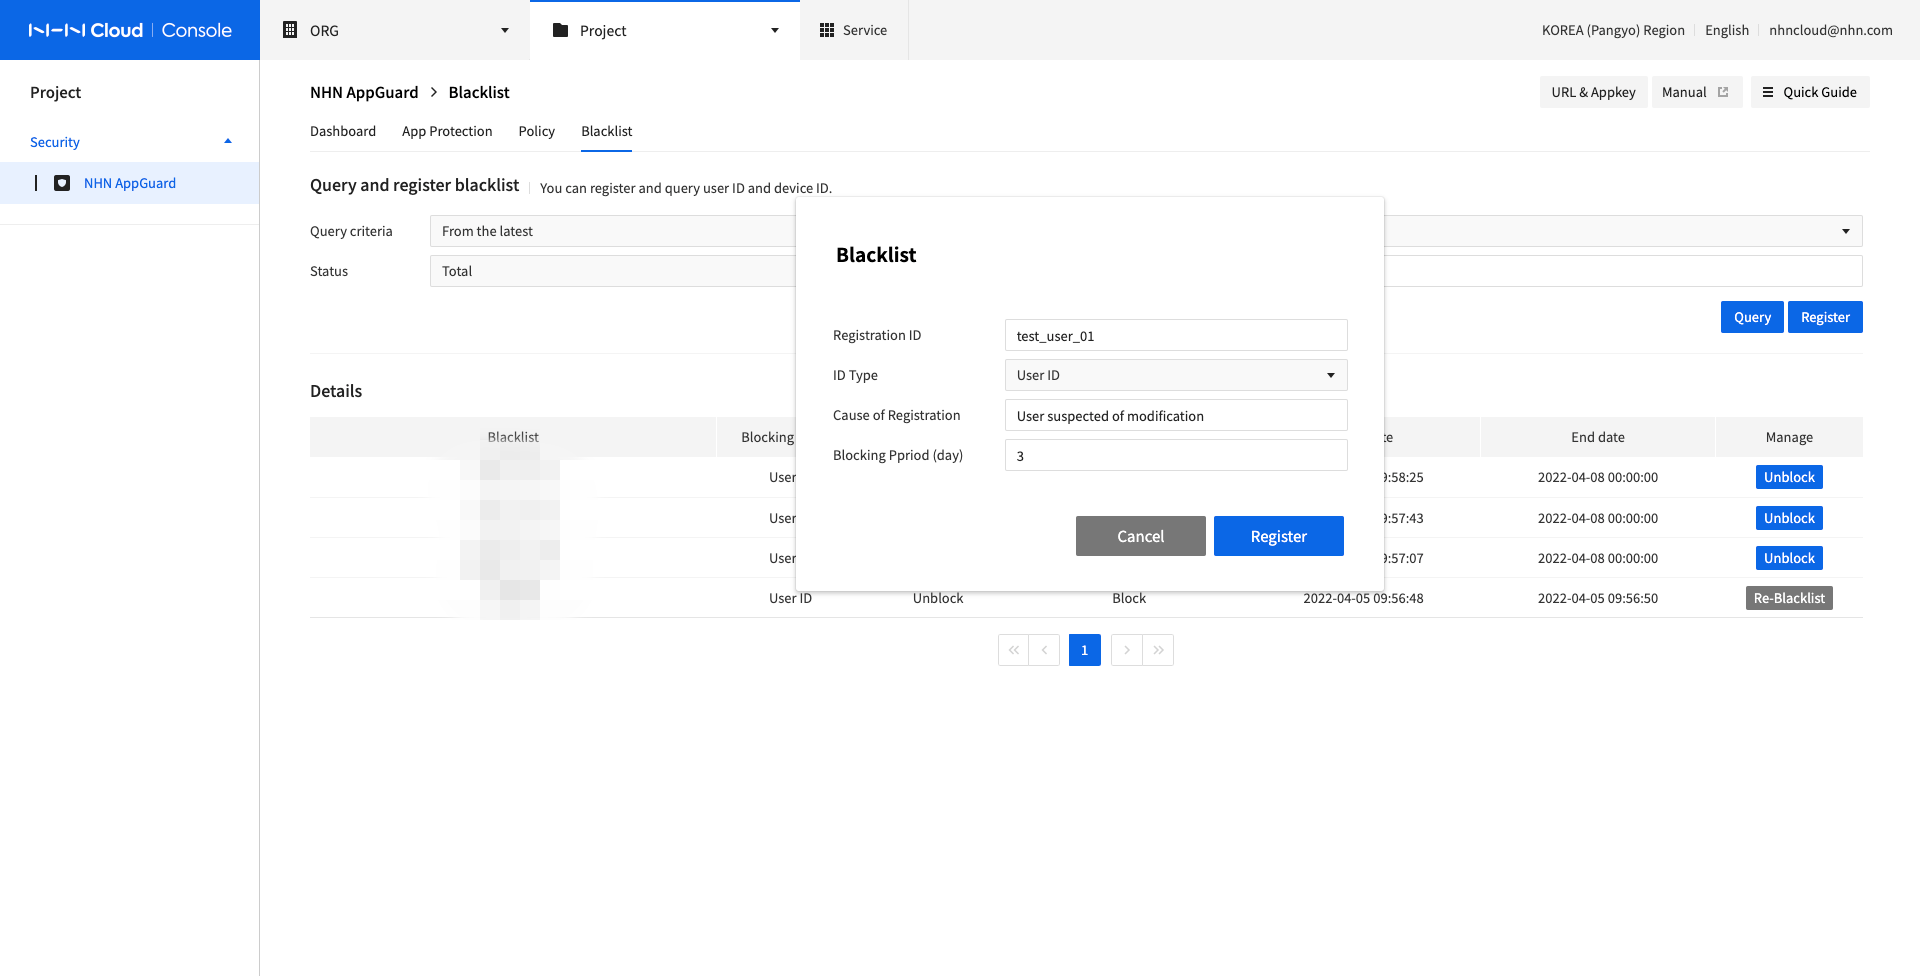
- Select Registration ID.
- Select ID Type.
- Enter Cause of Registration.
- Select Blocking Period (day).
- Click Register to register it on the Blacklist.
- Execute the app with registered blacklist ID and guide for NHN AppGuard shows during specified blocking period and app is closed.
Un-blacklist
Select Blacklist and click UnBlock from the registered list, and the page shows as follows:
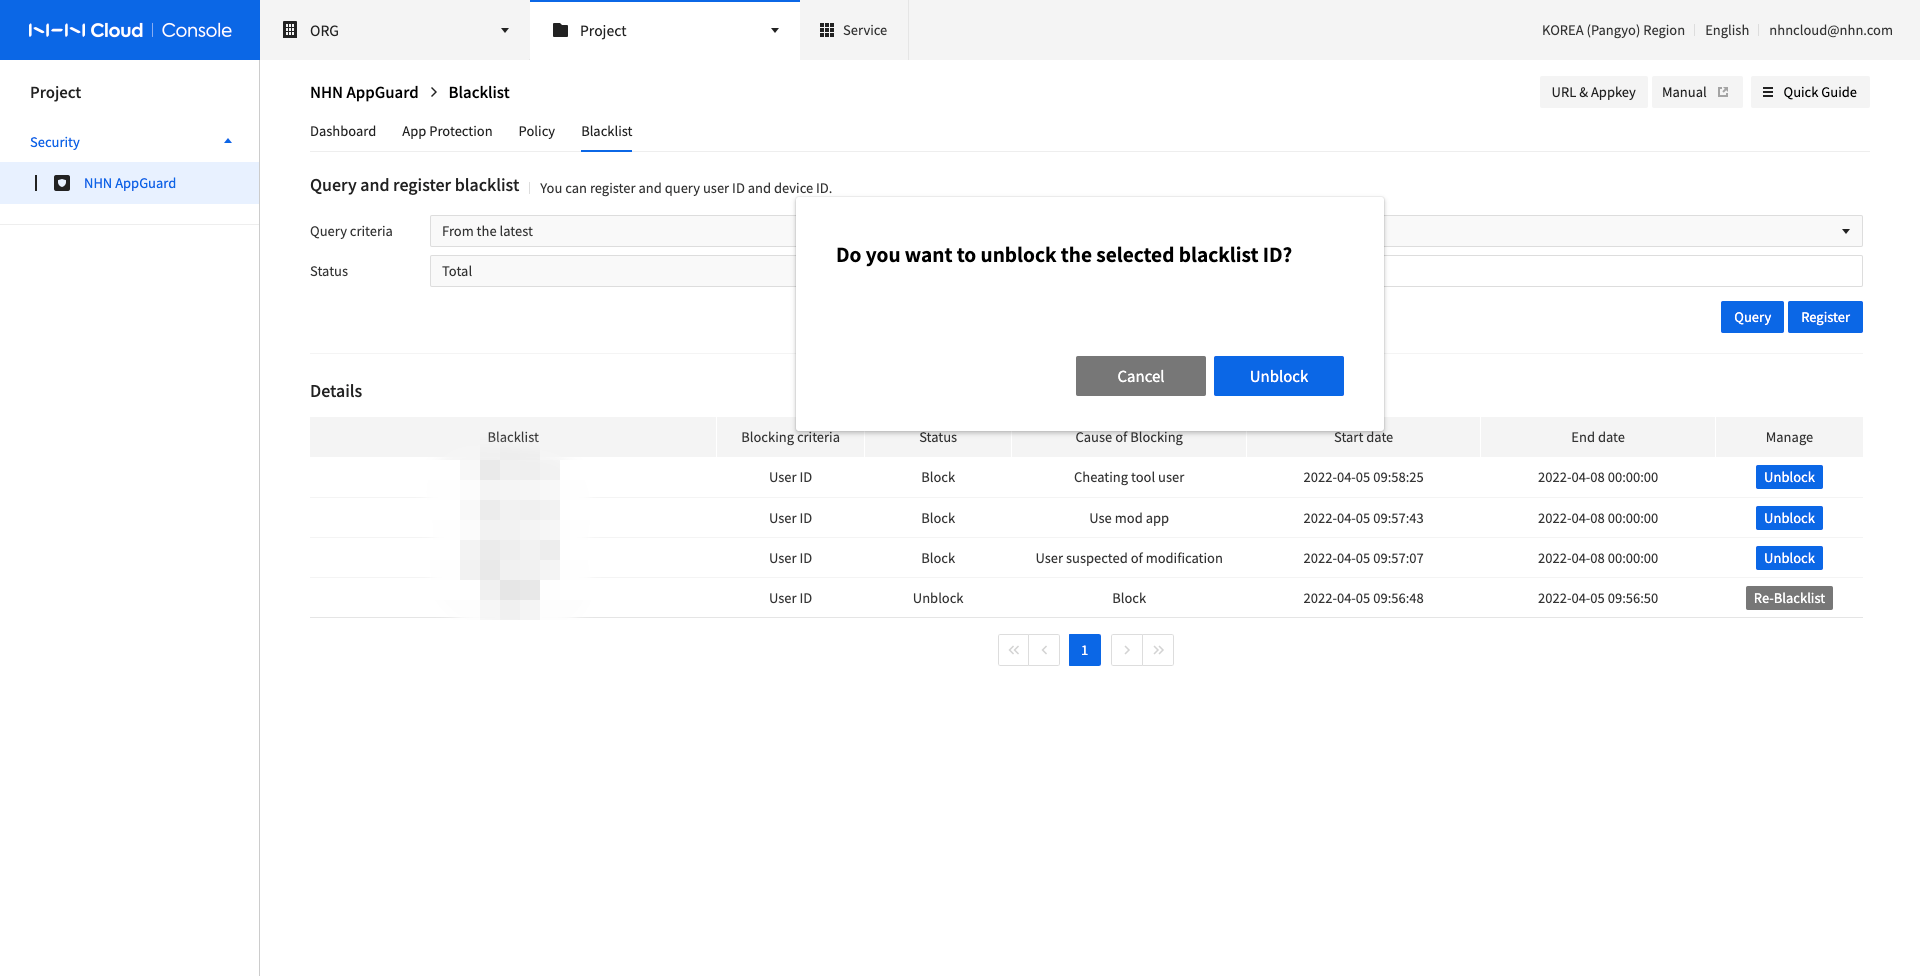
- Click UnBlock to release from the registered blacklist.
- Execute the app with unblacklisted ID and app is not closed by NHN AppGuard.
Re-blacklist
Select Blacklist and click Re-blacklist for a blacklist which has been unblacklisted, and the page shows as follows:
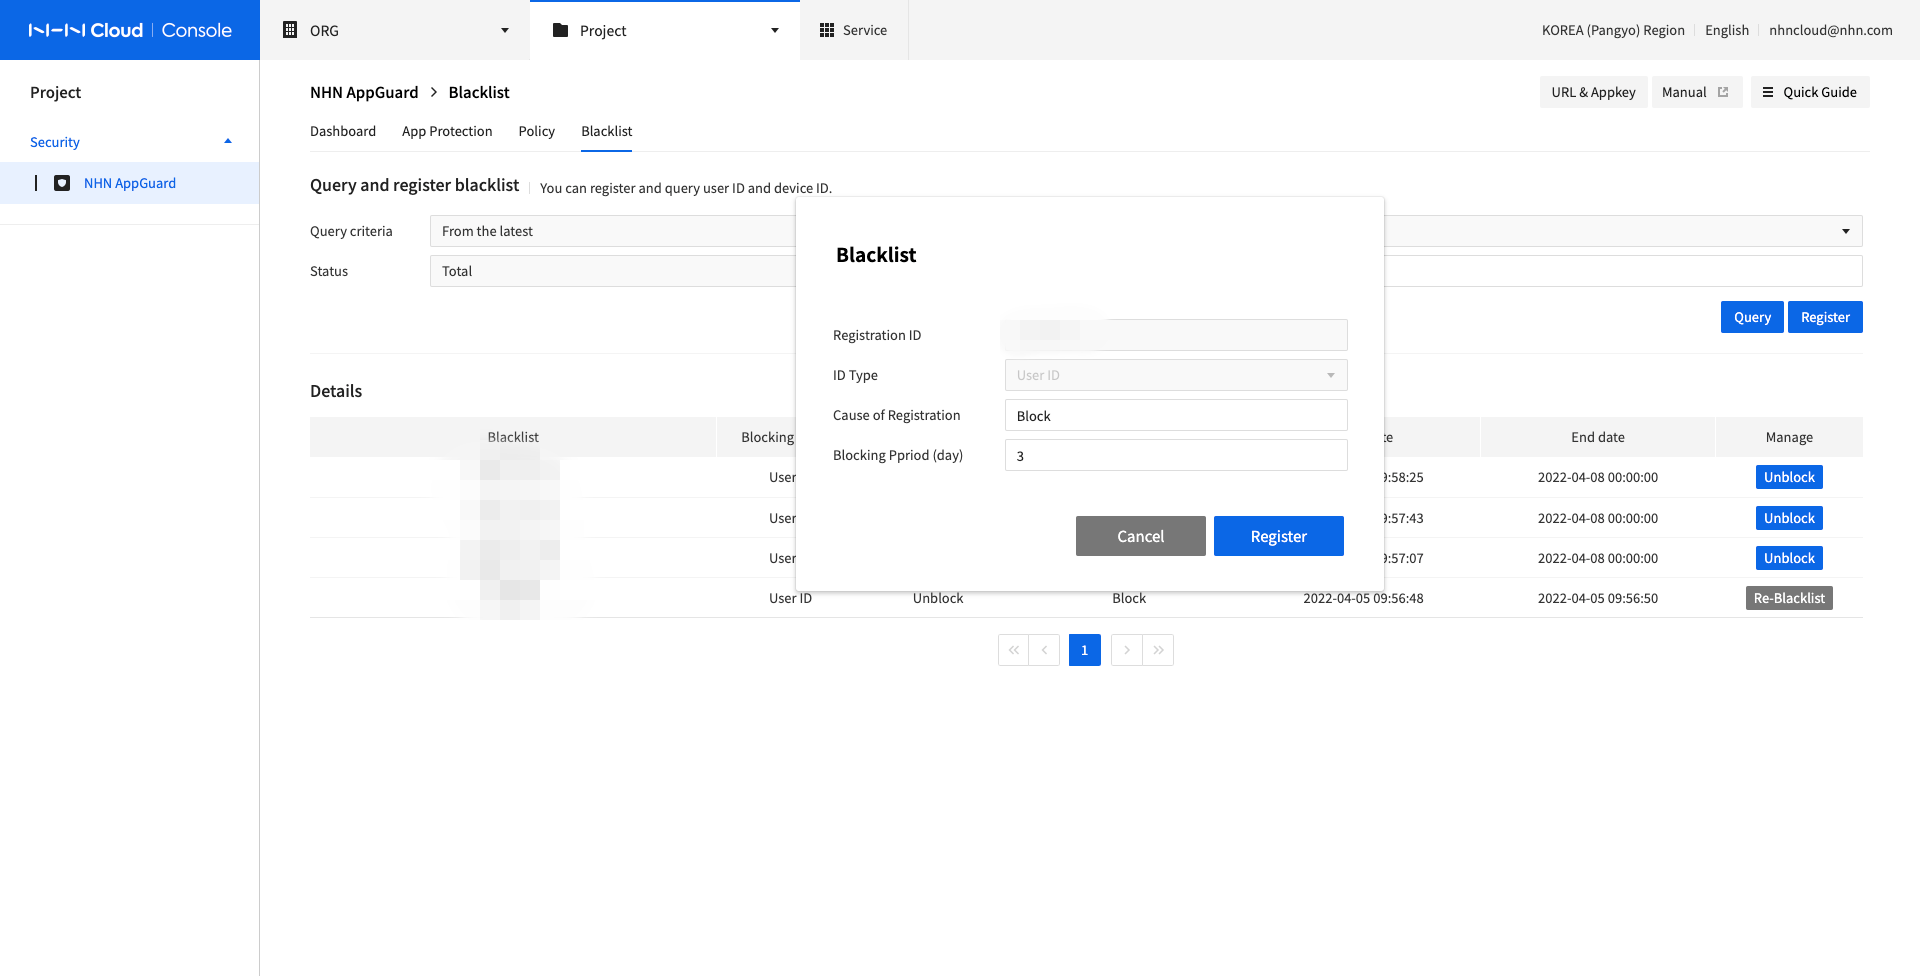
- Modify Cause of Registration and Blocking Period (day).
- Click Register to register the updated blacklist.
- Execute the app with re-registered blacklist ID and guide for NHN AppGuard shows during specified blocking period and app is closed.
Batch Register Blacklist
After selecting the Blacklist menu, click the Batch Register (Excel) button and you will see the following screen.

- Click Batch Register Blacklist Template File to download the template file.
- Open the template file and enter the registration ID, ID type, reason for registration, and **Block period in days**.
- For the ID type, enter DEVICEID or USERID.
- Click the Select File button to upload, then click the Register button to batch register the blacklist.
- When the registration is complete, a message appears in the processing results.
Batch Remove Blacklist
After selecting the Blacklist menu, check the blacklists you want to remove and click the Batch Remove button, you will see the following screen.

- Click the Remove button to batch remove the registered blacklist.
Batch Re-register Blacklist
After selecting the Blacklist menu, check the blacklists you want to re-register and click the Batch Re-Register button, you will see the following screen.

- After entering the block period, click the Register button to batch re-register the blacklist.
Log Search
You can view the details of the detected logs on the Log Search tab.
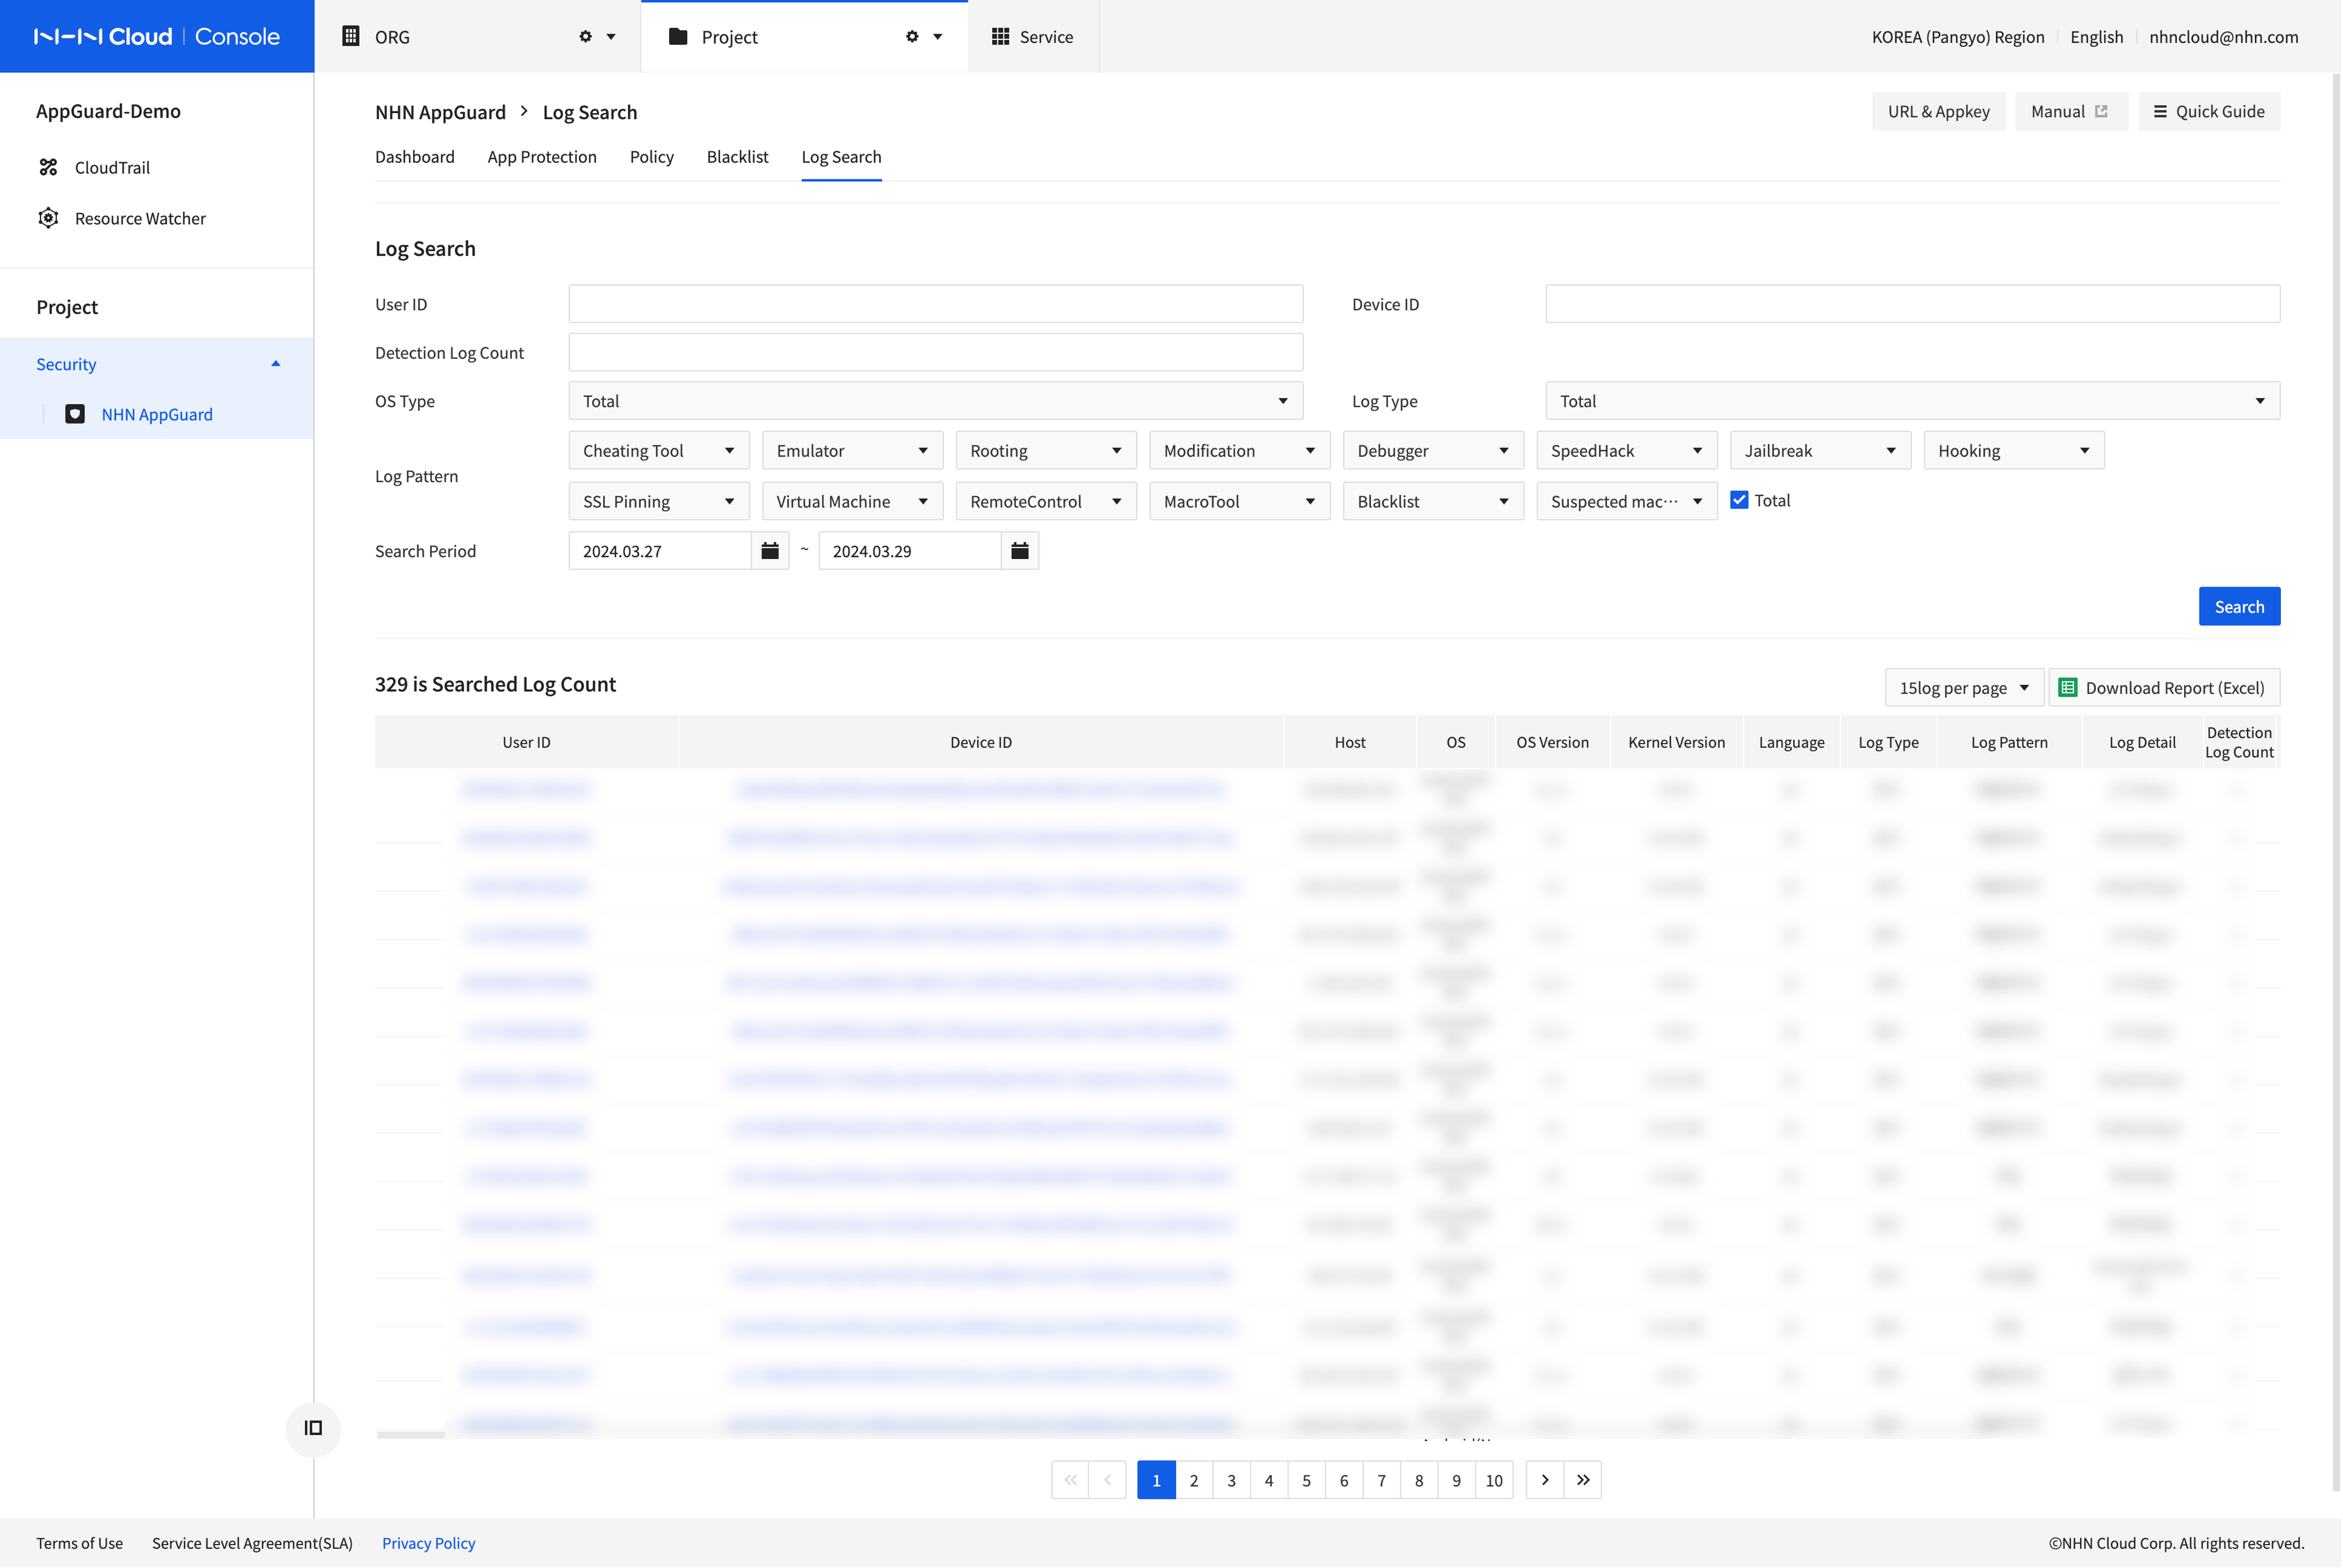
- You can search by User ID, Device ID, Detection Log Count, Log Pattern, and Search Period.
- Multiple User ID and Device ID can be added with comma as a delimiter.
- User ID, Device ID, Host IP, device model numbers, OS, Logs, App Information, and Detection Time appear.
- You can use the information in the ANDROID_ID column to view the device_key in Gamebase.
- You can download the search results by clicking Download Report (Excel).
Settings
Set Alarms
You can receive an alarm on the channel you set when the number of detection/block logs exceed a threshold.
- Set Thresholds
- Alarms are sent when the number of detections+blocks that occurred today exceeds a threshold based on the median value of detections+blocks that occurred during the comparison period.
- The median value is used to reduce the impact of cases where the number of logs increased dramatically due to abnormal behaviors, such as an attack within the comparison period.
- The threshold can be set from 10 to 10000%.
- For example, if the number of logs over 7 days is [5,5,5,5,5,7,7,7] and the threshold you set is 100%, alarms are sent if the number of logs today is 5 or more.
- Alarms are sent when the number of detections+blocks that occurred today exceeds a threshold based on the median value of detections+blocks that occurred during the comparison period.
- Set Alarm Receiving Channel
- You can enter up to five emails to receive alarms.
- You can enter multiple emails, separated by commas (,).
- You can only add or delete emails. You can't edit emails.
- Alarms are sent within 10 minutes of the threshold being exceeded.
- If you received an alarm, access the console to view the detection log.
Note
Alarms are sent up to once per day.
App Attestation
This guide describes how to use the NHN AppGuard App Attestation console. To use the App Attestation feature, you must request permission through Contact Us.
Product
You can configure basic information, app attestation policy, Android signing information, additional information, and more.
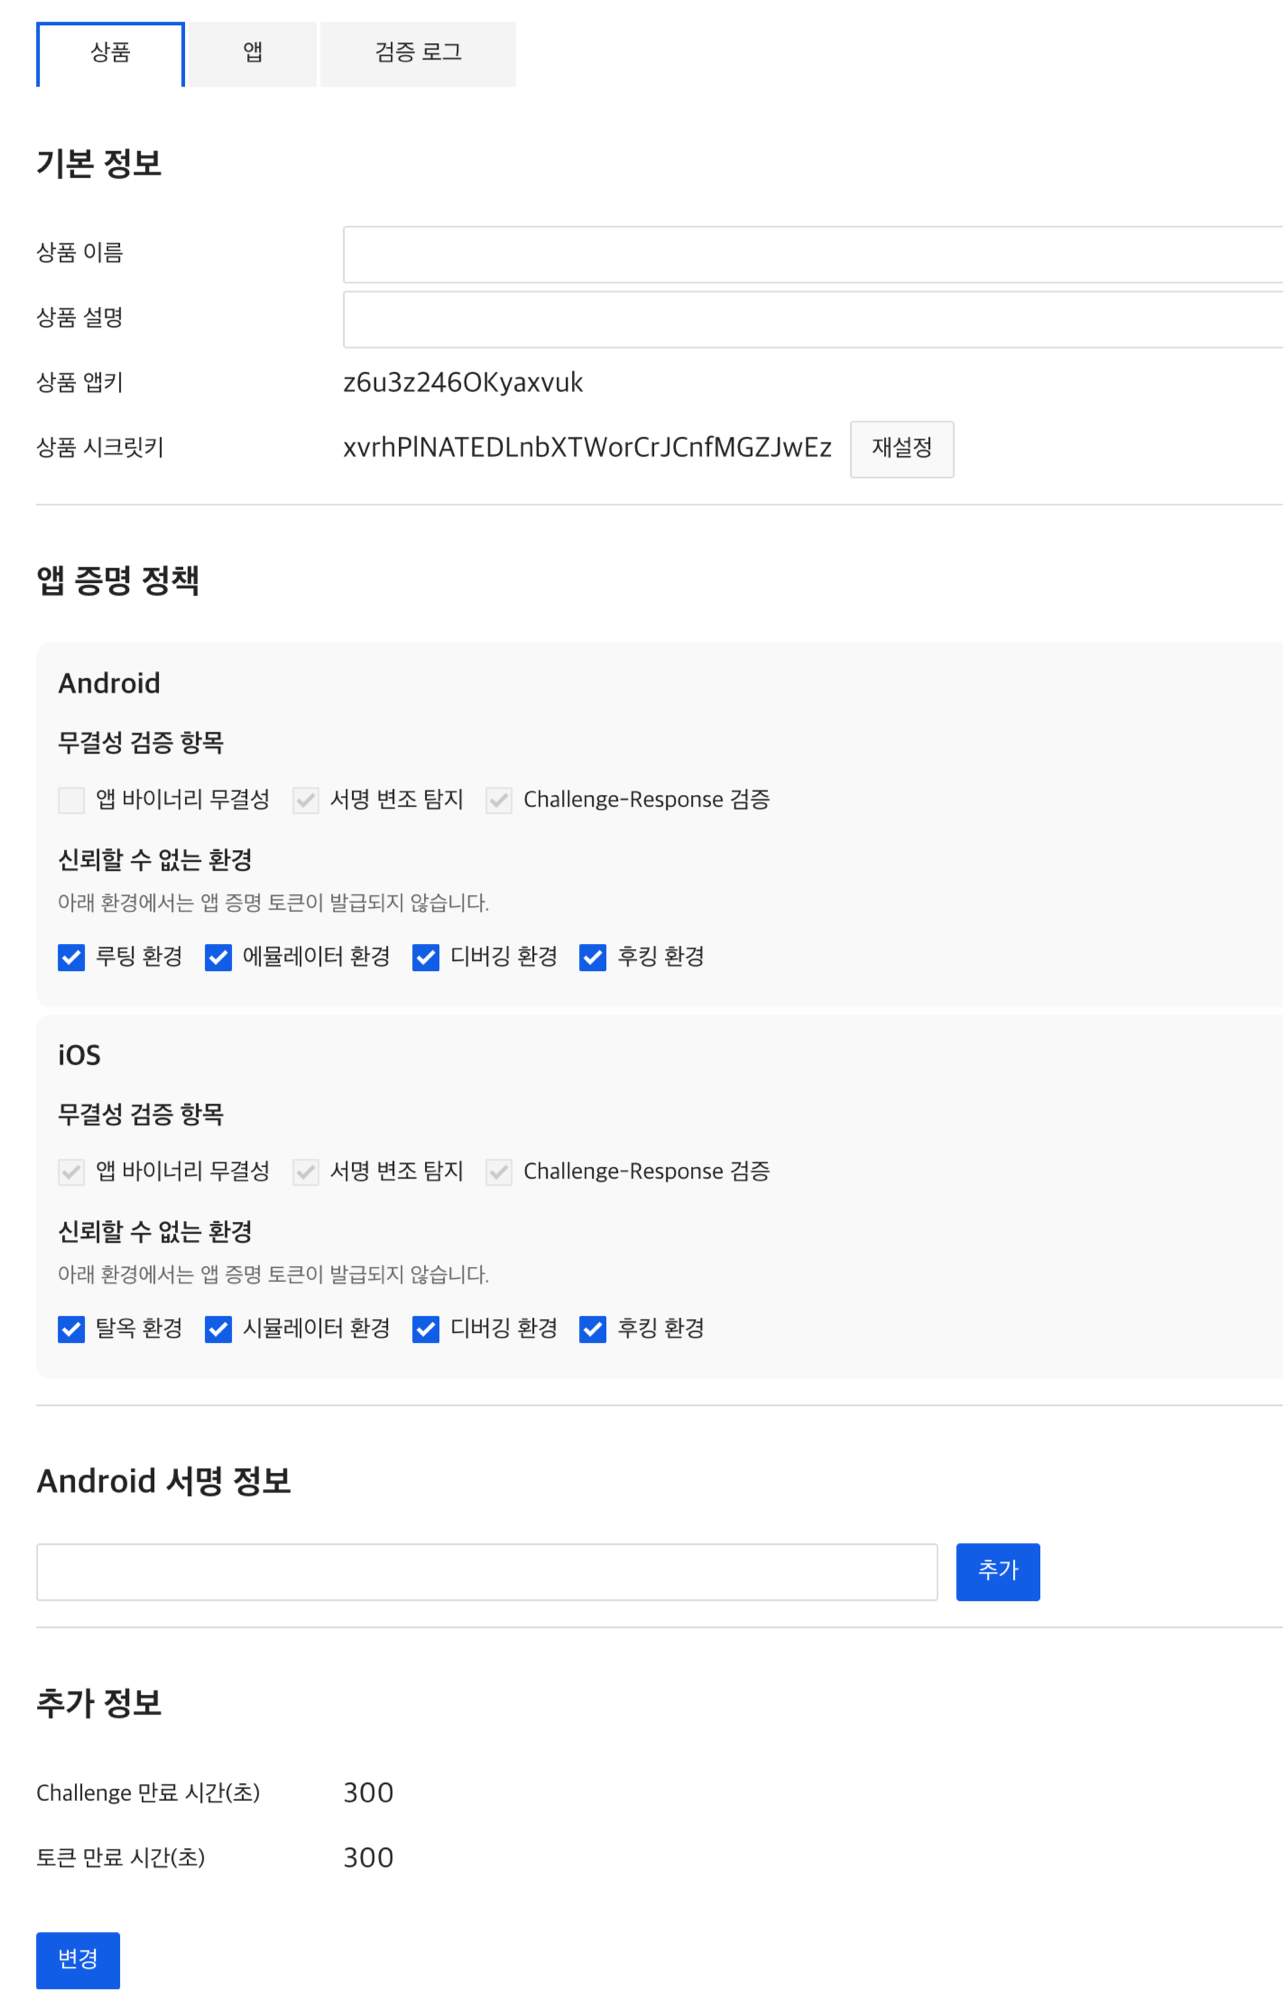
- Product Appkey: A unique key that identifies the product.
- Product Secret Key: A key used for HMAC authentication when making requests.
- Android Signature Info: Allows multiple entries. Values must exist before the Android verification logic is executed.
-
Additional Info
- Challenge Expiration Time (seconds): The validity period of a challenge.
- Token Expiration Time (seconds): The validity period of a token.
App Attestation Policy
Configure app attestation options for the Android and iOS platforms. The options are organized into two sections: Integrity Verification Items and Untrusted Environments.
Integrity Verification Items
The following items are enabled by default and cannot be changed.
| Item | Description |
|---|---|
| App Binary Integrity | Verifies whether the app binary has been tampered with. |
| Signature Tampering Detection | Detects whether the app signature has been tampered with. |
| Challenge-Response Verification | Performs Challenge-Response verification. |
Untrusted Environments
App attestation tokens are not issued in the following environments. You can enable or disable individual items using the checkboxes.
| Item | Android | iOS |
|---|---|---|
| Rooting/Jailbreak environment | Rooting environment | Jailbreak environment |
| Emulator/Simulator environment | Emulator environment | Simulator environment |
| Debugging environment | Debugging environment | Debugging environment |
| Hooking environment | Hooking environment | Hooking environment |
App
View app build information.

- App ID: A unique ID generated when the app is built.
- Click the Delete button to delete an app.
App Info
Click an app in the list to view its details.
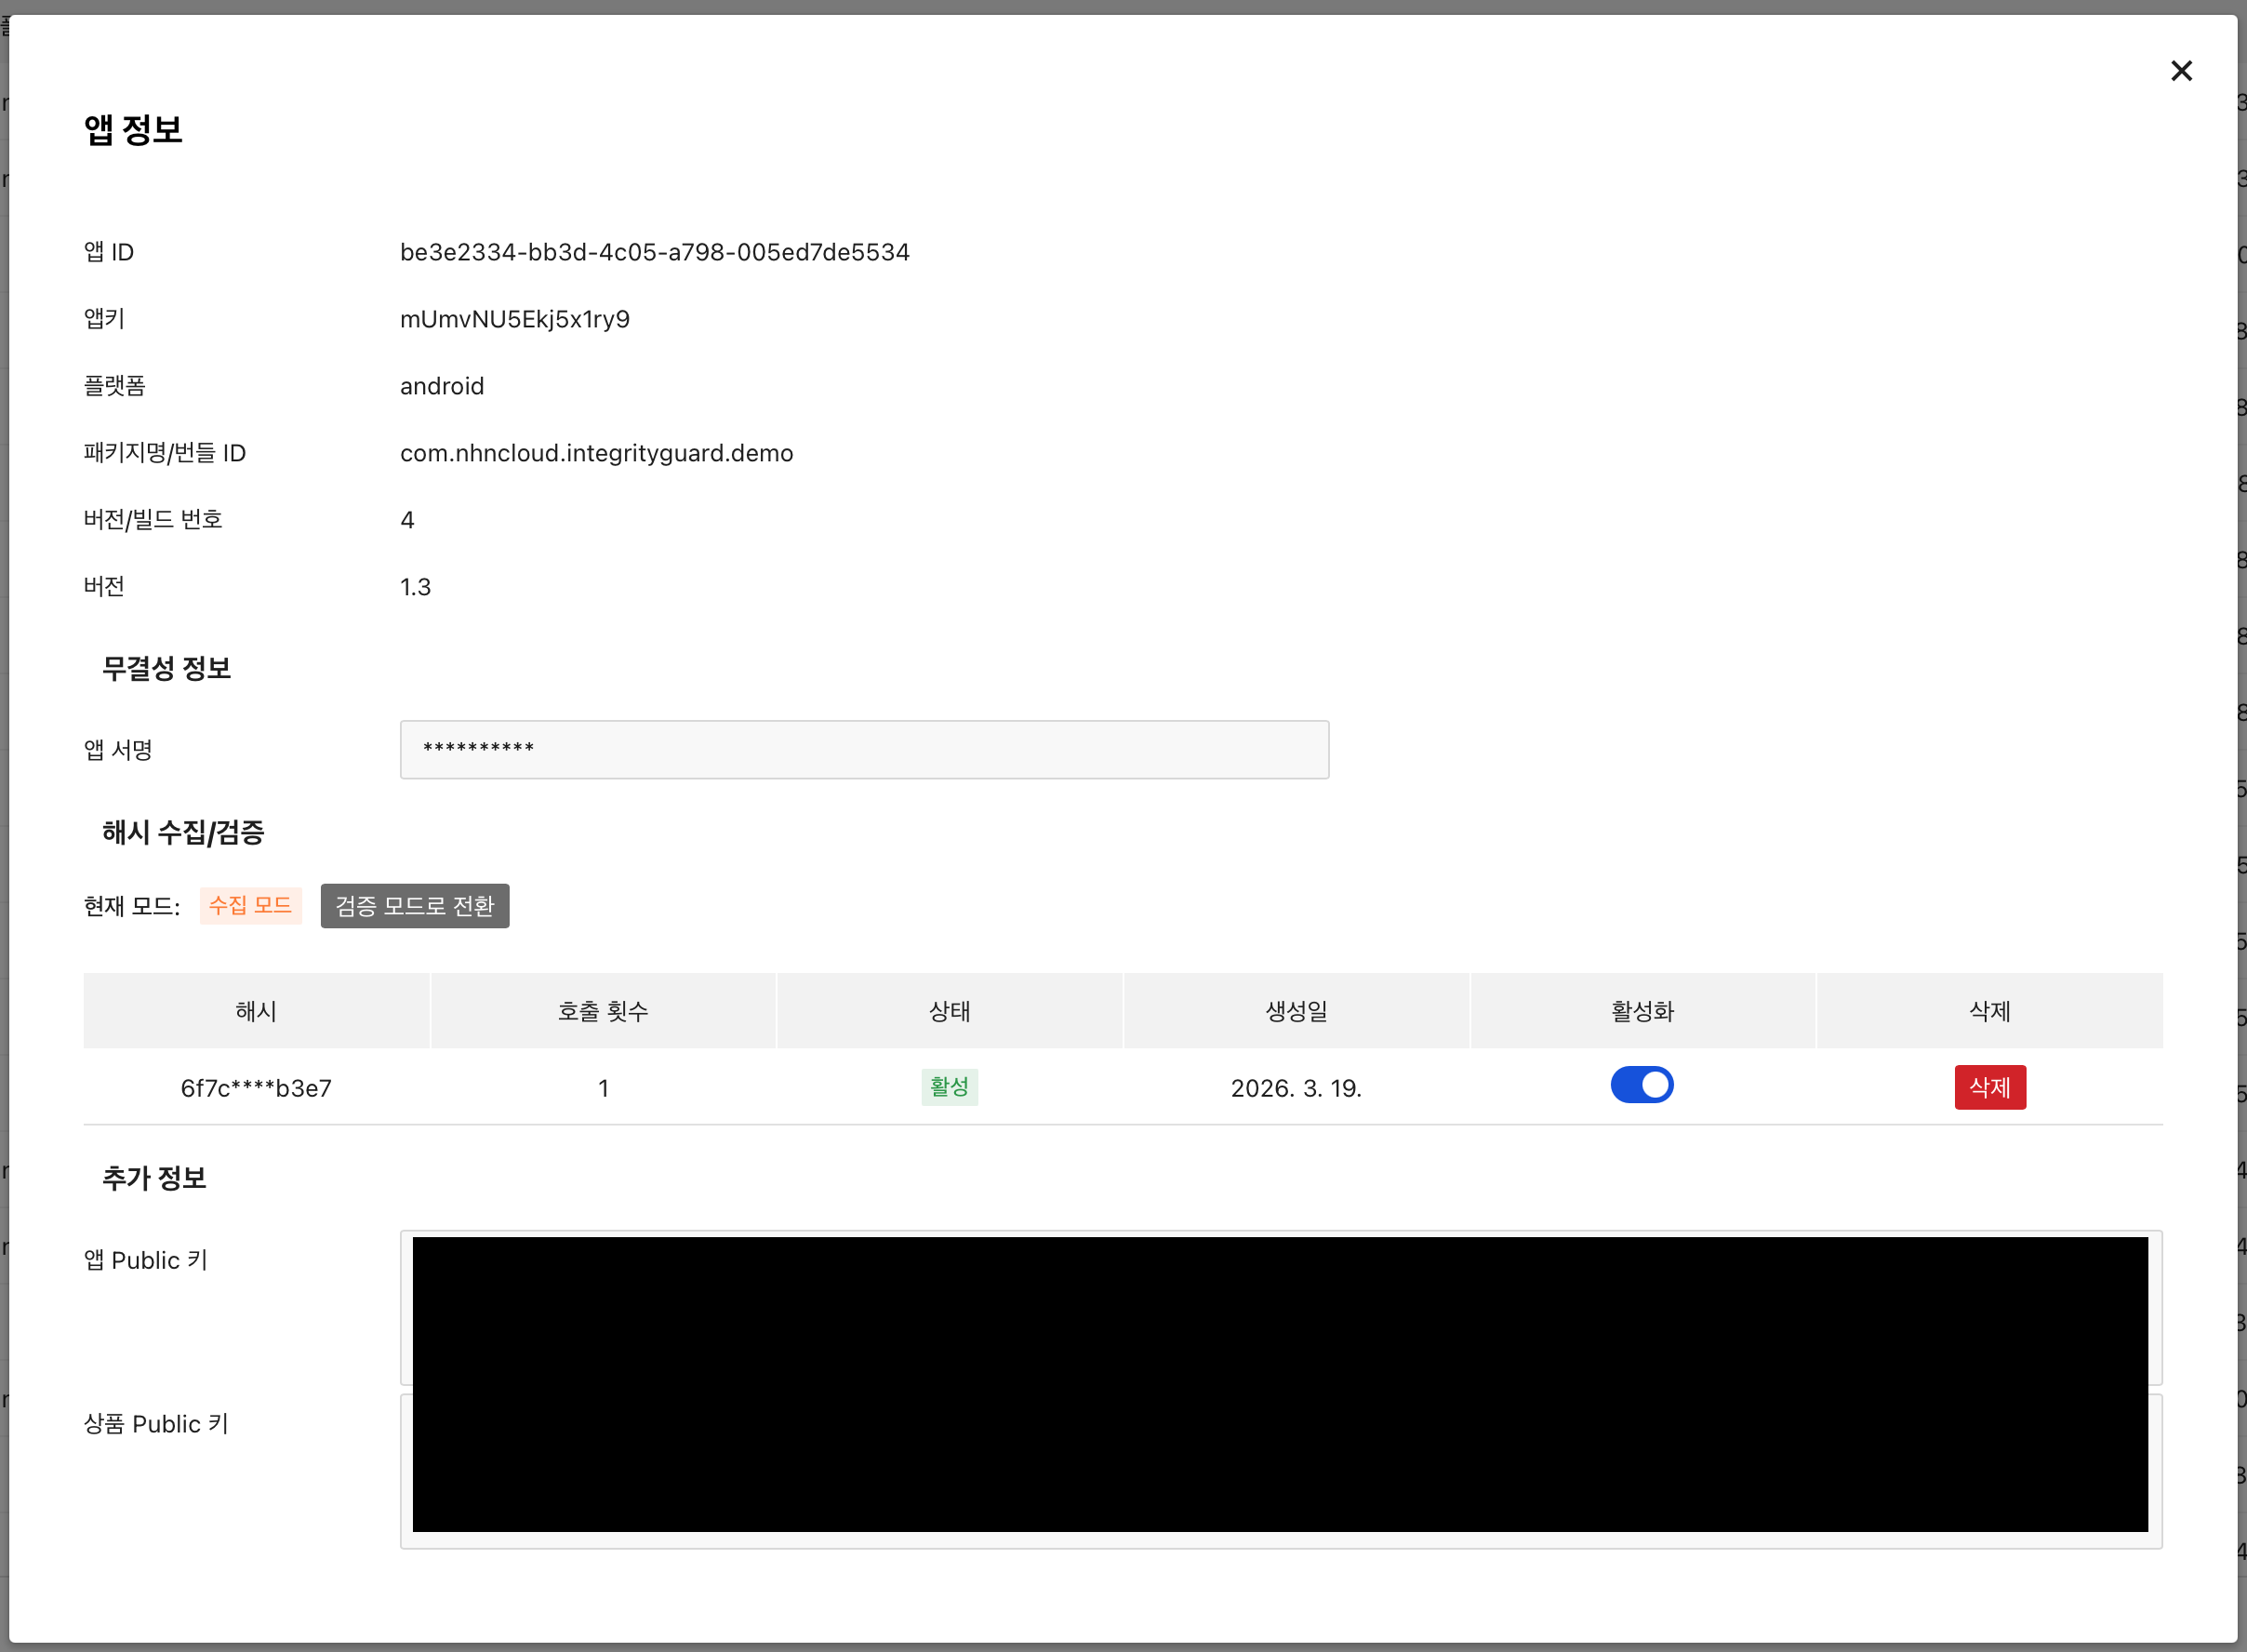
Basic Info
| Field | Description |
|---|---|
| App ID | Unique ID generated when the app is built |
| Appkey | Product Appkey |
| Platform | Android / iOS |
| Package Name / Bundle ID | Package name or bundle identifier of the app |
| Version Code / Build Number | Version code or build number of the app |
| Version | App version |
Integrity Info
- App Signature: Signature information required for app attestation.
Hash Collection/Verification
Collects and verifies the binary hash of the app. Since the app may be rebuilt when uploaded to a store, resulting in a different hash, collect multiple hashes before switching to verification mode.
- Collection Mode (default): Hashes are automatically collected when the app is launched. Only the signature is verified; hash verification is not performed.
- Verification Mode: Verifies integrity by comparing against collected active hashes. Verification fails if no matching hash is found.
Click the Switch Mode button to toggle between Collection Mode and Verification Mode.
View and manage collected hash information in the hash list table.
| Column | Description |
|---|---|
| Hash | Binary hash (masked) |
| Request Count | Number of times verification was requested with this hash |
| Status | Active / Inactive |
| Created Date | Date the hash was first collected |
| Activate | Toggle switch to activate or deactivate the hash |
| Delete | Delete an individual hash |
Note
The recommended workflow for hash collection/verification is as follows:
- Protect the app (Collection Mode is the default).
- Launch the protected app. Hash A is collected.
- Upload to the store. If the store rebuilds the app, Hash B is collected.
- Release from the store. If a rebuild occurs, Hash C is collected.
- Once collection is complete, switch to Verification Mode.
- Deactivate or delete any unnecessary hashes.
Additional Info
- App Public Key: The Public Key of the app SDK, which is information required for app attestation.
- Product Public Key: The Public Key of the server associated with the app, which is information required for app attestation.
Verification Log
You can view the app attestation logs.
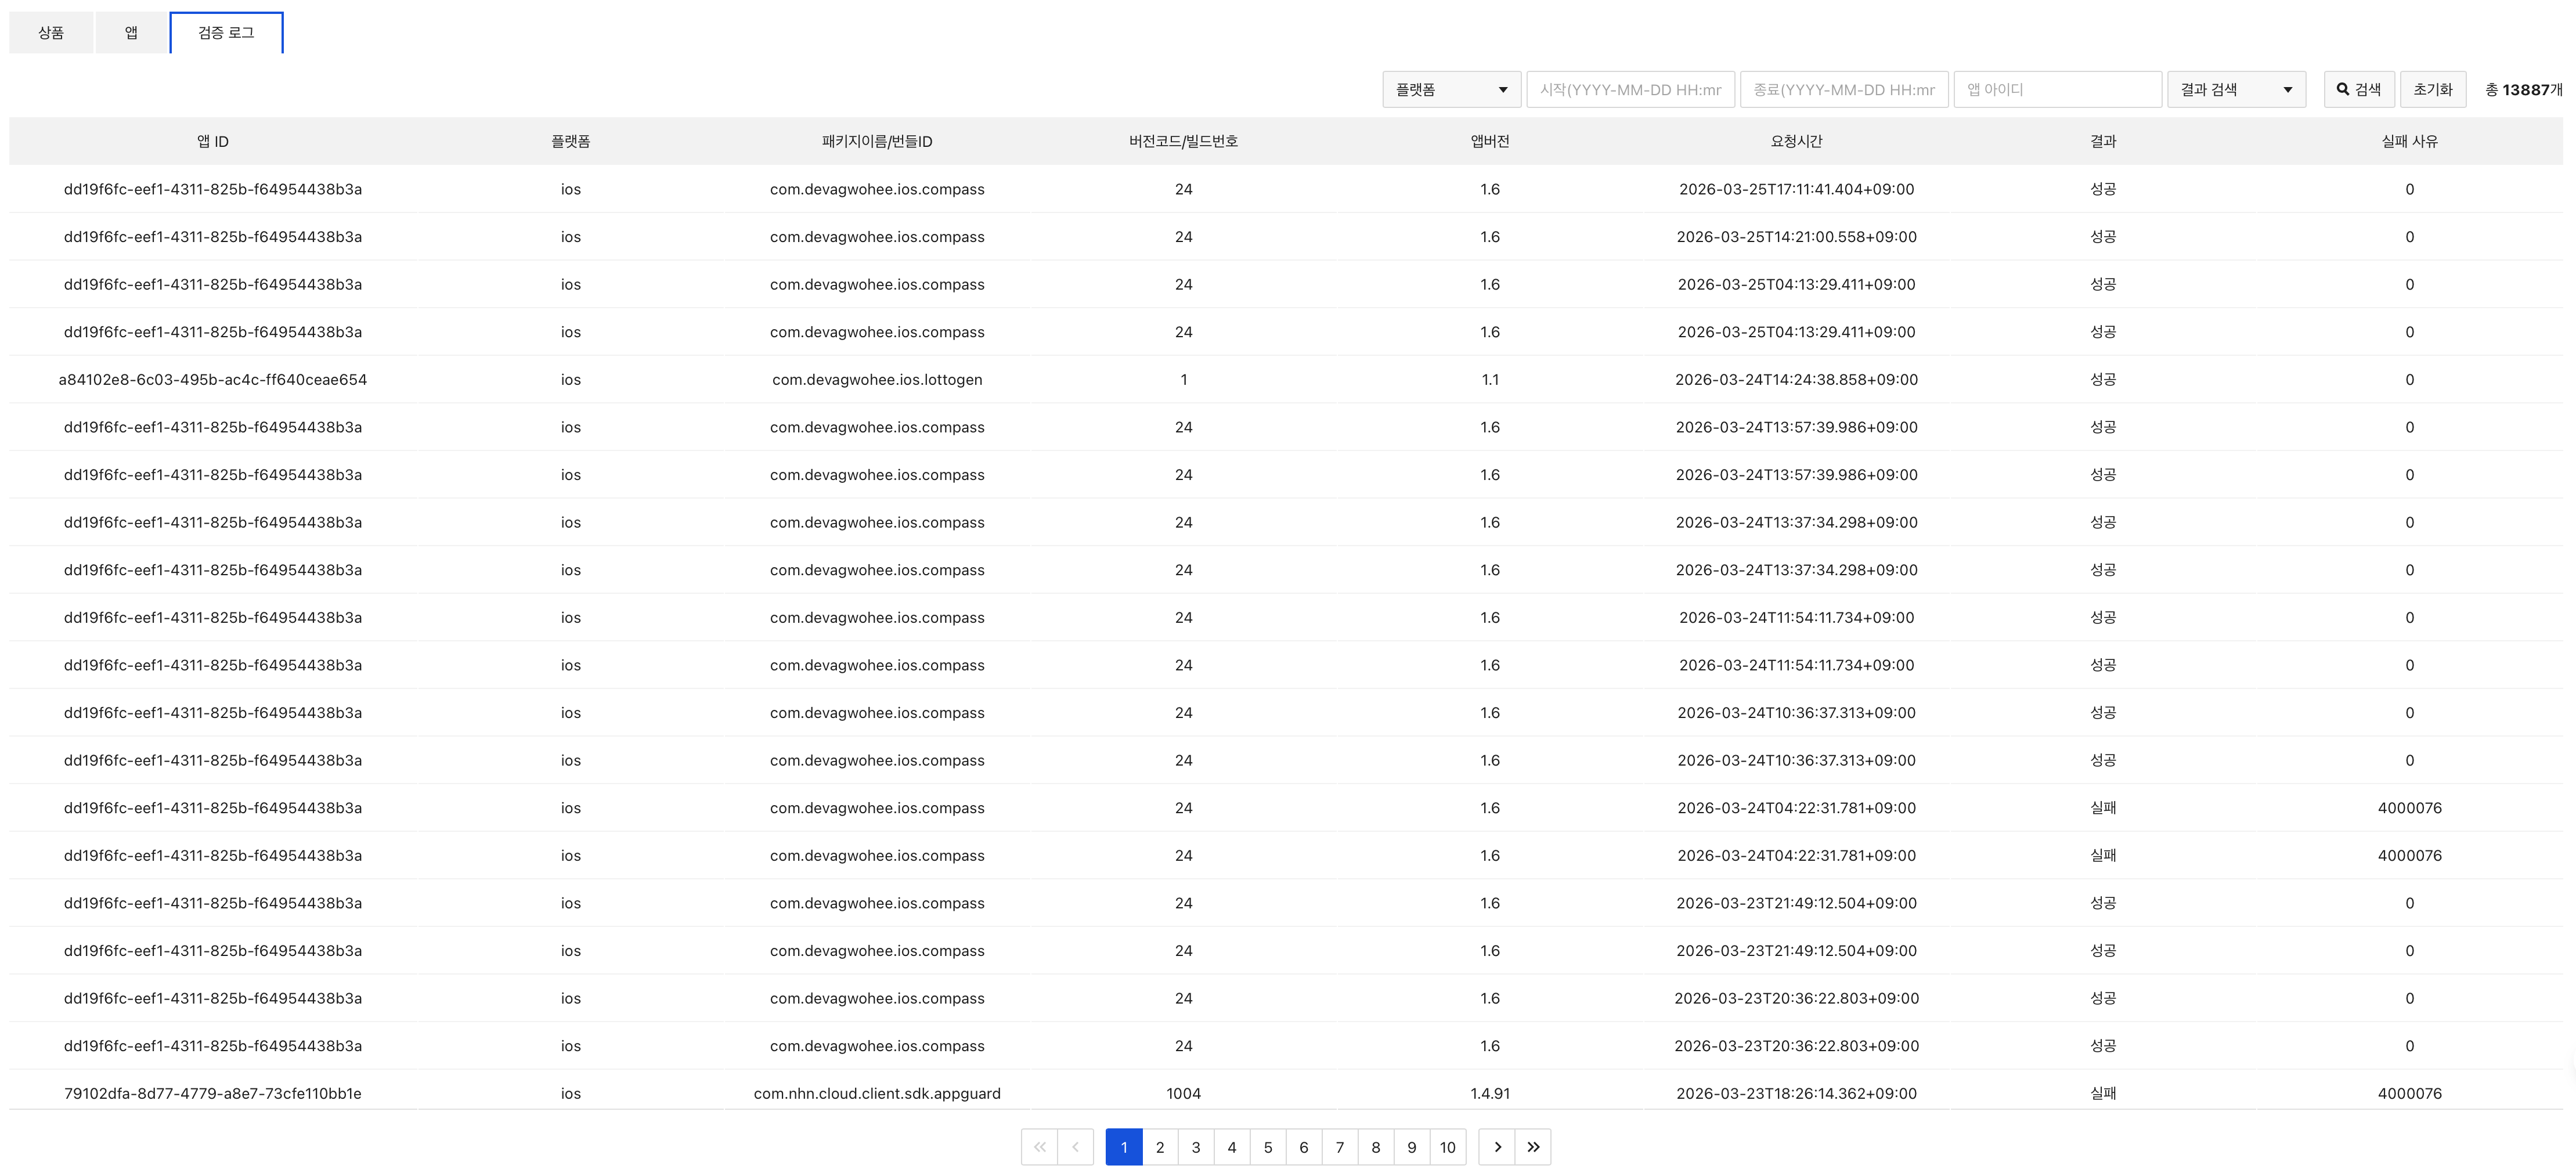
Search logs using the following filters:
| Filter | Description |
|---|---|
| Platform | Select Android or iOS |
| App Version | Search by app version |
| Package Name / Bundle ID | Search by package name or bundle ID depending on the platform |
| Version Code / Build Number | Search by version code or build number depending on the platform |
| Time Range | Specify start and end time (YYYY-MM-DD HH:mm:ss format) |
| App ID | Search by app ID |
| Result | Filter by success or failure |
Failure Reason Codes
| Code | Message | Reason |
|---|---|---|
| 0 | SUCCESS | |
| 4000068 | Android Signature Not Exist | Android signature information does not exist. |
| 4000074 | iOS signature not exist | App signature information in iOS integrity info does not exist. |
| 4000021 | Challenge not exist | The challenge does not exist when requesting app attestation |
| 4000069 | Integrity info not match | App integrity information (app hash, app signature) does not match. |
| 4000073 | App artifact not match | App package name, version code, or other information does not match. |
| 4000032 | Challenge verification failed | Verification result does not match. |
| 4000076 | Integrity option(rooting, emulator, debug, env..) check failed | Integrity options do not match. |
Table of Contents
- Security > NHN AppGuard > Console Guide
- Android
- iOS
- Unity
- Dashboard
- App Protection
- Download and Integrate SDKs
- Apply to Enable Obfuscation
- App Protection Menu
- Policy
- Introduction to Block Features
- Change History
- Individual Block
- Add Conditions
- Check Conditions
- Blacklist
- Blacklist
- Un-blacklist
- Re-blacklist
- Batch Register Blacklist
- Batch Remove Blacklist
- Batch Re-register Blacklist
- Log Search
- Settings
- Set Alarms
- App Attestation
- Product
- App
- Verification Log