Data & Analytics > DataFlow > Console User Guide
DataFlow can be used in the following order:
- Enable Service
- See [Project management] (https://docs.toast.com/en/TOAST/en/console-guide/# _14) to create a project.
- Select the desired project.
- Refer to the [Project Services Activation Guide] (https://docs.toast.com/en/TOAST/en/console-guide/#_18) to activate DataFlow.
- Execute Flow
- Create a flow by entering a name and description.
- Add the nodes you need, and enter settings to define how each node behaves.
- Node connections determine the order of nodes' actions to complete the flow.
- Execute the file.
- Verify that the flow ran successfully by checking the log information.
Management
Page that queries and manages the flow metadata information. Click Data & Analytics > DataFlow > Management.

Search
Search for flows with given criteria.
- Searches for flows that contain search items in the name.
Filter
Searches flows with given conditions.
- Provides filtering options based on the flow status values.
Flow List
Display query results of flows in a table form.
- Displays simple flow metadata and current flow execution status.
- Sort based on last modified date.
- You can select a flow to use management features such as changing flows, viewing flow details, and starting flow.
- The filter condition feature allows to query specific flows in certain states.
- Once queried flows need to be refreshed to update Query results.
- You can view 12 flows per page and move pages with the previous, next buttons.
Flow Status Information
| Flow Running Status | Description |
|---|---|
| START_FAILED | Failed to request flow running. |
| STARTING | Freeing up resources to run the flow. |
| QUOTA_EXCEEDED | Failed to run the flow due to insufficient resources. |
| PREPARING | Ready to run the flow. |
| RUNNING | Flow is running. |
| ERROR | An error occurred during flow running due to communication failure or authentication failure. If ERROR continues to occur, contact the Customer Center. |
| UNKNOWN | An error occurred for unknown reasons during the running of the flow. If UNKNOWN continues to occur, contact the Customer Center. |
| STOP_FAILED | Failed to request flow stop. |
| STOPPED | Flow is stopped. |
Flow Status Change Notifications
- You can be notified via email when the flow status is changed to a status set for notifications
- Flow status for notifications
- RUNNING
- ERROR
- STOPPED
- Default recipients
- A member with the DataFlow ADMIN role in the project where the DataFlow service you are using is enabled.
Create Flow
Create metadata to define flows.
- Create flow metadata by adding name and description to identify a flow.
- Flow names can overlap with other flows.
- You can specify Flow Template to easily load flows of features users wants.
Change Flow
Modify metadata of flows.
- Modify the existing flow name and description to reflect it in flow metadata.
- Flow templates cannot be specified.
- Changing flows are possible even when the flow is running.
Copy Flow
Create new metadata with existing flow definitions.
- Create new metadata with the phrase
_copyadded to the name of existing flow. - Copy the flow logic of existing flow exactly as it is.
- You can also copy flows in running.
- Even though you copied a running flow, the flow is copied in a stopped status.
- If the current storage state of flows is temporary, it does not copy the last saved version of existing flows.
- If Scheduler copies the registered flow, the copied flow does not register the Scheduler.
- Copied flow is completely separate from an existing flow.
Delete Flow
Delete flow metadata
- Completely delete flow metadata
- Deleted flow cannot be recovered again.
- Running flow cannot be deleted.
More - Start a flow
Start a flow that is stopped.
- Each flow can run only one at a time.
- Temporarily saved flow starts with the version that was last saved.
- You cannot start a flow that has never been saved, only drafted.
- You cannot start a flow if it has never been saved even once.
- A flow cannot be started the same as the flow initiated by the user, even if the flow is already being run by Scheduler.
More - End a flow
- You can end flows that are preparing to run, running, or draining.
- End flows without processing any remaining events.
More - End after flow draining
- You can end a running flow after draining it.
- Draining means processing the remaining events in the flow.
- If the timeout time is exceeded, the draining will end without finishing.
- If the draining ends with timeouts remaining, exit immediately.
- A flow that is draining can be terminated directly via End Flow.
See Flow in Details
Detail page that checks the details of selected flow. Go to Data & Analytics > DataFlow > Management > Click one of the flows. You can adjust the screen ratio by moving the boundary between the flow list area and the flow detail view area. You can also adjust the screen proportion to specified percentage by using Resize Area button located in the upper right corner of Flow detail view area.
Basic Information
Displays detailed flow metadata.
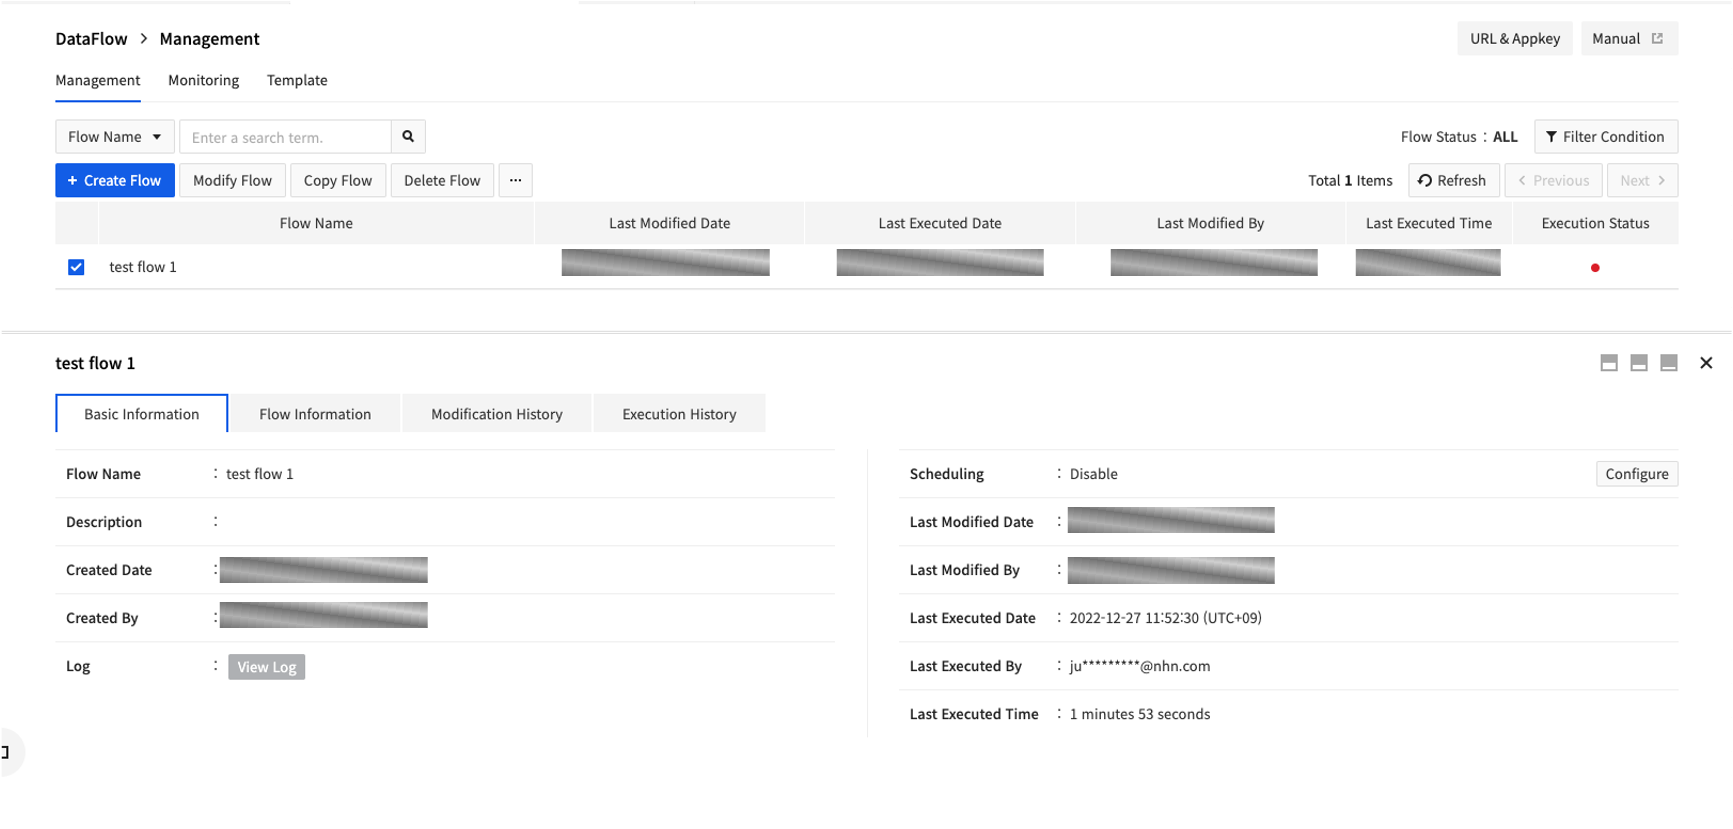
- Display the name and description information entered when creating a flow.
- Display the flow creation date and creator name, latest modification date/modifier, and latest execution date/runner information.
- Display the total running time at the time of the most recent run.
Basic Information - Recent Logs
- You can check Log information for current running flow directly through the Recent Logs.
- You can view logs for the recent 15 minutes.
Basic Information - All Logs
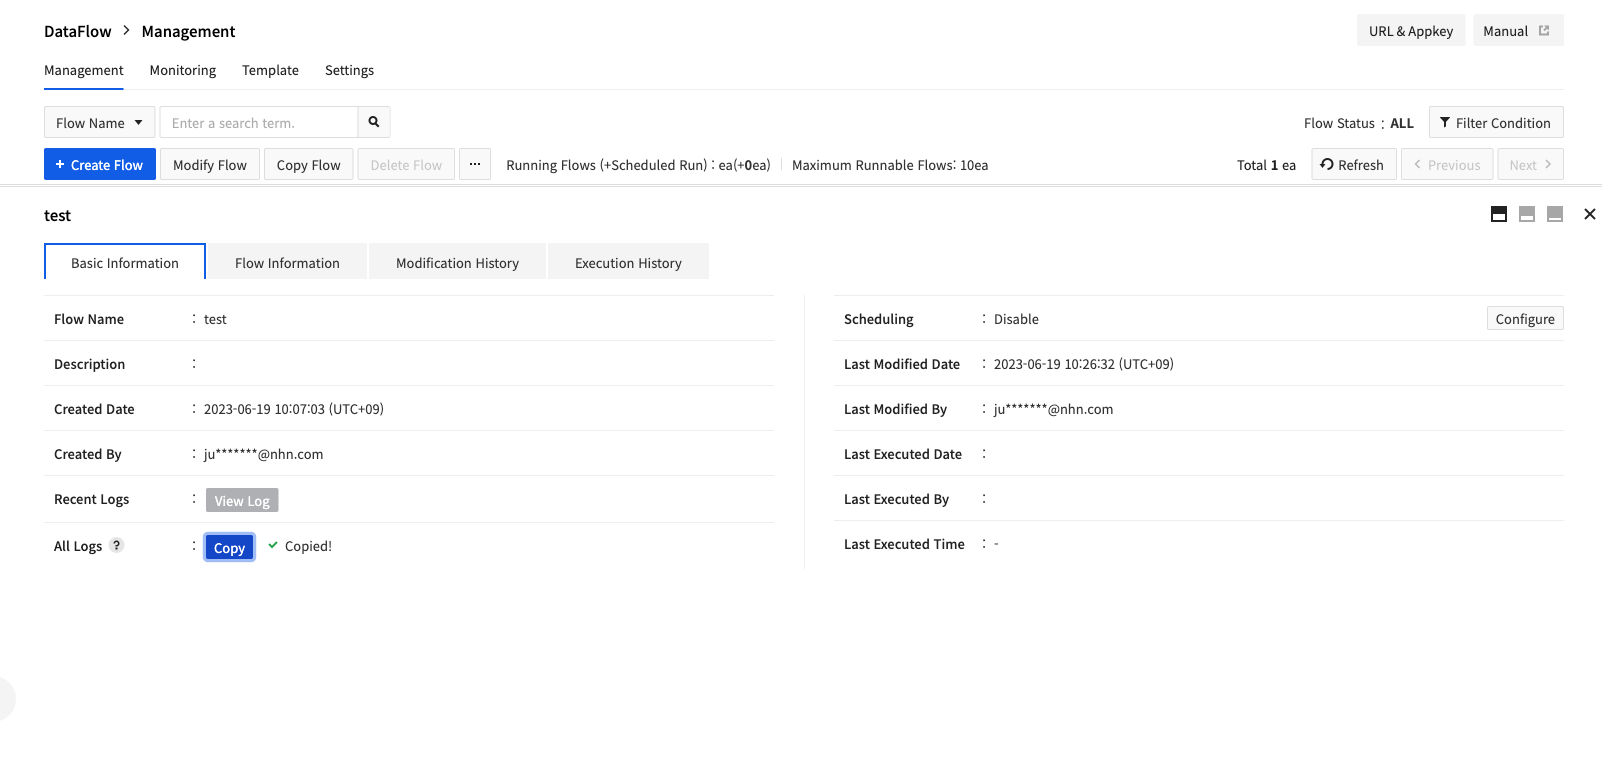 * When you enable Log & Crash Search, you can copy Lucene Query to view flow logs from Log & Crash Search.
Basic Information - Scheduling
- Scheduling feature allows you to schedule flow execution.
- If a flow is already running when the start time registered with Scheduler has arrived, the execution by Scheduler fails.
- Currently, only the Scheduled Execution feature is supported. Additional features will be supported in the future.
Flow Information
Define a flow logic.
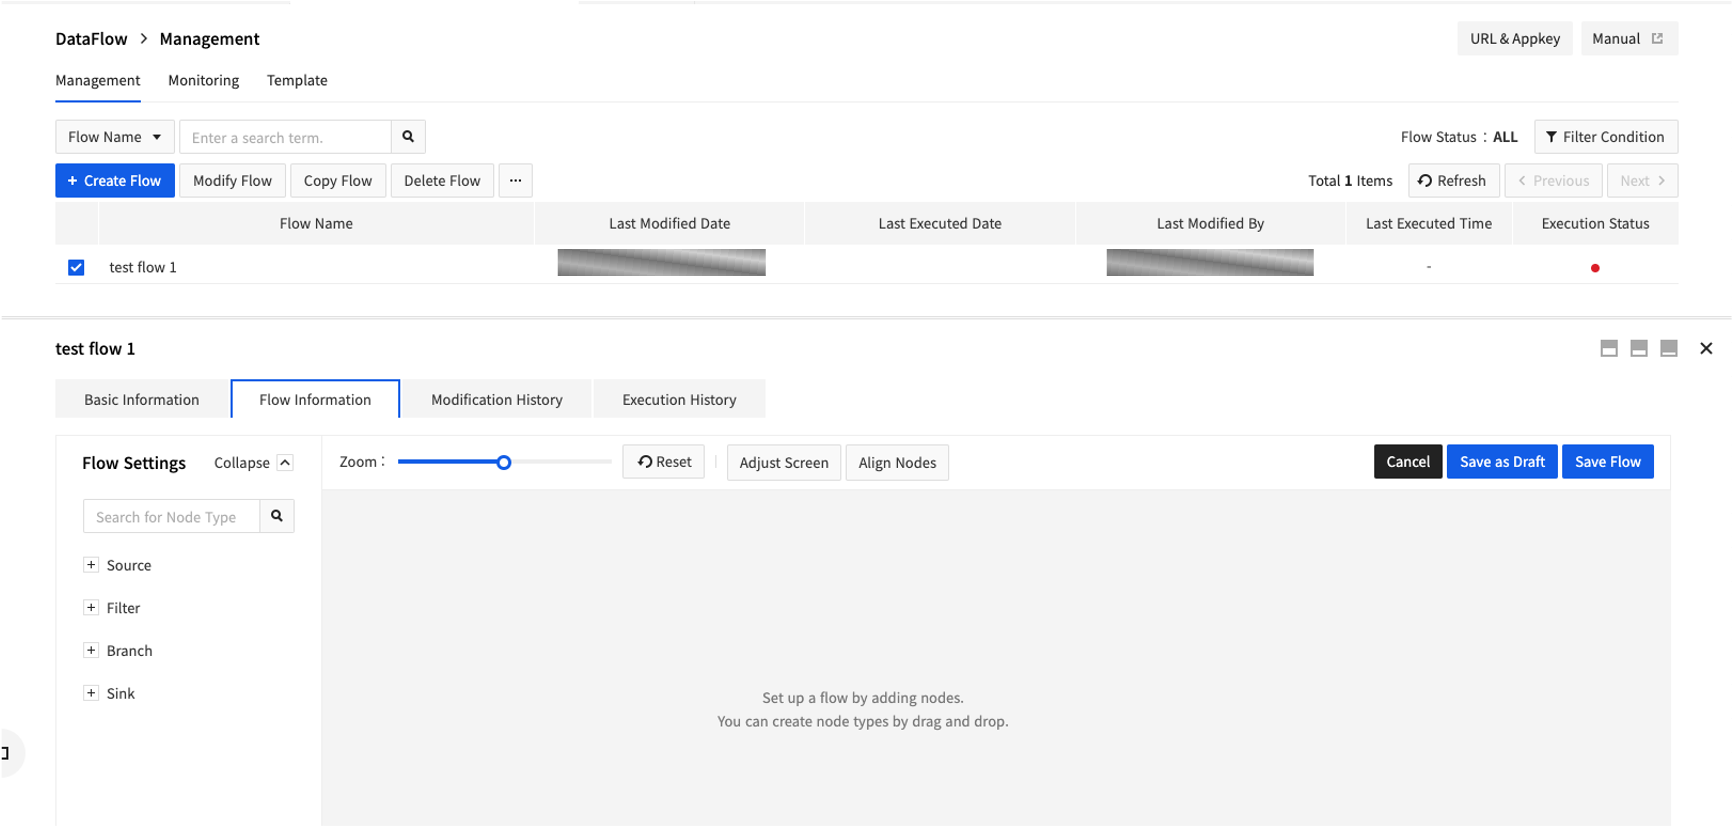
- Define a flow by importing flow components from Node type or Template from flow settings.
- The Collapse/Expand button allows to zoom-in/zoom-out the flow screen.
- Adjust the flow screen to define flows and change the graph configuration.
- Define a node behavior by entering the appropriate settings for each node.
- Define the flow of messages by linking connections among nodes.
- Each flow can define only one Directed Acyclic Graph (DAG).
- Connection that fits the category by respective type of node must be defined in order to be saved.
- A node can have multiple connections.
- If there are multiple input connections, messages from each connection are processed as single Flow.
- If there are multiple output connections, it replicates messages that the node outputs to all connections to create a flow.
- Scaling adjustment and initializing, screen adjustment, and node alignment allow to adjust a flow so that it is visible on screen.
- Adjust Scale
- Scale the screen on which the flow graph is displayed.
- Support scaling from 0.5 times to 2 times.
- Initialize
- Scale adjusted by 1 time through scaling adjustment.
- Adjust Screen
- Adjust the scale and center the screen so that the flow is visible on one screen.
- Align Node
- Arrange the arrangement of flows so that the each step is well visible.
- Adjust the scale and center the screen so that the Flow is visible on one screen.
- Adjust Scale
- You can cancel/save/temporarily save the edited flow definition.
- Cancel
- Return the edited flow definition to the last saved/temporarily saved.
- Save Temporarily
- Provide features to store flows in incomplete form.
- Temporarily saved flows cannot be started.
- Temporarily saved flows cannot revert to the point of the last save.
- You can record any changes made by entering commit name when temporarily saved.
- Save
- Statically assess and save the completeness of the flow.
- If you fail the flow completeness evaluation, the Save request fails and displays the reason why evaluation failed.
- Saved flows can be requested to start.
- When saving, you can enter the commit name to record changes made.
- Cancel
Modification History
Displays the history of flow modification.
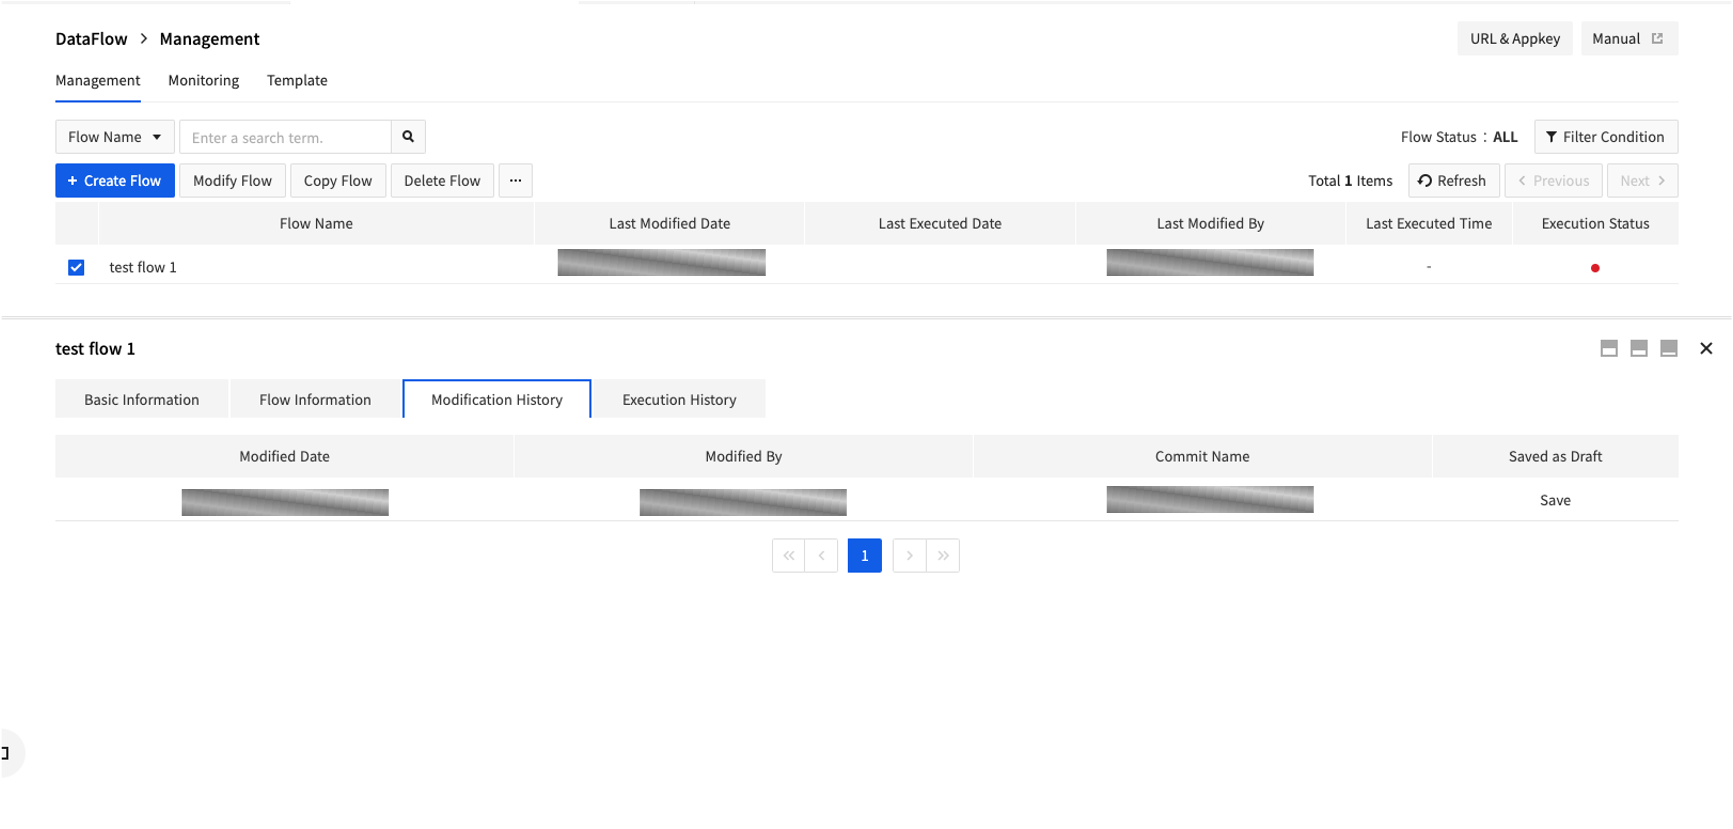
- Display the date and user information that has been modified.
- Display the commit name entered during Save/Temporarily Save.
- Display how the method was saved at the time, whether it was saved/temporarily saved.
Execution History
Display history of the request to start/end flow.
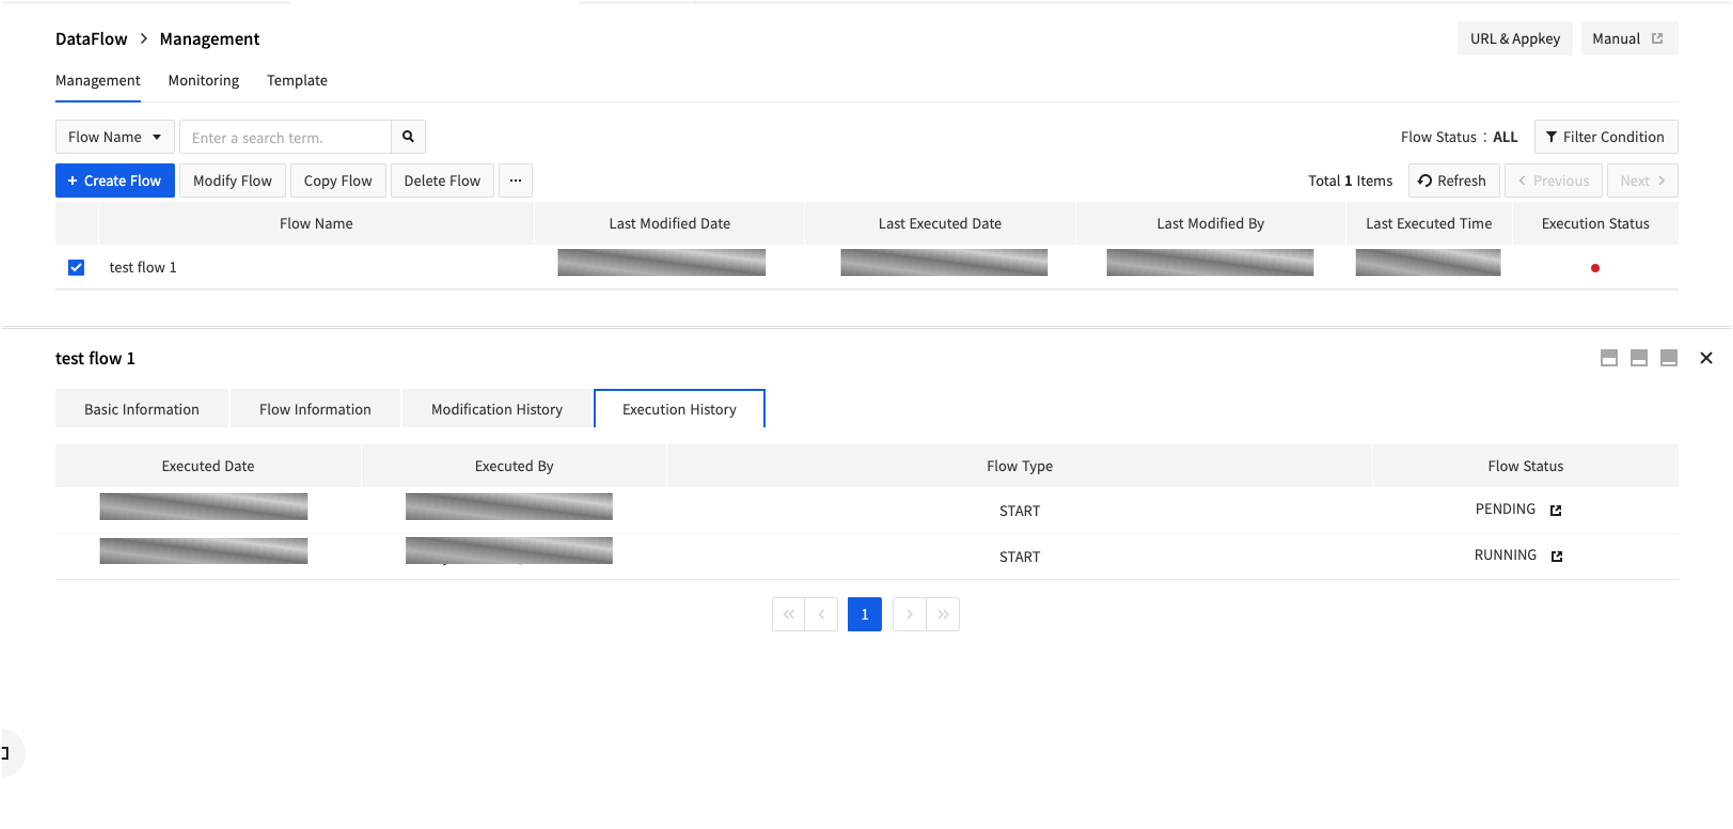
- Display the date of execution and user information.
- Displays the requested behavior.
- Displays the state of flow due to the requested behavior.
- If it is a running flow, new window allows to view detailed flow status information.
Monitoring
Display Monitoring information for running flow or node. Click Data & Analytics > DataFlow > Monitoring. You can adjust the screen ratio by moving boundaries between flow screen area and monitoring area. Also you can adjust screen proportion to the specified percentage by using the Resize Area button located in upper right corner of the Monitoring area.
Flow List
Display a list of flows that can be monitored.
- You can select a flow to view detailed monitoring information.
- You can expand the flow list tree to select each Node belongs to the Flow for Monitoring Details information.
- By collapsing the list, you can expand the detailed page for monitoring.
- You can also check Monitoring information of deleted flows through the View button.
Flow Screen Area
Area that displays the appearance of flow.
- Display a complete graph of currently running flow.
- You can select a node to view monitoring information specific to the respective node.
- You can modify the flow screen to position overall graph as desired.
Monitoring Area
It is area to display the monitoring chart.
- You can view the monitoring information for selected flow or node in a chart.
- Scaling Adjustment and initializing allow you to adjust a flow so that it is visible on the screen.
- Adjust Scale
- Scale the screen on which the flow graph is displayed.
- Support the scaling from 0.5 times to 2 times.
- Initialize
- The scale is adjusted by 1 time through scaling adjustment.
- Adjust Scale
- Select Chart Period
- Adjust Overall Period
- The button toggle allows you to synchronize Chart zoom-in/zoom-out actions to all Charts.
- Current Time
- Set the chart duration to the current time.
- Select Period
- Select the time period to check monitoring information.
- Use Refresh Settings to select how often the monitoring information is refreshed.
- The cancel button allows you not to apply the time period you want to change.
- Chart
- You can zoom the Chart zoom-in/zoom-out by specifying the chart range.
- Adjust Overall Period
Template
It is a page that queries, creates, and modifies the template metadata information. Click Data & Analytics>DataFlow> Templates.

Search
Searche templates based on the given criteria.
- If Search by template name, it searches for templates that contain search terms in their names.
Query Templates
Display Query result template in a table form.
- Display simple template metadata.
- Sort based on the last modified date.
- Selecting a template allows you to use features such as Changing Template, Viewing Template details, and so on.
- For once queried templates, you have to click Refresh to update query results.
- You can query 12 templates per page and navigate through the Previous and Next buttons.
Create Templates
Create metadata to define a template.
- Create template metadata by adding name and description to identify a template.
- Template names can overlap with other Template names.
- Flow templates cannot be specified.
- Created templates can be found in the node type list when defining flows or template logics.
Change Templates
Modify metadata in the template.
- Modify the existing template name and description to be reflected in the template metadata.
- Flow templates cannot be specified.
Copy Templates
Create new metadata with existing template definitions.
- Create new metadata with the
_copystatement added to the existing template name. - Copy the flow logic of the existing template as it is.
- Copied template is completely separate template from the existing template.
Delete Templates
Delete template metadata
- Completely delete template metadata
- Deleted template cannot be recovered.
See Templates in Details
Go to Data & Analytics > DataFlow > Templates > and Click one of the template You can adjust the screen ratio by moving boundaries between the template list area and See Templates in Details. Also you can adjust the screen proportion to the specified percentage by using the Resize Area button located in upper right corner of See Templates in Details.
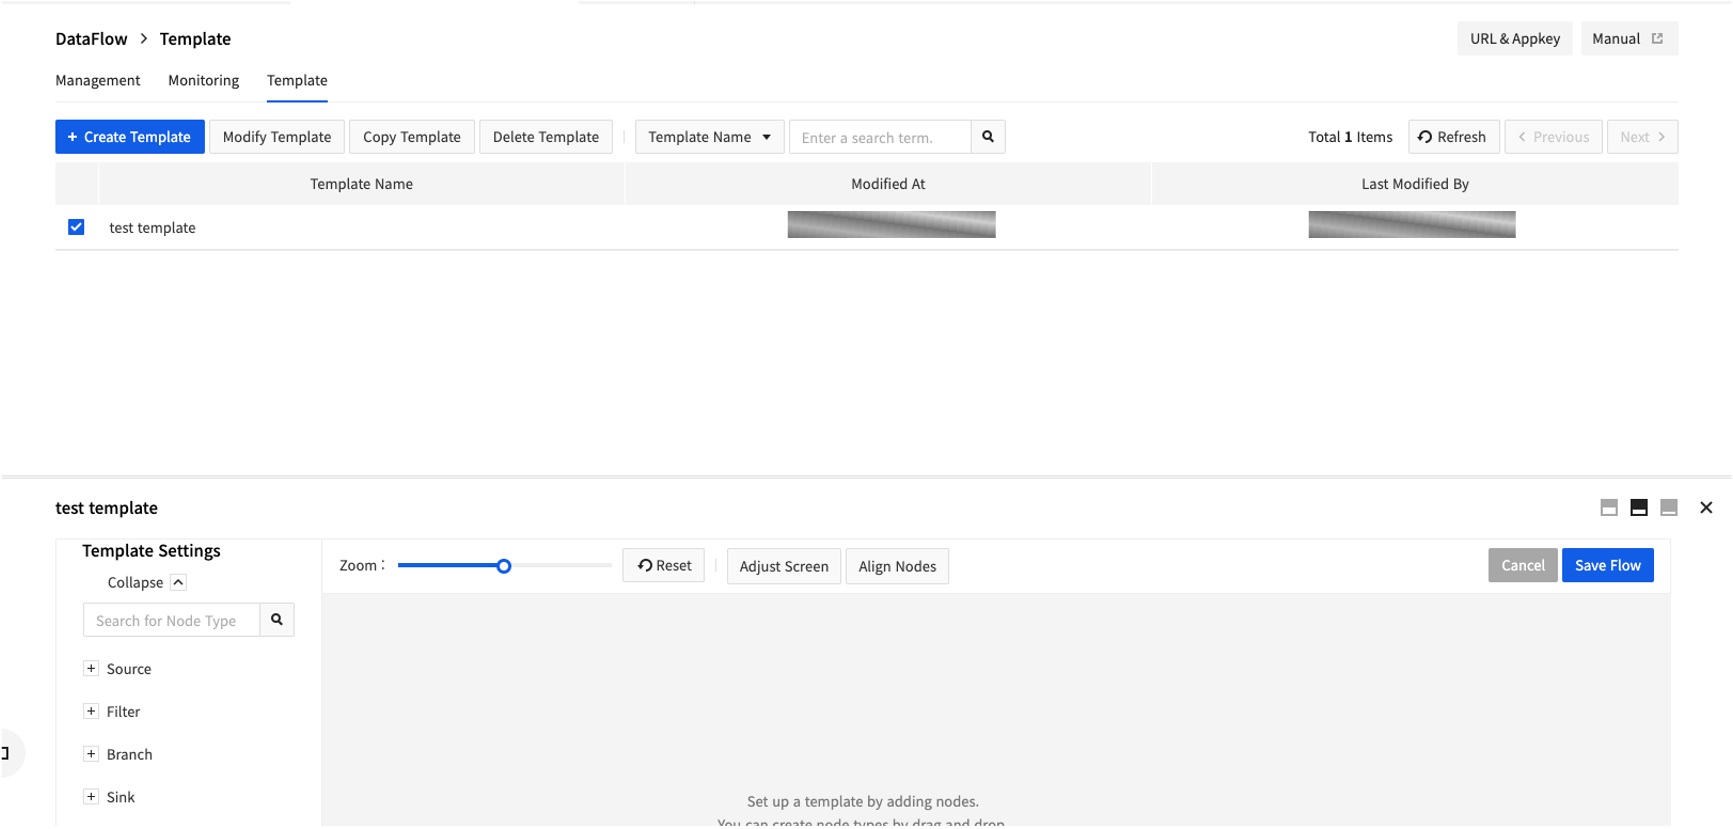
Template Information
Define template logics
- Define a template by importing flow components from the node type or template from Template Settings.
- The Collapse and Expand button allows you to zoom-in/zoom-out the template screen.
- Adjust the template screen to define a template and change graph configuration.
- Unlike flows, templates can freely save unfinished flows.
- Scaling adjustment and initializing, screen adjustment, and node alignment allow to adjust a flow so that it is visible on the screen.
- Adjust Scale
- Scale the screen on which the flow graph is displayed.
- Support scaling from 0.5 times to 2 times.
- Initialize
- Scales adjusted by 1 time through scaling adjustment.
- Adjust Screen
- Adjust the scale and center the screen so that the flow is visible on one screen.
- Align Node
- Arrange the arrangement of flows so that the each step is well visible.
- Adjust the scale and center the screen so that the flow is visible on one screen.
- Adjust Scale
- You can cancel/save edited the flow definition.
- Cancel
- Returns the edited template definition to the state it was in when it was last saved/saved temporarily.
- Save
- You can save a flow in incomplete form.
- Saved templates can be loaded from the template category in the node type.
- Cancel
Settings
Manage the settings for the service. Go to Data & Analytics > DataFlow > Settings.
Log & Crash Search settings
The feature to integrate your flow logs with Log & Crash Search you set. To store logs in the Log & Crash Search service, you must enable the Log & Crash Search service, which is available at an additional cost.

① Click Log & Crash Search Save Settings. ② Enter Log & Crash Search Appkey where you want to save the logs and Log Level to save. ③ Click Save to complete settings. ④ If you don't want to use the Log & Crash Search integration feature, click Delete to delete the save information.
- Log Field
| Name | Description |
|---|---|
| logLevel | Log level (INFO, WARN, ERROR, FATAL) |
| logSource | Flow |
| host | DataFlow |
| appkey | DataFlow service appkey |
| flowId | Flow ID |
| flowInstanceId | Flow Instance ID |
Validation Settings
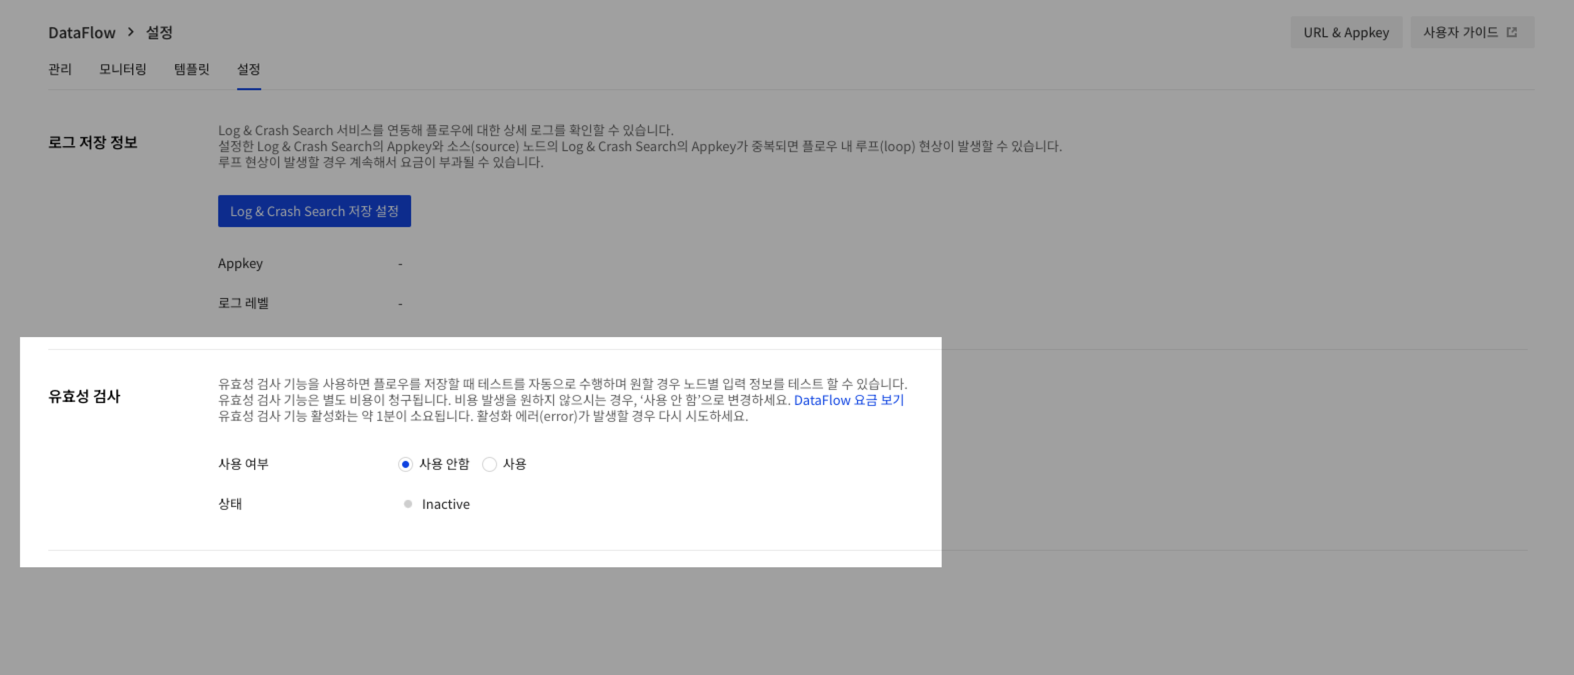
You can set whether to use validation for flows and nodes. If Validity Check is set to Not Use, node validation is not automatically performed when saving flows, validation for each node is not available.
Table of Contents
- Data & Analytics > DataFlow > Console User Guide
- Management
- Search
- Filter
- Flow List
- Create Flow
- Change Flow
- Copy Flow
- Delete Flow
- More - Start a flow
- More - End a flow
- More - End after flow draining
- See Flow in Details
- Basic Information
- Basic Information - Recent Logs
- Basic Information - All Logs
- Basic Information - Scheduling
- Flow Information
- Modification History
- Execution History
- Monitoring
- Flow List
- Flow Screen Area
- Monitoring Area
- Template
- Search
- Query Templates
- Create Templates
- Change Templates
- Copy Templates
- Delete Templates
- See Templates in Details
- Template Information
- Settings
- Log & Crash Search settings
- Validation Settings