Dev Tools > Pipeline > Console User Guide > Pipeline Management
Create a Pipeline
Pipeline stores the application deployment flow as a pipeline consisting of one or more stages. In Create Pipeline, you can create a basic pipeline that works in the following order: Build Source Code > Create Container Image > Upload Container Image > Deploy Container Image and create a pipeline by uploading pipeline template files.
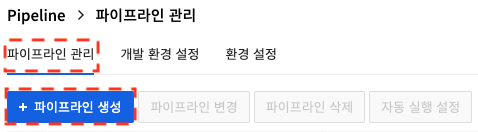
Click Create Pipeline in Pipeline Management. Pipeline creation is performed in the following steps. - Entering pipeline information - Source settings - Build Settings - Deployment settings - Final review and pipeline creation
Entering Pipeline Information
Enter basic information of the pipeline.
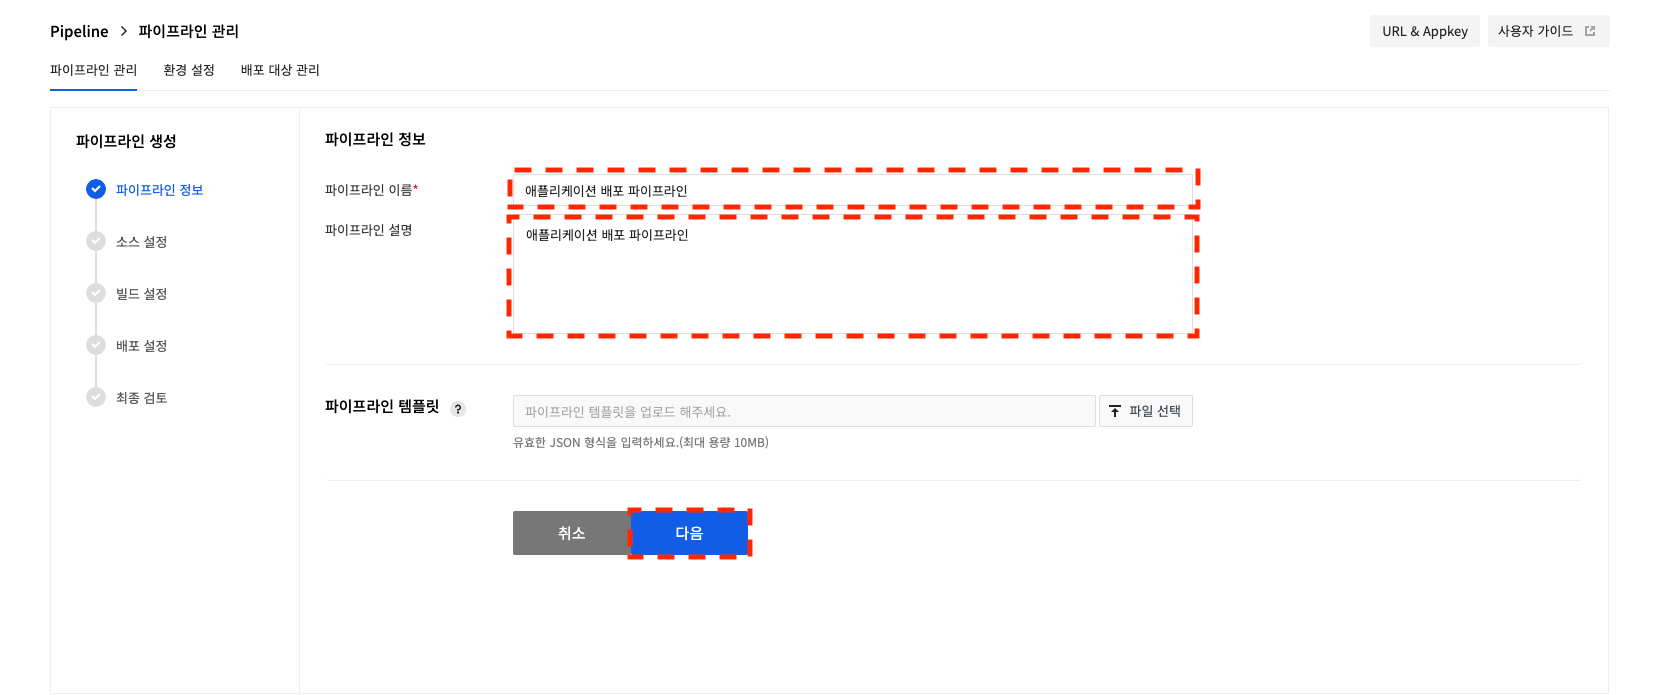
Enter the pipeline name and pipeline description, and click Next.
Additionally, you can create a pipeline with pipeline template files (JSON is used for pipeline template files).
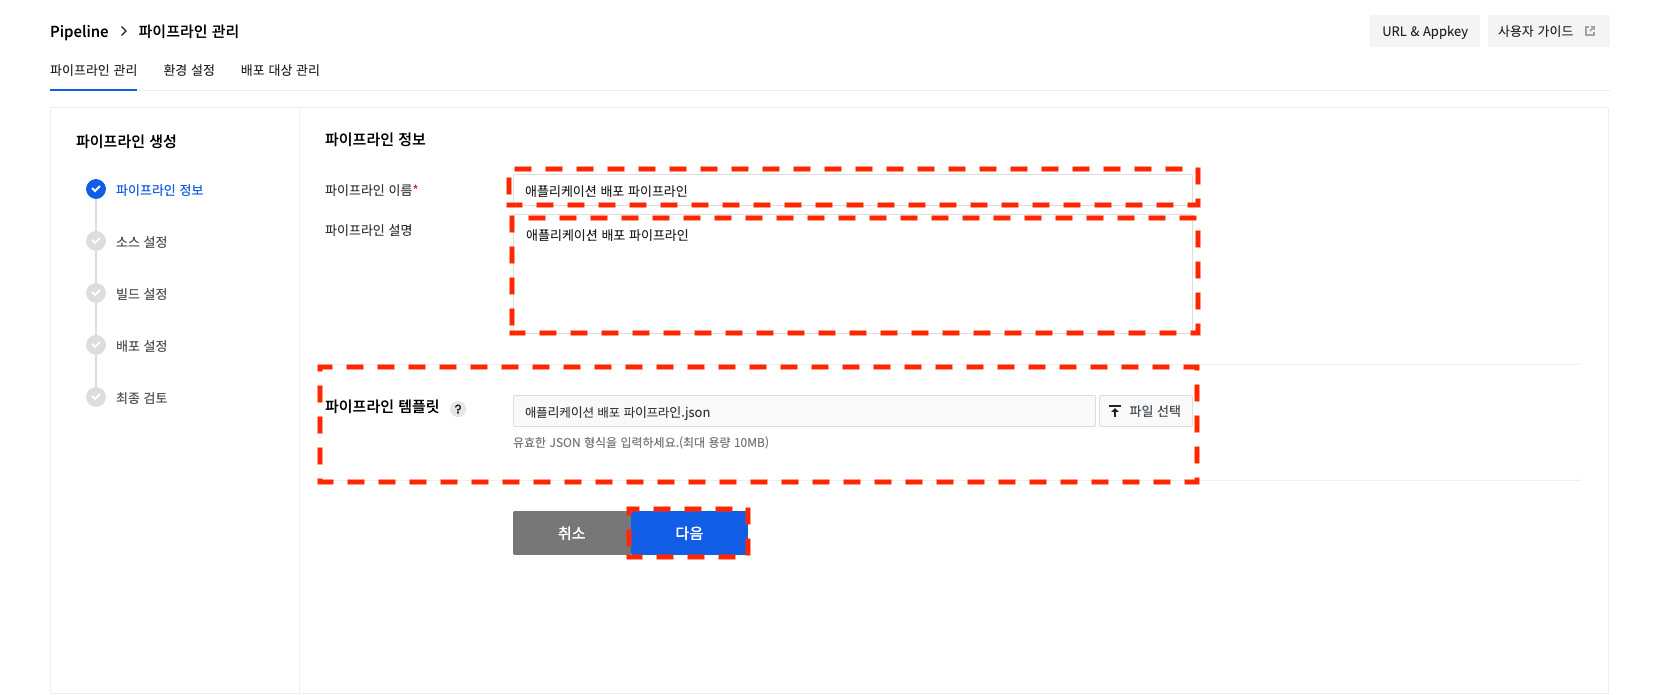
Enter a pipeline name and description and upload a pipeline template file to click Next.
Source Settings
Set the source repository used when building the source code in the NHN Cloud build tool. If you do not use the NHN Cloud build tool or do not build the source code in the NHN Cloud build tool, you can skip this step.

Enter the stage name, the source repository registered in the environment settings, and the branch to build the source code from, and click Next.
Build Settings
In the build settings, you can use the NHN Cloud build tool or the build tool registered in the environment settings. Enter a stage name and select the build tool to use under Build Tool.
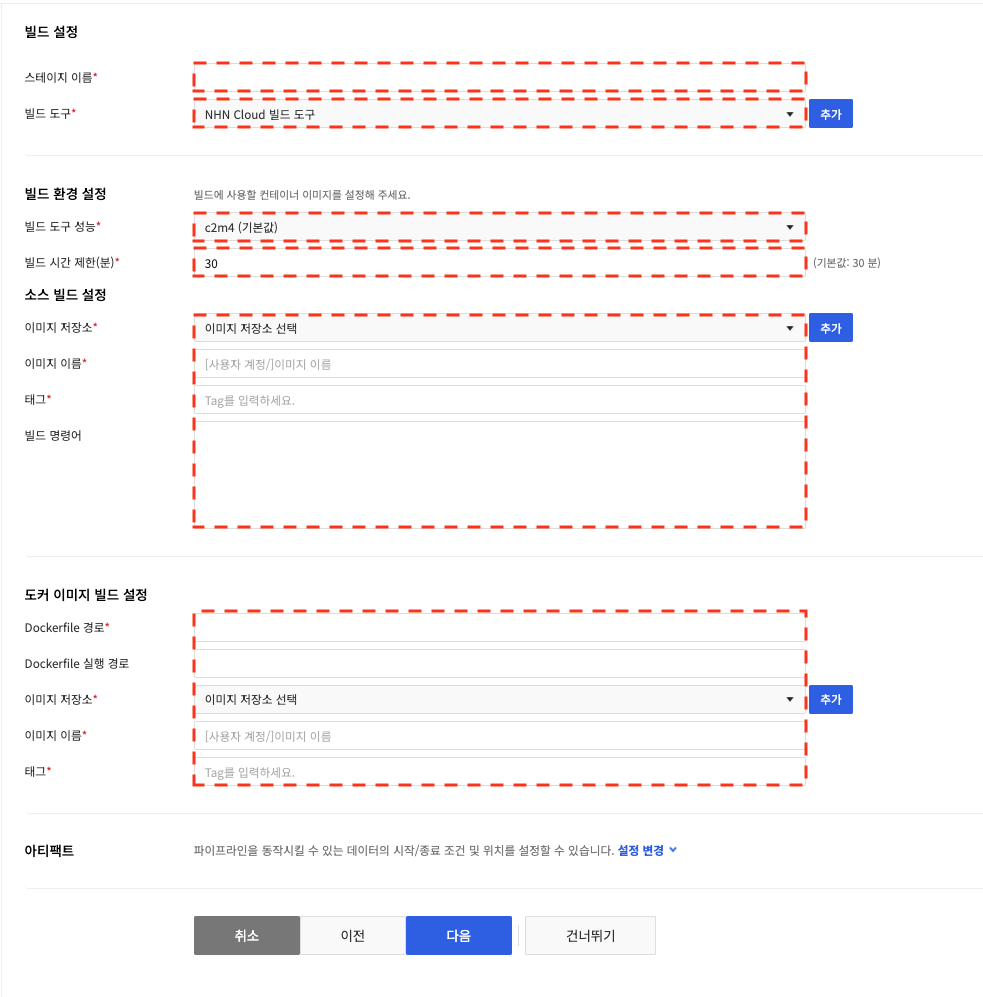
The NHN Cloud build tool allows you to build the application source code stored in the source repository without installing additional software, create a container image with the built application, and upload the created container image to the image registry.
In Build Environment Settings, you can enter the performance of the build machine and build time limits.
Enter how to build applications using the source code that you set up in Source Build Settings.
Enter the container image to use to build the source code, and the command to use to build it.
In the Docker Image Build Settings, enter how you want to create a container image from the application you built.
You can enter the path to the Dockerfile to use when creating the container image, the path to run the Dockerfile, the image repository to upload the created container image to, and the name and tags for the container image to upload.
For the dockerfile path, enter the path where the dockerfile exists in the source repository set up in the Source Build Settings.
For the dockerfile execution path, enter the path to use for building the Dockerfile.
You can use the image tag format in Tag. With the tag format, the image is dynamically tagged by replacing only the tag format portion and uploaded to the image registry.
If you enter a tag in the same form as the substituted form, the tag formatting may not work well.
| Image Tag Format | Substituted Format | Description |
|---|---|---|
| {BUILD_DATE_TIME} | yyyy-MM-dd_HH_mm_ss | This is replaced by the build execution time in the form of year-month-day-hour-minute-second. |
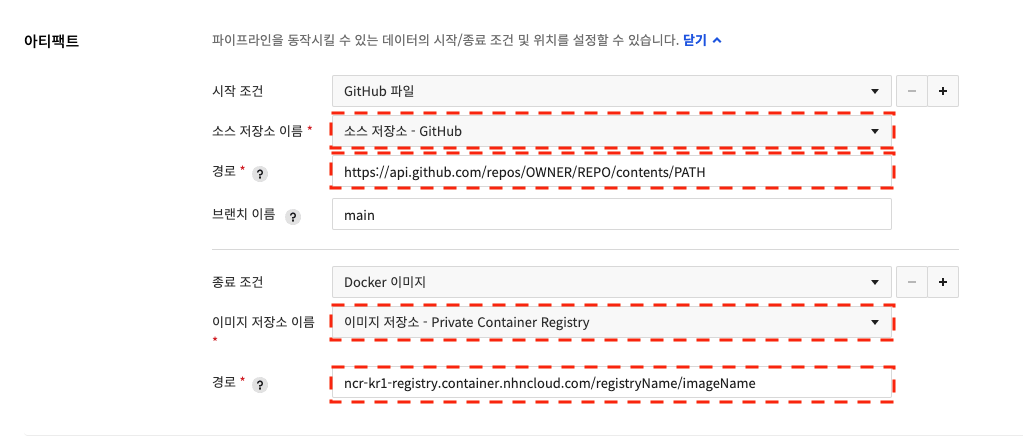 You can set Start Condition and End Condition by using the Artifact settings from NHN Cloud Build Tool.
An artifact set as a starting condition is checked for existence at the start of the stage to determine whether or not to proceed with the stage.
An artifact configured as an end condition sets the production of the stage as an artifact.
You can set Start Condition and End Condition by using the Artifact settings from NHN Cloud Build Tool.
An artifact set as a starting condition is checked for existence at the start of the stage to determine whether or not to proceed with the stage.
An artifact configured as an end condition sets the production of the stage as an artifact.
Artifacts that can be set in NHN Cloud Build Tools
For GitHub and GitLab, if a branch is not entered, the master branch is used as default.
| Artifact Type | Use Condition | Path or Reference Setting Examples |
|---|---|---|
| GitHub file | Start | https://api.github.com/repos/{organization}/{repository}/contents/{file-path} Example for GitHub Enterprise: https://github.mydomain.com/api/v3/repos/{organization}/{repository}/contents/{file-path} |
| GitLab file | Start | https://gitlab.com/api/v4/projects/{project-number}/repository/files/{file-path} |
| Docker container image | Start, End | {domain}/{dockerhub-account or image-registry-path}/{image-name} |
| HTTP file | Start | Accessible URL |
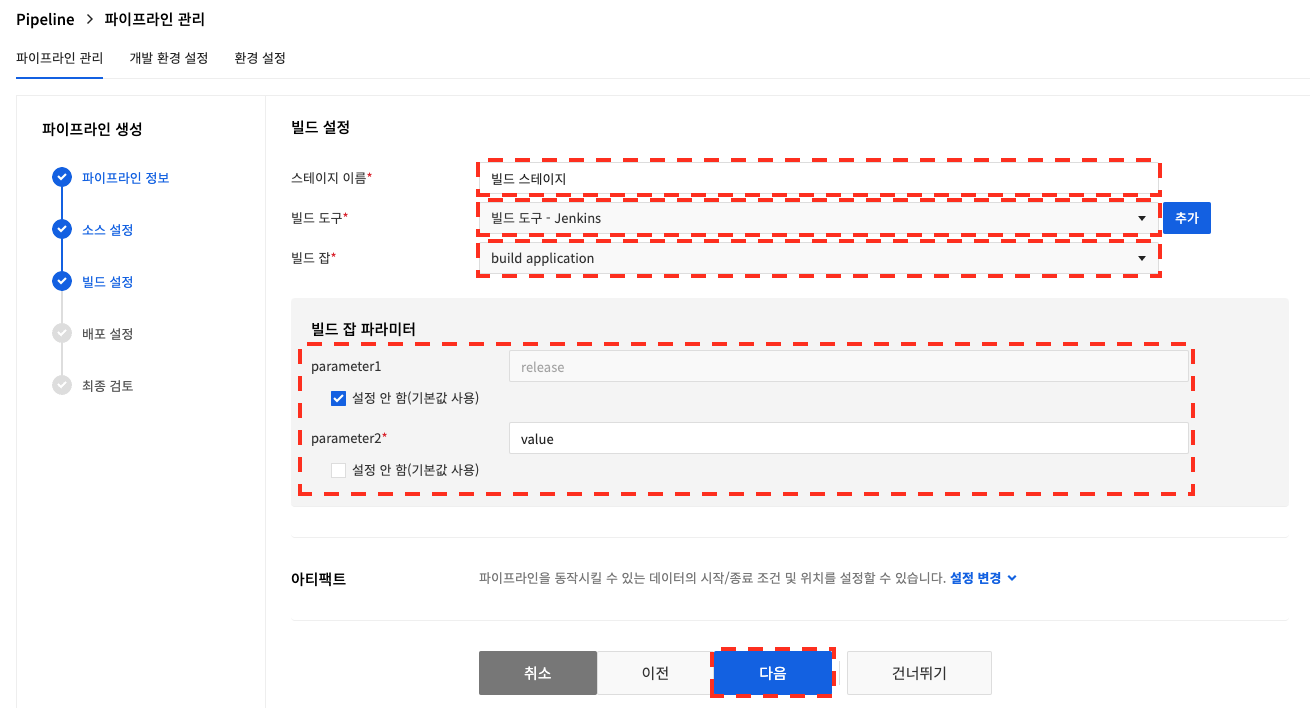
The build tool added in the environment settings allows you to run the build tool's build job. If you select a build job to run, you can enter additional parameters for the build job.
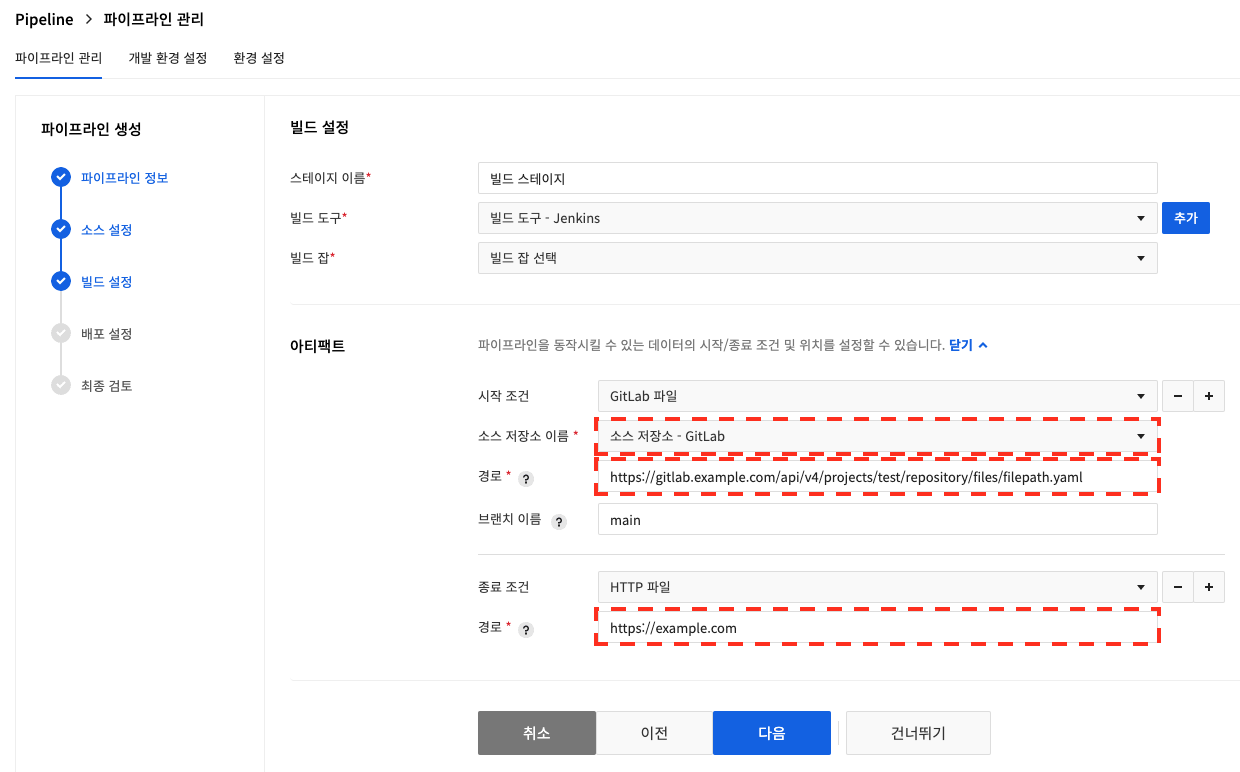 You can set Start Condition and End Condition by using the Artifact settings.
An artifact set as a starting condition is checked for existence at the start of the stage to determine whether or not to proceed with the stage.
An artifact configured as an end condition sets the production of the stage as an artifact.
You can set Start Condition and End Condition by using the Artifact settings.
An artifact set as a starting condition is checked for existence at the start of the stage to determine whether or not to proceed with the stage.
An artifact configured as an end condition sets the production of the stage as an artifact.
Artifacts that can be set in Build Tool
For GitHub and GitLab, if a branch is not entered, the master branch is used as default.
| Artifact Type | Use Condition | Path or Reference Setting Examples |
|---|---|---|
| GitHub file | Start | https://api.github.com/repos/{organization}/{repository}/contents/{file-path} Example for GitHub Enterprise: https://github.mydomain.com/api/v3/repos/{organization}/{repository}/contents/{file-path} |
| GitLab file | Start | https://gitlab.com/api/v4/projects/{project-number}/repository/files/{file-path} |
| Docker container image | Start | {domain}/{dockerhub-account or image-registry-path}/{image-name} |
| HTTP file | Start, End | Accessible URL |
After completing the build settings, click Next.
Deployment Settings
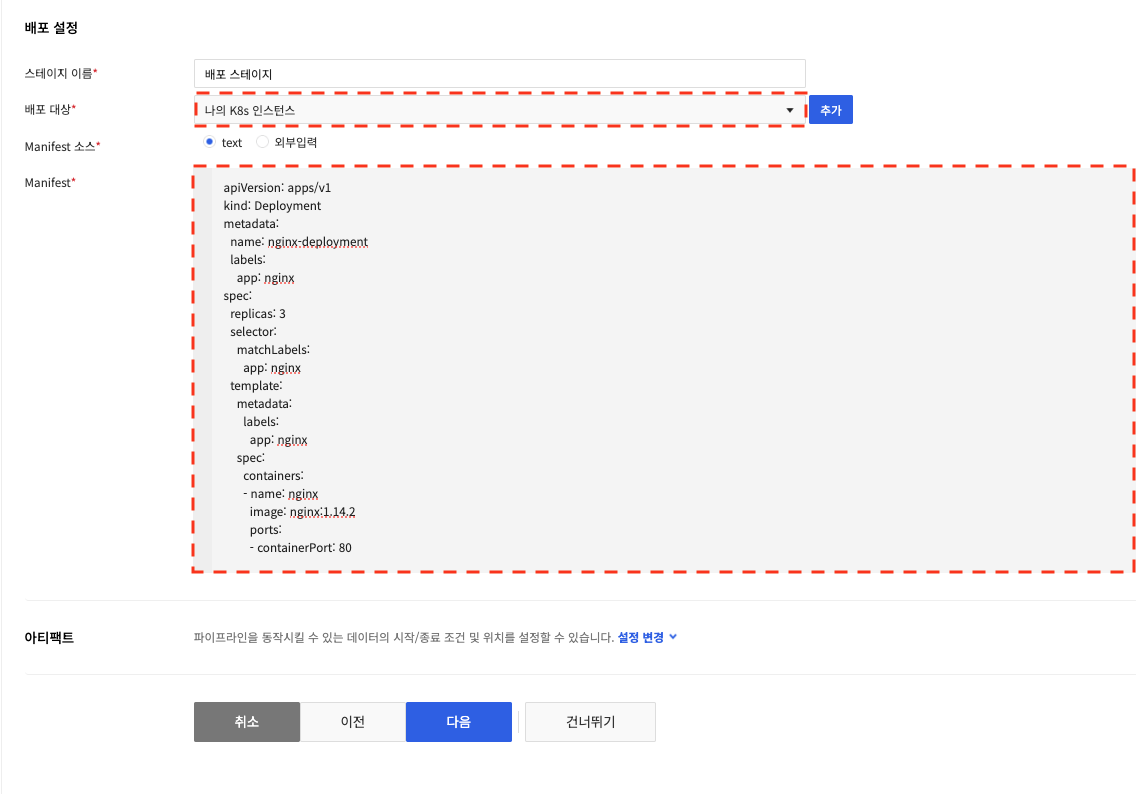
You can set how the container image is deployed to the deployment target added in the environment settings.
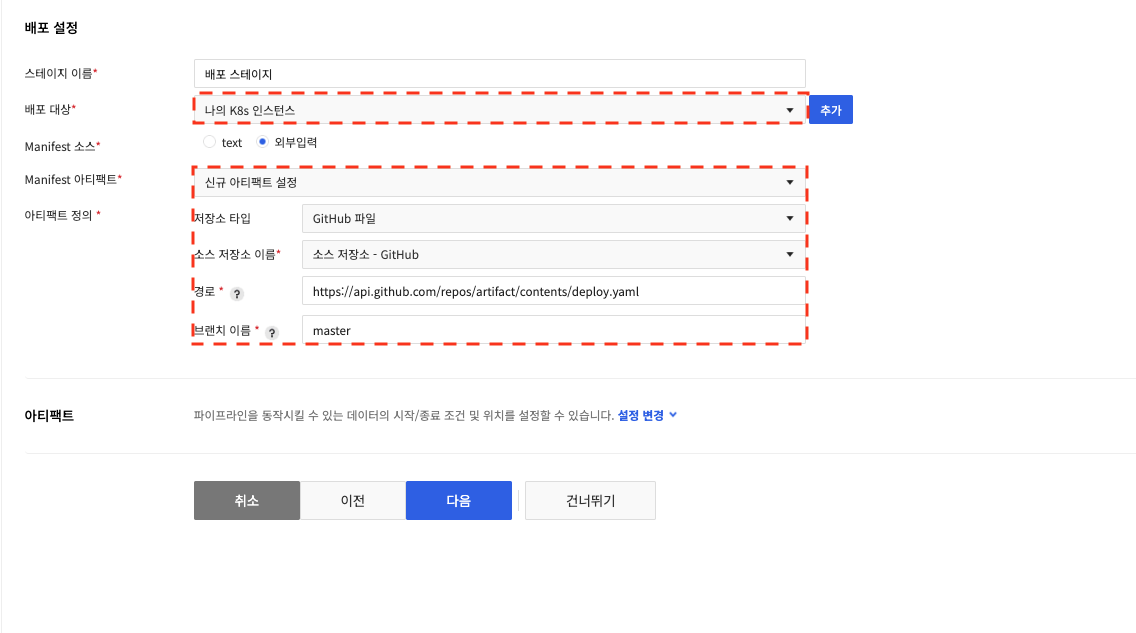
Select text or artifact for the Manifest Source.
Below is how to set.
When "text" is selected: Enter the stage name, deployment target, and Kubernetes Manifest to use for deployment, and click Next. See the Kubernetes documentation for how to write a Manifest.
If you select "External input": Enter the repository type, source repository, path, and branch name from "Define artifact", then click Next.
You can use the tag format you used in your build settingsin your manifest.
You can enter a tag format in Image tags in the Manifest container settings to deploy with the most recently built image.
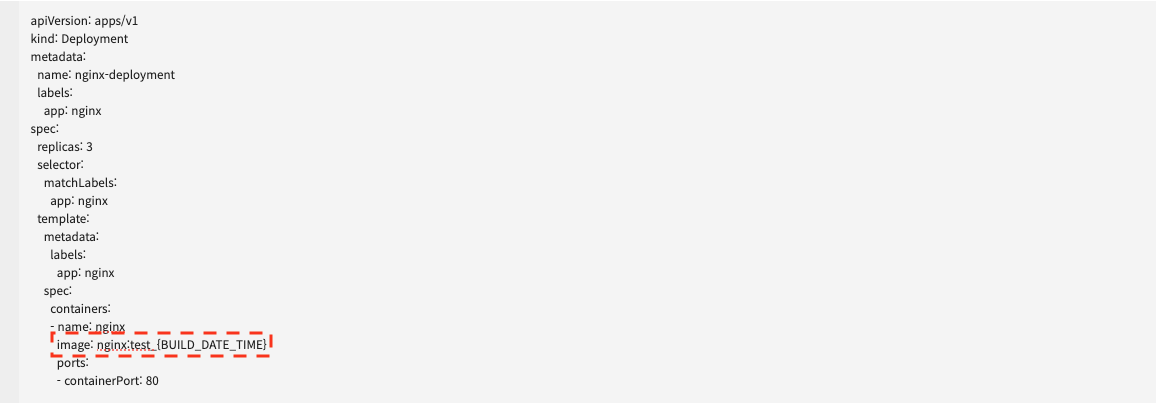
If you used the tag format in the build settings, enter _{BUILD_NUMBER} for the tag in the Docker image input area as shown above. When _{BUILD_NUMBER} is entered in the image tag, it is deployed with the most recent number.
To use the tag format, you must set build stage and NHN Cloud build tool.
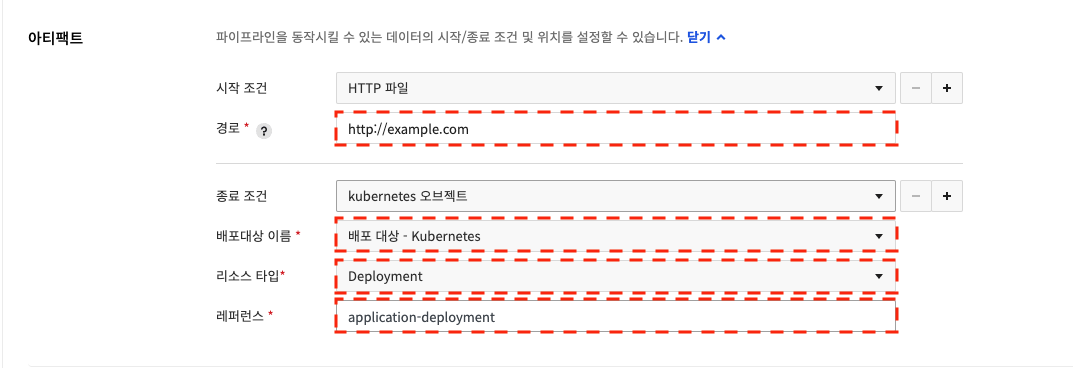 You can set Start Condition and End Condition by using the Artifact settings.
An artifact set as a starting condition is checked for existence at the start of the stage to determine whether or not to proceed with the stage.
An artifact configured as an end condition sets the production of the stage as an artifact.
Even if the stage fails because there are no Kubernetes objects in the entered manifest that match the End Condition, the manifest can be applied to the Kubernetes cluster.
You can set Start Condition and End Condition by using the Artifact settings.
An artifact set as a starting condition is checked for existence at the start of the stage to determine whether or not to proceed with the stage.
An artifact configured as an end condition sets the production of the stage as an artifact.
Even if the stage fails because there are no Kubernetes objects in the entered manifest that match the End Condition, the manifest can be applied to the Kubernetes cluster.
Artifacts that can be set in the deployment settings.
For GitHub and GitLab, if a branch is not entered, the master branch is used as default.
| Artifact Type | Use Condition | Path or Reference Setting Examples |
|---|---|---|
| GitHub file | Start | https://api.github.com/repos/{organization}/{repository}/contents/{file-path} Example for GitHub Enterprise: https://github.mydomain.com/api/v3/repos/{organization}/{repository}/contents/{file-path} |
| GitLab file | Start | https://gitlab.com/api/v4/projects/{project-number}/repository/files/{file-path} |
| Docker container image | Start | {domain}/{dockerhub-account or image-registry-path}/{image-name} |
| HTTP file | Start | Accessible URL |
| kubernetes object | End | Object name |
Final Review and Pipeline Creation
In the final review, you can check the full configuration you’ve entered for your pipeline.
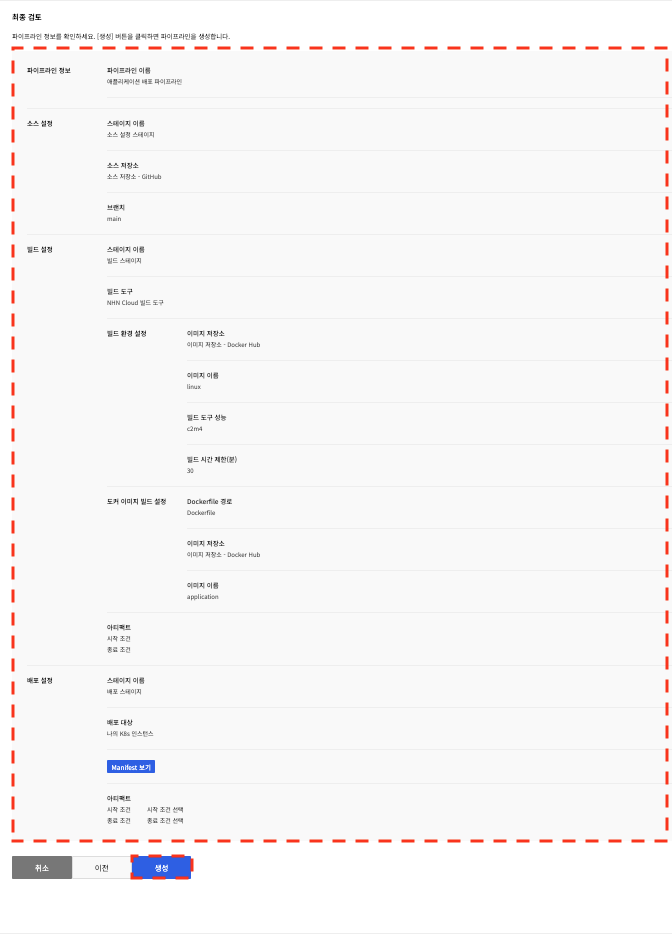
If a pipeline is created with a pipeline template file, you can check the uploaded file name.
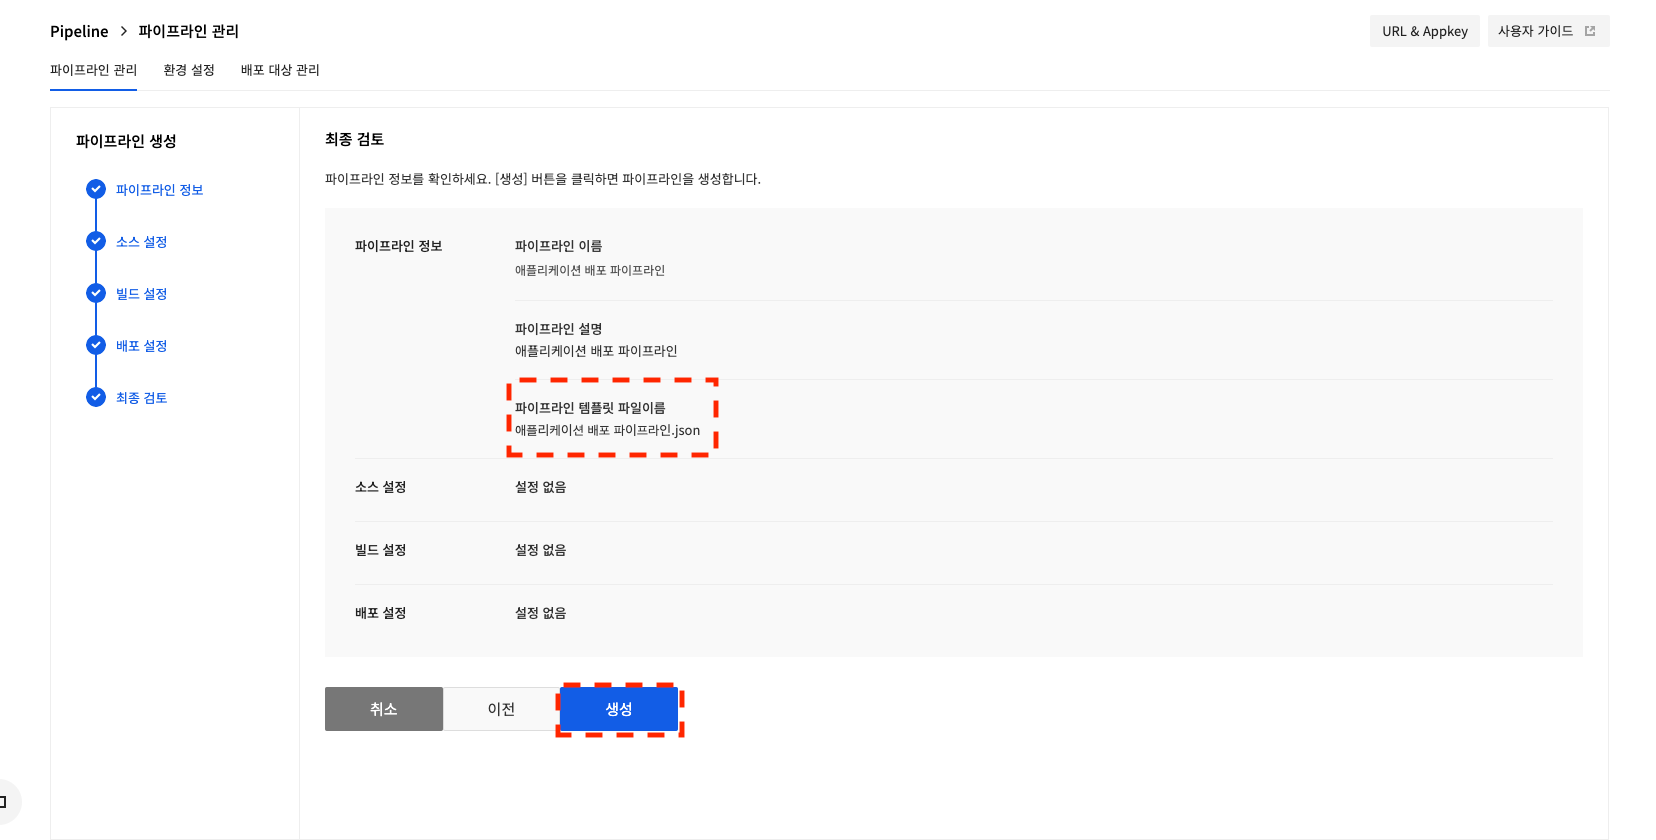
After confirming the entered configuration, click Create.
Run a Pipeline
There are two ways to run a pipeline: manual run and automatic run.
Manual Run
Manual run allows you to run your pipeline when you want.
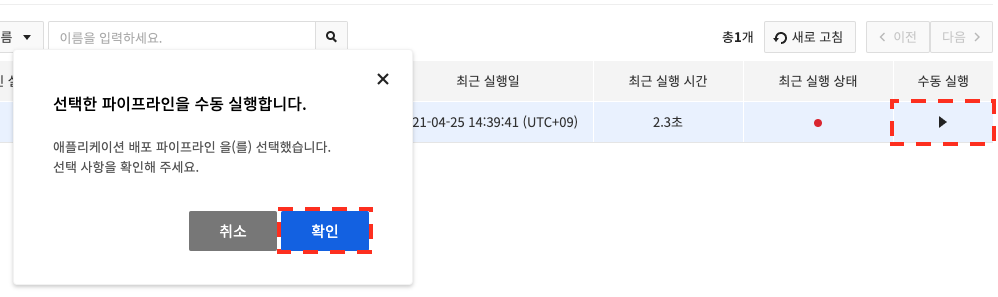
In Pipeline Management, click ▶︎ (Manual Run). when the dialog box appears, click OK.
Autorun
Autorun lets you configure your pipeline to run automatically when an event occurs in your GitHub or GitLab repository or when a container image in your image registry is updated.
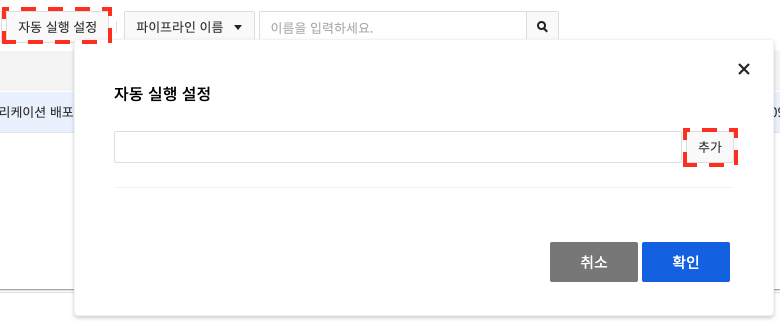
Click Autorun Settings and click Add in the Autorun Settings dialog box.
GitHub Autorun Settings
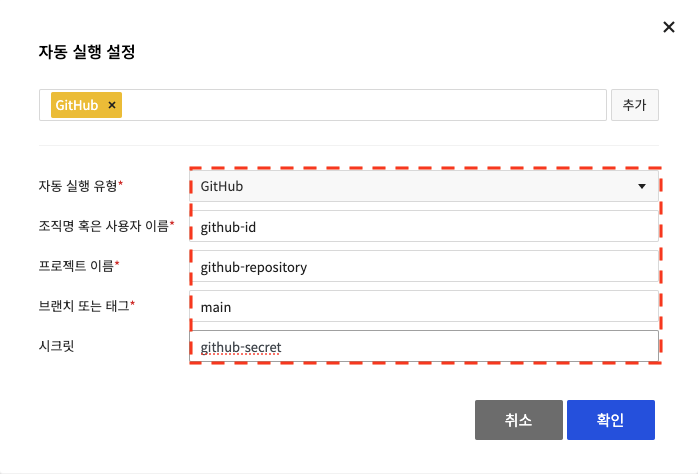
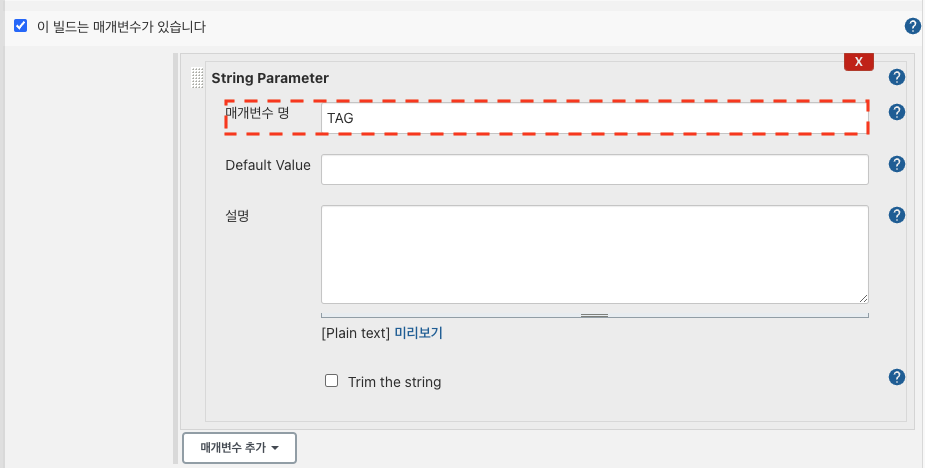
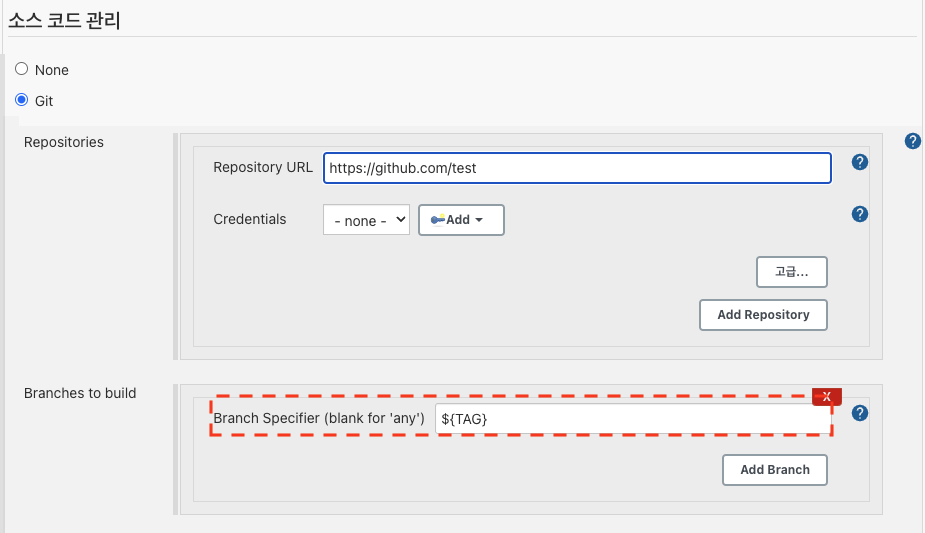
Using a GitHub webhook, you can configure your pipeline to run automatically when an event occurs in a repository on GitHub or GitHub Enterprise. Set the autorun type to GitHub, enter the repository's organization or user name, project name, branch, and secret, and click OK. To set autorun by tag, enter the tag name in the Branch or Tag item, such as 'refs/tags/tagname'. You can use a JAVA regular expression for the 'tagname' part. After setting up autorun with tags, run the build with the tags set when using NHN Cloud build tool. If you want to run a build with tags in the Build - Jenkins stage, you need to configure the following settings.
Set parameters as follows in Jenkins.
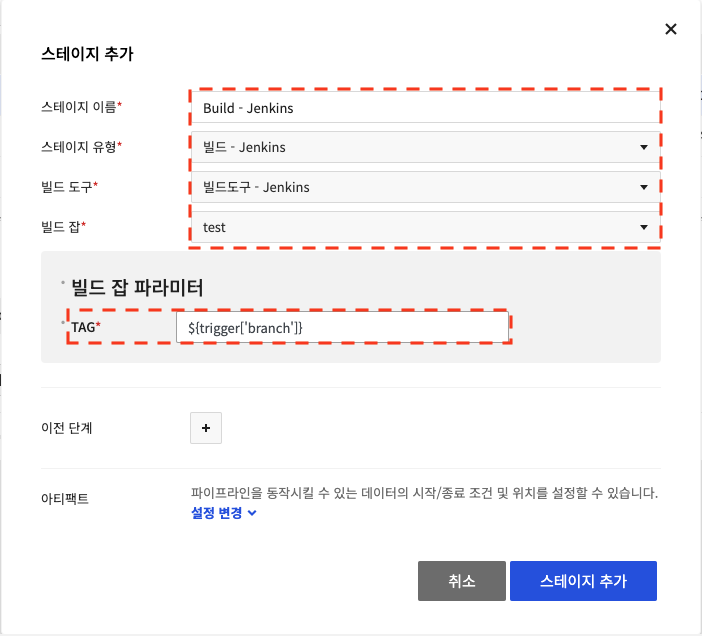
 Enter as follows in Build Job Parameter from Set Build Tool.
GitHub Webhook Settinig Values
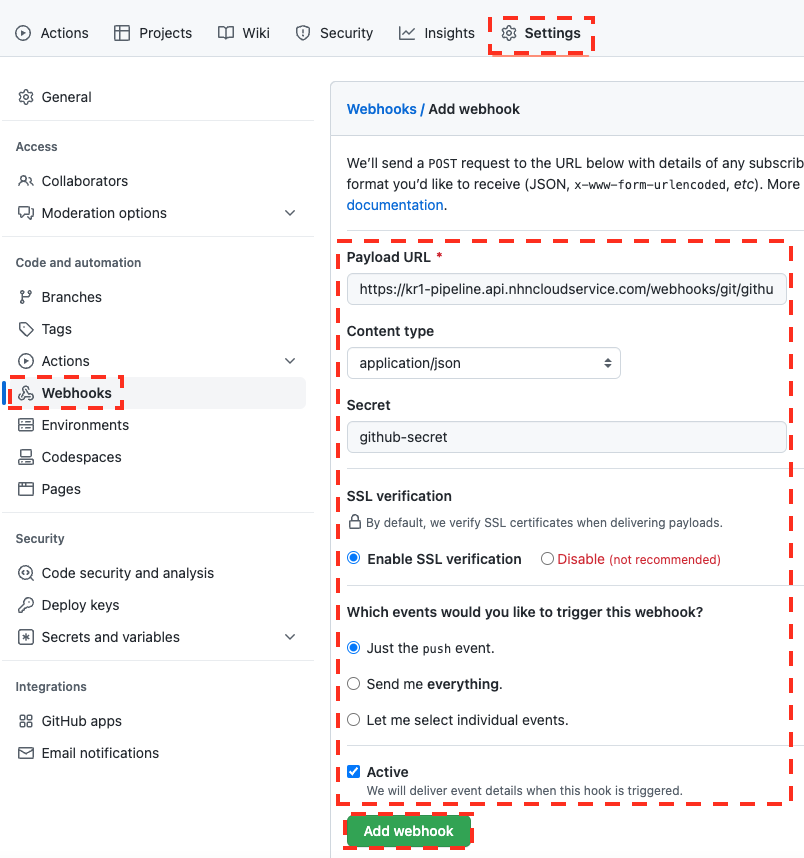
| Item | Setting value |
|---|---|
| Payload URL | https://kr1-pipeline.api.nhncloudservice.com/webhooks/git/github |
| Content type | application/json |
| Secret | The value entered in the secret of the pipeline autorun settings |
| event | push event, create event(When using tags) |
You can set it to autorun only when specific files are pushed. (up to 5)
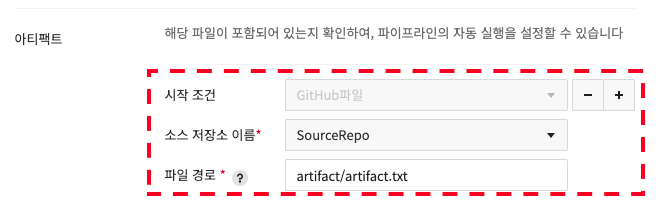
For Source Repository Name, select the source repository you registered in Preferences. For File Path, enter the path containing the file in the selected source repository.
GitLab Autorun Settings
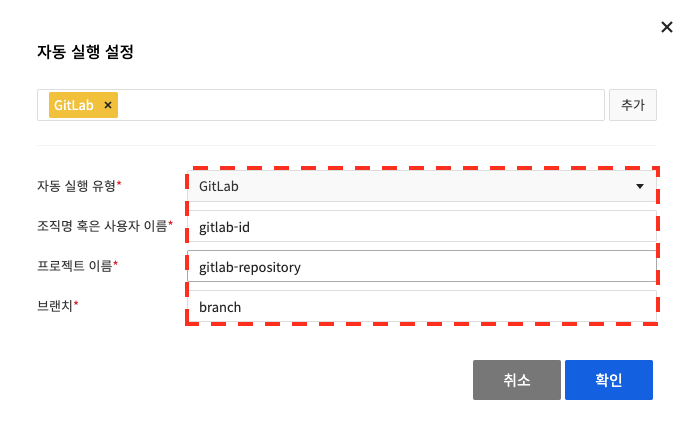
Using a GitLab webhook, you can configure your pipeline to run automatically when an event occurs in the GitLab repository. Set the autorun type to GitLab, enter the repository's organization or user name, project name, and branch, and click OK. GitLab secret setting will be supported in the future.
Set up a webhook in the GitLab repository.
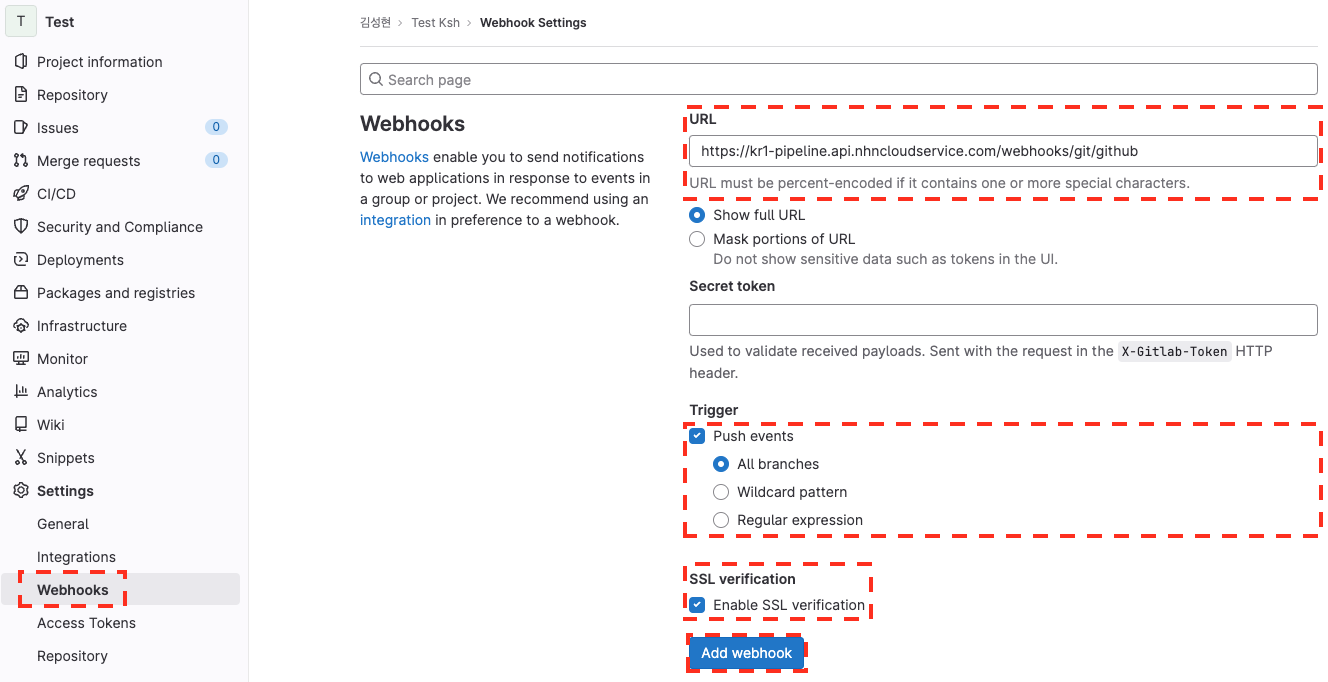
| Item | Setting value |
|---|---|
| URL | https://kr1-pipeline.api.nhncloudservice.com/webhooks/git/gitlab |
| Trigger | Select Push events |
| Secret | Do not set |
| SSL verification | Select Enable SSL verification |
Precautions for GitLab Webhook settings
When setting autorun with GitLab's user name, make sure to set the user name to be the same as GitLab's user name. If the user name is set differently, autorun may not work.
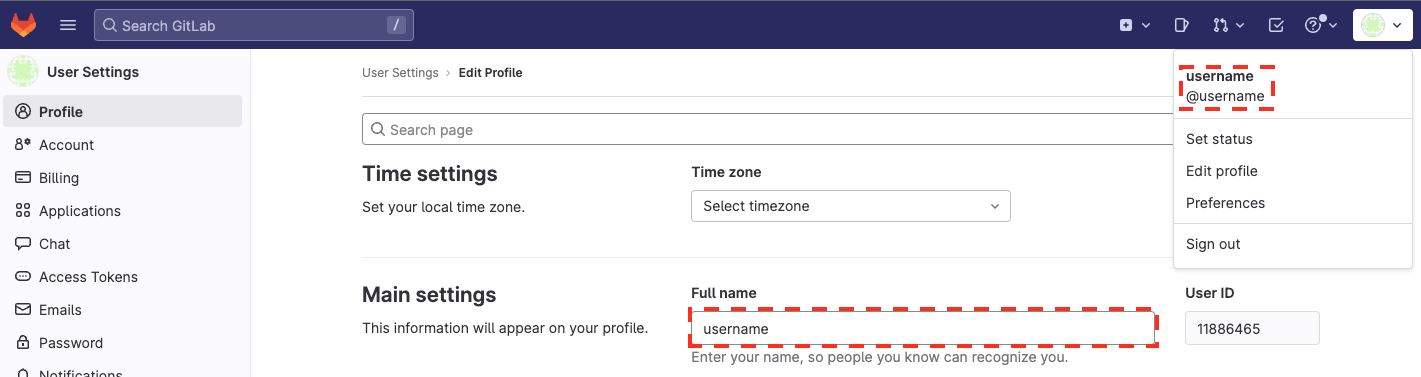
Image Repository Autorun Setting
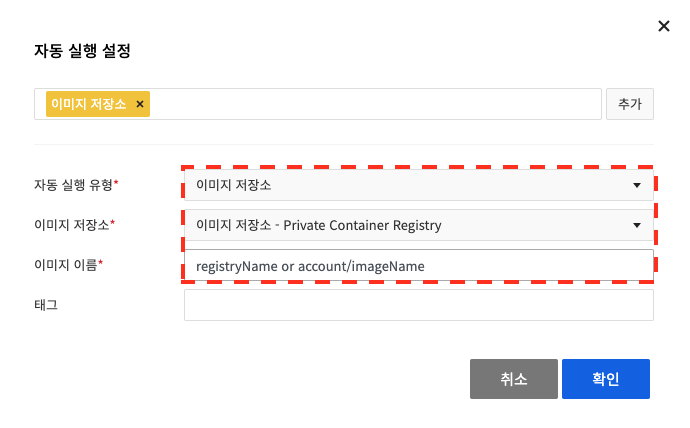
If you want the pipeline to run automatically when the container image is updated, set Image Registry for Autorun Type.
After selecting the image registry registered in the environment settings, enter Image Name. Enter the image name in the form of registry name/image name for NHN Cloud container registry.
For Docker Hub, enter in the form of docker hub account/image name. Tag can use JAVA regular expression and is automatically executed when a tag matching the entered tag is pushed.
If you do not enter a tag, it will be automatically executed when a new tag except latest is pushed.
When finished, click Confirm.
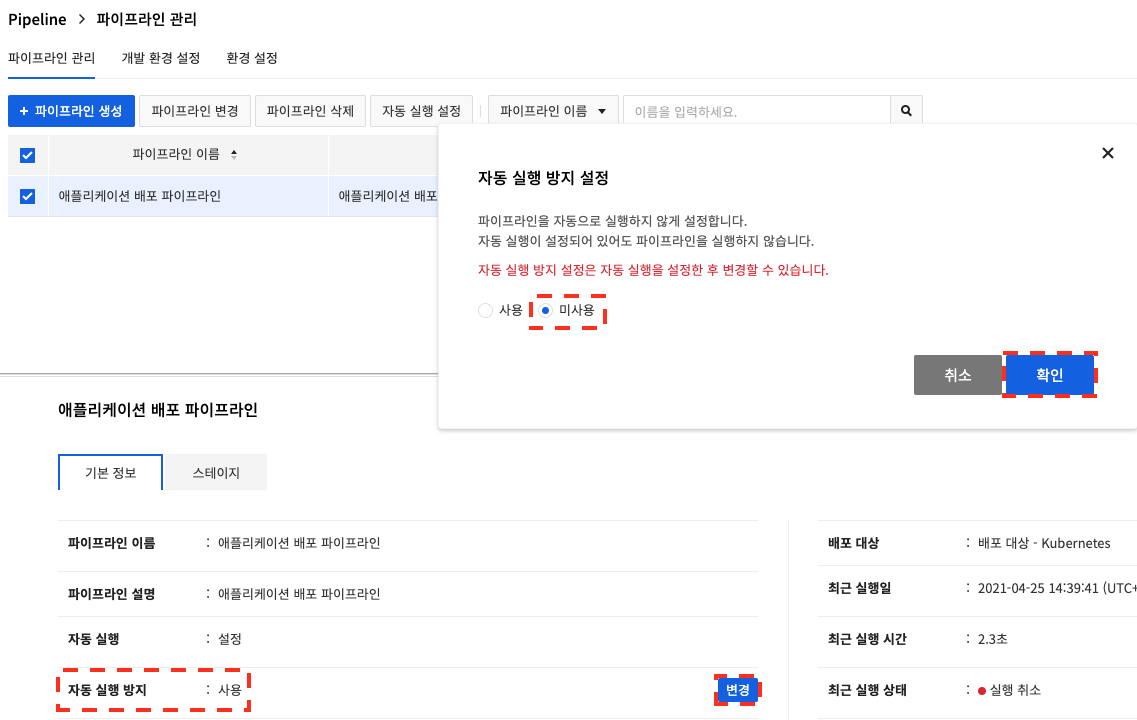
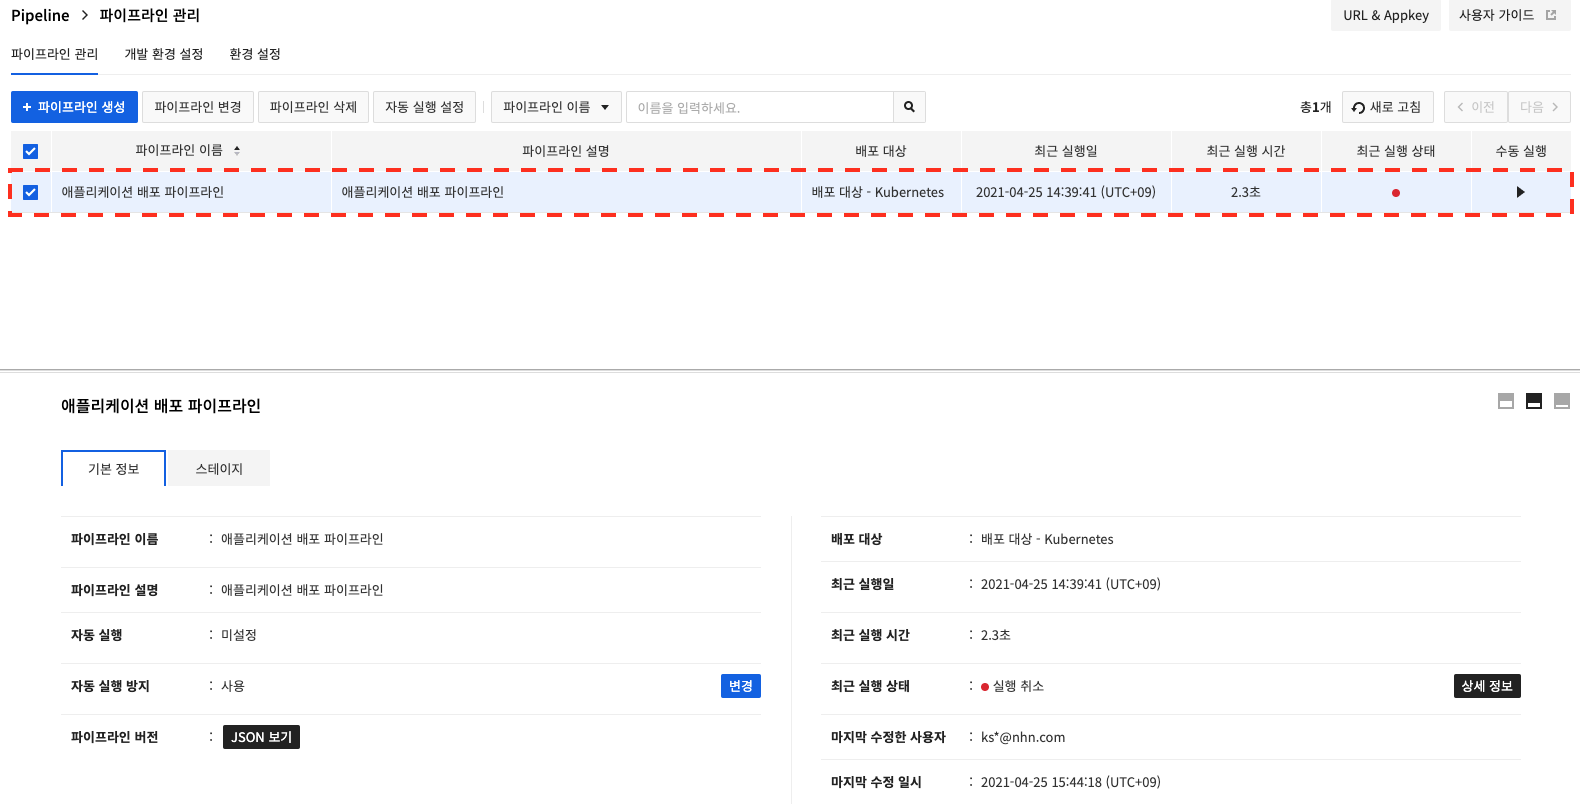
When a new pipeline is created, Prevent Autorun is set as default. If you want the pipeline to run automatically, you must change Prevent Autorun to Disable. After selecting the pipeline, click Change under Prevent Autorun at the bottom of Basic Information. In the Set Autorun Prevention dialog box, select Disable and click OK.
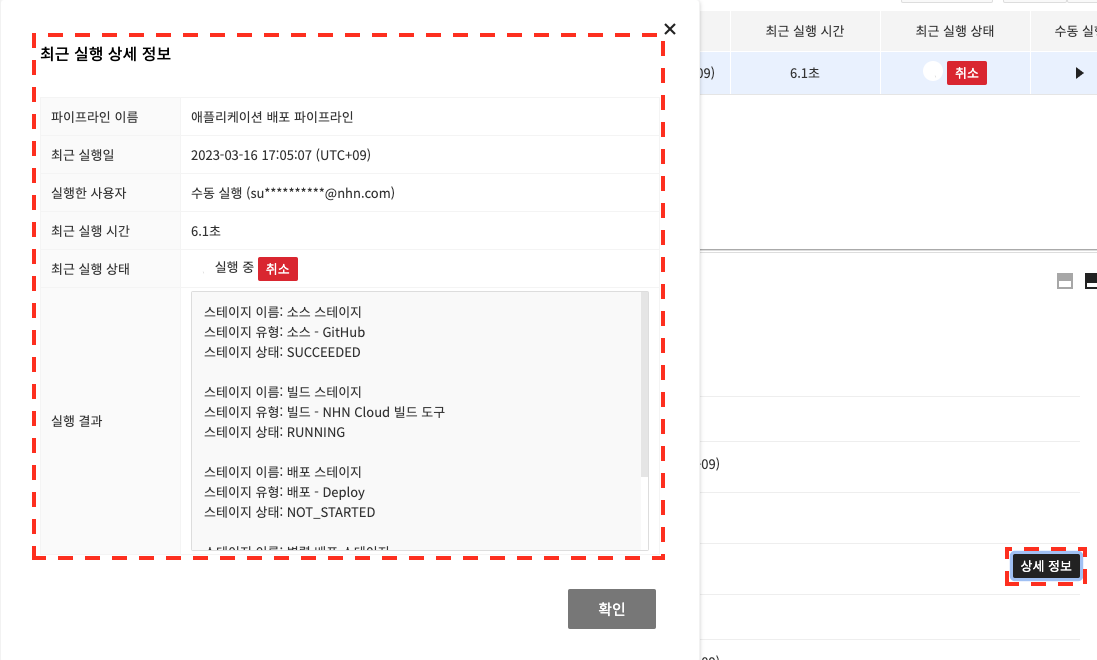
To check the detailed information about the running pipeline, select a running pipeline and click Details under Recent Run Status in Basic Information at the bottom.
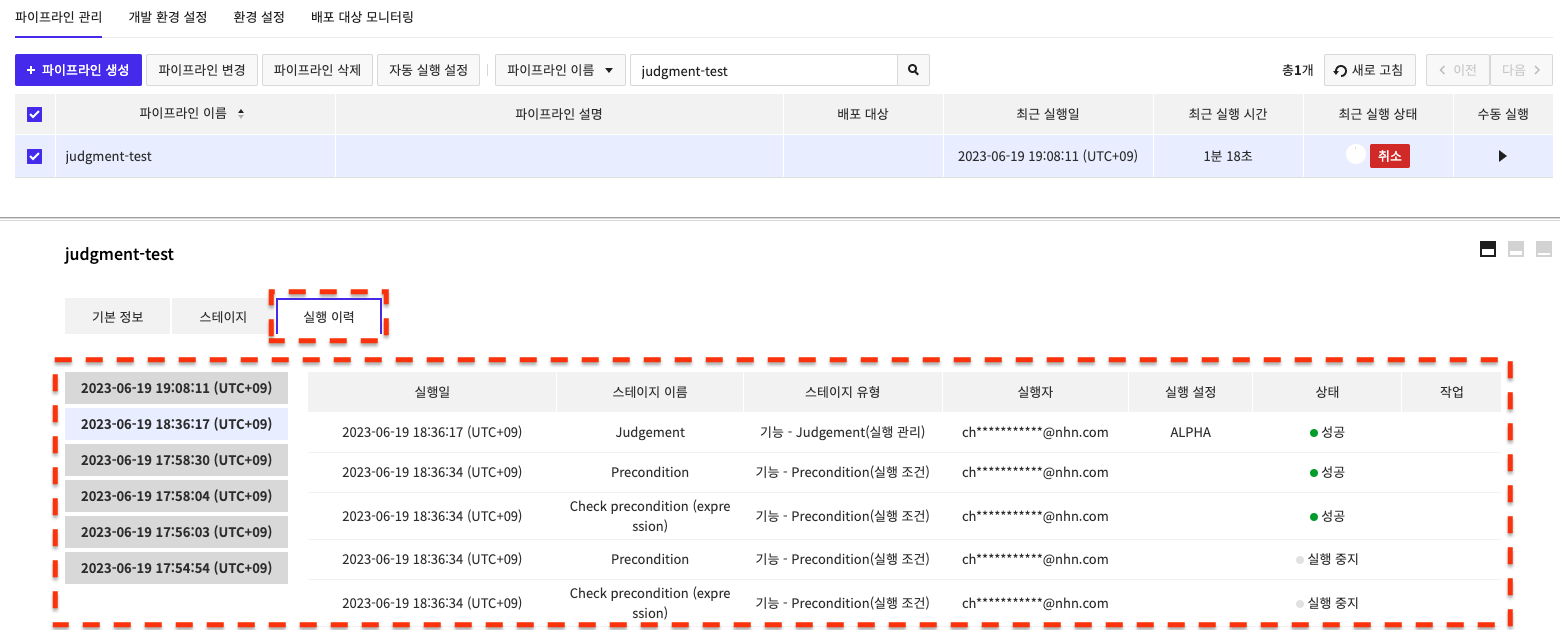
Run History
If you run your pipeline manually or automatically, you can view the run history on the Run History tab.
Manage a Pipeline
You can add, change, or delete stages that make up the pipeline.
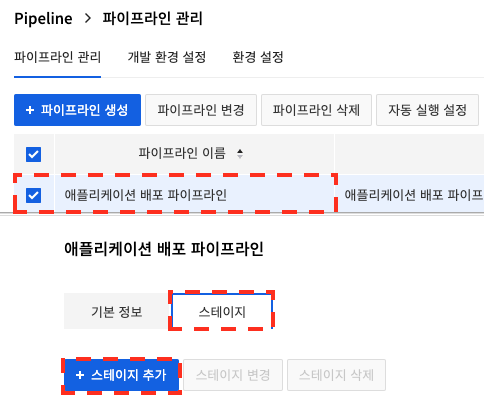
After selecting a pipeline, click Stage at the bottom to display the screen to manage stages. Click Add Stage, and the Add Stage dialog box appears.
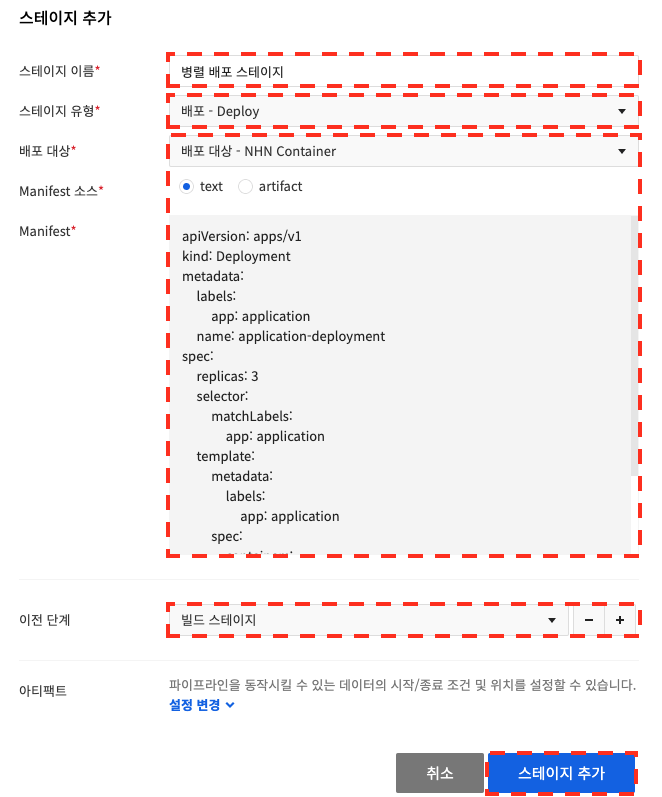
After setting the stage name, stage type, input values for each stage type, and previous stage, click Add Stage to add a stage to the pipeline. Pipeline provides a number of different stage types that you can use when configuring your application deployment flow.
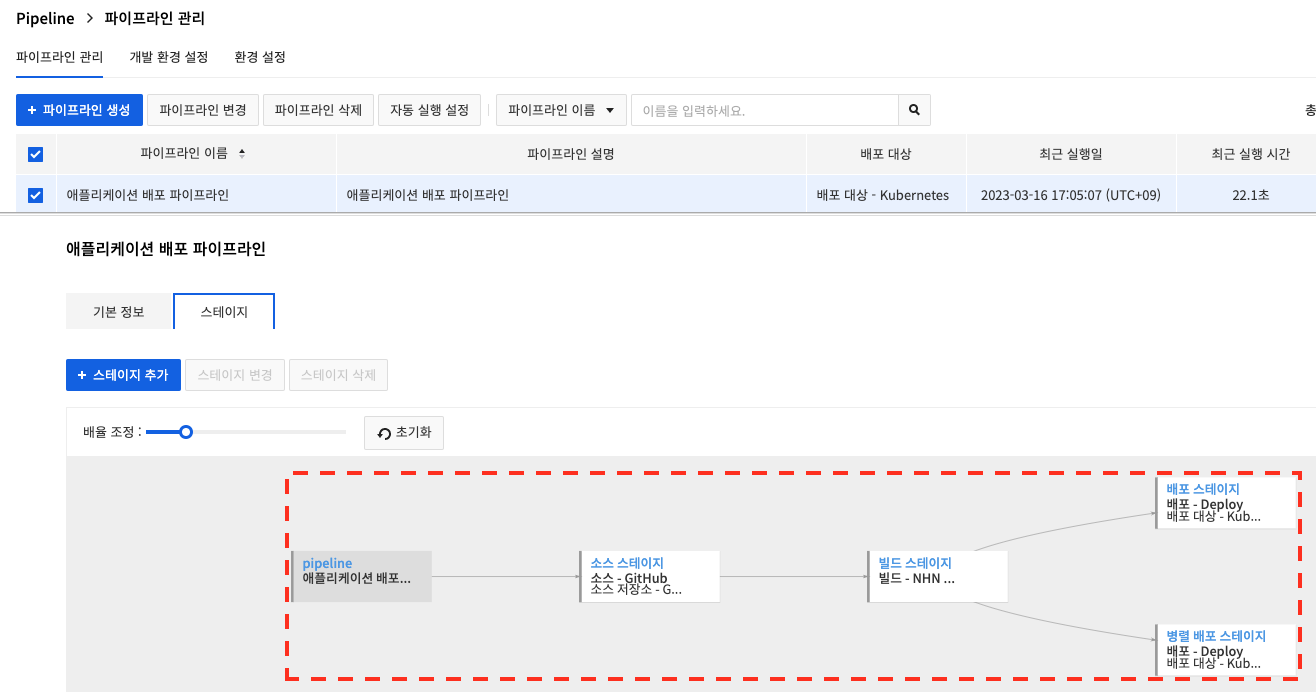
Stages can run in parallel depending on how the previous stage is selected. If one of the stages in the parallel configuration fails, execution of the remaining stages is canceled and the pipeline execution fails.
Modify and Download Pipeline JSON
Change a pipeline by modifying JSON.
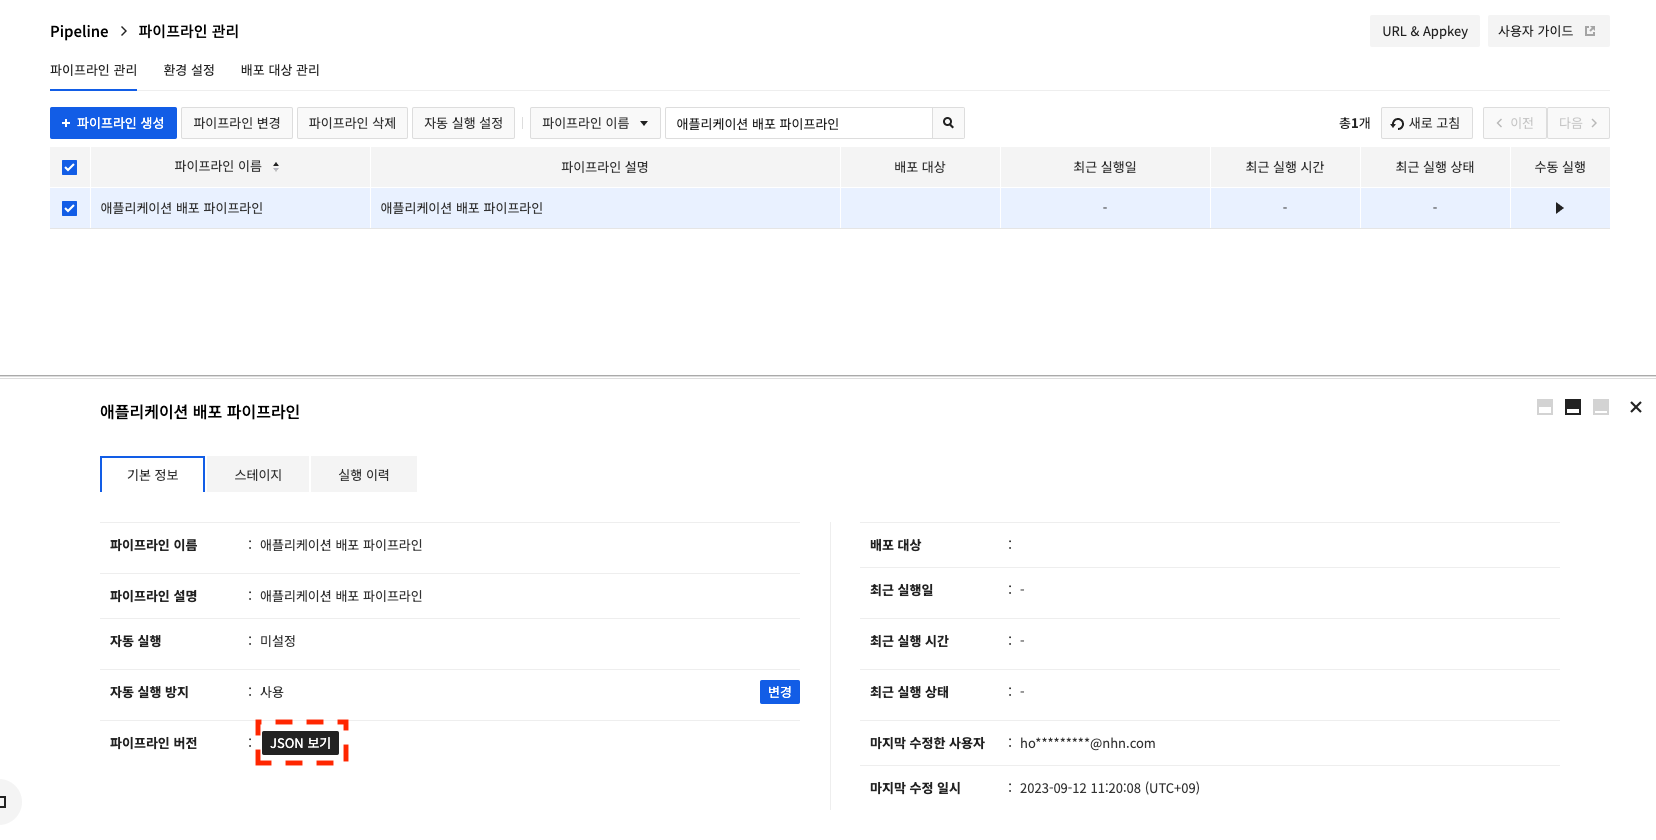
Click View JSON to check a pipeline in the JSON format.
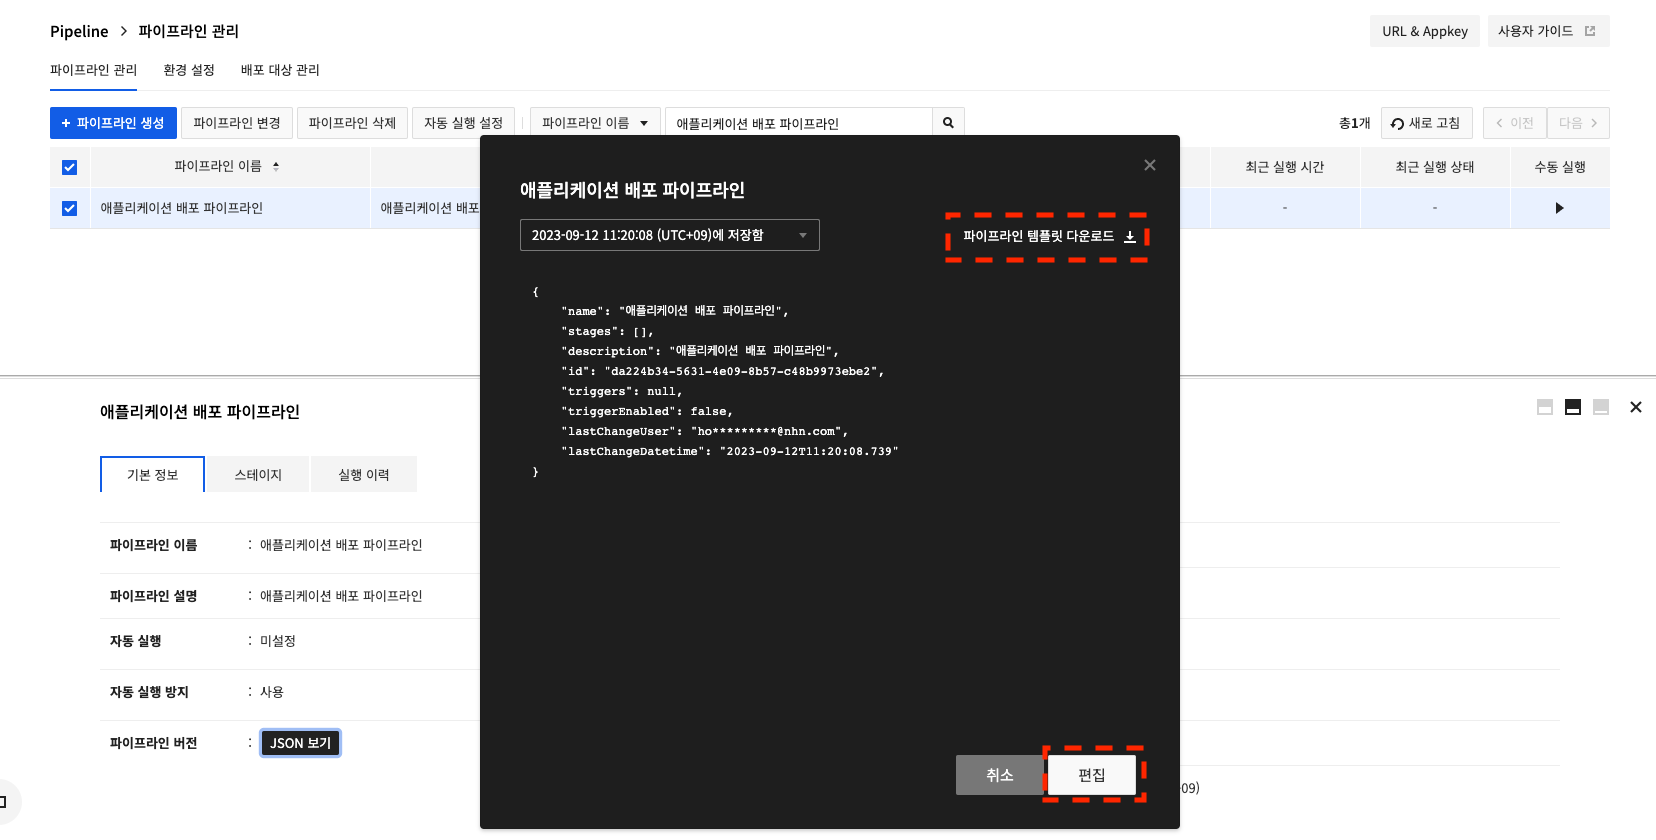
Click Download Pipeline Template to save as JSON files.
Click Edit to directly modify JSON files from the screen.
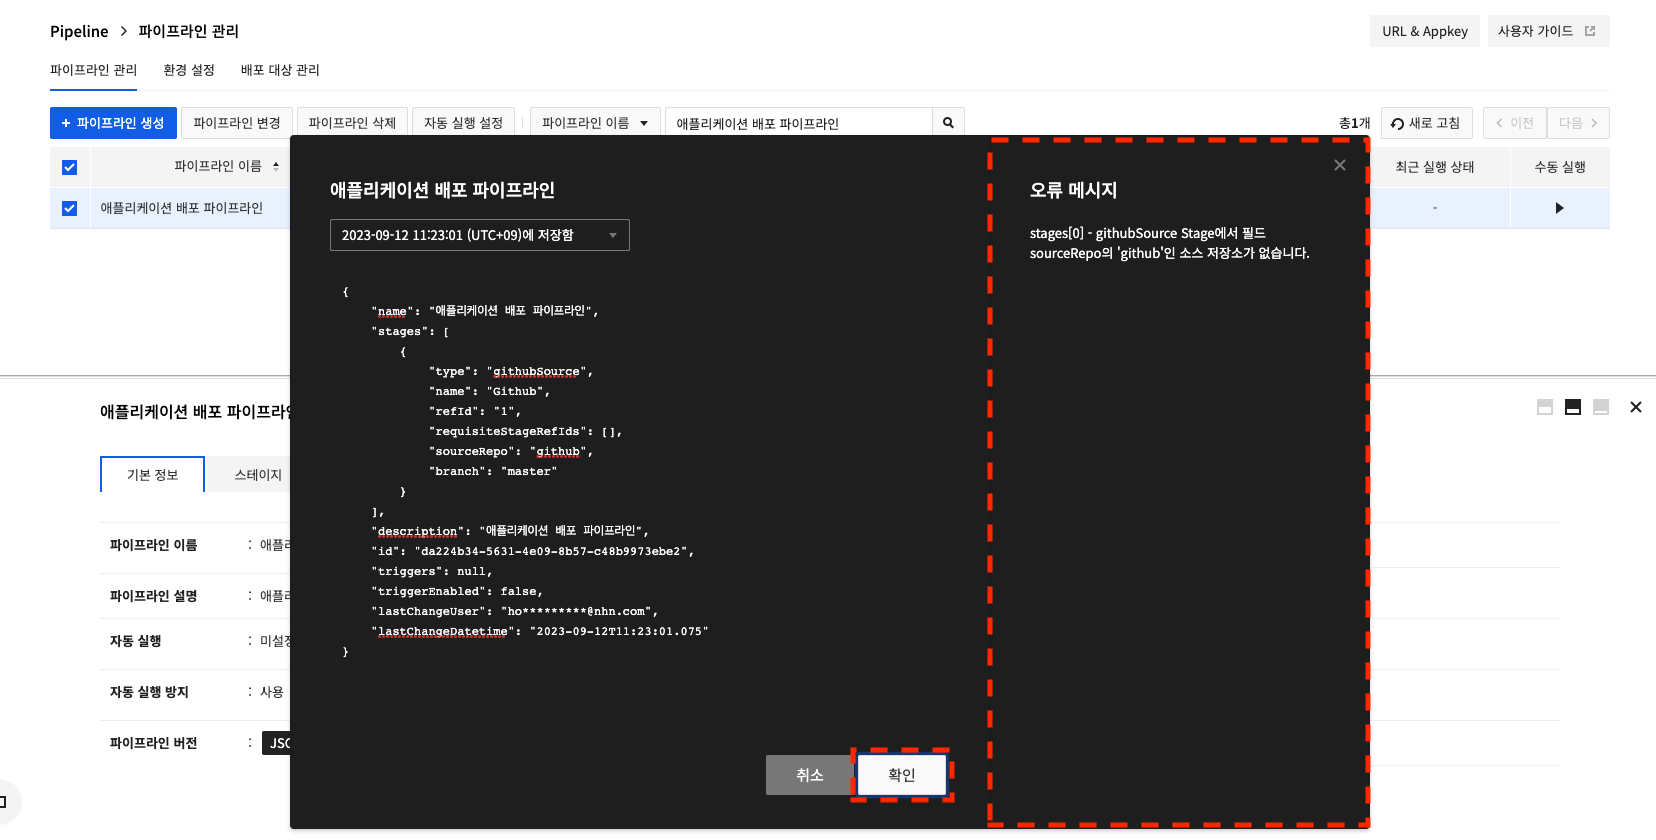
If you click OK after making a change, the change is applied in the pipeline. However, if the input value is invalid, an error message will be exposed.
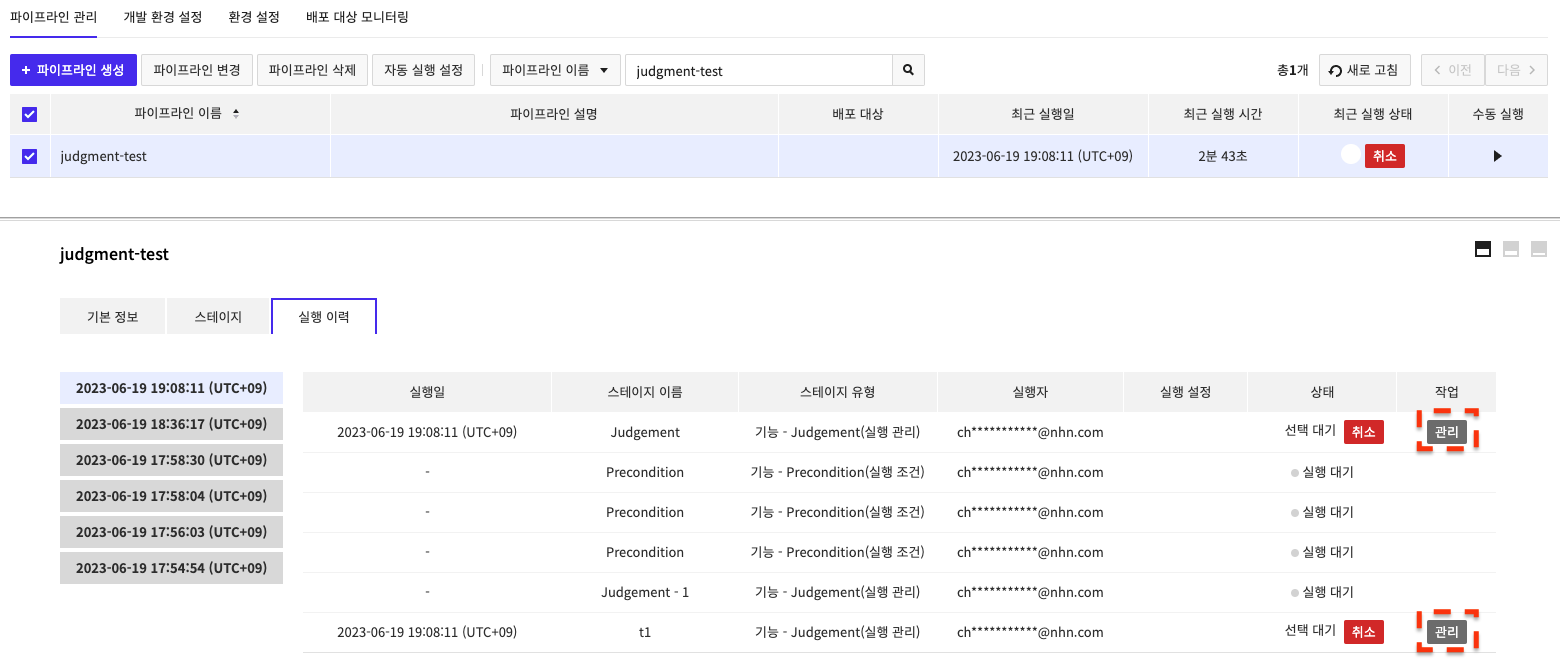
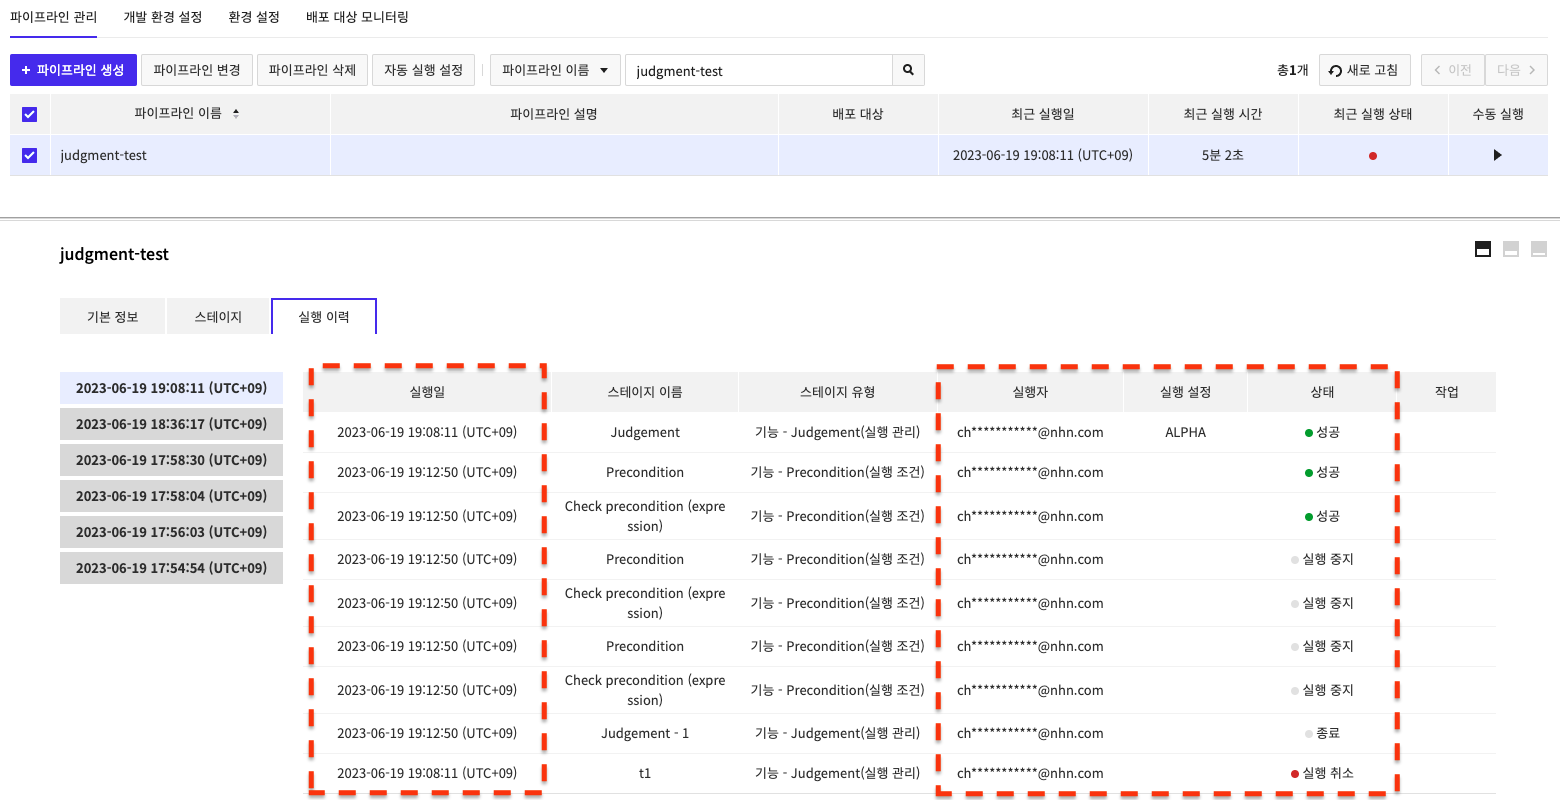
Run History and Work
View the run history in Run History and select the run settings for the Judgement stage, and decide whether to stop stage running or run stage.
If you select the history of a running pipeline from Run History, you can see the information on the running stage as shown below.
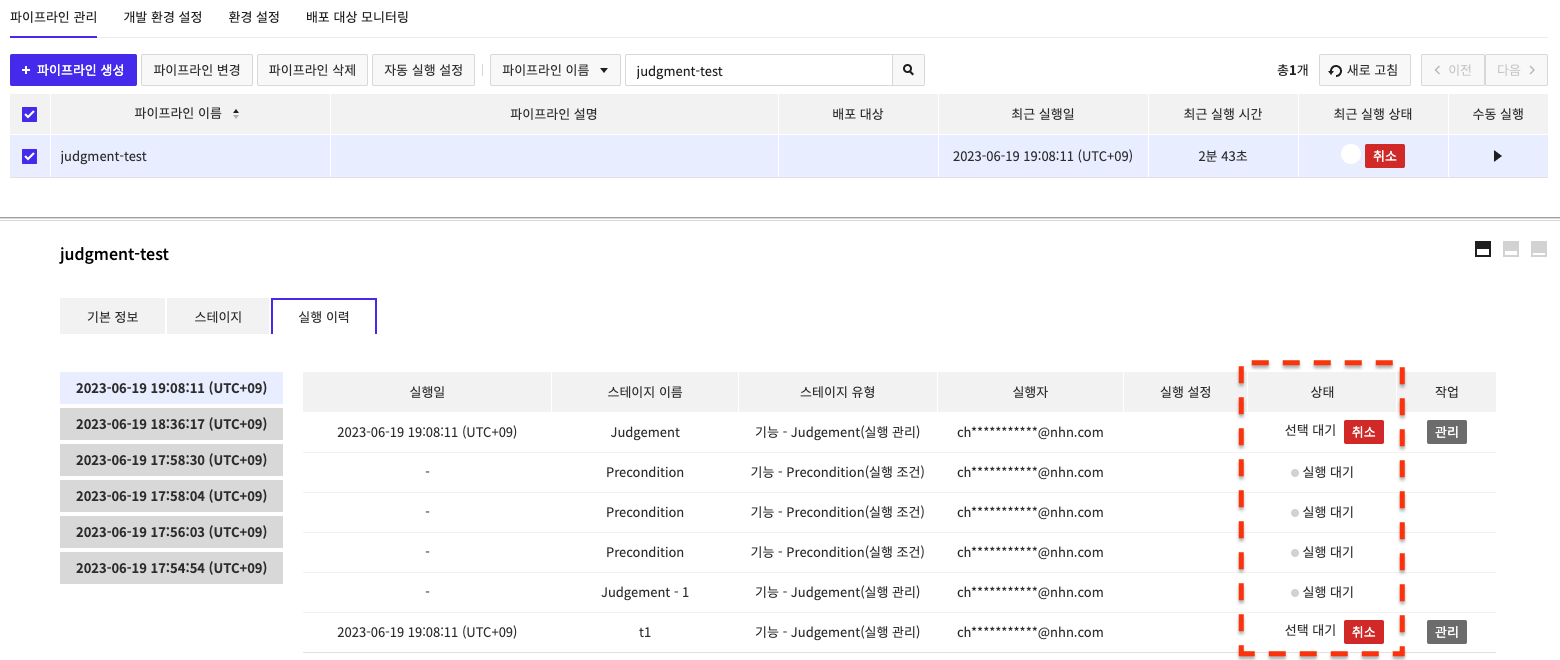
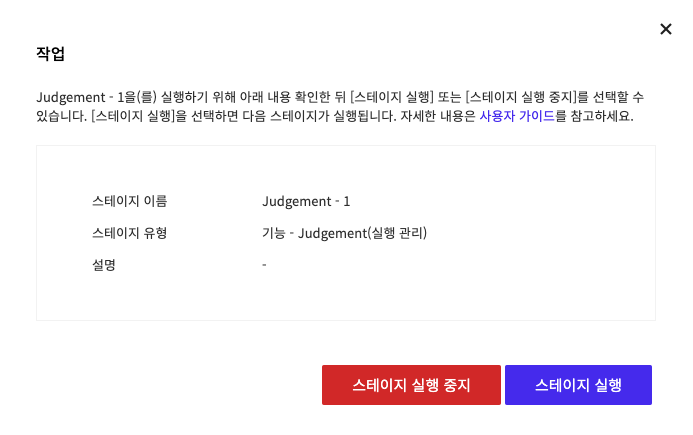
If the Judgement stage is waiting to run, click theManage button to open the following popup where you can select Description, and Run Settings values, and Stop Running Stage/Run Stage.
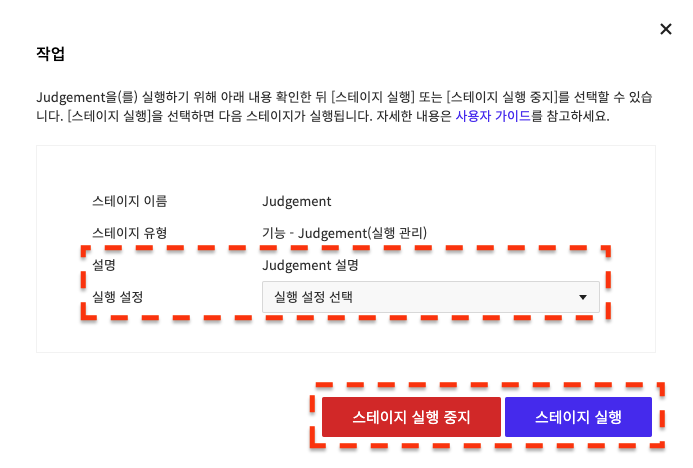
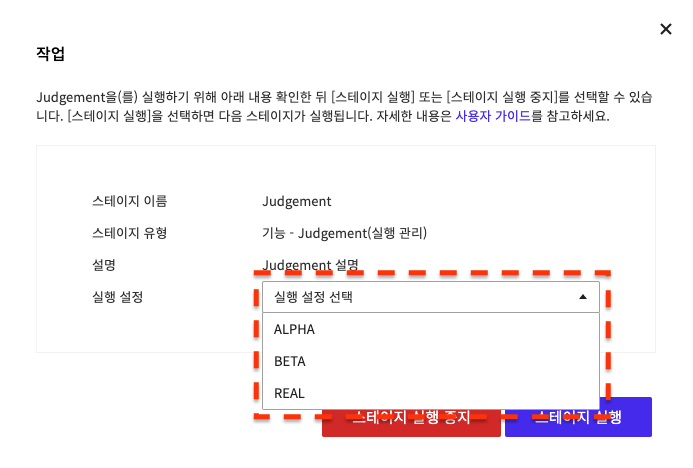
If you haven't entered any run settings, select Stop Running Stage/Run Stage only without selecting run settings.
Runs according to the stage settings, and the run history is updated every 5 seconds.
If you select Stop Running Stage, running stops for that branch, and if you cancel a running stage, the entire selected pipeline running is canceled.