Contact Center > Online Contact > Service Guide (Consultation) > Ticket Management
Ticket
Submitted/created tickets could be assigned and processed by trigger conditions (could be set in Service Management → Ticket → Trigger menu) or could be manually assigned to agents.
Ticket Processing
_en.png) From ① All Tickets Menu, you could check overall current situation of tickets regardless of ticket’s status and assigned agent. And from other detailed menus, you could check the current situation of tickets displayed by detailed conditions such as group or ticket status.
From ① All Tickets Menu, you could check overall current situation of tickets regardless of ticket’s status and assigned agent. And from other detailed menus, you could check the current situation of tickets displayed by detailed conditions such as group or ticket status.
Information which you could check by each detailed menu is as follows:
- ③ All Tickets in Group: You can view the entire ticket within the group you belong to.
- ④ My Tickets in Progress: When a ticket is assigned to an agent, the status changes to processing. In this menu, you can view tickets assigned to you.
- ⑤ My Tickets in Pending: If a ticket needs to be additionally checked, the agent can set the ticket status to pending. In this menu, you can view tickets which you processed as ‘pending’.
- ⑥ My Resolved Tickets: If an agent process a ticket as ‘resolved’, the status of the ticket changes to ‘resolved’ and could be viewed at this menu. If the customer resubmits inquiries to the answer mail, the ticket could be processed again.
- ⑦ My Completed Tickets: A ticket becomes ‘completed’ if the administrator processes the ticket to be ‘completed’, or if two weeks has been past after the ticket was resolved. Completed tickets cannot be processed.
- ⑧ Spam Box: Tickets are moved to spam box if processed as 'Resolve Internally → Spam’. Spam tickets could be restored or deleted. They could not be answered or forwarded before restoration.
Keep Tickets
_en.png) Agents could assign unassigned tickets to oneself through ‘keep’ button. Click ① Keep button, and select agent group if you belong to more than one group.
Agents could assign unassigned tickets to oneself through ‘keep’ button. Click ① Keep button, and select agent group if you belong to more than one group.
If ticket assign is set through trigger, tickets could be assigned according to the trigger conditions. In this case, to change automatically assigned agents, administrator of the service could forward the ticket to another agent. Click ② Forward button, and select agent.
Process Tickets
If a ticket is assigned, the status of the ticket changes to ‘processing’. Customer inquiries could be processed in this state. Ticket Information, Ticket History, and Event tabs are available for tickets, and additionally, Chat History tab is displayed for tickets generated through chat widget/chat history, and Customer Information tab is displayed when customer information management function is enabled.
_1_en.png)
- ① Ticket Information: Information related to customer inquiry
- Ticket ID
- Group/Agent
- Status
- Channel: The channel which the inquiry was submitted
- Language: The language of the help center which the inquiry was submitted
- Submission type, customer/agent field
- Ticket processing history
_en.png)
- ① Ticket History: History of the customer's previous inquiries
_en.png)
- ① Event: Occurred events of the ticket (Ticket assign, Change of agent, etc.)
_1_en.png) After filling in the contents, you can pre-check whether the banned word is included, and the final reply mail including the mail layout through ① ticket preview.
Tickets could be ② processed as follows:
After filling in the contents, you can pre-check whether the banned word is included, and the final reply mail including the mail layout through ① ticket preview.
Tickets could be ② processed as follows:
- Resolved: Tickets could be resolved to send a final answer mail to the customer.
- Pending: Tickets could be pended to send a intermediate reply before the final reply.
- Add a Comment: Comments could be added to the ticket.
- Resolve Internally: Tickets could be resolved internally when the ticket does not need to be replied.
- Spam
- Abuse
- Test
- Duplicate
- Resolved via Chat: Inquiry resolved through chat
- Resolved via Call: Inquiry resolved through call
- Others
③ Ticket Batching function could be used when similar inquiries need to be answered at once, or when agents/groups of tickets should be changed together.
✔ [FAQ] How can I use answer templates? ✔ [FAQ] Can I process tickets with the same inquiry all at once?
Create Tickets
_1_en.png) You could create new tickets through ① Create Ticket button. Tickets could be created when additional tickets are needed in the process of handling customer inquiries.
The following items are required to enter when creating a ticket:
You could create new tickets through ① Create Ticket button. Tickets could be created when additional tickets are needed in the process of handling customer inquiries.
The following items are required to enter when creating a ticket:
- ② Group
- ③ Agent
- ④ Submission Type
- ⑤ Title, ⑥ Contents
Escalate Tickets
Inquiries which are difficult to resolve could be escalated to issue management type service.
_en.png)
_en.png)
If you click ① Escalation button, screen which you could select service to escalate would be displayed. Only issue management type services will be displayed in the drop box. After ② selecting the service to escalate, click confirm. Escalation screen would be displayed in the bottom of the ticket.
If you select the submission type, ③ Customer Fields which were set in [Service Management → Ticket → Field] menu of issue management service would be displayed according to the selected submission type. Fill in the customer fields, title, contents, and click ④ Escalation button to process ticket escalation.
After the ticket was escalated, the status of the ticket will be changed to ⑤ Escalation in Progress. If the ticket was processed as resolved, pending, resolve internally in issue management service, the status will be changed into Escalation resolved.
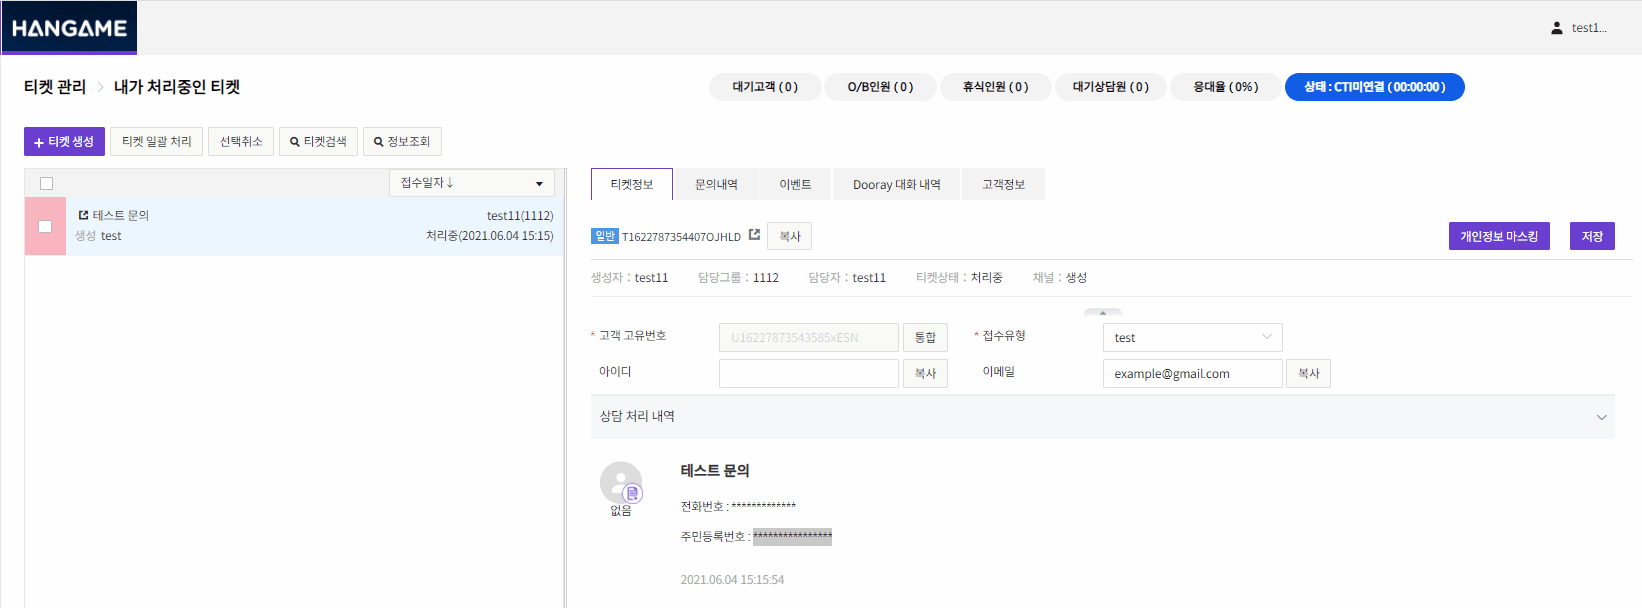
Personal Data Masking
If Security Service function is activated in the contract details, Masking Personal Information button is showed in the ticket management page. Through this function, the personal information of the customer could be encrypted.
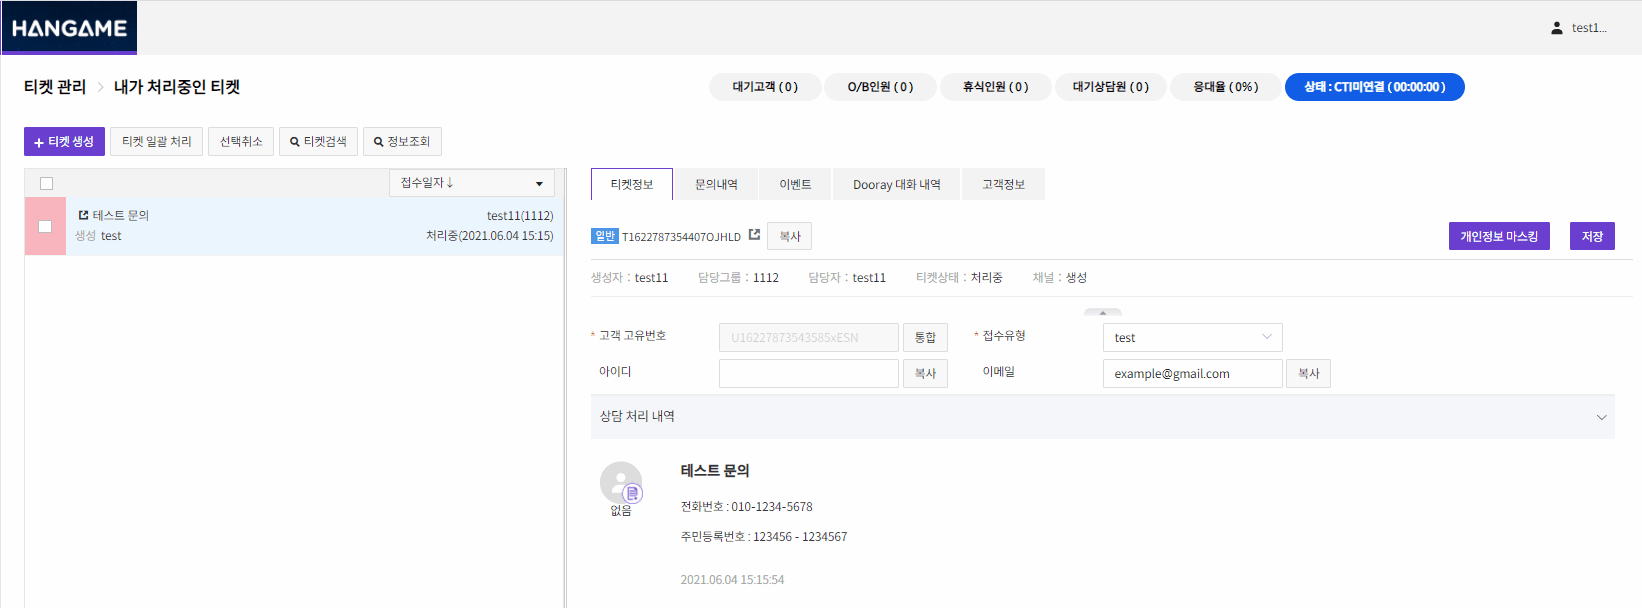 The areas where you can mask personal information when managing tickets are customer inquiries and replies from agents.
Drag to select the area which needs masking, and click Masking Personal Information button. The personal information inside the page will be substituted with asterisks (*). The masked data is stored in the masked state on the database.
The areas where you can mask personal information when managing tickets are customer inquiries and replies from agents.
Drag to select the area which needs masking, and click Masking Personal Information button. The personal information inside the page will be substituted with asterisks (*). The masked data is stored in the masked state on the database.
 To remove data masking, click the substituted area. A pop-up page asking whether to remove data masking will be showed.
Click confirm to remove data masking on the page and database.
To remove data masking, click the substituted area. A pop-up page asking whether to remove data masking will be showed.
Click confirm to remove data masking on the page and database.
Search Tickets
_3_en.png) If you click the ① Search Ticket button in top of the ticket list, conditions of searching tickets will be displayed. The conditions are as follows.
If you click the ① Search Ticket button in top of the ticket list, conditions of searching tickets will be displayed. The conditions are as follows.
- Created Time
- Priority
- Ticket ID
- Title
- Group/Agent
- Status
- Channel
- Submission Type
- Processing Type
- Customer Unique Number
- Name
- ID
- Phone
- Language